
Popular categories
Looking for a yarn?


Comments / Questions (260)
![]() Lorna wrote:
Lorna wrote:
Could you please tell me what to do with the 40 stitches between the right and left from the piece that was already worked with the 2nd row of A2? When doing the edge,do I just start anywhere and work around? Thanks
17.06.2019 - 05:23DROPS Design answered:
Dear Lorna, you are not supposed to have worked the 2nd row in A.2 before working front pieces separately, you may have then to adjust the edge to work either only the 2nd row in A.2 over front pieces adjusting nicely the beg and end of rows or then to work another repeat in A.2 in the round (this might use more yarn than required). Happy crocheting!
17.06.2019 - 08:57
![]() Stephanie wrote:
Stephanie wrote:
Hallo, ich bin jetzt an der Umrandung angekommen. ich weiß nicht wie ich die 2 Reihen von A2 anfangen soll. Wäre echt hilfreich wenn es dazu ein Video geben würde. Oder können Sie es mir besser erklären da es in der Anleitung es nicht zuverstehen ist. Vielen Dank für Ihre Hilfe.
28.03.2019 - 07:35DROPS Design answered:
Liebe Stephanie, jetzt häkeln Sie die 2 ersten Reihen in A.2, und wenn Sie in den Maschen häkelen, werden wie zuvor 4 Stb überspringen und wenn Sie in den Seiten den Reihen überspringen Sie 2 Stäbchen Reihen. Viel Spaß beim häkeln!
01.04.2019 - 09:31
![]() ROSELYNE MOUTHON wrote:
ROSELYNE MOUTHON wrote:
Bonjour, Pourquoi n ai-je pas de réponse à ma question posée à 2 reprises? Merci
13.03.2019 - 15:19DROPS Design answered:
Bonjour Mme Mouthon, votre question a été reportée à nos stylistes, merci pour votre patience.
13.03.2019 - 15:23
![]() ROSELYNE MOUTHON wrote:
ROSELYNE MOUTHON wrote:
Bonjour,le Rang 29 correspond, pour moi, à 2B, 3dB,1 1picot, 3dB, 2B pour A2. Comment accrocher ces brides à la chainette du rang 28? Merci
09.03.2019 - 09:58DROPS Design answered:
Bonjour Mme Mouthon, au rang 29, on crochète 1 bride dans chacune des mailles en l'air de la chaînette du rang 28, puis au rang 30, vous crochetez comme indiqué en faisant en même temps le même rang de A.2 que pour les autres motifs du tour. Bon crochet!
09.04.2019 - 09:40
![]() ROSELYNE MOUTHON wrote:
ROSELYNE MOUTHON wrote:
Bonjour, J ai un souci au rang 24 et 25 avec le nombre de brides. Rang 24: 169 B et 13 motifs ( 13x9 ) font:286 B Suis-je d accord avec vous? Rang 25: je n arrive pas à avoir 182 Brides Je bloque et je ne veux pas abandonner ce projet, il est trop joli. Merci de m aider.
04.03.2019 - 15:39DROPS Design answered:
Bonjour Mme Mouthon, au 24ème rang, vous crochetez 13 fois (2 brides (= 1 augm), 1 b dans chacune des 11 b suivantes = 13 brides), soit 13 x 13 = 169 brides + 13 fois A.2. Au 25ème rang, vous augmentez 1 bride dans les sections en brides (= 2 brides dans la 1ère bride, 1 b dans chacune des 12 b suivantes = 14 brides) soit 14 brides x 13 = 182 brides + 13 A.2. Bon crochet!
04.03.2019 - 16:13
![]() Carmen Acacio Martin wrote:
Carmen Acacio Martin wrote:
Hola os comento que esta mui bien esplicado os felicito asi se trabaja muibien el modelo es mui bonito gracias perdonar mis faltas ortograficas soy mui mallor y no estudiado mucho
18.01.2019 - 14:50Stephanie wrote:
Please can you explain in more detail how to do the Edge around the whole garment? I don't understand "when working first round of A.2 over dc-rows, skip 2 dc-rows on each side of dc-group"
31.10.2018 - 11:41DROPS Design answered:
Dear Stephanie, for the edge you will work A.2 all around the circle (skipping 4 sts before working 2 dc,3ch,2 dc in next st). When working along the front pieces (= in the rows) skip 2 dc-rows instead of 4 sts. Happy crocheting!
31.10.2018 - 12:08Jessica wrote:
Boa tarde. Fazendo as frentes, deve-se fazer 3 pontos juntos para a diminuição, certo? Diz para fazer no início de cada carreira. Mas essa diminuição é no início do direito e do verso ou só do direito? E os aumentos no grupos de ponto alto são somente no primeiro ponto alto no direito? Ou aumento no verso também? E uma última dúvida: o casaco das fotos daqui do site não foi feito conforme a receita aqui disponibilizada, certo? Pois o meu casaco está ficando diferente do das fotos.
29.05.2018 - 20:04DROPS Design answered:
Bom dia, Sim, deve fazer tanto as diminuições como os aumentos no direito da peça. Quanto ao casaco da foto, foi feito exactamente como a receita indica. É que para o casaco ficar igual, deve usar o fio DROPS indicado e conferir sempre sua amostra que deve ser igual à amostra indicada na receita. É fundamental fazer uma amostra e conferir se está igual à indicada e, acima de tudo, usar o fio DROPS do modelo. Bom croché!
30.05.2018 - 12:37Jessica wrote:
Bom dia. Acabei a carreira 27 e fiquei sem saber o que fazer. Diz para repetir mais 0-1-1 vezes as carreiras 24 a 27, mas não sei o que isso significa. Poderiam me explicar?
18.05.2018 - 14:06DROPS Design answered:
Boa tarde, Conforme o tamanho que está a fazer. Se estiver a fazer o tamanho S/M, não repete. Se estiver a fazer o tamanho L/XL ou XXL/XXXL, repete mais 1 vez as carreiras 24 a 27. Bom croché!
24.05.2018 - 15:44
![]() Corinne wrote:
Corinne wrote:
Bonjour. Je suis coincé au rang 27. Pouvez vous m'aider ? . merci.
29.04.2018 - 11:33DROPS Design answered:
Bonjour Corinne, au rang 27, vous crochetez comme au rang 25 en continuant les augmentations comme avant, autrement dit, vous aurez 1 bride de plus entre chaque A.2 soit 16 brides entre chaque A.2. Bon crochet!
30.04.2018 - 10:47
|
||||||||||||||||||||||||||||||||||||||||
Ros#roscardigan |
||||||||||||||||||||||||||||||||||||||||
 |
 |
|||||||||||||||||||||||||||||||||||||||
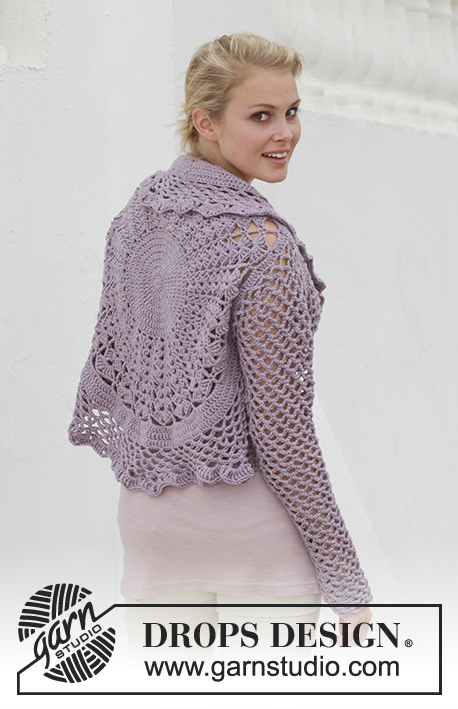
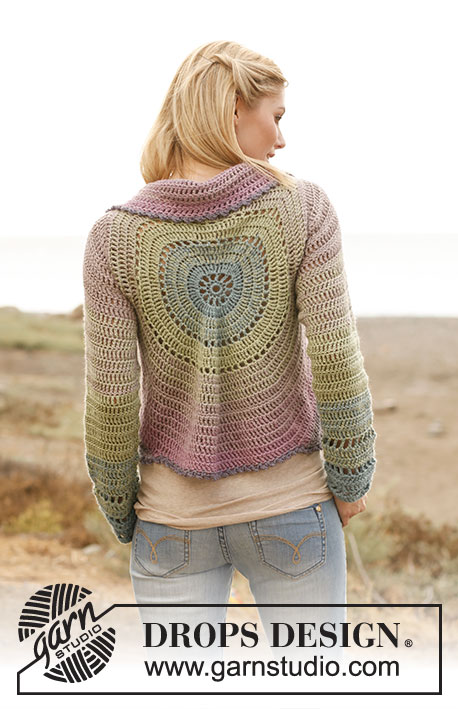
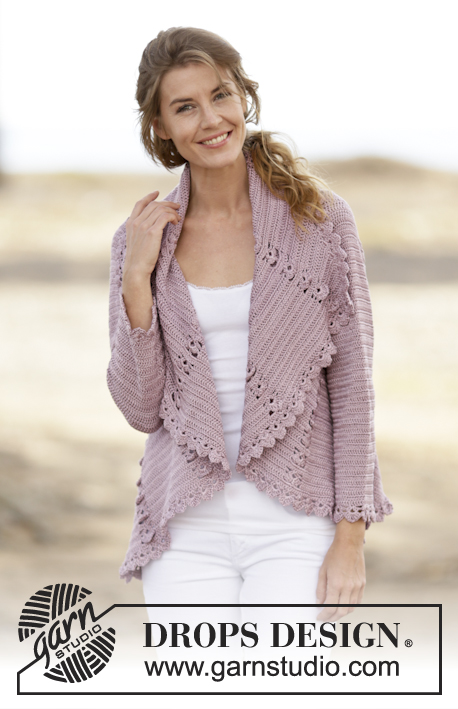
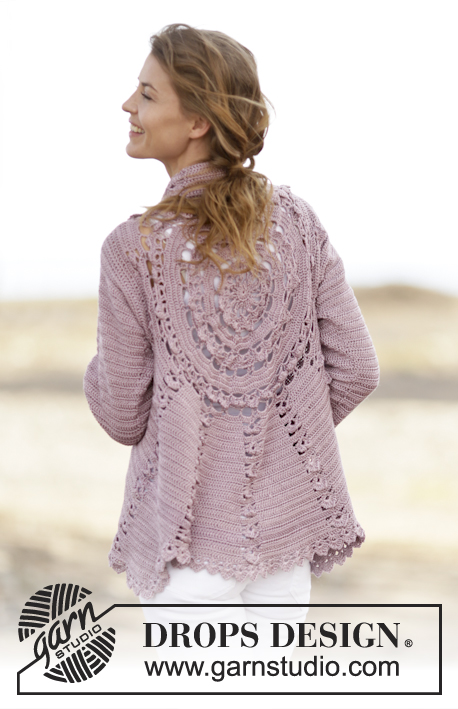
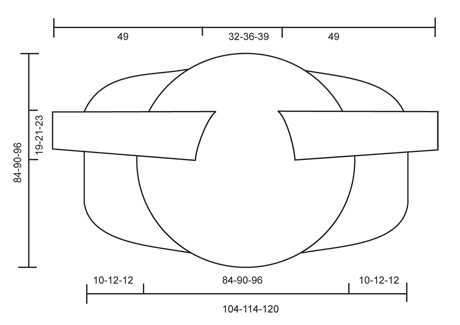
Crochet DROPS jacket worked in a circle with lace pattern in ”Cotton Viscose”. Size: S - XXXL.
DROPS 162-11 |
||||||||||||||||||||||||||||||||||||||||
|
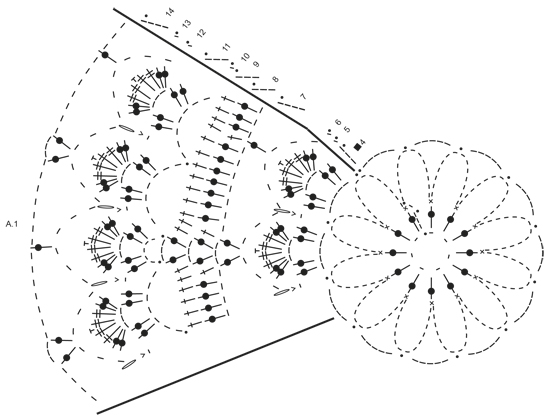
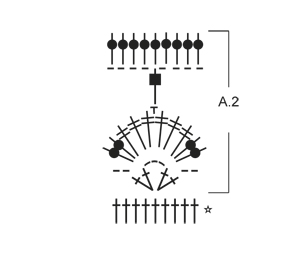
PICOT: Work ch 2, 1 sc in the 2nd ch from hook. CROCHET INFO: Beg every dc round/row with 3 ch that replace first dc and finish every round/row with 1 sl st in 3rd ch from beg of round/row. PATTERN: See diagrams A.1-A.2. After 3rd round, repeat A.1 6 times in total on round. CROCHET 3 dc TOG: Work 3 dc into 1 dc at beg of row as follows: Work 3 ch (= replace 1 dc), work 1 dc, but wait with last pull through (= 2 strands on hook), then work next dc but on last pull through, pull yarn through all sts on hook. DECREASE TIP (applies to sleeves): Dec at beg of row by working 1 sl st over the dc to be dec. Dec at end of row by working until 1 dc to be dec remains, turn piece. ---------------------------------------------------------- CIRCLE: Work 7 ch on hook size 3.5 mm/E/4 with Cotton Viscose and form a ring with 1 sl st in first ch. Then work A.1 as follows: ROUND 1: Work ch 3, 12 dc in ch-ring, finish with 1 sl st in 3rd ch from beg of round. ROUND 2: Work ch 1, * 1 sc in first dc, 14 ch *, repeat from *-* 12 times in total, finish with 1 sl st in first sc. Fasten off. ROUND 3: Work 1 sl st in first ch-space, ch 5, * 1 sl st in next ch-space, 5 ch *, repeat from *-* 11 times in total, finish with 1 sl st in first ch-space. A.1 is repeated 6 times in total on round. ROUND 4: Work ch 3, in first ch-space work: * 2 dc, ch 3, 2 dc in same ch-space, 1 ch *, repeat from *-* 12 times in total, finish with 1 sl st in 3rd ch from beg of round. ROUND 5: Work ch 1, in first ch-space work 2 dc, 2 tr, 1 PICOT – see explanation above, 2 tr, 2 dc, 1 sc in next ch, * in next ch-space work 2 dc, 2 tr, 1 picot, 2 tr, 2 dc, 1 sc in next ch *, repeat from *-* 11 times in total, finish with 1 sl st in first ch = 12 leaves. ROUND 6: Work ch 1, * ch 6, 1 sc in sc and ch (from 5th and 4th round) *, repeat from *-* 12 times in total, finish with 1 sl st in first ch. ROUND 7: Work ch 4, * ch 3, 1 dc in next ch-space, ch 7, 1 dc in next ch-space, ch 3, 1 dc in same ch-space, 4 ch *, repeat from *-* 6 times in total, finish with 1 sl st in 4th ch. ROUND 8: Work ch 3, 3 dc in next ch-space, * 1 dc in next dc, 7 dc in next ch-space, 1 dc in next dc, 1 dc in next ch-space, ch 3, 1 dc in same ch-space, 1 dc in next dc, 7 dc in next ch-space *, repeat from *-* 5 times in total, 1 dc in next dc, 7 dc in next ch-space, 1 dc in next dc, 1 dc in next ch-space, ch 3, 1 dc in same ch-space, 1 dc in next dc, 4 dc in first ch-space, finish with 1 sl st in 3rd ch = 114 dc. REMEMBER THE CROCHET GAUGE! ROUND 9: Work ch 3, * 1 dc in every dc until ch-space, in ch-space as follows: 1 dc, ch 3, 1 dc *, repeat from *-* the entire round, finish with 1 sl st in 3rd ch = 126 dc. ROUND 10: Work ch 1, * ch 7, skip 6 dc, 1 sl st in next dc, ch 7, skip 6 dc, 1 sl st in next dc, ch 5, 1 sl st in next dc, ch 7, skip 6 dc, 1 sl st in next dc *, repeat from *-* 5 times in total, ch 7, skip 6 dc, 1 sl st in next dc, ch 7, skip 6 dc, 1 sl st in next dc, ch 5, 1 sl st in next dc, ch 7, skip 6 dc, 1 sl st in first ch. ROUND 11: Work ch 3, in every ch-space work 2 dc, ch 3, 2 dc, ch 1, finish with 1 sl st in 3rd ch. ROUND 12: Work ch 1, * in next ch-space work 2 dc, 2 tr, 1 picot, 2 tr, 2 dc, 1 sc in next ch *, repeat from *-* 24 times in total, finish with 1 sl st in first ch = 24 leaves. ROUND 13: Work ch 1, * ch 6, 1 sc in sc and ch (from 12th and 11th round) *, repeat from *-* 24 times in total, finish with 1 sl st in first ch. ROUND 14: Work ch 4, * ch 3, 1 dc in next ch-space, ch 7, 1 dc in next ch-space, ch 3, 1 dc in same ch-space, 4 ch *, repeat from *-* 12 times in total, finish with 1 sl st in 4th ch. ROUND 15: Work 3 ch - READ CROCHET INFO, work 4 dc in first ch-space (i.e. ch-space with 3 ch), now work dc in all ch-space with 7 ch from previous round, do not work in ch-space with 3 ch from previous round. Work * 8 dc in each of the next 7 ch-spaces, 9 dc in next ch-space *, repeat from *-* 2 times in total, 8 dc in each of the next 7 ch-spaces, 5 dc in last ch-space (i.e. ch-space with 4 ch) = 195 dc. ROUND 16: Work * 1 dc in each of the first 14 dc, 2 dc in next dc *, repeat from *-* 13 times in total = 208 dc. ROUND 17: Work * 2 dc in first dc, 1 dc in each of the next 15 dc *, repeat from *-* 13 times in total AT THE SAME TIME inc 1 dc extra on round = 222 dc. ROUND 18: Work ch 1, * ch 6, skip 5 dc, 1 sl st in next dc *, repeat from *-* 37 times in total, finish with 1 sl st in first ch. ROUND 19:Work as round 11 in A.1: Work ch 3, in every ch-space work 2 dc, ch 3, 2 dc, ch 1, finish with 1 sl st in 3rd ch. ROUND 20: Work as round 12 in A.1: Work ch 1, * in next ch-space work 2 dc, 2 tr, 1 picot, 2 tr, 2 dc, 1 ch *, repeat from *-* 37 times in total, finish with 1 sl st in first ch = 37 leaves. ROUND 21: Work as round 13 in A.1: Work ch 1, * ch 6, 1 sc in sc and ch (from 20th and 19th round) *, repeat from *-* 37 times in total, finish with 1 sl st in first ch. ROUND 22: Work as round 14 in A.1: Work ch 4, * ch 3, 1 dc in next ch-space, ch 7, 1 dc in next ch-space, ch 3, 1 dc in same ch-space, 4 ch *, repeat from *-* 18 times in total, work ch 3, 1 dc in last ch-space, ch 4, finish with 1 sl st in 4th ch. ROUND 23: Work 4 dc in first ch-space (i.e. ch-space with 3 ch), now work dc in all ch-space with 7 ch from previous round, do not work in ch-space with 3 ch from previous round. Work * 7 dc in next ch-space, 8 dc in next ch-space, 7 dc in next ch-space *, repeat from *-* 11 times in total, 8 dc in next ch-space, 8 dc in next ch-space, 7 dc in next ch-space, 4 dc in last ch-space (i.e. ch-space with 4 ch) = 273 dc. Then work piece back and forth. Work every row tog at the end of row with 1 sl st in 3rd ch from beg of row. Turn piece. ROW 24 (= WS): Work * 2 dc in next dc, 1 dc in each of the next 11 dc (= dc-group), A.2 *, repeat from *-* 13 times in total = 169 dc and 13 A.2. Turn piece. A.2 is repeated vertically until finished measurements. ROW 25 (= RS): Work A.2, 2 dc in first dc, 1 dc in each of the next dc in dc-group, * A.2, 2 dc in first dc in dc-group, 1 dc in each of the next dc *, repeat from *-* until 1 dc-group remains, 2 dc in first dc, 1 dc in each of the next dc = 182 dc. Turn piece. ROW 26: Work as row 24 = 195 dc (15 dc between every A.2). ROW 27: Work as row 25 = 208 dc (16 dc between every A.2). Repeat row 24-27 0-1-1 more time = 208-260-260 dc (= 16-20-20 dc between every A.2). Piece measures approx. 20-23-23 cm / 8"-9"-9" from middle and outwards. Now work arm holes as follows: ROW 28 (= from WS): Work 2 dc in first dc, 1 dc in each of the next 15-19-19 dc, A.2 as before, 2 dc in next dc, 1 dc in each of the next 15-19-19 dc, A.2, 54-62-62 loose ch (= right armhole), skip: 16-20-20 dc + A.2 + 16-20-20 dc + A.2, work * 2 dc in next dc, 1 dc in each of the next 15-19-19 dc, A.2 *, repeat from *-* 5 times in total, 2 dc in first dc, 1 dc in each of the next 15-19-19 dc, 54-62-62 loose ch (= left armhole), skip: A.2 + 16-20-20 dc + A.2 + 16-20-20 dc, work A.2, 2 dc in next dc, 1 dc in each of the next 15-19-19 dc, A.2 = 153-189-189 dc, 9 A.2 and 108-124-124 ch. ROW 29 (from RS): Work A.2, 2 dc in next dc, 1 dc in each of the next 16-20-20 dc, A.2, in ch-row (= left armhole) work as follows: 1 dc in each of the 54-62-62 ch, * 2 dc in next dc, 1 dc in each of the next 16-20-20 dc, A.2 *, repeat from *-* 5 times in total, 2 dc in next dc, 1 dc in each of the next 16-20-20 dc, in next ch-row (= right armhole) work as follows: 1 dc in each of the 54-62-62 ch, then work A.2, 2 dc in next dc, 1 dc in each of the next 16-20-20 dc, A.2, 2 dc in next dc, 1 dc in each of the next 16-20-20 dc = 270-322-322 dc and 9 A.2. ROW 30 (= from WS): Work 1 dc in each of the next 18-22-22 dc, A.2 as before, 1 dc in each of the next 18-22-22 dc, A.2, 1 dc in each of the next 18-22-22 dc, A.2 (adjust row according to the other repetitions), 1 dc in each of the next 18-22-22 dc, A.2, * 1 dc in each of the next 18-22-22 dc, A.2 *, repeat from *-* 5 times in total, 1 dc in each of the next 18-22-22 dc, A.2, 1 dc in each of the next 18-22-22 dc, A.2, 1 dc in each of the next 18-22-22 dc, A.2, 1 dc in each of the next 18-22-22 dc, A.2 = 234-286-286 dc and 13 A.2. Work pattern as before but now inc only on every row from RS until 52-52-60 rows have been worked in total = 377-429-481 dc (29-33-37 dc in every dc-group). Insert 4 markers in the piece as follows from WS: Work 29-33-37 dc, A.2, 14-16-18 dc, insert 1st marker, work 15-17-19 dc, * A.2, 29-33-37 dc *, repeat from *-* 4 times in total, insert 2nd marker here (1st-2nd marker = right front piece). Work A.2, 29-33-37 dc, A.2, 29-33-37 dc and A.2, insert 3rd marker here. * Work 29-33-37 dc, A.2 *, repeat from *-* 4 times in total, 15-17-19 dc, insert 4th marker. (3rd-4th marker = left front piece), 14-16-18 dc, A.2. dc between 1st and 4th marker are up towards neck. Fasten off. RIGHT FRONT PIECE: Now work right front piece between 1st and 2nd marker, beg from 2nd marker (i.e. from RS) = 131-149-167 dc and 4 A.2. Continue inc in dc-groups as before BUT do not inc in dc-groups in each side of front piece - AT THE SAME TIME dec 2 dc at beg of every row by CROCHET 3 dc TOG - see explanation above. Work until 10-12-12 cm / 4"-4¾"-4¾" over front piece have been worked, adjust to finish with 1 whole repetition of A.2. Fasten off. LEFT FRONT PIECE: Work left front piece between 3rd and 4th marker the same way as right front piece, beg from 4th marker (i.e. from RS). EDGE: Work an edge around the entire jacket as follows: Work the first 2 rounds of A.2, when working first round of A.2 over dc-rows, skip 2 dc-rows on each side of dc-group. Beg every round with 3 ch and finish with 1 sl st in 3rd ch. SLEEVES: Work back and forth from armhole and down, work every row tog with 1 sl st at the end of row. Insert 1 marker in piece, NOW MEASURE PIECE FROM HERE. Beg by working 86-94-102 dc evenly around the opening for sleeve, beg of row should be under sleeve. Then work 3 rows with 1 dc in every dc. Continue with 1 dc in every dc - AT THE SAME TIME dec differently in the different sizes as follows: READ DECREASE TIP! SIZE S/M: Dec 1 st in each side of piece alternately every 3rd and 2nd row 16 times in total = 54 dc. SIZE L/XL: Dec 1 st in each side of piece every other row 20 times in total = 54 dc. SIZE XXL/XXXL: Dec 1 st in each side of piece every other row 24 times = 54 dc. ALL SIZES: Work 1 dc in every dc until sleeve measures approx. 47 cm / 18½", adjust so that next row is from WS. Then work the first 2 rounds of A.2 (= 6 repetitions in width). Fasten off. Work the other sleeve the same way. |
||||||||||||||||||||||||||||||||||||||||
Diagram explanations |
||||||||||||||||||||||||||||||||||||||||
|
||||||||||||||||||||||||||||||||||||||||
 |
||||||||||||||||||||||||||||||||||||||||
 |
||||||||||||||||||||||||||||||||||||||||
 |
||||||||||||||||||||||||||||||||||||||||
Have you finished this pattern?Tag your pictures with #dropspattern #roscardigan or submit them to the #dropsfan gallery. Do you need help with this pattern?You'll find 11 tutorial videos, a Comments/Questions area and more by visiting the pattern on garnstudio.com. © 1982-2026 DROPS Design A/S. We reserve all rights. This document, including all its sub-sections, has copyrights. Read more about what you can do with our patterns at the bottom of each pattern on our site. |
||||||||||||||||||||||||||||||||||||||||


With over 40 years in knitting and crochet design, DROPS Design offers one of the most extensive collections of free patterns on the internet - translated to 17 languages. As of today we count 325 catalogs and 12298 patterns - 12288 of which are translated into English (US/in).
We work hard to bring you the best knitting and crochet have to offer, inspiration and advice as well as great quality yarns at incredible prices! Would you like to use our patterns for other than personal use? You can read what you are allowed to do in the Copyright text at the bottom of all our patterns. Happy crafting!
Post a comment to pattern DROPS 162-11
We would love to hear what you have to say about this pattern!
If you want to leave a question, please make sure you select the correct category in the form below, to speed up the answering process. Required fields are marked *.