
Popular categories
Looking for a yarn?


Comments / Questions (196)
![]() Levray wrote:
Levray wrote:
Très jolie veste J'adore Entre le gilet et le boléro Juste eu des difficultés pour les côtés, je n'ai pas bien compris les explications Merci
04.03.2025 - 23:34
![]() Levray wrote:
Levray wrote:
Bonjour Je viens de finir le côté gauche J'ai donc fait 12 rangs en augmentant aux 2 marqueurs Mais j'ai beaucoup plus de 41 mailles Je ne comprends pas les explications pour diminuer Je termine par une bride puis Demi brides et une maille serrée Je fais une ml passe la maille et Fais deux mailles coulées Je ne comprends pas Pouvez vous m'aider svp
27.02.2025 - 00:23DROPS Design answered:
Bonjour Mme Levray, vous devez crocheter un total de 12 rangs en diminuant 3 m de chaque côté tous les rangs = 12x3x2=72 m seront diminuées au total, et en même temps, vous augmentez 12 fois 2 m (1 à chaque marqueur) = 24 au total. Vous aurez ainsi 89-72+24=41 mailles à la fin du dernier rang. Bon crochet!
27.02.2025 - 11:19
![]() Melly wrote:
Melly wrote:
Faccio molta fatica a capire come fare le maniche. Mi sembra che sto partendo a metà del braccio per poi salire verso la spalla, anziché scendere. E poi, quando faccio la diminuzione con la m.b.s. devo lavorare la m.a.d. nella seguente? Perchè a me esce un ammasso di maglie proprio brutto e di sicuro fastidioso una volta indossato. Inoltre, se io nello scalfo ho fatto 32 cat.+saltato 29 m.=61 m di giromanica, perchè a fare la manica devo partire con 34 m. (L/XL) se parto dall\'alto?
27.05.2024 - 22:57DROPS Design answered:
Buonasera Melly, le istruzioni sono corrette, si parte dall'arrotondamento della manica verso il basso. Buon lavoro!
30.05.2024 - 20:10
![]() Melly wrote:
Melly wrote:
Salve! Ho trovato un' incongruenza sui colori da usare nelle maniche. Credo che si parta dalla striscia 5 e non la 1.
27.05.2024 - 22:40DROPS Design answered:
Buonasera Melly, nelle istruzioni all'inizio del capo viene indicato come lavorare le strisce sulle maniche. Buon lavoro!
30.05.2024 - 20:08
![]() Melly wrote:
Melly wrote:
Salve, avrei un errore da segnalare. Nel giro 3 del CORPO, le 3 m.a.d. sono da fare nell'archetto e non nella maglia. E viceversa, la m.a.d. singola, va fatta sopra la m. del giro precedente e non nell'archetto.
27.05.2024 - 22:19DROPS Design answered:
Buonasera Melly, al momento non sono stati segnalati errori nel modello. Buon lavoro!
30.05.2024 - 20:06
![]() Johannah wrote:
Johannah wrote:
Vedr forstykkerne: Jeg skal nu hækle over de 81 masker samtidig med ind-og udtagning. Jeg starter med udtagning i 1. række, men skal jeg også tage ind i 1. række? I så fald arbejder jeg jo ikke over de 81 masker.
28.03.2023 - 12:37DROPS Design answered:
Hej Johannah, det stemmer, du tager ind og ud ifølge opskriften og får da49 dbl-st når du er klar med de 8 rækker :)
12.04.2023 - 15:20
![]() Johannah Mingdal wrote:
Johannah Mingdal wrote:
Ja, jeg bruger garnet i opskriften og hækle fastheden passer ret godt. Efter 13. Omgang hvor arbejdet skulle måle 20 cm fra midten af ringen, har jeg 19,5 cm. Herfra skal hækles yderligere 7 omgange, hvorefter arbejdet skal måle 35 cm. Dvs at 7 omgange efter planen skulle måle 15 cm. Det hænger ikke sammen, da 1 række ifølge fastheden fylder 1,8 cm. Derfor lander jeg på Ca 32 cm og mangler 3 cm. Og hvis jeg tager 2 omgange mere, så bliver der jo rod i striberne?
08.03.2023 - 13:47
![]() Johannah Mingdal wrote:
Johannah Mingdal wrote:
Vedr ærmer. Skal de hækles for sig selv og efterfølgende syes på i ærmegabet? Og skal der hækles 2 stykker med start oppefra på 34 lm til hvert ærme, som syes sammen efterfølgende? Det er meget svært at forstå 😳
06.03.2023 - 23:48DROPS Design answered:
Hej igen, ja ærmerne hækles for sig og sys i ærmegabet bagefter :)
08.03.2023 - 09:41
![]() Johannah Mingdal wrote:
Johannah Mingdal wrote:
Jeg hækler str. L/XL og er færdig med 20.omgang af ryggen. Nu skulle arbejdet måle Ca 35 cm fra midten, men det måler kun Ca 32 cm. Efter 14. række målte det fint de 20 cm som angivet, men der går noget galt på de resterende 5 rækker. De kan umuligt nå at komme op på 15 cm. Måler Ca 12 cm hos mig. Hvad gør jeg nu? 🤔
06.03.2023 - 22:47DROPS Design answered:
Hej Johannah, hækler du i 2 tråde DROPS Baby Alpaca Silk? Du skal have 5½ række med dbl-st i højden på 10 cm for at få målene til at passe :)
08.03.2023 - 09:39
![]() Anette Mjøen wrote:
Anette Mjøen wrote:
Det er feil i oppgitt garnmengde. Jeg skal begynne på det første forstykket nå og har allerede for lite av lys gammelrosa. Når jeg gjør en beregning er jeg ganske sikker på at det også blir for lite av grålilla. Ser av kommentarene det også er meldt tidligere (i 2018 av Sophie Kling). Hun heklet i str. S, jeg hekler L/XL. Vær så snill og rett oppskriften, slik at ikke flere bestiller for lite garn
17.01.2022 - 15:22
|
|
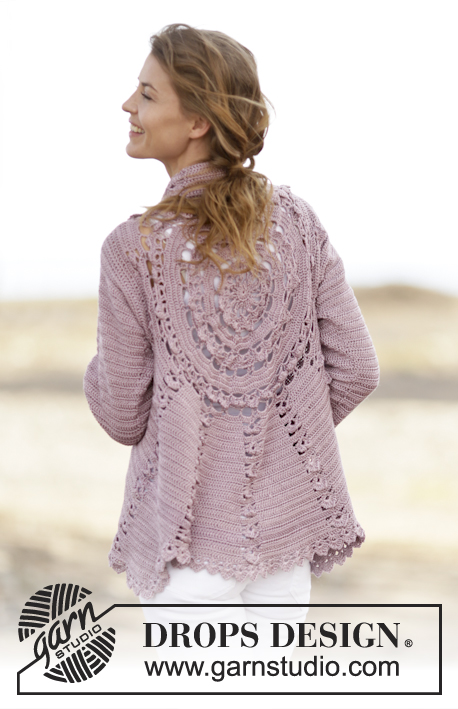
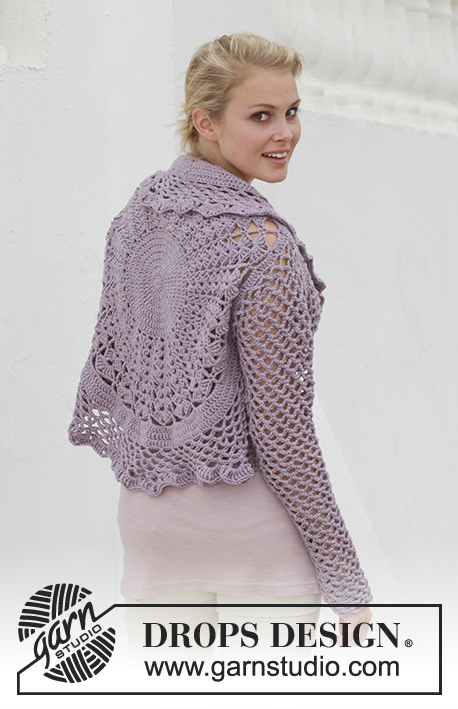
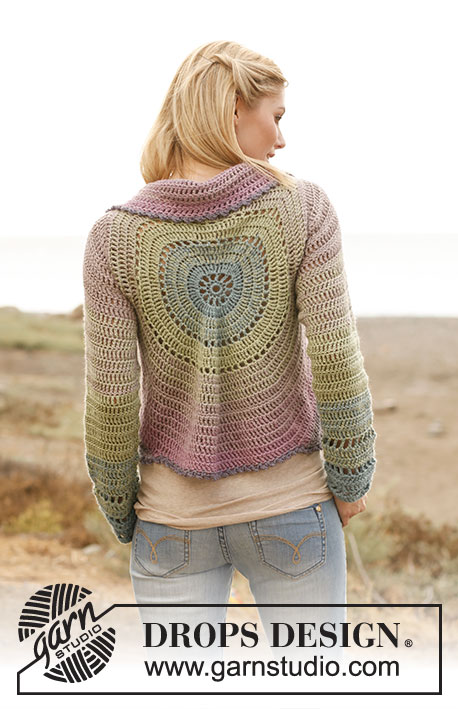
Summer Circle#summercirclejacket |
|
 |
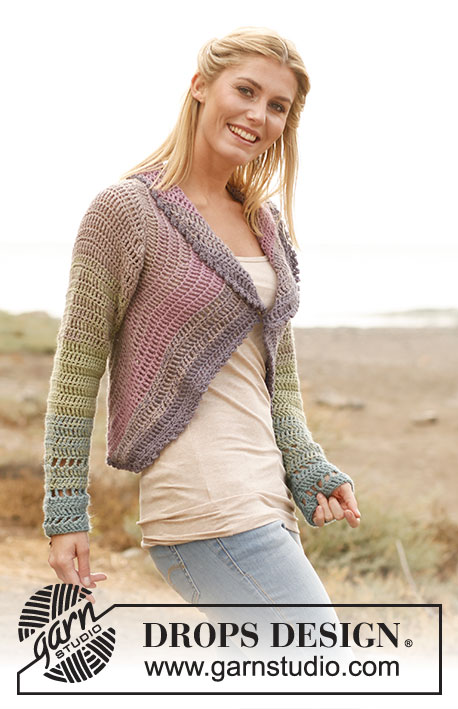 |
Crochet DROPS jacket worked in a circle in 2 strands ”BabyAlpaca Silk”. Size: S - XXXL.
DROPS 136-1 |
|
|
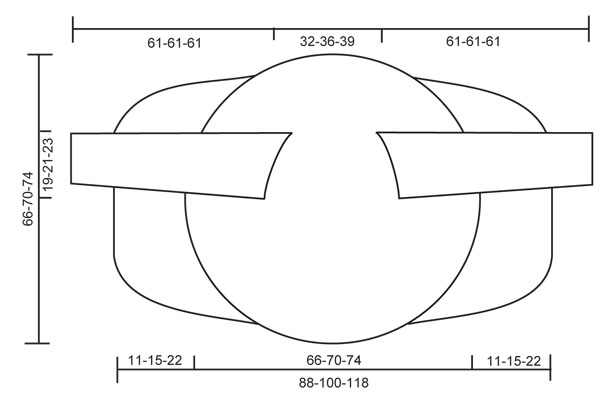
STRIPES: BODY: Beg with 2 strands light sea green. Then work 3-3-4 rounds with each of the following colors: Stripe 1: 2 strands light sea green, Stripe 2: 1 strand light sea green and 1 strand pistachio Stripe 3: 2 strands pistachio Stripe 4: 1 strand pistachio and 1 strand light gray purple Stripe 5: 2 strands light gray purple, Stripe 6: 1 strand light old pink and 1 strand light gray purple Stripe 7: 2 strands light old pink, Stripe 8: 1 strand light old pink and 1 strand gray purple Stripe 9 until finished measurements: 2 strands gray purple SLEEVE: Worked in stripes. Work sleeve cap as 5th-5th-4th stripe, then work 12 cm / 4¾" as stripe 4-4-3, 12 cm / 4¾" as stripe 3-3-2, 12 cm / 4¾" as stripe 2-2-1, and work as stripe 1 until finished measurements. CROCHET TIP: Replace first tr on every round/row with ch 4. DECREASE TIP 1 (applies to the body): Dec as follows: Work tr until 3 tr remain, * in the first of these work 1 dc, in the next 1 hdc and in the last 1 sc, turn with ch 1, skip sc, work 1 sl st in hdc and 1 sl st in dc, then 1 sc in first tr, 1 hdc in next tr and 1 dc in next tr, work tr until 3 tr remain at end of row *, repeat from *-* until a total of 6-8-12 rows have been worked. DECREASE TIP 2 (applies to sleeve): Dec at beg of row by working sl st over the no of tr to be dec. Dec at end of row by working until same no of tr to be dec remains, turn piece. -------------------------------------------------------- BODY: Worked in the round in a circle from mid back with 2 strands BabyAlpaca Silk and STRIPES – see explanation above. Ch 8 on hook size 5 mm / H/8 and form a ring with 1 sl st in first ch. ROUND 1: Work 12 sc in ch-ring, finish with 1 sl st in first sc. ROUND 2: 5 ch (= 1 dc + 2 ch), * 1 dc in next sc, 2 ch *, repeat from *-* the entire round and finish with 1 sl st in 3rd ch from beg of round = 12 dc with 2 ch between each. ROUND 3: READ CROCHET TIP! 1 tr, 2 tr in same dc, * 1 tr in ch-space, 3 tr in next dc *, finish with 1 tr in the last ch-space and 1 sl st in 4th ch from beg of round = 48 tr. ROUND 4: 1 tr, * 2 tr in next tr, 1 tr in next tr *, repeat from *-* and finish with 2 tr in next tr and 1 sl st in 4th ch from beg of round = 72 tr. ROUND 5: 1 tr, * 2 tr in next tr, 1 tr in each of the next 2 tr * repeat from *-* and finish with 2 tr in next tr, 1 tr in next tr and 1 sl st in 4th ch = 96 tr. ROUND 6: 5 ch (= 1 dc + 2 ch), * skip 1 tr, 1 dc in next tr, ch 2 *, repeat from *-* the entire round and finish with 1 sl st in 3rd ch from beg of round = 48 ch-spaces. ROUND 7: Work 1 tr in every dc and work 1 and 2 tr alternately in every ch-space the entire round = 120 tr. ROUND 8: Work 1 tr in every tr but work 2 tr in every 10th tr = 132 tr. ROUND 9: 5 ch (= 1 dc + 2 ch), * skip 1 tr, 1 dc in next tr, ch 2 *, repeat from *-* the entire round and finish with 1 sl st in 3rd ch from beg of round = 66 ch-spaces. ROUND 10: Work 1 tr in every dc and work 1 and 2 tr alternately in every ch-space the entire round = 165 tr. ROUND 11: Work 1 tr in every tr but work 2 tr in every 15th tr = 176 tr. ROUND 12: Work 1 tr in every tr but work 2 tr in every 16th tr = 187 tr. Piece measures approx. 20 cm / 8" from the middle and outwards. SIZE S/M: ROUND 13: ch 1, then work 1 sc in each of the first 45 tr (= up towards neck), ch 30 loosely, skip the next 27 tr (= armhole), then work 1 sc in each of the next 88 tr (= down towards back), ch 30 loosely, skip the next 27 tr (= armhole) and fasten with 1 sl st in first sc on round. ROUND 14: Work 1 tr in every sc - but inc 2 tr evenly over the first 45 sc (= 47 tr), then work 30 tr in ch-row over armhole, work 1 tr in every sc – but inc 3 tr evenly over the bottom 88 sc (= 91 tr), work 30 tr in ch-row over armhole and fasten with 1 sl st in 4th ch = 198 tr. ROUND 15 to 19: Continue with tr – while at the same time inc 6 tr evenly on every round. After 19th round there are 228 tr on the round and piece measures approx. 33 cm / 13" from the middle and outwards. Continue working only over 79 tr in each side – i.e. do not work over 35 tr at top by neck and 35 tr at bottom of back. Cut the yarn. Continue with explanation below for front piece. SIZE L/XL: ROUND 13: Work 1 tr in every tr but work 2 tr in every 17th tr = 198 tr. ROUND 14: 1 ch, then work 1 sc in each of the first 50 tr (= up towards neck), ch 32 loosely, skip the next 29 tr (= armhole), then work 1 sc in each of the next 90 tr (= down towards back), ch 32 loosely, skip the next 29 tr (= armhole) and fasten with 1 sl st in first sc on round. ROUND 15: Work 1 tr in every sc - but inc 3 tr evenly over the first 50 sc (= 53 tr), then work 32 tr in ch-row over armhole, work 1 tr in every sc – but inc 3 tr evenly over the bottom 90 sc (= 93 tr), work 32 tr in ch-row over armhole and fasten with 1 sl st in 4th ch = 210 tr. ROUND 16 to 20: Continue with tr – while at the same time inc 6 tr evenly on every round. After 20th round there are 240 tr on the round and piece measures approx. 35 cm / 13¾" from the middle and outwards. Continue working only over 81 tr in each side – i.e. do not work over 39 tr at top by neck and 39 tr at bottom of back. Cut the yarn. Continue with explanation below for front piece. SIZE XXL/XXXL: ROUND 13: Work 1 tr in every tr but work 2 tr in every 17th tr = 198 tr. ROUND 14: Work 1 tr in every tr but work 2 tr in every 18th tr = 209 tr. ROUND 15: 1 ch, then work 1 sc in each of the first 54 tr (= up towards neck), ch 36 loosely, skip the next 32 tr (= armhole), then work 1 sc in each of the next 91 tr (= down towards back), ch 36 loosely, skip the next 32 tr (= armhole) and fasten with 1 sl st in first sc on round. ROUND 16: Work 1 tr in every sc - but inc 2 tr evenly over the first 54 sc (= 56 tr), then work 36 tr in ch-row over armhole, work 1 tr in every sc – but inc 3 tr evenly over the bottom 91 sc (= 94 tr), and work 36 tr in ch-row over armhole = 222 tr. ROUND 17 to 22: Continue with tr – while at the same time inc 6 tr evenly on every round. After 22nd round there are 258 tr on the round and piece measures approx. 37 cm / 14½" from the middle and outwards. Continue working only over 89 tr in each side – i.e. do not work over 40 tr at top by neck and 40 tr at bottom of back. Continue with explanation below front piece. LEFT FRONT PIECE - ALL SIZES: = 79-81-89 tr. Insert a marker after 23-24-27 sts in from each side (= 33-33-35 sts between markers). Then work tr back and forth over these sts while at the same time inc 1 st at every marker on every row (i.e. inc 2 sts on row, inc alternately before and after marker) and dec 3 sts at end and beg of every row in each side – SEE DECREASE TIP 1 until a total of 6-8-12 rows back and forth have been worked = 55-49-41 tr. RIGHT FRONT PIECE: Work same way as on left piece over 79-81-89 tr in right side. SLEEVE: Worked back and forth from sleeve cap and down with 2 strands BabyAlpaca Silk and STRIPES – see explanation above. Ch 28-34-38 with stripe 5-5-4. Turn and work 1 tr in 5th ch from hook ( = 2 tr), then work 1 tr in every ch = 25-31-35 tr. ROW 2: Work ch 4, 3 tr in first tr, 1 tr in each of the next 23-29-33 tr, 4 tr in the last tr = 31-37-41 tr. Turn. ROW 3, 4 and 5: Work ch 4, 2 tr in first tr, 1 tr in every tr until 1 tr remains, 3 tr in the last tr = 43-49-53 tr. Turn. ROW 6: Work ch 4, 3 tr in first tr, 1 tr in each of the next 41-47-51 tr, 4 tr in the last tr = 49-55-59 tr. Turn. Switch to stripe 4-4-3 here. Then work tr on all rows until piece measures 17-15-15 cm / 6¾"-6"-6". Continue with tr while AT THE SAME TIME dec as follows in each side: SIZE S/M: * Work 1 row where dec 1 tr in each side - see Decrease tip. Work 1 row without dec. Work 1 row where dec 1 tr in each side. Work 2 rows without dec *, repeat from *-* a total of 3 times = 12 dec = 37 tr. SIZE L/XL + XXL/XXXL: * Work 1 row where dec 1 tr in each side - see Decrease tip. Work 1 row without dec *, repeat from *-* a total of 8 times = 16 dec = 39-43 tr. Continue to work as follows: ROW 1: 1 tr in every tr. ROW 2: 6 ch (= 1 tr + ch 2), skip 1 tr, 1 tr in next tr, * ch 2, skip 1 tr, 1 tr in next tr *, repeat from *-* the entire row = 18-19-21 ch-spaces. ROW 3: Work 1 tr in every tr and 1 tr in every ch-space = 37-39-43 tr. Repeat rows 1 to 3 a total of 3 times, sleeve measures approx. 61-61-61 cm / 24"-24"-24". Fasten off. ASSEMBLY: Sew sleeve seams tog edge to edge to avoid a chunky seam. Work 1 round around the entire body and at bottom of sleeves as follows with 2 strands gray purple: 1 sl st, * ch 5, 1 dc in first ch, skip 1 st, fasten with 1 sc in next st *, repeat from *-* the entire round and finish with 1 sl st in first ch. Sew in the sleeves. |
|
|
|
Have you finished this pattern?Tag your pictures with #dropspattern #summercirclejacket or submit them to the #dropsfan gallery. Do you need help with this pattern?You'll find 8 tutorial videos, a Comments/Questions area and more by visiting the pattern on garnstudio.com. © 1982-2025 DROPS Design A/S. We reserve all rights. This document, including all its sub-sections, has copyrights. Read more about what you can do with our patterns at the bottom of each pattern on our site. |
|


With over 40 years in knitting and crochet design, DROPS Design offers one of the most extensive collections of free patterns on the internet - translated to 17 languages. As of today we count 314 catalogs and 11822 patterns - 11812 of which are translated into English (US/in).
We work hard to bring you the best knitting and crochet have to offer, inspiration and advice as well as great quality yarns at incredible prices! Would you like to use our patterns for other than personal use? You can read what you are allowed to do in the Copyright text at the bottom of all our patterns. Happy crafting!
Post a comment to pattern DROPS 136-1
We would love to hear what you have to say about this pattern!
If you want to leave a question, please make sure you select the correct category in the form below, to speed up the answering process. Required fields are marked *.