
Popular categories
Looking for a yarn?


|
||||||||||||||||||||||||||||||||||||||||
Ros |
||||||||||||||||||||||||||||||||||||||||
 |
 |
|||||||||||||||||||||||||||||||||||||||
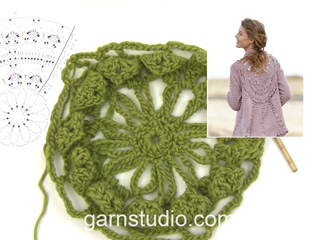
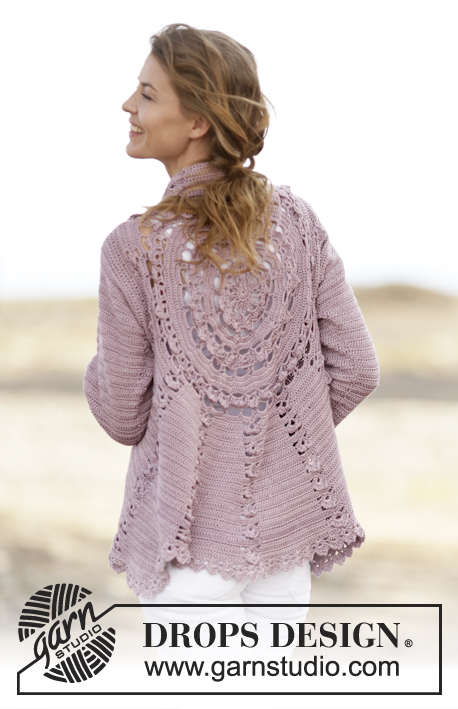
Crochet DROPS jacket worked in a circle with lace pattern in ”Cotton Viscose”. Size: S - XXXL.
DROPS 162-11 |
||||||||||||||||||||||||||||||||||||||||
|
PICOT: Work ch 2, 1 sc in the 2nd ch from hook. CROCHET INFO: Beg every dc round/row with 3 ch that replace first dc and finish every round/row with 1 sl st in 3rd ch from beg of round/row. PATTERN: See diagrams A.1-A.2. After 3rd round, repeat A.1 6 times in total on round. CROCHET 3 dc TOG: Work 3 dc into 1 dc at beg of row as follows: Work 3 ch (= replace 1 dc), work 1 dc, but wait with last pull through (= 2 strands on hook), then work next dc but on last pull through, pull yarn through all sts on hook. DECREASE TIP (applies to sleeves): Dec at beg of row by working 1 sl st over the dc to be dec. Dec at end of row by working until 1 dc to be dec remains, turn piece. ---------------------------------------------------------- CIRCLE: Work 7 ch on hook size 3.5 mm/E/4 with Cotton Viscose and form a ring with 1 sl st in first ch. Then work A.1 as follows: ROUND 1: Work ch 3, 12 dc in ch-ring, finish with 1 sl st in 3rd ch from beg of round. ROUND 2: Work ch 1, * 1 sc in first dc, 14 ch *, repeat from *-* 12 times in total, finish with 1 sl st in first sc. Fasten off. ROUND 3: Work 1 sl st in first ch-space, ch 5, * 1 sl st in next ch-space, 5 ch *, repeat from *-* 11 times in total, finish with 1 sl st in first ch-space. A.1 is repeated 6 times in total on round. ROUND 4: Work ch 3, in first ch-space work: * 2 dc, ch 3, 2 dc in same ch-space, 1 ch *, repeat from *-* 12 times in total, finish with 1 sl st in 3rd ch from beg of round. ROUND 5: Work ch 1, in first ch-space work 2 dc, 2 tr, 1 PICOT – see explanation above, 2 tr, 2 dc, 1 sc in next ch, * in next ch-space work 2 dc, 2 tr, 1 picot, 2 tr, 2 dc, 1 sc in next ch *, repeat from *-* 11 times in total, finish with 1 sl st in first ch = 12 leaves. ROUND 6: Work ch 1, * ch 6, 1 sc in sc and ch (from 5th and 4th round) *, repeat from *-* 12 times in total, finish with 1 sl st in first ch. ROUND 7: Work ch 4, * ch 3, 1 dc in next ch-space, ch 7, 1 dc in next ch-space, ch 3, 1 dc in same ch-space, 4 ch *, repeat from *-* 6 times in total, finish with 1 sl st in 4th ch. ROUND 8: Work ch 3, 3 dc in next ch-space, * 1 dc in next dc, 7 dc in next ch-space, 1 dc in next dc, 1 dc in next ch-space, ch 3, 1 dc in same ch-space, 1 dc in next dc, 7 dc in next ch-space *, repeat from *-* 5 times in total, 1 dc in next dc, 7 dc in next ch-space, 1 dc in next dc, 1 dc in next ch-space, ch 3, 1 dc in same ch-space, 1 dc in next dc, 4 dc in first ch-space, finish with 1 sl st in 3rd ch = 114 dc. REMEMBER THE CROCHET GAUGE! ROUND 9: Work ch 3, * 1 dc in every dc until ch-space, in ch-space as follows: 1 dc, ch 3, 1 dc *, repeat from *-* the entire round, finish with 1 sl st in 3rd ch = 126 dc. ROUND 10: Work ch 1, * ch 7, skip 6 dc, 1 sl st in next dc, ch 7, skip 6 dc, 1 sl st in next dc, ch 5, 1 sl st in next dc, ch 7, skip 6 dc, 1 sl st in next dc *, repeat from *-* 5 times in total, ch 7, skip 6 dc, 1 sl st in next dc, ch 7, skip 6 dc, 1 sl st in next dc, ch 5, 1 sl st in next dc, ch 7, skip 6 dc, 1 sl st in first ch. ROUND 11: Work ch 3, in every ch-space work 2 dc, ch 3, 2 dc, ch 1, finish with 1 sl st in 3rd ch. ROUND 12: Work ch 1, * in next ch-space work 2 dc, 2 tr, 1 picot, 2 tr, 2 dc, 1 sc in next ch *, repeat from *-* 24 times in total, finish with 1 sl st in first ch = 24 leaves. ROUND 13: Work ch 1, * ch 6, 1 sc in sc and ch (from 12th and 11th round) *, repeat from *-* 24 times in total, finish with 1 sl st in first ch. ROUND 14: Work ch 4, * ch 3, 1 dc in next ch-space, ch 7, 1 dc in next ch-space, ch 3, 1 dc in same ch-space, 4 ch *, repeat from *-* 12 times in total, finish with 1 sl st in 4th ch. ROUND 15: Work 3 ch - READ CROCHET INFO, work 4 dc in first ch-space (i.e. ch-space with 3 ch), now work dc in all ch-space with 7 ch from previous round, do not work in ch-space with 3 ch from previous round. Work * 8 dc in each of the next 7 ch-spaces, 9 dc in next ch-space *, repeat from *-* 2 times in total, 8 dc in each of the next 7 ch-spaces, 5 dc in last ch-space (i.e. ch-space with 4 ch) = 195 dc. ROUND 16: Work * 1 dc in each of the first 14 dc, 2 dc in next dc *, repeat from *-* 13 times in total = 208 dc. ROUND 17: Work * 2 dc in first dc, 1 dc in each of the next 15 dc *, repeat from *-* 13 times in total AT THE SAME TIME inc 1 dc extra on round = 222 dc. ROUND 18: Work ch 1, * ch 6, skip 5 dc, 1 sl st in next dc *, repeat from *-* 37 times in total, finish with 1 sl st in first ch. ROUND 19:Work as round 11 in A.1: Work ch 3, in every ch-space work 2 dc, ch 3, 2 dc, ch 1, finish with 1 sl st in 3rd ch. ROUND 20: Work as round 12 in A.1: Work ch 1, * in next ch-space work 2 dc, 2 tr, 1 picot, 2 tr, 2 dc, 1 ch *, repeat from *-* 37 times in total, finish with 1 sl st in first ch = 37 leaves. ROUND 21: Work as round 13 in A.1: Work ch 1, * ch 6, 1 sc in sc and ch (from 20th and 19th round) *, repeat from *-* 37 times in total, finish with 1 sl st in first ch. ROUND 22: Work as round 14 in A.1: Work ch 4, * ch 3, 1 dc in next ch-space, ch 7, 1 dc in next ch-space, ch 3, 1 dc in same ch-space, 4 ch *, repeat from *-* 18 times in total, work ch 3, 1 dc in last ch-space, ch 4, finish with 1 sl st in 4th ch. ROUND 23: Work 4 dc in first ch-space (i.e. ch-space with 3 ch), now work dc in all ch-space with 7 ch from previous round, do not work in ch-space with 3 ch from previous round. Work * 7 dc in next ch-space, 8 dc in next ch-space, 7 dc in next ch-space *, repeat from *-* 11 times in total, 8 dc in next ch-space, 8 dc in next ch-space, 7 dc in next ch-space, 4 dc in last ch-space (i.e. ch-space with 4 ch) = 273 dc. Then work piece back and forth. Work every row tog at the end of row with 1 sl st in 3rd ch from beg of row. Turn piece. ROW 24 (= WS): Work * 2 dc in next dc, 1 dc in each of the next 11 dc (= dc-group), A.2 *, repeat from *-* 13 times in total = 169 dc and 13 A.2. Turn piece. A.2 is repeated vertically until finished measurements. ROW 25 (= RS): Work A.2, 2 dc in first dc, 1 dc in each of the next dc in dc-group, * A.2, 2 dc in first dc in dc-group, 1 dc in each of the next dc *, repeat from *-* until 1 dc-group remains, 2 dc in first dc, 1 dc in each of the next dc = 182 dc. Turn piece. ROW 26: Work as row 24 = 195 dc (15 dc between every A.2). ROW 27: Work as row 25 = 208 dc (16 dc between every A.2). Repeat row 24-27 0-1-1 more time = 208-260-260 dc (= 16-20-20 dc between every A.2). Piece measures approx. 20-23-23 cm / 8"-9"-9" from middle and outwards. Now work arm holes as follows: ROW 28 (= from WS): Work 2 dc in first dc, 1 dc in each of the next 15-19-19 dc, A.2 as before, 2 dc in next dc, 1 dc in each of the next 15-19-19 dc, A.2, 54-62-62 loose ch (= right armhole), skip: 16-20-20 dc + A.2 + 16-20-20 dc + A.2, work * 2 dc in next dc, 1 dc in each of the next 15-19-19 dc, A.2 *, repeat from *-* 5 times in total, 2 dc in first dc, 1 dc in each of the next 15-19-19 dc, 54-62-62 loose ch (= left armhole), skip: A.2 + 16-20-20 dc + A.2 + 16-20-20 dc, work A.2, 2 dc in next dc, 1 dc in each of the next 15-19-19 dc, A.2 = 153-189-189 dc, 9 A.2 and 108-124-124 ch. ROW 29 (from RS): Work A.2, 2 dc in next dc, 1 dc in each of the next 16-20-20 dc, A.2, in ch-row (= left armhole) work as follows: 1 dc in each of the 54-62-62 ch, * 2 dc in next dc, 1 dc in each of the next 16-20-20 dc, A.2 *, repeat from *-* 5 times in total, 2 dc in next dc, 1 dc in each of the next 16-20-20 dc, in next ch-row (= right armhole) work as follows: 1 dc in each of the 54-62-62 ch, then work A.2, 2 dc in next dc, 1 dc in each of the next 16-20-20 dc, A.2, 2 dc in next dc, 1 dc in each of the next 16-20-20 dc = 270-322-322 dc and 9 A.2. ROW 30 (= from WS): Work 1 dc in each of the next 18-22-22 dc, A.2 as before, 1 dc in each of the next 18-22-22 dc, A.2, 1 dc in each of the next 18-22-22 dc, A.2 (adjust row according to the other repetitions), 1 dc in each of the next 18-22-22 dc, A.2, * 1 dc in each of the next 18-22-22 dc, A.2 *, repeat from *-* 5 times in total, 1 dc in each of the next 18-22-22 dc, A.2, 1 dc in each of the next 18-22-22 dc, A.2, 1 dc in each of the next 18-22-22 dc, A.2, 1 dc in each of the next 18-22-22 dc, A.2 = 234-286-286 dc and 13 A.2. Work pattern as before but now inc only on every row from RS until 52-52-60 rows have been worked in total = 377-429-481 dc (29-33-37 dc in every dc-group). Insert 4 markers in the piece as follows from WS: Work 29-33-37 dc, A.2, 14-16-18 dc, insert 1st marker, work 15-17-19 dc, * A.2, 29-33-37 dc *, repeat from *-* 4 times in total, insert 2nd marker here (1st-2nd marker = right front piece). Work A.2, 29-33-37 dc, A.2, 29-33-37 dc and A.2, insert 3rd marker here. * Work 29-33-37 dc, A.2 *, repeat from *-* 4 times in total, 15-17-19 dc, insert 4th marker. (3rd-4th marker = left front piece), 14-16-18 dc, A.2. dc between 1st and 4th marker are up towards neck. Fasten off. RIGHT FRONT PIECE: Now work right front piece between 1st and 2nd marker, beg from 2nd marker (i.e. from RS) = 131-149-167 dc and 4 A.2. Continue inc in dc-groups as before BUT do not inc in dc-groups in each side of front piece - AT THE SAME TIME dec 2 dc at beg of every row by CROCHET 3 dc TOG - see explanation above. Work until 10-12-12 cm / 4"-4 3/4"-4 3/4" over front piece have been worked, adjust to finish with 1 whole repetition of A.2. Fasten off. LEFT FRONT PIECE: Work left front piece between 3rd and 4th marker the same way as right front piece, beg from 4th marker (i.e. from RS). EDGE: Work an edge around the entire jacket as follows: Work the first 2 rounds of A.2, when working first round of A.2 over dc-rows, skip 2 dc-rows on each side of dc-group. Beg every round with 3 ch and finish with 1 sl st in 3rd ch. SLEEVES: Work back and forth from armhole and down, work every row tog with 1 sl st at the end of row. Insert 1 marker in piece, NOW MEASURE PIECE FROM HERE. Beg by working 86-94-102 dc evenly around the opening for sleeve, beg of row should be under sleeve. Then work 3 rows with 1 dc in every dc. Continue with 1 dc in every dc - AT THE SAME TIME dec differently in the different sizes as follows: READ DECREASE TIP! SIZE S/M: Dec 1 st in each side of piece alternately every 3rd and 2nd row 16 times in total = 54 dc. SIZE L/XL: Dec 1 st in each side of piece every other row 20 times in total = 54 dc. SIZE XXL/XXXL: Dec 1 st in each side of piece every other row 24 times = 54 dc. ALL SIZES: Work 1 dc in every dc until sleeve measures approx. 47 cm / 18½'', adjust so that next row is from WS. Then work the first 2 rounds of A.2 (= 6 repetitions in width). Fasten off. Work the other sleeve the same way. |
||||||||||||||||||||||||||||||||||||||||
Diagram explanations |
||||||||||||||||||||||||||||||||||||||||
|
||||||||||||||||||||||||||||||||||||||||

|
||||||||||||||||||||||||||||||||||||||||

|
||||||||||||||||||||||||||||||||||||||||

|
||||||||||||||||||||||||||||||||||||||||
|
Have you made this or any other of our designs? Tag your pictures in social media with #dropsdesign so we can see them! Do you need help with this pattern?You'll find tutorial videos, a Comments/Questions area and more by visiting the pattern on garnstudio.com. © 1982-2024 DROPS Design A/S. We reserve all rights. This document, including all its sub-sections, has copyrights. Read more about what you can do with our patterns at the bottom of each pattern on our site. |
||||||||||||||||||||||||||||||||||||||||


With over 40 years in knitting and crochet design, DROPS Design offers one of the most extensive collections of free patterns on the internet - translated to 17 languages. As of today we count 304 catalogs and 11422 patterns - 11417 of which are translated into English (US/in).
We work hard to bring you the best knitting and crochet have to offer, inspiration and advice as well as great quality yarns at incredible prices! Would you like to use our patterns for other than personal use? You can read what you are allowed to do in the Copyright text at the bottom of all our patterns. Happy crafting!
Comments / Questions (265)
Merci pour votre réponse mais du coup pour faire le 2eme rang de a2 sur les côtés des devants c est à dire sur les diminutions comment dois je faire 2b 3db picot 3db 2b puisque je n ai pas le 1er rang ? Je rappel que j ai fini le gilet sur le 1er rang de merci encore pour votre réponse 😍
30.03.2018 - 12:38DROPS Design answered:
Bonjour Virginie, si le cercle s'arrête avec le rang 1 de A.2, et si vous arrêtez les devants sur un rang 1 de A.2, vous pourrez crocheter la bordure en commençant par le rang 2 de A.2 le long du cercle et le long des devants. Bon crochet!
30.03.2018 - 12:46Bonsoir Je suis arrivée à la bordure mais j ai un soucis mes 2 devants finissent bien avec un a2 complet par contre le reste du tour c est à dire le rang 52 j ai fini par le 1er rang de a2 Donc comment dois je faire pour la bordure ? Je ne comprends pas comment faire coïncider le tour avec les 2 devant Merci d avance pour votre réponse 😘
30.03.2018 - 00:57DROPS Design answered:
Bonjour Virginie, dans l'idéal, il faudrait que le dernier tour des devants soit le même que pour le reste du cercle. Vous pouvez crocheter 1 tour supplémentaire pour les devants (= tour 1 de A.2) et ainsi terminer A.2 sur tout le cercle. Bon crochet!
30.03.2018 - 12:04Bonsoir Je suis arrivée au devant droit j ai bien compris que l on diminue a chaque début de rang mais concernant les augmentations est ce que l on augmente sur l endroit et l envers ou juste sur l endroit donc 1 rang sur 2 ? Merci d'avance pour votre réponse 😊
26.03.2018 - 23:46DROPS Design answered:
Bonjour Virginie, on continue à augmenter dans les groupes de brides comme avant, soit tous les rangs sur l'endroit, les diminutions se font elles au début de chaque rang. Bon crochet!
28.03.2018 - 14:59Bonjour Si je commence le devant droit 1 rang plus tôt, je me retrouve avec un décalage dans mes groupes de brides qui nécessitent une augmentation Par contre si je démarre au 1er marqueur au lieu du 2 ème, alors l'augmentation est alignée. Est ce donc logique de procéder ainsi ? Merci pour votre reponse !
23.03.2018 - 23:54DROPS Design answered:
Bonjour Mme Petit, les augmentations entre les groupes de motifs se continuent sur les devants tous les 2 rangs comme avant (sauf sur le 1er et le 2ème motif), vous pouvez donc continuer tranquillement, vous ne devez avoir aucun décalage entre les groupes de brides et les groupes de motifs qui doivent toujours s'aligner les uns au-dessus des autres. Bon crochet!
26.03.2018 - 10:52Ich habe die R 24 gehäkelt. 13 Stäbchen den Anfanfang von A2 2 Lm 2 Stb 3Lm 2 Stb 2Lm und wieder 13 Stäbchen bis zum Ende der Runde. Wenden. A2 nun bis zum fertigen Maß über A2 in der Höhe wdh. Jetzt geht es gleich mit R 25 weiter. Das Video war da nicht hilfreich. Es wurde nicht gewendet. Meine Frage lautet, wo bringe ich die Luftmaschen unter und die neuen Stb.Für das nächste A2 ? Ich hoffe, dass Sie mein Problem verstanden haben und mir weiterhelfen können.Grüße Petra Küsters
22.03.2018 - 10:37Bonjour Je viens de faire le rang 52. Or, mon motif A2 vient juste de redémarrer au 1er niveau (2m en l'air, 2 B,3m enl'air,2B). Est ce que cela n'est pas gênant sachant que c'est le dernier rang avant de démarrer les 2devants ? N'aurait il pas fallu faire sur ce rang 52 que des brides au lieu du 1er rang du motif A2 ? D'avance merci pour votre éclairage!
21.03.2018 - 13:05DROPS Design answered:
Bonjour Mme Petit, vous pouvez commencer les devants 1 rang plus tôt pour commencer un nouveau motif de A.2 sur les devants, et qu'ainsi la bordure finale tombera juste (= 2 rangs de A.2 au-dessus des A.2 tous terminés). Bon crochet!
21.03.2018 - 13:45Bonjour Je suis au rang 30 et au a2 sur les 64 brides . Je suis au 3eme rang de a2 sur le tour mais je ne vois pas où raccrocher la bride entre les 4ml puisque je n ai qu' un rang de bride ????? Ou accroche t on la bride ?
20.03.2018 - 00:02DROPS Design answered:
Bonjour Virginie, placez la bride au milieu de A.2 sur les 9 mailles de chaque motif ainsi: 4 ml, sautez 4 brides, 4 ml, 1 bride dans la bride suivante, sautez 4 brides. Bon crochet!
20.03.2018 - 09:07Tisztelt Cim! Sajnos a szegélynél elakadtam. Kérem legyen szíves segíteni, hogy az A2 minta első Körében, amikor a 2 láncszem,2 egyráhajtásos pálca, 3 lesz., megint 2 egyráhajtásos pálca,2 láncszem. Itt kezdődne újra az A2-es minta. 2 láncszemmel, nem horgolok közé pálcát? Szóval elakadtam. Kérem segítsen! Köszönettel Fodorné
13.03.2018 - 16:03DROPS Design answered:
Kedves Ilona, az A.2 mintában minden 9. szembe egy erp csoportot horgol. 1 erp csoport = 2 erp + 3 lsz + 2 erp. Vagyis a sort kört a következő módon kell horgolni: 2 lsz, az 5 szembe: ( 2 erp + 3 ls+2 erp). * 4 lsz, az előző sorban 8 szemet kihagyunk, a 9.szembe 1 erp csop.* Ism a *-* közötti részt, majd a kör végén 2 lsz. Sikeres kézimunkázást!
10.04.2018 - 00:58Leuk vest!! Ik ben aan het eind van toer 28. A.2=189 stokjes en die heb ik en ik ben aan het eind van mijn toer. Nu staat er 9 A.2 en 124 l...... maar waar haal ik die dan?
11.03.2018 - 20:40DROPS Design answered:
Hallo Astrid, Er staat = 153-189-189 stk, 9 A.2 en 108-124-124 l. dat is een samenvating van hoeveel van alles (stokjes, lossen en A.2) je op de toer hebt, dus die hoef je dan niet meer te haken.
12.03.2018 - 08:48Merci pour votre réponse mais justement dans l interval des 21 brides si je saute 6 brides je ne tombe pas sur la bride avant les 5ml ? Je tombe dans l arceau du tour précédent ? Je suis bloquée 🤔 Merci pour votre réponse
07.03.2018 - 14:46