
Popular categories
Looking for a yarn?


Comments / Questions (45)
![]() Jeanne wrote:
Jeanne wrote:
What does “insert a strand” mean? Do I knit with a different yarn to be carried along? I’m an experienced knitter and this term is unfamiliar to me.
21.02.2026 - 12:48DROPS Design answered:
Hi Jeanne, The "strands" are marker-threads which are inserted in addition to the other markers and need to be noticeably different. The markers are for increasing for raglan, the marker-threads for the pattern and should match the squares with arrows in the diagrams. Regards, Drops Team.
23.02.2026 - 07:27
![]() Loronda wrote:
Loronda wrote:
How do you prevent the yo increase from forming a hole? Can I use an alternative increase method?
19.01.2026 - 22:09DROPS Design answered:
Hi Loronda, You knit the yarn overs twisted on the next row (through the back loop). If you find this increase method tricky, you can knit 1 in both the front and back loops of the same stitch (instead of making yarn overs). Whichever method you use, the new stitches are worked into the pattern on the next row. Regards, Drops Team.
20.01.2026 - 08:04
![]() Genevieve Cabrol wrote:
Genevieve Cabrol wrote:
Non, j'ai 23 + 4 = 27 C'est 23 devant sur le demi-devant
07.12.2025 - 20:57DROPS Design answered:
Bonjour Mme Cabrol, les 19 cm de l'empiècement correspondent au devant, pas au dos, autrement dit, sans les rangs raccourcis de la réhausse, vous augmentez pour l'empiècement 15 x tous les 2 rangs + 6 x tous les 4 rangs = 54 rangs / 2,8 de tension = 19.2 cm, comme dans le schéma. Les 4 cm en haut du schéma correspondent à la hauteur d'épaules. Bon tricot!
08.12.2025 - 10:05
![]() Genevieve Cabrol wrote:
Genevieve Cabrol wrote:
En taille M il est indiqué que l’empiècement fait environ 19 cm. hors 5 rangs avant de démarrer les augmentations + 15 augmentations tous les deux rangs (30 rangs) + 6 augmentations tous les 4 rangs (24 rangs) .. j'arrive à 59 rangs et plutot 23 cm depuis le rang de montage ... c'est 28 rangs pour 10 cm dans l’échantillon.
07.12.2025 - 20:14DROPS Design answered:
Bonjour Genevieve, c'est bien, regardez le dessin schematique en bas de page. 19+4=23 cm. Bon tricot!
07.12.2025 - 20:20
![]() Carol McMillan wrote:
Carol McMillan wrote:
What is meant by "Then inc 1 st by making a YO on each side of the middle 2 sts in each side (marker is in the middle of these sts), P YO twisted on next row (= 4 sts inc)". Does it mean knit to 2 sts before marker YO, K2, slip marker, K2, YO? OR does it mean knit to 1 st before marker YO, K1, slip marker, K1, YO? OR does it mean knit to marker YO, slip marker, YO?
06.09.2024 - 01:25DROPS Design answered:
Dear Carol, the marker is not inside a stitch, but between the stitches; the stitches on each side of the marker are the middle stitches. So you work as follows: knit to 1 stitch before marker, yarn over, knit 1, slip marker, knit 1, yarn over. Happy knitting!
08.09.2024 - 18:12
![]() Carol McMillan wrote:
Carol McMillan wrote:
Hello, I have a problem with the increases before and after raglan. I am size XXL. I don't a problem with the increases for the Fronts or back but only with the sleeves. So for the sleeves I start with 15 sts ( work 8 sts, insert a strand in the last st , work 7 sts) Sleeve Increasing: 15 sts at the start with increases every other row 25 times, then every 4th row 2 times. = 15+50+4 = 69 sts) How can I get 77 sts as per pattern after increasing?
06.09.2024 - 00:19DROPS Design answered:
Dear Carol, the remaining 8 stitches are the 4 sts between markers on each side of the sleeves, which are added to the sleeve stitches. Happy knitting!
08.09.2024 - 18:09
![]() Brittinger wrote:
Brittinger wrote:
Ökning: När jag kommer fram till första markören ökar jag 1m stickar 3 m och är då framme vid nästa markör. Där ökar jag 1 m. Stickar sedan till markören för ärm då jag ökar 1 m före och 1 m efter markören. Är det så man ska göra? Finns ju ingen möjlighet att få till mönstret???? Vad används diagram A3 till? Tycker beskrivningen är mycket otydlig och tyvärr även era svar men hoppas nu på mer tydlighet och hjälp!
21.12.2023 - 15:30DROPS Design answered:
Hej Brittinger, ja du ökar (stickar den i färgen enligt mönsteret), stickar 3 m, ökar och stickar den i mönster... osv, mönstret börjar vid varje raglanövergång och fortsätter alltså inte hela vägen runt!
02.01.2024 - 08:51
![]() Brittinger wrote:
Brittinger wrote:
Det ökas 1 m genom att göra ett omslag före och efter de 4 m som sitter mellan markörerna på framst/bakst och ärmarna. Omslagen stickas vridet räta på nästa v. De ökade m stickas fortlöpande in i mönstret. Hur görs ökningen på ärmen? Vart gör jag den? Samtidigt som ökningen för raglan? Förklara tydligt, tack!
12.12.2023 - 13:27DROPS Design answered:
Hej Brittinger, Markøren sidder i overgangen mellem ryg & forstykke og ærmerne, så den ene af de 2 økninger er på ærmet og den anden er på ryg eller forstykket. Det er selve raglanøkningen som bliver til nye masker både på ærmet og på ryg og forstykke. Se vores video om hvordan man øker til raglan, du finder den nederst i mønsteret :)
13.12.2023 - 07:50
![]() Brittinger wrote:
Brittinger wrote:
Hur ska mönstret A2 bli rätt när jag ökar 2+2 msk på höger sida och 2+2 msk på vänster sida vartannat varv för ragglan. Finns ju ingen möjlighet att följa mönstret. Förklara tydligt hur detta ska göras!
11.12.2023 - 19:07DROPS Design answered:
Hej Brittinger, jo du fortsätter mönstret som tidigare, och så bygger du på det befintliga mönstret efterhand som du får nya maskor. Så är du på en rad med 3mörka, 1ljus,3mörka,1 ljus, och har precis stickat 2 mörka, så fortsätter du med 1 mörk (så du har 3) osv :)
12.12.2023 - 10:36
![]() Tanja wrote:
Tanja wrote:
Hallo! Wenn es beim höheren Halsrand heisst" an der hinteren Mitte anfangen", heisst das, ich soll nach der vorherigen Runde den Faden abschneiden und mittig neu beginnen?
30.09.2022 - 07:04DROPS Design answered:
Liebe Tanja, nach der letzten verkürzten Reihen, wenden Sie und stricken Sie alle Maschen bis Ende dieser Reihen, wenden Sie und die Reihe über alle Maschen stricken, wenden Sie und dann wie erklärt unter JACKE weiterstricken. Viel Spaß beim stricken!
30.09.2022 - 08:27
|
|||||||
Silver Dream Cardigan#silverdreamcardigan |
|||||||
 |
 |
||||||
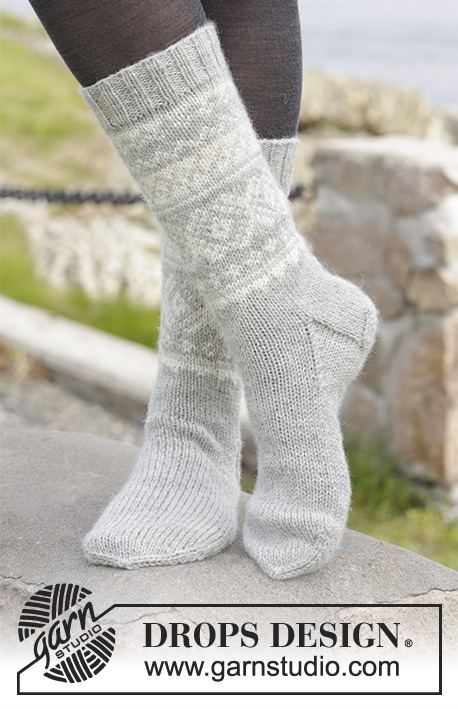
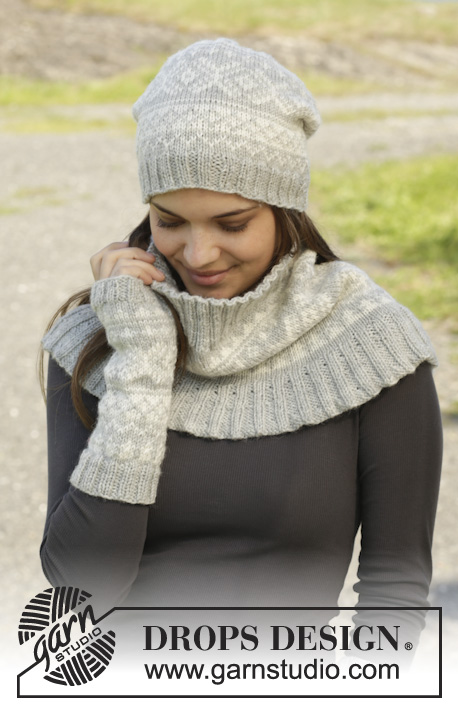
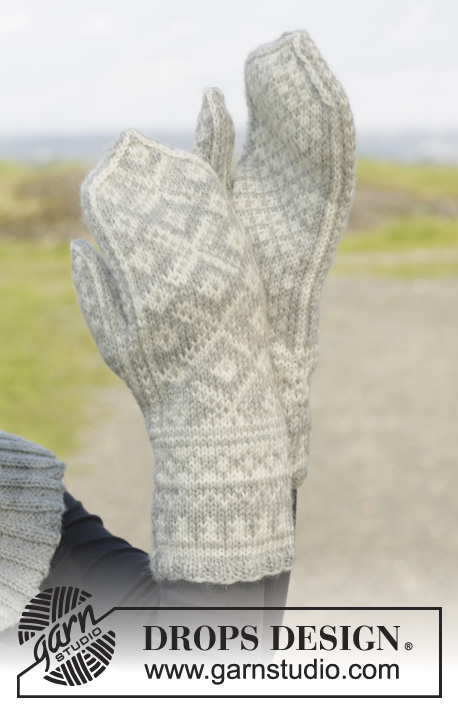
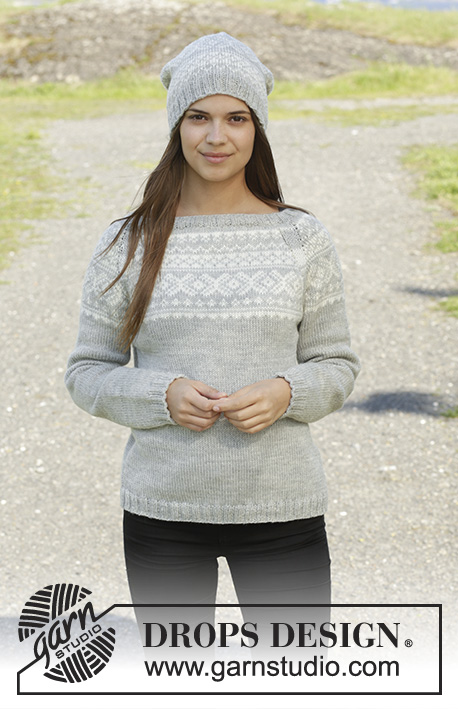
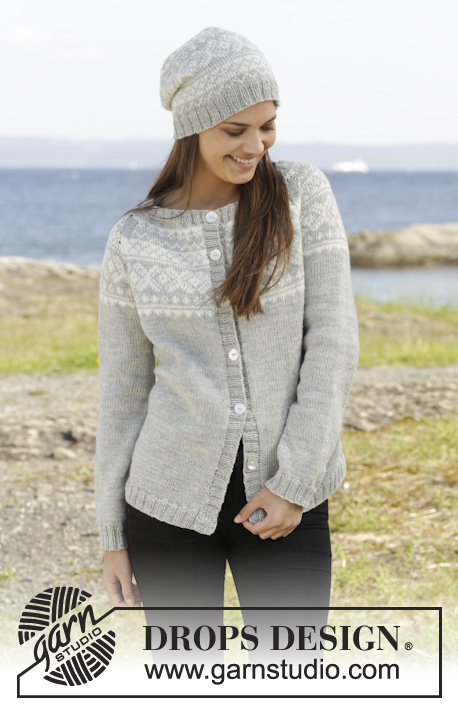
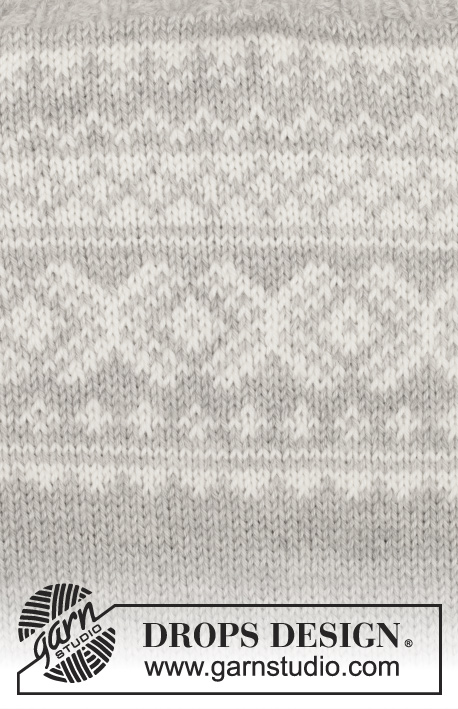
Knitted DROPS jacket and hat with Norwegian pattern, worked top down in ”Karisma”. Size: S - XXXL.
DROPS 157-1 |
|||||||
|
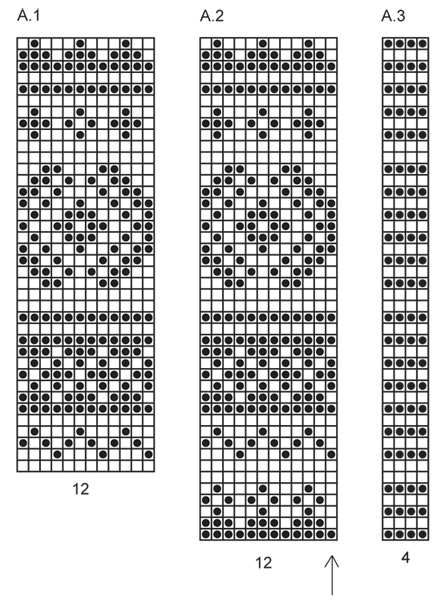
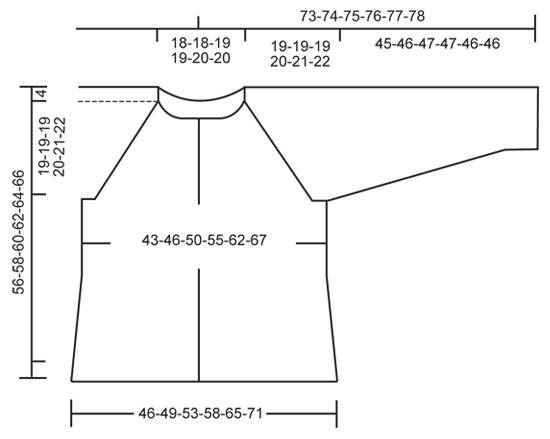
GARTER ST (back and forth on needle): K all rows. 1 ridge = K2 rows. PATTERN: See diagrams A.1-A.3. Work entire pattern in stockinette st. ELEVATION: Work an elevation in the back of neck as follows: NOTE! On every turn in the middle of piece slip 1st st, tighten yarn and continue to work. Beg mid back and work until 22-25-28-29-29-31 sts remain, turn, tighten yarn and work until 22-25-28-29-29-31 sts remain in the other side. Turn, tighten yarn and work until 37-41-46-49-49-53 sts remain, turn, tighten yarn and work until 37-41-46-49-49-53 sts remain in the other side. Turn, tighten yarn and work until 53-58-65-70-70-76 sts remain, turn, tighten yarn and work until 53-58-65-70-70-76 sts remain in the other side. INCREASE TIP (applies to raglan): Inc 1 st by making a YO before and after the 4 sts between markers on front piece/back piece and sleeves. K YO twisted on next row. Work the inc sts in the pattern. PATTERN TIP: Diagram A.3 shows how to work the 4 raglan sts to avoid large spaces between sts. After diagram work piece with light pearl gray until finished. ---------------------------------------------------------- JACKET: Worked back and forth on circular needle, top down. Work neck edge and band at the end. Cast on 111-111-115-119-123-123 sts (includes 1 edge st in GARTER ST - see explanation above) on circular needle size 4 mm / US 6 with light pearl gray. P 1 row from WS. Continue with stockinette st with 1 edge st in garter st in each side until finished measurements - AT THE SAME TIME on next row inc 12-28-36-40-36-52 sts evenly = 123-139-151-159-159-175 sts. P 1 row from WS. Then work ELEVATION - see explanation above - in the neck. REMEMBER THE GAUGE! Then work 2 rows over all sts, next row is from RS. Work 1 row and at the same time insert 8 markers and 5 strands in the piece as follows: Work 22-25-28-29-29-31 sts, insert a marker after these sts and insert a strand in the 2nd st from beg (= mid front on right front piece). Work 4 sts, insert a marker, work 6-7-7-8-8-10 sts, insert a strand in the last st on right needle (= mid st on sleeve). Work 5-6-6-7-7-9 sts, insert a marker. Work 4 sts, insert a marker, work 21-24-27-28-28-30 sts, insert a strand in the last st on right needle (= middle of back piece). Work 20-23-26-27-27-29 sts, insert a marker. Work 4 sts, insert a marker, work 6-7-7-8-8-10 sts, insert a strand in the last st on right needle (= middle of sleeve). Work 5-6-6-7-7-9 sts, insert a marker. Work 4 sts, insert a marker. Work 22-25-28-29-29-31 sts, insert a strand in next to last st (= mid front on left front piece). READ ALL OF THE FOLLOWING SECTION BEFORE CONTINUING: Now work PATTERN according to diagram A.2 - READ PATTERN TIP! NOTE: St with strand on back piece, front piece and sleeves should fit st with arrow in diagram. Count out towards the side (i.e. the pattern will not fit in transitions between body and sleeves). AT THE SAME TIME inc for raglan in every transition between body and sleeves as follows - READ INCREASE TIP: ON BODY: Inc every round 0-0-0-2-10-14 times in total, every other round 14-15-17-19-20-20 times in total and then every 4th round 6-6-5-4-2-2 times in total (= 81-89-97-105-119-131 sts on back piece and 42-46-50-54-61-67 sts on each front piece) ON SLEEVE: Inc every other round 14-15-19-20-25-23 times in total and every 4th round 6-6-4-4-2-4 times in total (= 59-63-67-71-77-81 sts on sleeve). Piece measures approx. 19-19-19-20-21-22 cm / 7½"-7½"-7½"-8"-8¼"-8¾" from cast-on edge at the front, now measure piece from here! After all inc for raglan, there are 283-307-331-355-395-427 sts on needle. Work next row as follows from RS: Work the first 42-46-50-54-61-67 sts (= front piece), slip the next 59-63-67-71-77-81 sts on stitch holder (= sleeve), cast on 8-8-8-10-10-10 new sts, work 81-89-97-105-119-131 sts (= back piece), slip the next 59-63-67-71-77-81 sts on stitch holder (= sleeve), cast on 8-8-8-10-10-10 new sts, work the remaining 42-46-50-54-61-67 sts (= front piece) = 181-197-213-233-261-285 sts. Insert 1 marker in the middle of the 8-8-8-10-10-10 new sts under each sleeve. Then work in stockinette st with 1 edge sts in garter st in each side as before until piece measures approx. 36-37-38-39-40-41 cm / 14¼"-14½"-15"-14¼"-15¾"-16⅛" from cast-on edge at the front. Then inc 1 st by making a YO on each side of the middle 2 sts in each side (marker is in the middle of these sts), P YO twisted on next row (= 4 sts inc). Repeat inc every 4-4-4-5-5-5 cm / 1½"-1½"-1½"-2"-2"-2" 2 more times (= 3 times in total) = 193-209-225-245-273-297 sts. Work until piece measures 52-54-56-58-60-62 cm / 20½"-21¼"-22"-22¾"-23⅝"-24⅜" from cast-on edge at the front. On next row from RS, inc 7 sts evenly in all sizes = 200-216-232-252-280-304 sts. Switch to circular needle size 3.5 mm / US 4. Work rib as follows from WS: 1 edge st in garter st, * P 2, K 2 *, repeat from *-* until 3 sts remain. Finish with P 2 and 1 edge st in garter st. Work until rib measures approx. 4 cm / 1½". Bind off with K over K and P over P. SLEEVE: Work piece in the round on circular needle in stockinette st. Slip sts from one stitch holder back on circular needle size 4 mm / US 6 (= 59-63-67-71-77-81 sts). Work in stockinette st and cast on 8-8-8-10-10-10 new sts at the end of row = 67-71-75-81-87-91 sts. Insert a marker in the middle of the new sts under the sleeve. When piece measures approx. 3 cm / 1", dec 1 st on each side of the middle 2 sts under sleeve (marker is in the middle of these 2 sts). Switch to double pointed needles when needed. Repeat dec every 3½-3½-3-2½-2-2 cm / 1¼"-1¼"-1"-⅞"-¾"-¾" 8-9-10-12-15-16 more times (= 9-10-11-13-16-17 times in total) = 49-51-53-55-55-57 sts. When piece measures 41-42-43-43-42-42 cm / 16"-16½"-17"-17"-16½"-16½", inc 7-5-7-5-9-7 st evenly = 56-56-60-60-64-64 sts. Switch to double pointed needles size 3.5 mm / US 4 and work rib (K 2, P 2) until piece measures 45-46-47-47-46-46 cm / 17¾"-18"-18½"-18½"-18"-18" from where new sts were cast on. Bind off with K over K and P over P. Work the other sleeve the same way. LEFT BAND: Work band back and forth on circular needle size 3.5 mm / US 4. Pick up 120-124-128-132-136-140 sts, (no of sts must be divisible by 4) inside 1 edge st on left front piece with light pearl gray. Work rib as follows from WS: 1 st in garter st, * P 2, K 2 *, repeat from *-*, finish with P 2 and 1 st in garter st. Then work K over K and P over P until rib measures 3 cm / 1". Bind off with K over K and P over P. RIGHT BAND: Work as left band but when band measures approx. 1.5 cm / ½", dec for 5-5-6-6-6-6 buttonholes evenly (dec for buttonholes in P sections seen from RS). 1 buttonhole = P 2 tog and make 1 YO – top buttonhole should be approx. 6 cm / 2⅜" from the top (there should also be 1 buttonhole on neck edge), the other buttonholes should be approx. 8 cm / 3⅛" apart. The distance after last buttonhole down towards edge is larger. NECK EDGE: Beg at the edge on right band at the top. Use circular needle size 3.5 mm / US 4 and pick up 128-128-132-136-140-140 sts (no of sts must be divisible by 4) with light pearl grey around the entire edge and over left band. Work rib as follows (1st row = WS): 1 st in garter st, * P 2, K 2 *, repeat from *-*, finish with P 2 and 1 st in garter st. Continue with K over K and P over P with 1 st in garter st in each side of piece. When neck edge measures 1 cm / ⅜", dec for 1 buttonhole over the other buttonholes on right band. Continue rib until neck edge measures approx. 2 cm / ¾". Bind off with K over K and P over P. ASSEMBLY: Sew holes tog under sleeves and fasten yarn. ---------------------------------------------------------- HAT: Worked in the round on circular needle, switch to double pointed needles when needed. Cast on 116 sts with light pearl gray on circular needle size 3.5 mm / US 4. Work rib = K 2/P 2 until piece measures approx. 4 cm / 1½". Switch to circular needle size 4 mm / US 6. K 1 round with pearl gray while AT THE SAME TIME dec 8 sts evenly = 108 sts. Then work pattern according to diagram A.1 (= 9 repetitions on round). REMEMBER THE GAUGE! When A.1 has been worked 1 time vertically, continue with light pearl gray and stockinette st. Work 1 round AT THE SAME TIME insert 9 markers in the hat with 12 sts between every marker. On next round, dec 1 st after every marker by K 2 tog (= 9 sts dec). Repeat dec every other round 10 times in total = 18 sts. On next round K tog all sts 2 by 2 = 9 sts. Cut the yarn and pull it through the remaining sts, tighten tog and fasten. The hat measures approx. 25 cm / 9¾" vertically. |
|||||||
Diagram explanations |
|||||||
|
|||||||
 |
|||||||
 |
|||||||
Have you finished this pattern?Tag your pictures with #dropspattern #silverdreamcardigan or submit them to the #dropsfan gallery. Do you need help with this pattern?You'll find 33 tutorial videos, a Comments/Questions area and more by visiting the pattern on garnstudio.com. © 1982-2026 DROPS Design A/S. We reserve all rights. This document, including all its sub-sections, has copyrights. Read more about what you can do with our patterns at the bottom of each pattern on our site. |
|||||||


With over 40 years in knitting and crochet design, DROPS Design offers one of the most extensive collections of free patterns on the internet - translated to 17 languages. As of today we count 324 catalogs and 12245 patterns - 12235 of which are translated into English (US/in).
We work hard to bring you the best knitting and crochet have to offer, inspiration and advice as well as great quality yarns at incredible prices! Would you like to use our patterns for other than personal use? You can read what you are allowed to do in the Copyright text at the bottom of all our patterns. Happy crafting!
Post a comment to pattern DROPS 157-1
We would love to hear what you have to say about this pattern!
If you want to leave a question, please make sure you select the correct category in the form below, to speed up the answering process. Required fields are marked *.