
Popular categories
Looking for a yarn?


Comments / Questions (33)
Lynn wrote:
I'm just about to start this lovely cardigan. In the very start of the pattern where it says 'Work 3 ridges in garter stitch' I take it that means 6 rows?!
13.09.2018 - 12:05DROPS Design answered:
Dear Lynn, yes that's right, to work 1 ridge you will work 2 rows with knitting stitches, to get the 3 ridges, you will work 6 rows with knitting stitches. Happy knitting!
13.09.2018 - 13:13
![]() Pia Wettergren wrote:
Pia Wettergren wrote:
Kommer rettelse med ved print aaf opskrift?
17.06.2018 - 17:34DROPS Design answered:
Hej Pia, ja opskriften er rettet på nettet og det er den aktuelle og rettede opskrift som kommer ved print af opskrift. God fornøjelse!
18.06.2018 - 10:47
![]() Marie wrote:
Marie wrote:
Hej jag har stickat denna i färg nr 26. Har ni någon knapp, helst pärlemor och i matchande färg som passar .
04.05.2018 - 13:31DROPS Design answered:
Hei Marie. Her er en link til knappene våre, så kan du se hva du syntes passer best. God fornøyelselink
07.05.2018 - 13:06Raske wrote:
Hello! Love this pattern, but have a question. To end yoke, I stitch in pattern, then place left sleeve stitches on holder, then cast on new stitches under left sleeve, then stitch stitches for the back. The next instruction is to place right sleeve stitches onto holder, then cast on new stitches. Shouldn't I first cast on new stitches for under right sleeve, then place right sleeve stitches onto holder? Thanks!
25.06.2017 - 17:06DROPS Design answered:
Dear Raske, thank you for your question. Both sides, when separating the sleevs from the stitches on the body, you should first put the stitches that will later become the sleeves on a stitch holder or a piece of yarn, and then cast on the stitches that will help to form the underarm. I hope this helps, Happy Knitting!
25.06.2017 - 19:48
![]() Lenka wrote:
Lenka wrote:
Dobrý den koukám na ty návody na raglán svetry. Prosím vás to je pletené z hora od ramene? To nabírání ok mi tak připadá,jelikož kdyby to bylo od spodu od pasu tak přece musím ujímat ne?No nevím nejsem z toho ani trochu moudá.Lenka
07.03.2017 - 07:51DROPS Design answered:
Dobrý den, Lenko, ano tento svetr je pletený shora, od průkrčníku a ramen směrem k dolnímu okraji. Hodně zdaru! Hana
23.09.2017 - 14:38
![]() Claudia wrote:
Claudia wrote:
Hallo....hier meine nächste Frage:-)) Ich habe jetzt die zweite oben genannte Zunahme (19 x) fertiggestrickt. Was bedeutet jetzt aber.....danach in jeder 2. Hin-R. (= in jeder 4. R.)???? Jede 2. Hin-R. bedeutet für mich von 4. Reihen in der 3. Reihe zunehmen Wenn ich das dann einmal mache habe ich aber nur 314 M und eine Länge von ca. 18,5 cm LG Claudia
02.02.2017 - 14:35DROPS Design answered:
Liebe Claudia, jede 2. Hin-Reihe bedeutet jede 4. Reihe, dh: 1 R mit Zunahmen von der Vorderseite, dann 3 Reihe ohne Zunahmen stricken, dann bei der nächsten Reihe (= 4. Reihe) zunehmen. Vergessen Sie nicht, Ihre Maschenprobe zu beachten. Viel Spaß beim stricken!
02.02.2017 - 16:37
![]() Claudia wrote:
Claudia wrote:
Wie geht das mit dem Knopfloch. Also in der Hinreihe werden zwei zusammen gestrickt und ein Umschlag gemacht. Was mache ich mit dem Umschlag auf der Rückreihe....stricken oder fallen lassen. Wobei, wenn ich ihn fallen lasse, ja eine Masche dann in der nächsten Reihe zu wenig ist???? Danke im voraus LG Claudia
30.01.2017 - 16:41DROPS Design answered:
Liebe Claudia, bei der nächsten Reihe sollen Sie den Umschlag stricken, so daß Sie die genaue Maschenanzahl haben. Viel Spaß beim stricken!
30.01.2017 - 17:51
![]() Anna-Maria Johansson wrote:
Anna-Maria Johansson wrote:
Hej! Jag stickar stek L och har nu stickat färdigt oket, ökat 2x12 för sömmen under ärmarna och gjort första ökningen efter 4 cm. Jag har då 236 m, enligt mönstret ska jag ha 240 m. Antalet maskor stämmer med det som ska vara enligt mönster när jag börjar på fram- och bakstycke (110+61+61=232 m). Jag förstår mönstret som att jag efter 4 cm ska öka 2 maskor i varje sida=4 m. 232+4=236.
13.08.2016 - 14:00DROPS Design answered:
Hej. Det var ett fel i mönstret som nu har rättats. Tack för info! Mvh DROPS Design
18.08.2016 - 14:37Kaho wrote:
Thank you for this elegant pattern and I really love it. I have started knitting it, however I have a question about the yoke knitting. I work in L size, according to the description: "work 54 sts, turn, work 59 sts, turn. Continue back and forth over 5 sts more on every turn until 75 sts are worked." I wonder why the calculation is 75? If I work with according the description, the calculation should be 74 sts right?(54, 59, 64, 69,74) is there any other detail that I didn't notice?
16.10.2015 - 07:57DROPS Design answered:
Dear Mrs Kaho, your question has been forwarded to our Design team. Thank you for your patience.
02.03.2016 - 09:54
![]() Lena Larsson wrote:
Lena Larsson wrote:
Mönstret för mosstickningen verkar saknas. Eller ska jag utgå från att det är helt vanlig mosstickning? Lena
23.09.2015 - 19:51DROPS Design answered:
Hej Lena, Mosstickningen stickar du enligt A.1 nederst i beskrivningen. Lycka till!
24.09.2015 - 09:06
|
|||||||
Come Here Cardigan#comeherecardigan |
|||||||
|
|
|||||||
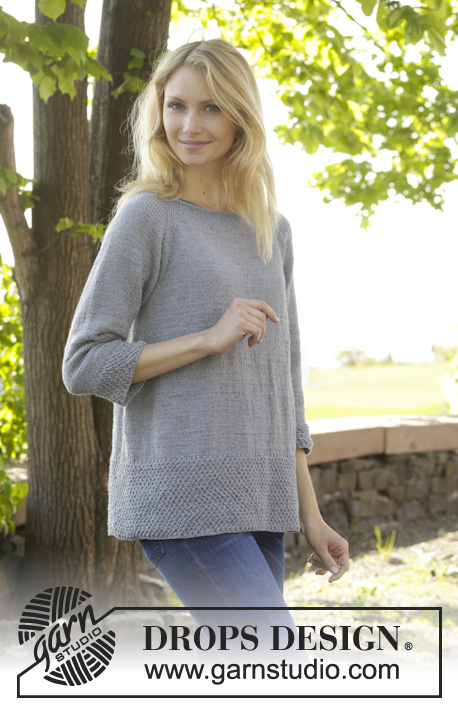
Knitted DROPS jacket with raglan and seed st, worked top down ”Cotton Merino”. Size: S - XXXL.
DROPS 157-35 |
|||||||
|
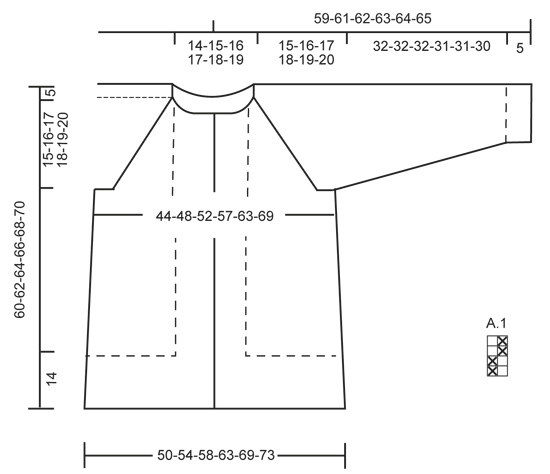
GARTER ST (back and forth on needle): K all rows. 1 ridge = K2 rows. PATTERN (double seed st vertically): See diagram A.1. The diagram shows all rows in pattern seen from RS. RAGLAN: All inc are done from RS. Inc 2 sts on each side of every raglan as follows (= 16 sts inc): Inc as follows before 4 sts in stockinette st and marker: K 2 in the next 2 sts (i.e. work in front and back loop of st) = 2 sts inc. Inc as follows after marker and 2 sts in stockinette st: K 2 in the next 2 sts (i.e. work in front and back loop of st) = 2 sts inc. Inc 1 st on each side of every raglan as follows (= 8 sts inc): Inc as follows before 2 sts in stockinette st and marker: 1 YO, 2 sts in stockinette st. Inc after marker as follows: 2 sts in stockinette st, 1 YO. P YOs twisted on next row to avoid holes. DECREASE TIP: Dec as follows before marker: Work until 3 sts remain before marker, K 2 tog, K 1. Dec as follows after marker: K 1, slip 1 st as if to K, K 1, psso. BUTTONHOLES: Dec for buttonholes on right band. 1 buttonhole = K tog third and fourth st from edge and make 1 YO. Dec for buttonholes when piece measures (measured from cast-on edge): SIZE S: 2, 11 and 20 cm / ¾", 4½", 8" SIZE M: 2, 11 and 20 cm / ¾", 4½", 8" SIZE L: 2, 11 and 20 cm / ¾", 4½", 8" SIZE XL: 2, 12 and 21 cm / ¾", 4¾", 8¼" SIZE XXL: 2, 12 and 21 cm / ¾", 4¾", 8¼" SIZE XXXL: 2, 12 and 21 cm / ¾", 4¾", 8¼" ---------------------------------------------------------- JACKET: Work jacket back and forth, top down on circular needle. Work sleeve in the round on circular needle/double pointed needles. YOKE: Cast on 114-118-122-126-130-134 sts on circular needle size 3.5 mm / US 4 with Cotton Merino. Work 3 ridges in GARTER ST – see explanation above, AT THE SAME TIME on row from RS in 2nd ridge inc 9-14-18-22-29-35 sts evenly. Repeat inc in 3rd ridge = 132-146-158-170-188-204 sts. Switch to circular needle size 4 mm / US 6. Then work an elevation in back of neck in stockinette st as follows, beg from RS: Work86-97-106-115-128-140 sts, turn, work 40-48-54-60-68-76 sts, turn, work 45-53-59-65-73-81 sts, turn. Continue back and forth over 5 sts more on every turn until 60-68-74-80-88-96 sts are worked, turn and work the rest of row. Work 1 row in stockinette st from WS. Now work as follows: A.1 over the first 20-22-26-28-32-36 sts, 5-6-5-6-6-6 sts in stockinette st, insert a marker, 22-23-23-23-24-24 sts in stockinette st, insert a marker, 38-44-50-56-64-72 sts in stockinette st, insert a marker, 22-23-23-23-24-24 sts in stockinette st, insert a marker, 5-6-5-6-6-6 sts in stockinette st, A.1 over the remaining 20-22-26-28-32-36 sts. Remember BUTTONHOLES - see explanation above. REMEMBER THE GAUGE! Continue with A.1 and stockinette st, AT THE SAME TIME on next row from RS beg inc for RAGLAN – see explanation above! Inc 2 sts on each side of every marker on every row from RS 1-1-1-2-2-3 times in total. Then inc 1 st on each side of every marker on every row from RS 18-19-21-21-23-23 times in total, and on every other row from RS 1 time in all sizes = 300-322-350-378-412-444 sts. Piece measures 20-21-22-23-24-25 cm / 8"-8¼"-8¾"-9"-9½"-9¾" from shoulder. Now work as follows: Work the first 46-50-55-60-66-72 sts, slip the next 64-67-71-75-80-84 sts on a stitch holder (= sleeve), cast on 12 new sts under left sleeve (insert a marker in the middle of these new sts), work the next 80-88-98-108-120-132 sts, slip the next 64-67-71-75-80-84 sts on a stitch holder (= sleeve), cast on 12 new sts under right sleeve (insert a marker in the middle of these new sts), work the remaining 46-50-55-60-66-72 sts on needle. NOW MEASURE THE PIECE FROM HERE. BODY: There are now 92-100-110-120-132-144 sts for back piece and 52-56-61-66-72-78 sts for each front piece. Continue with stockinette st and A.1 as before. NOTE: Work the new sts under each sleeve in stockinette st. When piece measures 4 cm / 1½", inc 2 sts in each side as follows: Work until 1 st before marker, 1 YO, 2 sts in stockinette st, 1 YO, continue as before over back piece until 1 st remains before next marker, 1 YO, 2 sts in stockinette st, 1 YO, work the rest of row. NOTE: On next row work YOs twisted to avoid holes. Repeat inc every 2½-2½-3-3-3-3½ cm / ⅞"-⅞"-1⅛""-1⅛""-1⅛"-1¼" 6-6-5-5-5-4 more times = 224-240-256-276-300-320 sts. When all inc are done and piece measures 26-27-28-29-30-31 cm / 10¼"-10⅝"-11"-11⅜"-11¾"-12¼", continue with A.1 over all sts. When piece measures 40-41-42-43-44-45 cm / 15¾"-16⅛"-16½"-17"-17¼"-17¾", bind off with K over K and P over P. SLEEVE: Work sleeve in stockinette st in the round on circular needle/double pointed needles. There are 64-67-71-75-80-84 sts for each sleeve. Slip sts from stitch holder back on circular needle/double pointed needles size 4 mm / US 6 and cast on 12 new sts under sleeve = 76-79-83-87-92-96 sts. Work in stockinette st in the round, AT THE SAME TIME insert a marker in the middle of the new sts under sleeve (i.e. 6 sts on each side of marker). NOW MEASURE THE PIECE FROM HERE. When piece measures 4 cm / 1½", dec 1 st on each side of marker - READ DECREASE TIP. Repeat dec approx. every 2-2-2-1½-1½-1½ cm / ¾"-¾"-¾"-½"-½"-½" 11-11-12-13-15-15 more times = 52-55-57-59-60-64 sts. When sleeve measures 32-32-32-31-31-30 cm / 12½"-12½"-12½"-12¼"-12¼"-11¾", dec 0-1-1-1-0-0 sts = 52-54-56-58-60-64 sts. Continue with A.1 over all sts. Bind off when sleeve measures 37-37-37-36-36-35 cm / 14½"-14½"-14½"-14¼"-14¼"-13¾". Work the other sleeve the same way. ASSEMBLY: Sew the holes under the sleeves. Sew buttons on left band approx. 2 cm / ¾" in from edge. |
|||||||
Diagram explanations |
|||||||
|
|||||||
 |
|||||||
Have you finished this pattern?Tag your pictures with #dropspattern #comeherecardigan or submit them to the #dropsfan gallery. Do you need help with this pattern?You'll find 24 tutorial videos, a Comments/Questions area and more by visiting the pattern on garnstudio.com. © 1982-2026 DROPS Design A/S. We reserve all rights. This document, including all its sub-sections, has copyrights. Read more about what you can do with our patterns at the bottom of each pattern on our site. |
|||||||


With over 40 years in knitting and crochet design, DROPS Design offers one of the most extensive collections of free patterns on the internet - translated to 17 languages. As of today we count 324 catalogs and 12290 patterns - 12280 of which are translated into English (US/in).
We work hard to bring you the best knitting and crochet have to offer, inspiration and advice as well as great quality yarns at incredible prices! Would you like to use our patterns for other than personal use? You can read what you are allowed to do in the Copyright text at the bottom of all our patterns. Happy crafting!
Post a comment to pattern DROPS 157-35
We would love to hear what you have to say about this pattern!
If you want to leave a question, please make sure you select the correct category in the form below, to speed up the answering process. Required fields are marked *.