
Popular categories
Looking for a yarn?


Comments / Questions (170)
![]() Sif wrote:
Sif wrote:
Jeg er lige startet og har sat mærketråde. det næste jeg skal igang med er raglan, men opskriften siger "set fra retsiden". skal jeg ikke igang med "set fra vrangsiden"'? i så fald, gentager jeg så bare mønsteret ligesom det første afsnit?
12.03.2015 - 21:09DROPS Design answered:
Hej Sif, Jo strik en pind fra vrangen inden du går igang med raglanen fra retsiden. God fornøjelse!
21.05.2015 - 14:01
![]() Sif wrote:
Sif wrote:
Jeg er lige startet og har sat mærketråde. det næste jeg skal igang med er raglan, men opskriften siger "set fra retsiden". skal jeg ikke igang med "set fra vrangsiden"'? i så fald, gentager jeg så bare mønsteret ligesom det første afsnit?
11.03.2015 - 23:50
![]() Virginia wrote:
Virginia wrote:
Holyyyyyy! You need to be mathematician to figure this one out. I am at the body, just finished the decreases and about to begin the increases. The number of pattern stitches do not equate to the instructions. I have spent the most past of two days figuring it out. Finally just used the picture to do the calculations. I really just wanted to knit! Would not recommend this to anyone. It will be lovely when done but it has tested my patience.
28.02.2015 - 20:47
![]() Nicky Hodkinson wrote:
Nicky Hodkinson wrote:
I can't wait to knit this cardigan, but I'm not sure what size to knit. My chest measurement is 104cms should I knit the Large, X large or XX large?? Thank you
16.01.2015 - 19:39DROPS Design answered:
Dear Mrs Hodkinson, you can measure a similar garment you have and like the shape and compare them to the measures from chart at the bottom of the page, it will then help you to find out matching size. Happy knitting!
19.01.2015 - 09:55
![]() Tracey Hunt wrote:
Tracey Hunt wrote:
Thank you so much for previous help i am so enjoying knitting this now. i just want to check that im on the right track. when i have inc 7 pearl (large size) on raglan side after first A2 on fronts and back do i start start making A2 again , many thank for your help in advance.
15.01.2015 - 23:56DROPS Design answered:
Dear Mrs Hunt, on body, work the first 6 inc sts in A.2 then P the next 7 inc sts, the next 6 sts in A.2, P the next 7 inc sts (see NOTE under pattern), and then A.2 over the next 6 inc sts, P the next 7 inc sts, then inside A.1/A.2 and P the last inc st. Happy knitting!
16.01.2015 - 10:03Tracey Hunt wrote:
Absolutely love this patten , i have been trying for 4 days now to understand it i am an experianced knitter or 20 years and have no idea how to start the pattern off on the ragland inc yo on 10 rows and have no idea how to start any pattern off i am in tears as i would have loved to knit this
12.01.2015 - 02:25DROPS Design answered:
Dear Mrs Hunt, you start working pattern and inc at the same time for raglan - see "RAGLAN" : inc with a YO before you work: A.1/A.2, marker, A.1/A.2 and then after you have worked these sts. Repeat the inc first every row then every other row then every 3rd row - the inc sts will be worked differently on body and on sleeve. Happy knitting!
12.01.2015 - 10:40
![]() Marie wrote:
Marie wrote:
Er der ikke fejl i opskriften: Der står efter raglan udtagninger, dvs. først de 23 på hver anden pind og derefter 6 på hver tredje, at der er 364 masker. Herefter står der så jeg skal tage endnu en maske ud, men jeg kan ikke få dette til at passe med de masker der står i næste stykke, når jeg skal sætte ærmerne på pinden. Ifølge denne bliver der nemlig 8 masker til overs efter jeg har delt hvert stykke, hvilket svarer til de 8 masker jeg burde tage ind efter de første 29 indtagninger.
29.12.2014 - 22:20DROPS Design answered:
Hej Marie, Kan det være den aller første udtagning til raglan som egentlig ikke skulle gøres i den mindste størrelse... Hvis det er, så må du bare justere maskeantallet inden du starter på ærmerne, så mønsteret går op. God fornøjelse!
05.02.2015 - 14:30
![]() Barbara wrote:
Barbara wrote:
Hallo zusammen. Ich habe Probleme mit der Raglanzunahme. Wo genau muß ich aufnehmen. LG
09.12.2014 - 15:33DROPS Design answered:
Die Raglanzunahmen erfolgen rechts und links neben A.1/A.2. Es sind also immer 12 M zwischen den Raglanzunahmen, beidseitig dieser 12 M je 1 Zunahme.
06.03.2015 - 11:29
![]() Janne Pedersen wrote:
Janne Pedersen wrote:
Jeg synes der er fejl i diagram forklaringen, især det sidste symbol, hvordan får man udtagningen med i A5?
03.12.2014 - 22:45DROPS Design answered:
Hej Janne, Du strikker bare et omslag imellem de to masker hvor ringen er tegnet. God fornøjelse!
05.12.2014 - 08:57
![]() Ragnhild Beate Jønsberg wrote:
Ragnhild Beate Jønsberg wrote:
Ved raglanfellingene står det at det skal økes ved å ta et kast, men da økes det jo bare med en maske. Og siden det er 4 merker så blir det bare 4 masker pr. pinne?
26.11.2014 - 15:39DROPS Design answered:
Hei Ragnhild. Du öker paa hver side af hver raglan markering (= 2 gange), saa bliver det 8 masker per omgang
27.11.2014 - 16:16
|
||||||||||||||||||||||||||||
Alana Cardigan#alanacardigan |
||||||||||||||||||||||||||||
 |
 |
|||||||||||||||||||||||||||
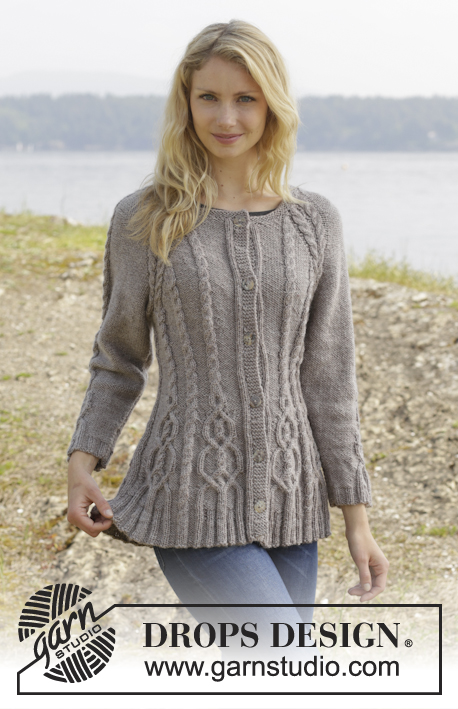
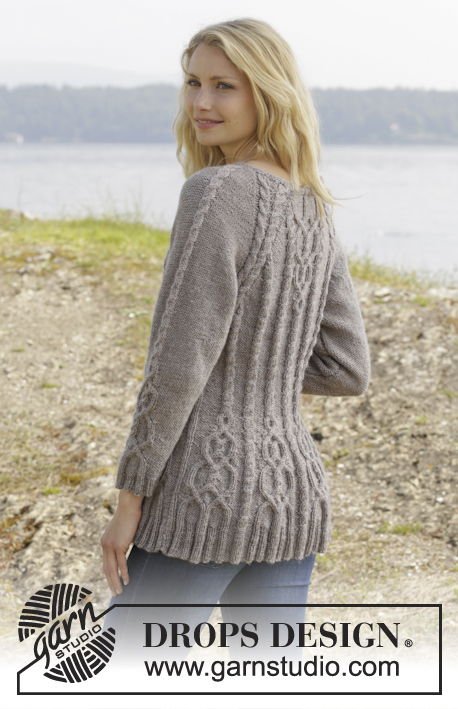
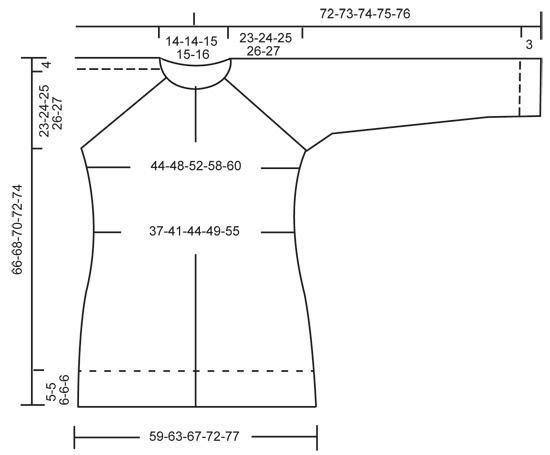
Knitted DROPS jacket with cables and raglan, worked top down in ”Karisma”. Size S-XXL
DROPS 156-4 |
||||||||||||||||||||||||||||
|
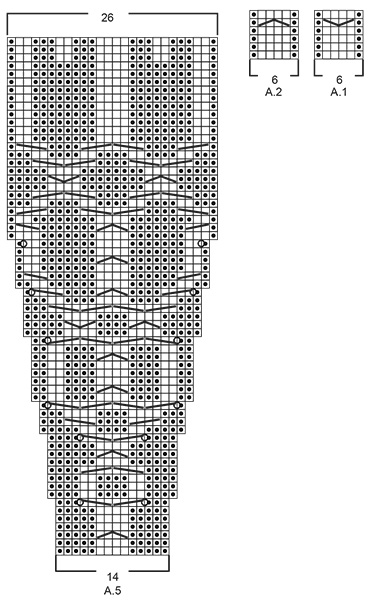
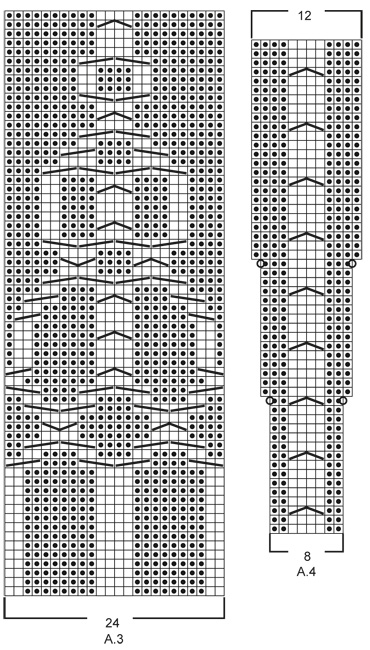
GARTER ST (back and forth on needle): K all rows. 1 ridge = K2 rows. PATTERN: See diagrams A.1 - A.5. The diagrams show all rows in pattern seen from RS. RAGLAN: Inc on each side of raglan sts (A.1/A.2, marker, A.2/A.1) by making 1 YO = 8 inc on row. On next row work YOs twisted to avoid holes. Then work the new sts P on sleeves (seen from RS), and on front and back piece work the new sts in to pattern as explained below. DECREASE TIP (applies to sleeves): Dec on each side of marker as follows: Work until 3 sts remain before marker, P 2 tog, P 2, P 2 tog = 2 sts dec. INCREASE TIP: All inc are done from RS. Inc 1 st by making a YO. On next row K YOs twisted, i.e. work in the back loop of st instead of front to avoid holes. P the new sts (seen from RS). KNITTING TIP: For every 10th row work short rows over the 5 sts in garter st in bands as follows (beg from RS): K 5 band sts, turn piece, tighten yarn and K back, turn piece and work as before over all sts, turn piece, K 5 band sts in garter st, turn piece, tighten yarn and K back. That way the ridges in band will not contract as much. BUTTONHOLES: Dec for buttonholes on right band. 1 buttonhole = K tog third and fourth st from edge and make 1 YO. Dec for buttonholes when piece measures: SIZE S: 2, 12, 22, 32, 42 and 52 cm / ¾",4 ¾",8 ¾",12½",16½",20½" SIZE M: 2, 12, 22, 32, 42 and 52 cm / ¾",4 ¾",8 ¾",12½",16½",20½" SIZE L: 2, 11, 20, 29, 38, 47 and 56 cm / ¾",4½",8",11½",15",18½",22" SIZE XL: 2, 11, 20, 29, 38, 47 and 56 cm / ¾",4½",8",11½",15",18½",22" SIZE XXL: 2, 11, 20, 29, 38, 47, 56 and 65 cm / ¾",4½",8",11½",15",18½",22",25½ ---------------------------------------------------------- JACKET: Worked back and forth, top down on circular needle to make room for all the sts. YOKE: Cast on 108-108-113-113-117 sts on circular needle size 4 mm / US 6 with Karisma. Work 3 ridges in GARTER ST - see explanation above. K next row AT THE SAME TIME inc 24-24-23-23-27 sts evenly = 132-132-136-136-144 sts. Remember BUTTONHOLES - see explanation above. Now work as follows from RS: 5 sts in garter st, P 1, K 2 (= band), P 12-12-13-13-15, A.1, insert 1st marker, A.2, P 2, A.2, P 2, A.1, insert 2nd marker, A.2, P 0-0-1-1-3, A.3, P 0-0-1-1-3, A.1, insert 3rd marker, A.2, P 2, A.2, P 2, A.1, insert 4th marker, A.2, P 12-12-13-13-15, K 2, P 1, 5 sts in garter st (= band) – READ KNITTING TIP! READ ALL OF THE FOLLOWING SECTION BEFORE CONTINUING! REMEMBER THE GAUGE! On next row from RS beg inc for RAGLAN – see explanation above, AT THE SAME TIME work pattern as follows: RAGLAN: Repeat inc every row 0-2-10-20-20 times in total. Then inc on every other row (i.e. on every row from RS) 23-32-30-26-27 times and in every 3rd row 6-0-0-0-0 times = 364-404-456-504-520 sts. PATTERN: Work pattern on body as follows (P the inc sts on sleeves): Work the first 6 sts inc in A.2, then P next 8-9-7-8-8 inc sts, work the next 6 inc sts in A.2, P the next 8-9-7-8-8 inc sts. NOTE: (Size M-L-XL-XXL): When A.3 has been worked 1 time vertically, continue with A.2 over cable and P (seen from RS) the remaining sts from A.3 until start of body. S/M: Then inc as before on sleeve and inc inside A.1/A.2 (i.e. between A.1 and A.2, towards marker for raglan) on front and back piece 1-4 more times. P the new sts. L/XL/XXL: Continue with A.2 over the next 6 inc sts, P the next 7-8-8 inc sts, then inc as before on sleeve and inc inside A.1/A.2 (i.e. between A.1 and A.2, towards marker for raglan) on front and back piece 1-4-5 more times. P the last 1-4-5 inc sts. Piece now measures 27-28-29-30-31 cm / 10½"-11"-11½"-11¾"-12¼" from shoulder. Now work as follows from WS: Work 55-60-67-73-76 sts (= right front piece), slip the next 80-90-102-114-116 sts on a stitch holder for sleeve, cast on 12 new sts under sleeve, insert a blue marker in the middle of these new sts (= side), work the next 94-104-118-130-136 m (= back piece), slip the next 80-90-102-114-116 sts on a stitch holder for sleeve, cast on 12 new sts under sleeve, insert a blue marker in the middle of these new sts (= side), work the remaining 55-60-67-73-76 sts (= left front piece). There are now 228-248-276-300-312 sts on needle. NOW MEASURE THE PIECE FROM HERE. BODY: There are now 106-116-130-142-148 sts for back piece and 61-66-73-79-82 sts for each front piece. Then continue pattern as follows from RS: S/M: 5 sts in garter st, P 1, K 2 (= band), P 12-12, A.2, insert a marker, P 8-9, A.2, insert a marker, P 8-9, A.1, P 7-7, A.2 0-1 time in width, P 7-7, A.2, P 8-9, insert a marker, A.2, P 8-9, insert a marker, A.2, P 9-9, A.2, P 9-9, A.2, insert a marker, P 8-9, A.2, insert a marker, P 8-9, A.1, P 7-7, A.2 0-1 time in width, P 7-7, A.2, P 8-9, insert a marker, A.2, P 8-9, insert a marker, A.2, P 12-12, K 2, P 1, 5 sts in garter st. L/XL/XXL: 5 sts in garter st, P 1, K 2 (= band), P 13-14-15, A.2, insert a marker, P 7-8-8, A.2, insert a marker, P 7-8-8, A.2, insert a marker, P 7-8-8, A.1, P 4-6-5, A.2 1-1-2 times in width, P 4-6-5, A.2, P 7-8-8, insert a marker, A.2, P 7-8-8, insert a marker, A.2, P 7-8-8, insert a marker, A.2, P 10-11-12, A.2, P 10-11-12, A.2, insert a marker, P 7-8-8, A.2, insert a marker, P 7-8-8, A.2, insert a marker, P 7-8-8, A.1, P 4-6-5, A.2 1-1-2 times in width, P 4-6-5, A.2, P 7-8-8, insert a marker, A.2, P 7-8-8, insert a marker, A.2, P 7-8-8, insert a marker, A.2, P 13-14-15, K 2, P 1, 5 sts in garter st. READ THE NEXT 2 SECTIONS BEFORE CONTINUING! Now dec and inc at the same time as follows: DECREASE: Dec differently as follows: Dec 1 st by P 2 tog towards the bands mid front, repeat dec every 1½-1½-1½-2-2 cm / ½"-½"-½"-¾"-¾" 5-5-4-4-5 more times. AT THE SAME TIME dec 1 st on each side of the middle cable on back piece. Repeat dec every 2-2-1½-1½-1½ cm / ¾"-¾"-½"-½"-½" 3-3-4-4-6 more times. AT THE SAME TIME dec 1 st towards cable in every P section with marker in (= 8-8-12-12-12 markers). Repeat dec every 3-2½-5-4-4 cm / 1⅛"-⅞"-2"-1½"-1½" 2-3-1-2-2 more times. INCREASE (towards the sides): When piece measures 3 cm / 1", inc along the cable towards the sleeve (i.e. cable from raglan) in P section towards the sides – READ INCREASE TIP! Inc 4 sts on row. Repeat inc every 1½-1½-2½-1½-1 cm / ½"-½"-⅞"-½"-⅜" 3-4-2-4-10 more times. When all dec and inc are done, 200-216-244-264-294 sts remain. When piece measures 11-12-12-13-14 cm / 4½"-4¾"-4¾"-5"-5½", work pattern as follows: 5 sts in garter st, P 1, K 2 (= band), P 2-2-4-4-5, A.5, A.4, A.5, A.4 0-0-1-1-1 time, P 7-8-6-11-15, A.2 0-1-1-1-2 times in width, P 7-8-6-11-15, A.4 0-0-1-1-1 time in width, * A.5, A.4 *, repeat from *-* 2-2-3-3-3 more times in width, A.5 1-1-0-0-0 times in width, P 7-8-6-11-15, A.2 0-1-1-1-2 times in width, P 7-8-6-11-15, A.4 0-0-1-1-1 time in width, A.5, A.4, A.5, P 2-2-4-4-5, K 2, P 1, 5 sts in garter st (= band). NOTE: Adjust the first cable in A.4 and A.5 to get a nice transition between diagrams. Continue with pattern and inc according to diagram. When A.4 and A.5 have been worked vertically and piece measures approx. 33-34-34-35-35 cm / 13"-13½"-13½"-13¾"-13¾", there are 316-332-376-396-426 sts on needle. Insert a marker here. NOW MEASURE THE PIECE FROM HERE. Now work rib inside 8 band sts in each side of piece as follows: S/M: * Work K over K and P over P until 7-11 sts remain before the blue marker in the side, P 2, K 2, P 3-4 *, repeat from *-* 1 more time and continue with K over K and P over P until band sts. L/XL/XXL: * Work K over K and P over P until 8-14-21 sts remain before the blue marker in the side, K 2-2-2, P 3-4-3, K 0-2-2, P 0-3-3, K 0-0-2, P 0-0-3 *, repeat from *-* 1 more time and continue with K over K and P over P until band sts. When rib has been worked for 2 cm / ¾" from marker, inc by making 1 YO before first P st in every P section. READ INCREASE TIP! When rib has been worked for 5-5-6-6-6 cm / 2"-2"-2½"-2½"-2½", bind off with K over K and P over P. SLEEVES: Slip the 80-90-102-114-116 sts from stitch holder back on circular needle. Work 1 row over all sts and cast on 12 new sts at the end of row = 92-102-114-126-128 sts. Insert a marker in the middle of the new sts (i.e. 6 sts on each side of marker). NOW MEASURE THE PIECE FROM HERE. Then work sleeve in the round on circular needle/double pointed needles. Continue the middle cable on sleeve as before but work P over cables in raglan. On 2nd round beg dec on each side of marker - READ DECREASE TIP. Repeat dec every other round 6 more times = 78-88-100-112-114 sts. Then dec 1 st on each side of marker every 2-1½-1-1-1 cm / ¾"-½"-⅜"-⅜"-⅜" 13-17-22-27-27 times = 52-54-56-58-60 sts. AT THE SAME TIME when piece measures 15 cm / 6", work A.5 over cable in the middle of sleeve - adjust the first cable in A.5 to get a nice transition between diagrams. NOTE: Do not inc in A.5 on sleeve, i.e. do not work YOs in diagram. When A.5 is finished and sleeve measures 37 cm / 14½", work rib as follows from marker at beg of round: P 0-0-1-2-3, K 1-2-2-2-2, P 3, K 2. P 3, K 2, P 2, continue rib as on last row in A.5 (= 26 sts), P 2, K 2, P 3, K 2, P 3, K 1-2-2-2-2, P 0-0-1-2-3. Continue like this for 3 cm / 1", bind off with K over K and P over P. ASSEMBLY: Sew the holes under the sleeves. Sew the buttons on to left band. |
||||||||||||||||||||||||||||
Diagram explanations |
||||||||||||||||||||||||||||
|
||||||||||||||||||||||||||||
 |
||||||||||||||||||||||||||||
 |
||||||||||||||||||||||||||||
 |
||||||||||||||||||||||||||||
Have you finished this pattern?Tag your pictures with #dropspattern #alanacardigan or submit them to the #dropsfan gallery. Do you need help with this pattern?You'll find 25 tutorial videos, a Comments/Questions area and more by visiting the pattern on garnstudio.com. © 1982-2026 DROPS Design A/S. We reserve all rights. This document, including all its sub-sections, has copyrights. Read more about what you can do with our patterns at the bottom of each pattern on our site. |
||||||||||||||||||||||||||||


With over 40 years in knitting and crochet design, DROPS Design offers one of the most extensive collections of free patterns on the internet - translated to 17 languages. As of today we count 324 catalogs and 12290 patterns - 12280 of which are translated into English (US/in).
We work hard to bring you the best knitting and crochet have to offer, inspiration and advice as well as great quality yarns at incredible prices! Would you like to use our patterns for other than personal use? You can read what you are allowed to do in the Copyright text at the bottom of all our patterns. Happy crafting!
Post a comment to pattern DROPS 156-4
We would love to hear what you have to say about this pattern!
If you want to leave a question, please make sure you select the correct category in the form below, to speed up the answering process. Required fields are marked *.