
Popular categories
Looking for a yarn?


Comments / Questions (14)
![]() Jamaschi wrote:
Jamaschi wrote:
Guten Tag, wenn der Schal aus der Mitte gestrickt wird, könnte man dann auch einen offenen zweiseitigen Anschlag verwenden, um so die Naht zu vermeiden?
01.11.2024 - 07:53DROPS Design answered:
Liebe Frau Jamaschi, das kann man wahrscheinlich machen. Viel Spaß beim Stricken!
01.11.2024 - 10:02
![]() Corinne wrote:
Corinne wrote:
Bonjour, Je ne comprends pas trop l’ordre des diagrammes. Faut-il répéter les diagrammes 1, 2 puis 3 plusieurs fois jusqu’à obtenir la longueur voulue ? C’est ce qui me semble plus logique. Mais ce n’est pas très clair dans l’explication. Merci
06.12.2019 - 18:56DROPS Design answered:
Bonjour Corinne, vous commencez par tricoter A.1 (A., B, et C) jusqu'à ce que l'ouvrage mesure 51 cm. Vous tricotez ensuite 6 x A.2 (A, B et C) en hauteur, et vous tricotez ensuite 1 x A.3 (8 fois en largeur) en hauteur, l'ouvrage doit mesurer environ 77 cm de hauteur totale. Bon tricot!
09.12.2019 - 07:51Anna Nyman wrote:
Hej jag förstaar inte hur jag ska göra paa slutet. Sista diagrammet. Jag börjar väl längst ner? och sen blir det bara mer maskor. Ska jag lägga upp maskor. Fattar inte hur det hela ska kunna bli smaa spetsar. Det är första gaangen som jag stickar en saan här sak. Tacksam för hjälp. Videon som annars är bra hjälper mig inte vidare. Glad stickhälsning Anna i Schweiz
26.01.2016 - 18:47DROPS Design answered:
Hej Anna, Jo når du strikker ifølge A.3 får du automatisk de små buer. Når du er klar strækker du buerne ud i små spidser som vi har beskrevet i opskriften. God fornøjelse!
09.03.2016 - 16:04
![]() Karina wrote:
Karina wrote:
Måste man använda rundsticka och isåfall varför? Jag förstår inte varför men är inte heller någon van stickerska.
14.11.2015 - 11:04DROPS Design answered:
Hej. Arbetet stickas fram och tillbaka men vi rekommenderar att du använder en rundsticka för att få plats med alla maskor. Lycka till!
17.11.2015 - 12:17
![]() Loredana wrote:
Loredana wrote:
Buongiorno! Vi ringrazio per la pazienza e la disponibilità' Loredana
19.06.2015 - 12:53
![]() Loredana wrote:
Loredana wrote:
Buonasera! Mi scuso,e' evidente che mi sono mal espressa...so perfettamente che la misura 35x77 si riferisce ad una meta',resta comunque il fatto che una volta unite le due meta' misureranno circa 35x154....quello che sottolineavo e' come sia possibile che la larghezza 35 cm,sia superiore a quella del lavoro finito (34cm)! Di nuovo grazie.
17.06.2015 - 14:25DROPS Design answered:
Buongiorno Loredana. Chiediamo alla casa madre di verificare la correttezza delle misure riportate nelle spiegazioni. Eventuali modifiche verranno apportate direttamente on line. Grazie e buon lavoro!
19.06.2015 - 10:43
![]() Loredana wrote:
Loredana wrote:
Buongiorno! Alla fine delle spiegazioni per eseguire le due meta' c'e' scritto: il lavoro misura circa 35x77....come e' possibile se le misure una volta bloccato saranno di circa 34x190? Grazie
17.06.2015 - 09:37DROPS Design answered:
Buongiorno Loredana, 35x77 è la misura di metà lavoro: ne vanno realizzate 2 e poi cucite insieme. Il bloccaggio se eseguito bene servirà a portare il lavoro alla misura corretta e a mettere il risalto il motivo traforato. Buon lavoro!
17.06.2015 - 13:06
![]() Maria Grazia Vitturini wrote:
Maria Grazia Vitturini wrote:
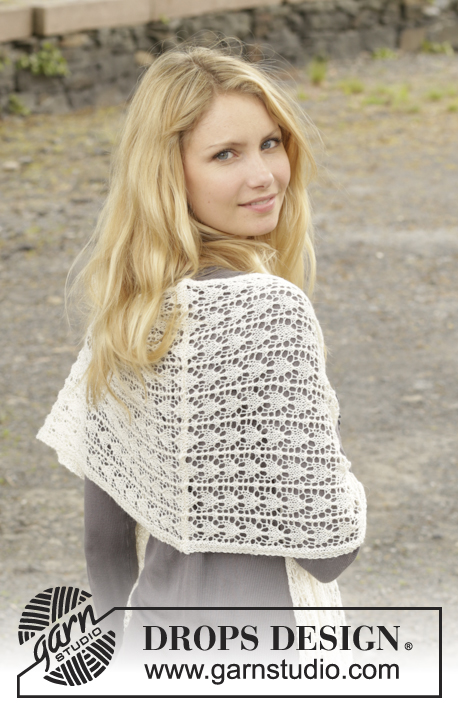
Ho realizzato il bordo dello scialle secondo lo schema A3, seguendo le istruzioni. Il risultato però non sembra lo stesso della foto; è possibile che le "punte" ben definite si ottengano solo dopo il fissaggio del lavoro? Grazie!
16.03.2015 - 22:00DROPS Design answered:
Buongiorno Maria Grazia. Sì le punte si definiscono meglio in fase di bloccaggio. Quando mette lo scialle in forma dopo averlo lavato, dovrebbe riuscire a fissare ogni punta con uno spillo. E’ anche importante che il bordo di chiusura delle m sia elastico. Buon lavoro!
17.03.2015 - 09:03
![]() Anita wrote:
Anita wrote:
SUPERBE!!!! Je vais me le faire en mohair noire. Merci beaucoup.
22.07.2014 - 16:36Jolanda wrote:
Hello, i was wondering, is this pattern available in Dutch?
19.07.2014 - 20:43Jolanda answered:
Sorry.... Gevonden!
19.07.2014 - 20:58
|
||||||||||||||||
Reverie#reverieshawl |
||||||||||||||||
 |
 |
|||||||||||||||
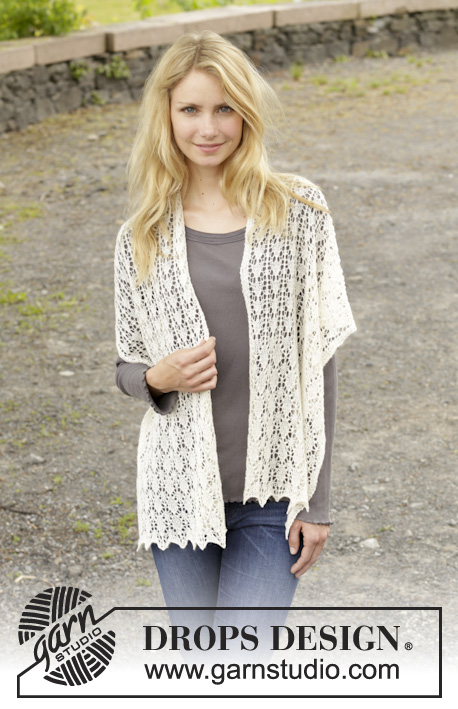
Knitted DROPS shawl with lace pattern in ”Lace” or "Alpaca" or "BabyAlpaca Silk".
DROPS 157-36 |
||||||||||||||||
|
GARTER ST (back and forth on needle): K all rows. 1 ridge = K2 rows. PATTERN: See diagrams A.1-A.3. The diagrams show all rows in pattern seen from RS. ---------------------------------------------------------- SHAWL: Worked back and forth in 2 parts - from mid back and out to the side, and sewn tog when finished. 1st HALF: Place circular needle double (or use another needle in approx. the same size in addition to the needle you are working on) and cast on 81 sts on circular needle size 3.5 mm / US 4 with Lace or Alpaca to avoid a tight edge, pull out one needle. K 1 row from WS. Work next row as follows from RS: 3 sts in GARTER ST – see explanation above, A.1 A, (= 6 sts), A.1 B over the next 64 sts (= 8 times), finish with A.1 C (= 5 sts) and 3 sts in garter st. When piece measures 51 cm / 20'', adjust so that last row is 2nd row in diagram, work as follows: 3 sts in garter st, A.2 A (= 6 sts), A.2B over the next 64 sts (= 8 times), finish with A.2 C (= 5 sts) and 3 sts in garter st. Work A.2 6 times in total vertically. Then work as follows from RS: 3 sts in garter st, 6 sts in stockinette st, A.3 over the next 64 sts (= 8 times), 5 sts in stockinette st, finish with 3 sts in garter st. Work A.3 1 time vertically, loosely bind off. Piece measures approx. 35 x 77 cm / 13 3/4" x 14½". Work 2nd half the same way. ASSEMBLY: Graft/sew the 2 parts tog at the cast-on edge st by st. BLOCKING: Place the shawl in lukewarm water until it is soaking wet. Carefully squeeze the water out of the shawl - do not twist the shawl - then roll the shawl in a towel and squeeze to remove more water - the shawl will now only be moist. When using Alpaca – READ SHAPING! Place the shawl on a carpet or mattress - carefully stretch it out to size and fasten it with pins. Leave to dry. Repeat the process when the garment has been washed. |
||||||||||||||||
Diagram explanations |
||||||||||||||||
|
||||||||||||||||
 |
||||||||||||||||
Have you finished this pattern?Tag your pictures with #dropspattern #reverieshawl or submit them to the #dropsfan gallery. Do you need help with this pattern?You'll find 15 tutorial videos, a Comments/Questions area and more by visiting the pattern on garnstudio.com. © 1982-2026 DROPS Design A/S. We reserve all rights. This document, including all its sub-sections, has copyrights. Read more about what you can do with our patterns at the bottom of each pattern on our site. |
||||||||||||||||


With over 40 years in knitting and crochet design, DROPS Design offers one of the most extensive collections of free patterns on the internet - translated to 17 languages. As of today we count 324 catalogs and 12290 patterns - 12280 of which are translated into English (US/in).
We work hard to bring you the best knitting and crochet have to offer, inspiration and advice as well as great quality yarns at incredible prices! Would you like to use our patterns for other than personal use? You can read what you are allowed to do in the Copyright text at the bottom of all our patterns. Happy crafting!
Post a comment to pattern DROPS 157-36
We would love to hear what you have to say about this pattern!
If you want to leave a question, please make sure you select the correct category in the form below, to speed up the answering process. Required fields are marked *.