
Popular categories
Looking for a yarn?


Comments / Questions (99)
![]() Anya Roeling wrote:
Anya Roeling wrote:
Het meerderen in de mouw is voor mij nog onduidelijk. Er moet aan beide zijden van A1 gemeerderd worden. A1 is de kabel. Als ik het patroon zo lees dan zou aan beide zijden van de \"originele\" kabel de gemeerderde kabels moeten verschijnen. Op de foto lijkt het er op dat de gemeerderde kabels allebei ná de originele kabel komen te liggen. Maar ik moet ook toegeven dat de foto niet heel echt duidelijk dat ene detail weergeeft.
30.11.2018 - 16:08DROPS Design answered:
Dag Anya,
Je meerdert voor en na de eerste A.1 en zodra je 4 steken gemeerderd hebt, brei je die gemeerderde steken in A.1, dus dan heb je 3x A.1 naast elkaar. Daarna, als je weer genoeg hebt gemeerderd, brei je die in A.6 aan beide kanten.
04.12.2018 - 13:38
![]() Sally wrote:
Sally wrote:
Please can you explain ‘from WS work k over k and p over p’ . Does this mean that it will be stocking stitch. And is every row worked from the chart or just the RS rows?
24.05.2018 - 21:11DROPS Design answered:
Dear Sally, from WS you will work as follows: K the 6 sts in garter st on each side, and work K over K and P over P the sts in diagrams (the P2 from RS for example will be worked K2 from WS) - work the WS rows in pattern as shown in diagram (read from left towards right from WS). Happy knitting!
25.05.2018 - 09:13
![]() Sigrun Antonsen wrote:
Sigrun Antonsen wrote:
Drops mønster 148-2 Jeg har strikket i mange år og ulike mønstre uten problem, men her er det noe jeg ikke forstår. For størrelse L+XL står det at det skal strikkes ............6-11 rett, sette 1 merketråd (= siden), strikk 6-11 rett..... Hva mens med det? Er det antall masker etter størrelsen? For størrelse S+M står det 8-13. Jeg har snakket med personalet i butikken, men de forstod det heller ikke. Jeg er enig med de so etterlyser tydeligere bilder av mønsteret.
27.03.2016 - 13:24DROPS Design answered:
Hej Sigrun, Jo det er antal masker for hver af de to størrelser som er med under "L + XL". Det vil sige at hvis du strikker L skal du strikke 6 rett osv. Markere gerne i opskriften så du hele tiden følger din størrelse! God fornøjelse!
31.03.2016 - 12:15
![]() Michela wrote:
Michela wrote:
Guten Tag, ich habe die Maschenprobe mit der Nadelstärke 4 und 3 1/2 gestrickt und jedes Mal beträgt die Maschenzahl um 10 x10 cm zu erlangen weinger als in der Anleitung aufgeführt. Woran kann dies liegen und wie müsste ich die korrekt Maschenzahl ausrechnen, die ich allenfalls benötigen würde? Herzlichen Dank für die Antwort, Michela
09.03.2016 - 08:15DROPS Design answered:
Liebe Michaela, das könnte daran liegen, dass Sie etwas lockerer stricken als unser Standardmass. Versuchen Sie es lieber nochmals mit einer noch dünneren Nadel statt das Muster umzurechnen. Diese Anleitung eignet sich nicht gut zum umrechnen.
09.03.2016 - 08:53
![]() Diane Filion wrote:
Diane Filion wrote:
Could you please tell me what K 8- 13 means in Rosaline fitted jacket with lace & cables by Drops 148-2 design Pattern no r-623 SIZE S + M: THANK YOU
10.01.2016 - 16:02DROPS Design answered:
Dear Mrs Filion, these numbers apply to each size: in size S (1st size), you will work K 8, in size M (2nd size), you will work K 13. Happy knitting!
11.01.2016 - 10:39Ariane wrote:
Hi & thanks so much for this beautiful pattern. i'm having a problem understanding 1 thing: when reaching 56cms while working the front left/right side, it says to: "slip the outermost 12sts towards mid front on 1 stitch holder for neck " i don't understand which 12 sts i'm supposed to slip to holder, and what i'm supposed to do with them. also, if i slip 12 sts, it breaks off in the middle of the A4 pattern. should i just work half the pattern? i'm confused... thanks in advance, a
06.01.2016 - 20:14DROPS Design answered:
Dear Ariane, you slip the first 12 sts towards front band on a st holder, ie the 6 front band sts + the next 6 sts, continue in pattern as before (make sure you have correct number of sts in diagram with 1 yo=1 dec) and bind off sts towards neckline at the beg of every row from neckline. Afterwards the sts from st holder on each side will be knit tog with picked sts around neckline for neck edge. Happy knitting!
07.01.2016 - 09:25
![]() MARIA wrote:
MARIA wrote:
Om ökningarna på ärmarna I ärmmönstret står det "De 4 första m som ökas i varje sida stickas fortlöpande in i A1. De 9 nästa stickas fortlöpande in i A6 och de resterande stickas aviga. " Jag förstår inte hur jag ska sticka in m i mönstret. Mönstret har ju ett visst antal m och om det blir fler m så stämmer ju inte mönstret sen. Det blir väldigt mycket fler maskor på ärmen efter 13-18 ökningar som jag inte vet hur jag ska få in i mönstret. Tacksam för en närmare förklaring på detta!
22.12.2015 - 13:25DROPS Design answered:
Hej Maria, jo när du har ökat 4 ggr har du så du kan sticka en fläta till enligt A1 under ärmen, se bilden! Lycka till!
25.01.2016 - 13:53
![]() Lillian Enevoldsen wrote:
Lillian Enevoldsen wrote:
Spørgsmål: Jeg har strikket ryg og for stykke uden problemer. Selv om billedet viser en str. S, mønstret er anderledes i de andre str. Kan i ikke oplyse det i opskriften? MEN mit problem er udtagningerne i ærmet. Hvad jeg kan se på billedet er der to snoninger ved siden af hinanden sådan forstår jeg ikke opskriften. Der er der vrang masker, til jeg er færdig med at tage ud. Har i et andet bud på, hvordan jeg ellers skal forstå opskriften. Glæder mig til den er færdig.
10.10.2015 - 15:14DROPS Design answered:
Hej Lillian, Det kan muligvis også have noget med størrelsen at gøre... Men der står at de første 4 nye masker strikkes ind i A.1 - har du set det?
12.10.2015 - 12:16
![]() Irene wrote:
Irene wrote:
Anche per la taglia S la quantità indicata non è sufficiente, viene indicato 600 gr, ma a me ne sono occorsi 700. Also for size S the indicated quantity isn't sufficient. I used 700 g. instead of 600 g.
27.04.2015 - 12:41DROPS Design answered:
Buongiorno Irene. Inoltreremo la sua segnalazione alla casa madre. Grazie e buon lavoro!
27.04.2015 - 12:47
![]() Anne Marie Nagott wrote:
Anne Marie Nagott wrote:
Det er alt for lidt garn der er angivet i opskriften. Har strikket den i størrelse L og skulle bruge 900 g i stedet for som angivet 700 g.
01.02.2015 - 02:48
|
|||||||||||||||||||||||||
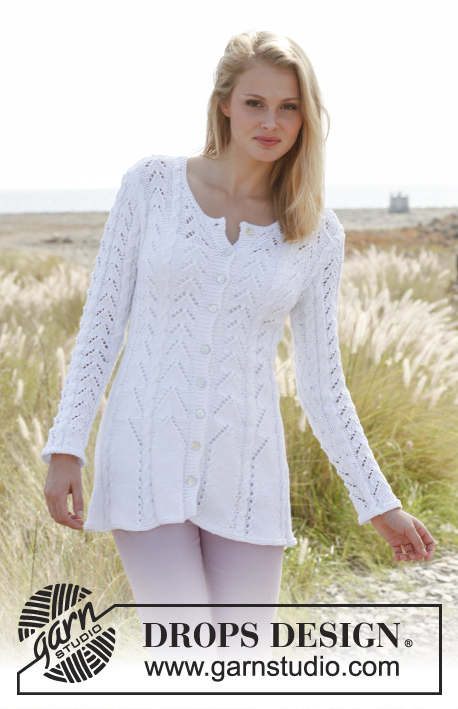
Rosalinde#rosalindecardigan |
|||||||||||||||||||||||||
 |
 |
||||||||||||||||||||||||
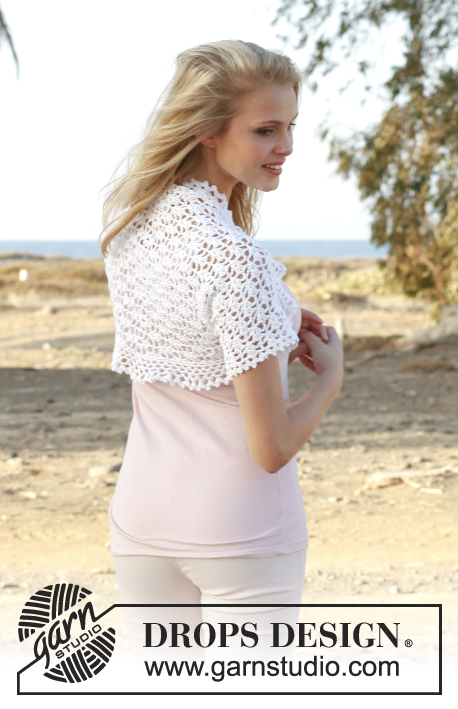
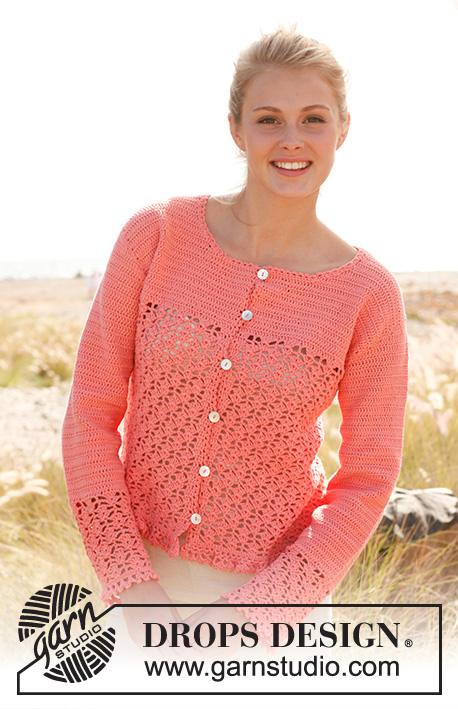
Knitted DROPS fitted jacket with lace pattern and cables in ”Muskat”. Size: S - XXXL.
DROPS 148-2 |
|||||||||||||||||||||||||
|
GARTER ST (back and forth on circular needle): K all rows. 1 ridge = 2 K rows. GARTER ST (in the round on double pointed needles): * K 1 round and P 1 round *, repeat from *-*. 1 ridge = 2 rounds. PATTERN: See diagrams A.1 to A.6. Diagrams show all rows/rounds in pattern seen from RS. DECREASE TIP: Dec in each side on section in stockinette st in both sides on body as follows: Slip 1st st as if to K, K 1, psso, work in stockinette st until 2 sts remain, K 2 tog (= 2 sts dec). INCREASE TIP: Inc 1 st by making 1 YO. On next row work YOs twisted to avoid holes (i.e. work in back loop of st instead of front). BUTTONHOLE: Dec for buttonholes on right band. 1 buttonhole = K tog third and fourth st from mid front and make 1 YO. Dec for buttonholes when piece measures: SIZE S: 8, 14, 20, 26, 32, 38, 44, 50 and 56 cm / 3⅛",5½",8",10¼",12½",15",17¼",19¾" and 22" SIZE M: 8, 15, 22, 28, 34, 40, 46, 52 and 58 cm / 3⅛",6",8¾",11",13⅜",15¾",18",20½" and 22¾" SIZE L: 8, 14, 21, 27, 34, 40, 47, 53 and 60 cm / 3⅛",5½",8¼",10⅝",13⅜",15¾",18½",21" and 23⅝" SIZE XL: 6, 13, 20, 27, 34, 41, 48, 55 and 62 cm / 2⅜",5⅛",8",10⅝",13⅜",16⅛",19",21⅝" and 24⅜" SIZE XXL: 8, 15, 22, 29, 36, 43, 50, 57 and 64 cm / 3⅛",6",8¾",11⅜",14¼",17",19¾",22½" and 25¼" SIZE XXXL: 10, 17, 24, 31, 38, 45, 52, 59 and 66 cm / 4",6¾",9½",12¼",15",17¾",20½",23¼" and 26" ---------------------------------------------------------- BODY: Worked back and forth on circular needle from mid front. Cast on 244-264-312-332-404-420 sts (includes 6 band sts in each side towards mid front) on circular needle size 4 mm / US 6 with Muskat. K 3 rows (1st row = WS). Work next row as follows from RS: SIZE S + M: 6 band sts in GARTER ST – see explanation above, P 2, * A.2 (= 19 sts), A.1 (= 4 sts) *, repeat from *-* 2 times in total, P 2 and K 8-13, insert 1 marker (= side), K 8-13, P 2, ** A.1 (= 4 sts), A.2 (= 19 sts) **, repeat from **-** 4 times in total, work A.1 (= 4 sts), P 2 and K 8-13, insert 1 marker (= side), K 8-13, P 2, ** A.1 (= 4 sts), A.2 (= 19 sts) **, repeat from **-** 2 times in total and finish with P 2 and 6 band sts in GARTER ST. SIZE L + XL: 6 band sts in GARTER ST - see explanation above, P 2, A.2 (= 19 sts), * A.2 (= 19 sts), A.1 (= 4 sts) *, repeat from *-* 2 times in total, P 2 and K 6-11, insert 1 marker (= side), K 6-11, P 2, ** A.1 (= 4 sts), A.2 (= 19 sts) **, repeat from **-** 2 times in total, work A.2 (= 19 sts), A.1 (= 4 sts), A.2 (= 19 sts), * A.2 (= 19 sts), A.1 (= 4 sts) *, repeat from *-* 2 times in total, P 2 and K 6-11, insert 1 marker (= side), K 6-11, P 2, ** A.1 (= 4 sts), A.2 (= 19 sts) **, repeat from **-** 2 times in total, work A.2 (= 19 sts) and finish with P 2 and 6 band sts in GARTER ST. Size XXL + XXXL: 6 band sts in GARTER ST - see explanation above, P 2, A.2 (= 19 sts), * A.2 (= 19 sts), A.1 (= 4 sts) *, repeat from *-* 3 times in total, P 2 and K 6-10, insert 1 marker (= side), K 6-10, P 2, ** A.1 (= 4 sts), A.2 (= 19 sts) **, repeat from **-** 3 times in total, work A.2 (= 19 sts), A.1 (= 4 sts), A.2 (= 19 sts), * A.2 (= 19 sts), A.1 (= 4 sts) *, repeat from *-* 3 times in total, P 2 and K 6-10, insert 1 marker (= side), K 6-10, P 2, ** A.1 (= 4 sts), A.2 (= 19 sts) **, repeat from **-** 3 times in total, work A.2 (= 19 sts) and finish with P 2 and 6 band sts in GARTER ST. ALL SIZES - READ ALL OF THE FOLLOWING SECTION BEFORE CONTINUING! Continue pattern like this (from WS work K over K and P over P). REMEMBER THE GAUGE! When piece measures 8 cm / 3⅛", (make sure that next row is worked from RS), dec 1 st in each side on body (i.e. at the edge in each side on both sections in stockinette st with markers) – READ DECREASE TIP (= 4 sts dec). Repeat dec every 8 cm / 3⅛" 3 more times (= 4 dec in total – after last dec 8-18-4-14-4-12 sts in stockinette st remain in each side, i.e. 4-9-2-7-2-6 sts on each side of both markers). AT THE SAME TIME when piece measures 8-8-8-6-8-10 cm / 3⅛"-3⅛"-3⅛"-2⅜"-3⅛"-4", beg dec for BUTTONHOLES - see explanation above. After diagram A.2 continue with diagram A.3 (instead of A.2 - work the other sts as before). After all dec in the sides and in A.3, 164-184-200-220-260-276 sts remain on needle and piece measures approx. 32 cm / 12½". Then continue as before but work pattern according to diagram A.4 instead of A.3. When piece measures approx. 40 cm / 15¾" in all sizes (make sure that next row is worked from RS), inc as follows: ALL SIZES: Inc 1 st on the right side of every cable (i.e. in every other P-section with 2 P sts seen from RS) – READ INCREASE TIP (= 9-9-9-9-13-13 sts inc). When piece measures 42-42-42-42-43-43 cm / 16½"-16½"-16½"-16½"-17"-17", inc 1 st on the left side of every cable (i.e. in the remaining P-sections with 2 P sts = 9-9-9-9-13-13 sts inc). Repeat inc on the right side of every cable (i.e. in every other P-section with 3 P sts) when piece measures 44-44-44-44-46-46 cm / 17¼"-17¼"-17¼"-17 ¼"-18"-18" and on the left side of every cable (i.e. in the remaining P-sections with 3 P sts) when piece measures 46-46-46-46-49-49 cm / 18"-18"-18"-18"-19¼"-19¼". SIZE L + XL (only applies to these 2 sizes): AT THE SAME TIME when piece measures 42 cm / 16½", inc 1 st on each side of marker in each side - READ INCREASE TIP (= 4 sts inc). Repeat inc when piece measures 46 cm / 18". ALL SIZES: When all inc are done there are 200-220-244-264-312-328 sts in total on needle. Continue pattern. When piece measures 47-48-49-50-51-52 cm / 18½"-19"-19¼"-19¾"-20"-20½", work next row from RS as follows: Work 48-52-59-63-74-77 sts as before (= right front piece), bind off 8-10-8-10-12-14 sts for armhole, work 88-96-110-118-140-146 sts as before (= back piece), bind off 8-10-8-10-12-14 sts for armhole and work the last 48-52-59-63-74-77 sts as before (= left front piece). Finish each part separately. LEFT FRONT PIECE: = 48-52-59-63-74-77 sts. Continue pattern as before (1st row = WS). Then bind off for armhole at beg of every row from RS: 2 sts 1-2-1-2-6-7 times and 1 st 1-3-1-3-6-7 times = 45-45-56-56-56-56 sts. When piece measures 56-58-60-62-64-66 cm / 22"-22¾"-23⅝"-24⅜"-25¼"-26", slip the outermost 12-12-15-15-15-15 sts towards mid front on 1 stitch holder for neck (work them before slipping them on the stitch holder). Continue to bind off for neck at beg of every row from WS: 2 sts 2 times and 1 st 4 times - NOTE: Work sts that do not fit the pattern in stockinette st when casting/binding off for neck. After all bind offs for armhole and neck, 25-25-33-33-33-33 sts remain on shoulder. Continue pattern as before with 1 edge st in garter st in each side until piece measures approx. 66-68-70-72-74-76 cm / 26"-26¾"-27½"-28⅜"-29⅛"-30"- stop after 1 whole repetition with A.4 vertically, bind off. RIGHT FRONT PIECE: Work as left front piece but reversed, i.e. when casting/binding off for armholes, bind off at beg of every row from WS (instead of RS) and bind off for neck at beg of every row from RS (instead of WS) – NOTE: When slipping sts on 1 stitch holder for neck, make sure that 1 row has been worked from WS after last buttonhole before slipping sts on stitch holder. BACK PIECE: = 88-96-110-118-140-146 sts. Continue to bind off for armholes at beg of every row in each side as on front piece = 82-82-104-104-104-104 sts. Continue pattern as before with 1 edge st in garter st in each side. When piece measures 64-66-68-70-72-74 cm / 25¼"-26"-26¾"-27½"-28⅜"-29⅛", bind off the middle 30-30-36-36-36-36 sts for neck. Continue to bind off 1 st on next row from neck = 25-25-33-33-33-33 sts remain on the shoulder. Continue pattern with 1 edge st in garter st in each side until back piece is the same length as front piece, bind off. Repeat on the other shoulder. SLEEVE: Worked in the round on double pointed needles, switch to circular needle when needed. Cast on 51-51-68-68-85-85 sts on double pointed needles size 4 mm / US 6 with Muskat. Work 2 ridges in GARTER ST in the round on double pointed needles - see explanation above! Work next round as follows: * Work A.1 (= 4 sts), work A.5 (= 13 sts) *, repeat from *-* 3-3-4-4-5-5 times in total. Continue pattern like this upwards. When A.5 has been worked, 45-45-60-60-75-75 sts remain on needle and piece measures approx. 9 cm / 3½". Now continue pattern but work A.6 instead of A.5 until finished measurements (work the other sts as before). AT THE SAME TIME when piece measures 11-11-10-12-12-12 cm / 4⅜"-4⅜"-4"-4¾"-4¾"-4¾", inc 1 st on each side of A.1 at beg of round (inc by making 1 YO which is worked P twisted on next round). Repeat inc every 2½-2-3-2-2½-2 cm / ⅞"-¾"-1⅛"-¾"-⅞"-¾" 14-17-12-16-12-14 more times (= 15-18-13-17-13-15 inc in total) = 75-81-86-94-101-105 sts – NOTE: Work the first 4 sts inc in each side in A.1, work the next 11-11-9-11-9-11 sts in A.6 and P the remaining 0-3-0-2-0-0 sts. READ ALL OF THE FOLLOWING SECTION BEFORE CONTINUING! When piece measures 49-49-48-48-45-44 cm / 19¼"-19¼"-19"-19"-17¾"-17¼" (shorter measurements in the larger sizes because of wider shoulders), bind off 8-10-8-10-12-14 sts mid under sleeve (i.e. bind off A.1 and 2-3-2-3-4-5 sts on each side of A.1), finish the sleeve working back and forth on needle. Then bind off for sleeve cap at beg of every row in each side as follows: bind off 2 sts 3-4-3-4-4-4 times and 1 st 3-3-2-2-7-10 times, then bind off 2 sts in each side until piece measures approx. 56-57-54-55-56-57 cm / 22"-22½"-21¼"-21⅝"-22"-22½" – stop after 1 whole repetition with A.6 vertically. Then bind off the remaining sts, piece measures approx. 57-58-55-56-57-58 cm / 22½"-22¾"-21⅝"-22"-22½"-22¾". Make another sleeve. ASSEMBLY: Sew the shoulder seams. Sew the sleeves inside 1 edge st. Sew on buttons. Steam the garment to make it hang nicely. NECK EDGE: Pick up approx. 90 to 110 sts around the neck (includes sts on stitch holders at the front) on circular needle size 4 mm / US 6. K 3 rows and bind off with K from RS. |
|||||||||||||||||||||||||
Diagram explanations |
|||||||||||||||||||||||||
|
|||||||||||||||||||||||||
 |
|||||||||||||||||||||||||
 |
|||||||||||||||||||||||||
Have you finished this pattern?Tag your pictures with #dropspattern #rosalindecardigan or submit them to the #dropsfan gallery. Do you need help with this pattern?You'll find 27 tutorial videos, a Comments/Questions area and more by visiting the pattern on garnstudio.com. © 1982-2026 DROPS Design A/S. We reserve all rights. This document, including all its sub-sections, has copyrights. Read more about what you can do with our patterns at the bottom of each pattern on our site. |
|||||||||||||||||||||||||


With over 40 years in knitting and crochet design, DROPS Design offers one of the most extensive collections of free patterns on the internet - translated to 17 languages. As of today we count 324 catalogs and 12290 patterns - 12280 of which are translated into English (US/in).
We work hard to bring you the best knitting and crochet have to offer, inspiration and advice as well as great quality yarns at incredible prices! Would you like to use our patterns for other than personal use? You can read what you are allowed to do in the Copyright text at the bottom of all our patterns. Happy crafting!
Post a comment to pattern DROPS 148-2
We would love to hear what you have to say about this pattern!
If you want to leave a question, please make sure you select the correct category in the form below, to speed up the answering process. Required fields are marked *.