
Popular categories
Looking for a yarn?


Comments / Questions (168)
![]() Lena wrote:
Lena wrote:
Skal jeg strikke et omslag sidst i A-1 (b)eller skal omslaget med i A-1 (c)?
19.08.2013 - 06:49DROPS Design answered:
Du strikker det med sidst i A.1B. A.1B skal gaa over 16 masker og A.1C over 5.
19.08.2013 - 10:30Jill Jespersen wrote:
When knitting size medium how do I do pattern A-4 with a repeat of 25 stitches over 179 stitches after the decreases? I will adjust the decreases to fit multiples of 25 but would be interested to hear your explanation.
28.06.2013 - 14:42DROPS Design answered:
Dear Mrs Jesperen, in size M, you are supposed to have 163 sts for body after dec in last row in A-3, you then work A-4 as follows : 5 front band sts, A-4a (=4 sts beg of the pattern see on the bottom part of diagram), repeat 9 times A-4b (=16 sts), A-4c (=5 sts - end of pattern) and 5 front band st = 163 sts. Happy knitting!
28.06.2013 - 21:46
![]() Ineke wrote:
Ineke wrote:
Hallo Marijke, Je bent de enige niet. Ik heb zelf ook een dergelijke opmerking geplaatst bij Karisma zelf. Lees maar eens na en ook de reactie van Drops. Groetjes,Ineke
12.05.2013 - 19:12
![]() Marijke wrote:
Marijke wrote:
Ik heb net deze vest gebreid met de Karisma wol zoals in beschrijving. Na het wassen (op 30 graden en plat drogen) is de vast jammer genoeg veel groter geworden. Ik dacht dat dit goede kwaliteit wol was. Heeft iemand enig idee hoe dit komt ?
12.05.2013 - 15:39DROPS Design answered:
Hoi Marijke. Dat is jammer om te horen. Het kan zijn dat de stekenverhouding niet klopte (kan lubberen veroorzaken). Verder raad ik altijd aan om eerst een proeflapje te breien en wassen in je machine. Wol is een natuurproduct en elke wasmachine/wolwasmiddel anders... Dan weet je precies hoe het garen reageert in jouw machine en voorkom je een heleboel frustratie ;o) Vergeet niet om het model na het wassen plat te laten drogen!
14.05.2013 - 10:15
![]() Rianne wrote:
Rianne wrote:
Ik kom niet goed uit als ik bij maat M op het achterpand over moet gaan in A.4. Als je begint met drie steken recht (1 ks en de eerste 2 steken van het patroon) kan je vervolgens 8 keer de combi van 5 steken/3 steken doen, maar dan hou je na de laatste keer 3 steken, 4 steken over waar je er 8 (één keer de 5, één keer de laatste 2 steken van het patroon en 1 ks zou moeten hebben).
25.03.2013 - 00:01DROPS Design answered:
Dit staat er in het patroon: "Brei A.4 een keer in de hoogte (tel naar de zijkanten vanuit de st gemarkeerd met 1 pijl in het telpatroon = middenachter, brei de st aan elke zijkant die niet in het patroon passen in tricotst)". Dit betekent dat u zorgt dat de st bij het pijltje in het midden komt (43e st voor maat M) en tel naar de zijkanten. De st, die geen deel van het motief kunnen vormen breit u in tricotst.
27.03.2013 - 11:26Noudy wrote:
When i start binding off for the sleeve cap, do i keep knitting an edge st at the beginning of every row ? or do i consider it bound off already ?
31.01.2013 - 00:21DROPS Design answered:
Dear Noudy, edge st has been bind off with the first bound off, just continue cast off and dec in pattern as stated. Happy knitting !
31.01.2013 - 13:54H.y.a wrote:
In the part of instructions for making the sleeves i didn't understand the part where it says "(count outwards so that st marked with 1 arrow in diagram is on the middle of sleeve)can you please describe that? thanks in advance
29.01.2013 - 21:16DROPS Design answered:
Mark middle st on your sleeve. Now count from middle st how many sts you have until edge st. Write it down. Now count on chart same no sts (repeating pattern) from middle st, til you have same no sts as on half sleeve. Square where you reached to right number, is point where you should start pattern. Check twice. Happy knitting!
29.01.2013 - 21:47
![]() Johanna wrote:
Johanna wrote:
Tere, milline oleks selle heegelduse skeem ?
15.01.2013 - 15:27DROPS Design answered:
See kampsun on kootud, mitte heegeldatud. Aga uues kataloogis leidub ka palju ilusaid heegeldisi.
29.01.2013 - 22:17
![]() Ulla Bøgvad wrote:
Ulla Bøgvad wrote:
Jeg vil meget gerne strikke den, men det kniber lidt med taljen, som jeg ikke har, kan jeg strikke den lige op uden indtagninger
12.01.2013 - 17:27DROPS Design answered:
Hej Ulla. Det kan du godt, men saa skal du ikke tage ind i A.3.
16.01.2013 - 16:58
![]() Yvonne wrote:
Yvonne wrote:
Har just avslutat detta arbete.Allt gick utmärkt. Men kragen? Jag hittar inget i mönstret vad jag ska göra med de 20 maskor i var sida jag har på en tråd?
05.01.2013 - 13:01DROPS Design answered:
Sticka enligt besk under Vänster Framst: .... Sticka sedan med rätst över kragen så här: * 2 v över endast de yttersta 15-15-15-18-18-18 m (mot mitt fram), 2 v över alla m *, upprepa *-* tills kragen mäter ca 5½-5½-6-6-6½-6½ cm innerst längs den kortaste sidan (den kommer då att mäta det dubbla ytterst),sätt m på 1 tråd. MONTERING: Sy kragen tills mitt bak med maskstygn. Se gärna instruktionsvideo!
23.01.2013 - 14:21
|
|||||||||||||||||||
Eva Luna#evalunacardigan |
|||||||||||||||||||
|
|
|||||||||||||||||||
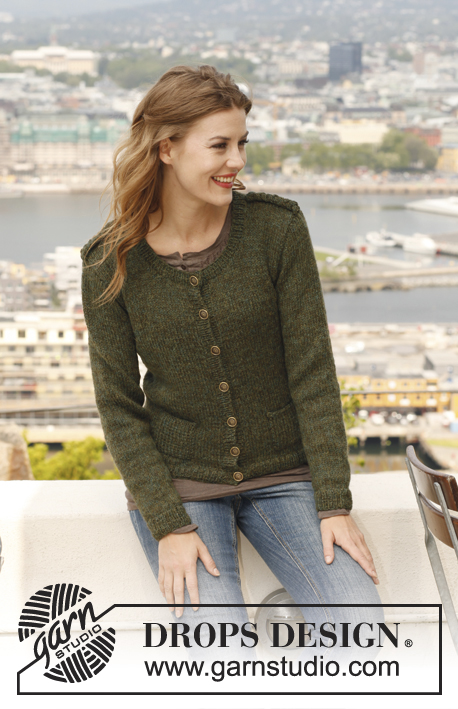
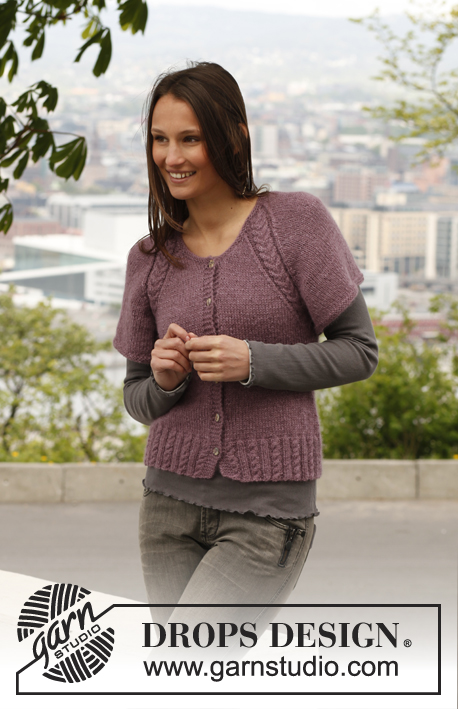
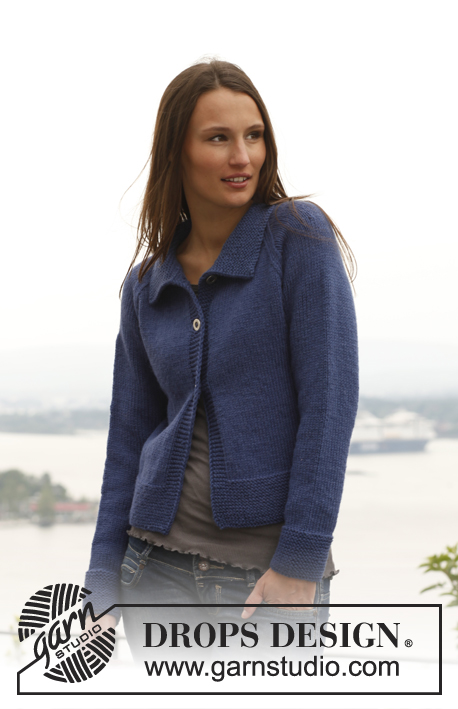
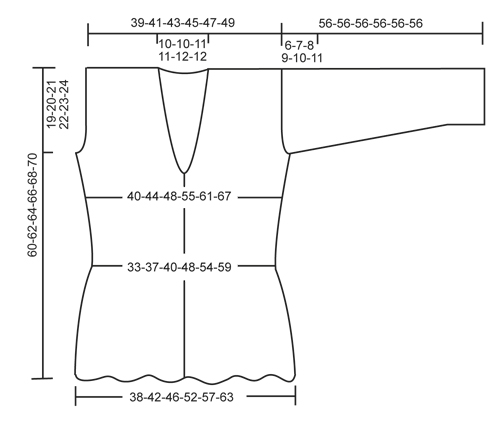
Knitted DROPS fitted jacket with lace pattern and shawl collar in ”Karisma”. Size: XS - XXXL.
DROPS 141-6 |
|||||||||||||||||||
|
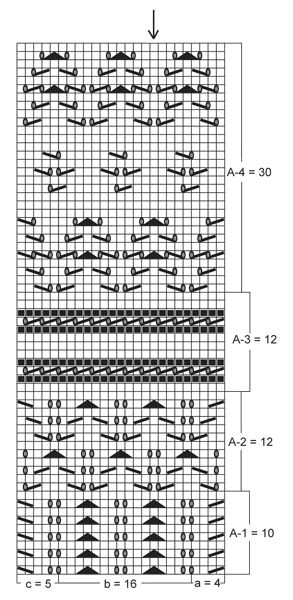
GARTER ST (back and forth on needle): K sts on all rows. BUTTONHOLES: Bind off for buttonholes on right band. 1 buttonhole = K tog third and fourth st from mid front and make 1 YO. Bind off for buttonholes when piece measures: SIZE XS/S: 6, 13, 20, 27, 34 and 40 cm / 2⅜",5⅛",8",10⅝",13⅜" and 15¾". SIZE M: 6, 13, 20, 27, 34 and 41 cm / 2⅜",5⅛",8",10⅝",13⅜" and 16⅛". SIZE L: 6, 14, 21, 28, 35 and 42 cm / 2⅜",5½",8¼",11",13¾" and 16½". SIZE XL: 6, 14, 22, 29, 36 and 43 cm / 2⅜",5½",8¾",11⅜",14¼" and 17". SIZE XXL: 6, 14, 22, 30, 37 and 44 cm / 2⅜",5½",8¾",11¾",14½" and 17¼". SIZE XXXL: 6, 14, 22, 30, 38 and 45 cm / 2⅜",5½",8¾",11¾",15" and 17¾". PATTERN: See diagrams A-1 to A-4. Diagrams show all rows seen from RS. DECREASE TIP (applies to neck): Dec from RS inside all sts in garter st, i.e. band + the sts inc for collar. Dec as follows on the left side, before all sts in garter st: K 2 tog. Dec as follows on the right side, after all sts in garter st: Slip 1 st as if to K, K 1, psso. ---------------------------------------------------------- BODY: Worked back and forth on circular needle from mid front. Loosely cast on 211-231-251-281-311-341 sts (includes 5 band sts in each side towards mid front) on circular needle size 4 mm / US 6 with Karisma. Work first row as follows (= WS): K 5, K 2 tog, * K 7, slip 1 st as if to K, K 2 tog, psso *, repeat from *-* until 14 sts remain, K 7, K 2 twisted tog, K 5 = 171-187-203-227-251-275 sts. K 2 rows over all sts. Insert 2 markers in the piece; 45-49-53-59-65-71 sts in from each side (= 81-89-97-109-121-133 sts between markers on back piece). Continue as follows: 5 band sts in GARTER ST (see explanation above), work diagram A-1 as follows: Diagram a over 4 sts, diagram b over 152-168-184-208-232-256 sts and diagram c over 5 sts, then 5 band sts in garter st. Work A-1 one time vertically. AT THE SAME TIME when piece measures 6 cm / 2⅜", beg to bind off for BUTTONHOLES – see explanation above! REMEMBER THE GAUGE! Then work diagram A-2 the same way (bands are worked in garter st the entire time), repeat A-2 a total of 3 times vertically. Continue with diagram A-3 – AT THE SAME TIME on 1st row dec 12-12-12-8-8-8 sts evenly (dec 6-6-6-4-4-4 sts over back piece and 3-3-3-2-2-2 sts over each front piece, do not dec over bands) = 159-175-191-219-243-267 sts, also dec 12-12-12-8-8-8 sts evenly on last row in A-3 - distribute the dec the same way as previous dec = 147-163-179-211-235-259 sts. When A-3 has been worked 1 time vertically, work A-4 1 time vertically. After A-4, piece measures approx. 32 cm / 12½". Continue with A-3 – AT THE SAME TIME on 1st row inc 16 sts evenly (8 sts over back piece and 4 sts over each front piece) = 163-179-195-227-251-275 sts. Also inc the same way on last row in A.3 = 179-195-211-243-267-291 sts. When A-3 has been worked one time, continue with A-2 (inc for collar will beg before A-2 is done – read explanation below). COLLAR: At the same time when piece measures 39-40-41-42-43-44 cm / 15¼"-15¾"-16⅛"-16½"-17"-17¼", beg inc for collar in each side towards mid front. Inc by making 1 YO inside outermost sts in garter st in each side - on next row K YO twisted to avoid holes. Repeat inc every other row until 15-15-15-18-18-18 sts have been inc in each side, i.e. there are a total of 20-20-20-23-23-23 sts in garter st in each side. Work A-2 until piece measures approx. 41-42-43-44-45-46 cm / 16⅛"-16½"-17"-17¼"-17¾"-18" - stop after one full repetition. Then work first row in A-3 as follows: Inc for collar and work band as before, dec 1 st for neck – SEE DECREASE TIP, work until 2-3-3-4-4-5 sts remain before marker in the side, bind off 4-6-6-8-8-10 sts for armhole, work until 2-3-3-4-4-5 sts remain before next marker, bind off 4-6-6-8-8-10 sts for armhole, work until 2 sts remain before band, dec 1 st for neck – SEE DECREASE TIP, work band and inc for collar as before. Finish each part separately. LEFT FRONT PIECE: Read all of the following section before continuing! PATTERN: Continue with A-3 until diagram has been worked 1 time vertically, then work A-4 one time (work the sts that do not fit up towards neck when dec for neck are worked in stockinette st), then work A-3 one more time and then work in stockinette st until finished measurements - 1 st at the edge towards armhole is worked in garter st the entire time. ARMHOLE: At the same time bind off for armhole at beg of every row from the side as follows: 2 sts 0-0-0-2-3-4 times and then 1 st 0-0-2-3-5-6 times. COLLAR AND NECK: Continue inc for collar, repeat dec for neck every other row 4 more times and then every 4th row 5-5-6-6-7-7 times. After inc for collar and dec for neck, there are 50-53-54-59-60-62 sts on needle. When piece measures 60-62-64-66-68-70 cm / 23⅝"-24⅜"-25¼"-26"-26¾"-27½", bind off the first 30-33-34-36-37-39 sts from RS for shoulder, work the rest of row (= 20-20-20-23-23-23 sts remain for collar). Then work in garter st over collar as follows: * 2 rows over only the outermost 15-15-15-18-18-18 sts (towards mid front), 2 rows over all sts *, repeat from *-* until collar measures approx. 5½-5½-6-6-6½-6½ cm / 2¼"-2¼"-2⅜"-2⅜"-2½"-2½" on inside along the shortest side (it will then measure the double in the outer side), slip sts on a stitch holder. RIGHT FRONT PIECE: Work as left front piece but reversed. When casting/binding off the shoulder sts, this is done from WS to avoid cutting the thread to work the collar. BACK PIECE: = 81-87-95-109-121-131 sts. Bind off for armholes in each side as on front piece = 81-87-91-95-99-103 sts. AT THE SAME TIME finish A-3 with outermost sts in each side in garter st, continue with A-4 one time vertically (count outwards so that st marked with 1 arrow in diagram is mid back, work the sts in each side that do not fit the pattern in stockinette st). Then work A-3 one more time before continuing in stockinette st until finished measurements. When piece measures 58-60-62-64-66-68 cm / 22¾"-23⅝"-24⅜"-25¼"-26"-26¾", bind off the middle 19-19-21-21-23-23 sts for neck and finish each shoulder separately. Bind off 1 st on next row from neck = 30-33-34-36-37-39 sts remain on each shoulder. Bind off when piece measures 60-62-64-66-68-70 cm / 23⅝"-24⅜"-25¼"-26"-26¾"-27½". SLEEVE: Worked back and forth on needle. Loosely cast on 63-63-63-73-73-73 sts (incl 1 edge st in each side) on needle size 4 mm / US 6 with Karisma. Work first row as follows (= WS): K 1, K 2 tog, * K 7, slip 1 st as if to K, K 2 tog, psso *, repeat from *-* until 10 sts remain, K 7, K 2 twisted tog, K 1 = 51-51-51-59-59-59 sts. K 2 rows over all sts. Work as follows (1st row = RS): 1 edge st in garter st, work diagram A-1 as follows: Diagram a over 4 sts, diagram b over 40-40-40-48-48-48 sts and diagram c over 5 sts, finish with 1 edge st in garter st. Work A-1 one time vertically. READ ALL OF THE FOLLOWING SECTION BEFORE CONTINUING! PATTERN: Continue with A-2 the same way four times vertically, then work A-3 one time, A-4 one time (count outwards so that st marked with 1 arrow in diagram is on the middle of sleeve), A-3 one time and then A-2 until finished measurements. INCREASE: At the same time when piece measures 12-12-14-14-16-16 cm / 4¾"-4¾"-5½"-5½"-6¼"-6¼", inc 1 st in each side. Repeat inc every 4½-3½-2½-2½-2-1½ cm / 1¾"-1¼"-⅞"-⅞"-¾"-½" 8-10-12-11-14-17 more times = 69-73-77-83-89-95 sts – work the inc sts in stockinette st until they fit the pattern. SLEEVE CAP: When piece measures 50-49-48-47-46-45 cm / 19¾"-19¼"-19"-18½"-18"-17¾" (shorter measurements in the larger sizes because of longer sleeve cap and wider shoulders), bind off for sleeve cap at beg of every row in each side: 4 sts 1 time, then 2 sts in each side until piece measures 55 cm / 21½"" in all sizes (make sure that the pattern is not displaced when binding off, work the sts that do not fit in stockinette st), finally bind off 3 sts 1 time in each side before binding off the remaining sts. The piece now measures approx. 56 cm / 22" in all sizes. ASSEMBLY: Sew the shoulder seams. Sew the collar tog mid back with grafting/kitchener sts and sew it to the back piece. Sew sleeve seams inside 1 edge st and sew in the sleeves. Sew on buttons. |
|||||||||||||||||||
Diagram explanations |
|||||||||||||||||||
|
|||||||||||||||||||
 |
|||||||||||||||||||
 |
|||||||||||||||||||
Have you finished this pattern?Tag your pictures with #dropspattern #evalunacardigan or submit them to the #dropsfan gallery. Do you need help with this pattern?You'll find 13 tutorial videos, a Comments/Questions area and more by visiting the pattern on garnstudio.com. © 1982-2026 DROPS Design A/S. We reserve all rights. This document, including all its sub-sections, has copyrights. Read more about what you can do with our patterns at the bottom of each pattern on our site. |
|||||||||||||||||||


With over 40 years in knitting and crochet design, DROPS Design offers one of the most extensive collections of free patterns on the internet - translated to 17 languages. As of today we count 324 catalogs and 12290 patterns - 12280 of which are translated into English (US/in).
We work hard to bring you the best knitting and crochet have to offer, inspiration and advice as well as great quality yarns at incredible prices! Would you like to use our patterns for other than personal use? You can read what you are allowed to do in the Copyright text at the bottom of all our patterns. Happy crafting!
Post a comment to pattern DROPS 141-6
We would love to hear what you have to say about this pattern!
If you want to leave a question, please make sure you select the correct category in the form below, to speed up the answering process. Required fields are marked *.