
Popular categories
Looking for a yarn?


Comments / Questions (168)
![]() Hauser Ruth wrote:
Hauser Ruth wrote:
Ich möchte PAPIER.ANLEITUNGEN
25.02.2025 - 19:45DROPS Design answered:
Liebe Frau Ruth, unsere Anleitungen können nur direkt von unserer Website ausgedruckt werden; auf dem kleinen Drucker oben rechts klicken um die Anleitung auszudrucken. Viel Spaß beim Stricken!
26.02.2025 - 08:07
![]() Hauser Ruth wrote:
Hauser Ruth wrote:
Ich möchte PAPIER.ANLEITUNGEN
25.02.2025 - 19:41
![]() Alice wrote:
Alice wrote:
What size are the "DROPS SILVER ANTIQUE BUTTON NO 533: 6 pieces" Are they no longer available?
03.06.2023 - 19:36DROPS Design answered:
Dear Alice, they are 20mm buttons, but unfortunately they have been discontinued. You can substitute them for other buttons of your choice. Happy knitting!
04.06.2023 - 18:21
![]() LOTISSEMENT LA PRADE wrote:
LOTISSEMENT LA PRADE wrote:
Bonjour je viens de rabattre les maille pour l épaule et je ne comprends pas ce que l on doit faire pour l encolure , comment fait on les rangs raccourcis ? a cet endroit , avez vous une vidéo je vous remercie
24.01.2023 - 14:59DROPS Design answered:
Bonjour Mme La Prade, pour tricoter des rangs raccourcis, retrouvez cette vidéo (méthode de base) ou bien celle-ci (méthode des mailles enveloppées) et tricotez ainsi, en commençant sur l'endroit/devant droit ou sur l'envers/devant gauche: 2 rangs sur 15-18 m (laissez les autres sans les tricoter), 2 rangs sur les 20-23 m, répétez ces 4 rangs ainsi. Bon tricot!
24.01.2023 - 16:44
![]() LYDIE PUERTAS wrote:
LYDIE PUERTAS wrote:
Bonjour je suis arrivé en haut du devant gauche : pour la partie que l on doit finir en jersey que devient la bande ( la bordure ) en point mousse ?? doit on la continuer en point mousse ? ou est ce que on la continue en jersey?? merci beaucoup pour votre reponse
07.01.2023 - 15:40DROPS Design answered:
Bonjour Mme Puertas, vous continuez à tricoter les mailles du col/de la bordure devant au point mousse comme avant - continuez les augmentations du col/les diminutions de l'encolure si elles ne sont pas terminées, puis rabattez les mailles de l'épaule et continuez à tricoter les mailles du col au point mousse, en rangs raccourcis. Bon tricot!
09.01.2023 - 09:04
![]() LYDIE PUERTAS wrote:
LYDIE PUERTAS wrote:
Bonjour j aimerai savoir puisque les augmentations pour le col se font au point mousse est ce que la bordure devant droite et gauche est elle aussi au point mousse ?? ou en jersey ?
13.12.2022 - 14:45DROPS Design answered:
Bonjour Mme Puertas, tout à fait, on tricote 5 mailles de bordure devant au point mousse dès le début. Bon tricot!
13.12.2022 - 15:39
![]() Thea wrote:
Thea wrote:
Waarom moeten de steken van de panden op een hulpdraad worden gezet? Lijkt mij dat ze gewoon afgekant kunnen worden aangezien de schoudernaden aan elkaar worden genaaid
21.01.2020 - 17:39DROPS Design answered:
Dag Thea,
De steken van de schouder worden ook gewoon afgekant. Daarna brei je alleen over de steken van de kraag verder op beide voorpanden. De kraag wordt aan de achterkant met maassteken aan elkaar gemaakt. Dit is uitgelegd in een van de bijgevoegde video's.
26.01.2020 - 14:48
![]() Marieken Scholten wrote:
Marieken Scholten wrote:
Bij het afkanten van de mouw staat: Kant bij een hoogte van 50-49-48-47-46-45 cm af voor de mouwkop aan het begin van elke nld aan elke kant: 1 keer 4 st, dan 2 st aan elke kant tot het werk 55 cm meet voor alle maten . Is het de bedoeling dat ik ieder 2e naald 2 steken afkant, of maarééen keer.
09.12.2019 - 22:16DROPS Design answered:
Dag Marieken,
Het is de bedoeling dat je steeds aan het begin van elke naald 2 steken afkant. Dus op zowel de heengaande als de teruggaande naald.
12.12.2019 - 10:34
![]() Lina Audronyte-Vladimirova wrote:
Lina Audronyte-Vladimirova wrote:
Hello again, could you please be kind and help me with the decrease for neck and increase for collar? How many stitches has to be on collar band-20 all the time (XS size) ? I decrease for neck, but why to increase for collar? Please explain.
06.12.2019 - 09:13DROPS Design answered:
Dear Mrs Audronyte-Vladimirova, you decrease for the V-neck and at the same time increase for the shawl collar, ie you will have more stitches in garter stitch (= front band stitches + new stitches increased for the collar) until there is a total of 20 sts in garter stitch. Happy knitting!
06.12.2019 - 10:00
![]() Lina Audronyte-Vladimirova wrote:
Lina Audronyte-Vladimirova wrote:
Hello! Could you please help me, do I need to increase for collar EVERY row? It looks bad. I think increasing one stitch EVERY SECOND row would look much better? Please help me find out if correctly understand this step.
26.11.2019 - 18:23DROPS Design answered:
Dear Mrs Audronyte-Vladimirova, increases for collar as worked on every other row until 15 or 18 sts have been increased in each side (in each front piece); there will be 20-23 sts in garter stitch in each side. But you will have to divide body before all increases are done, ie divide for piece 2 cm after first increases for collar. Happy knitting!
27.11.2019 - 07:46
|
|||||||||||||||||||
Eva Luna#evalunacardigan |
|||||||||||||||||||
|
|
|||||||||||||||||||
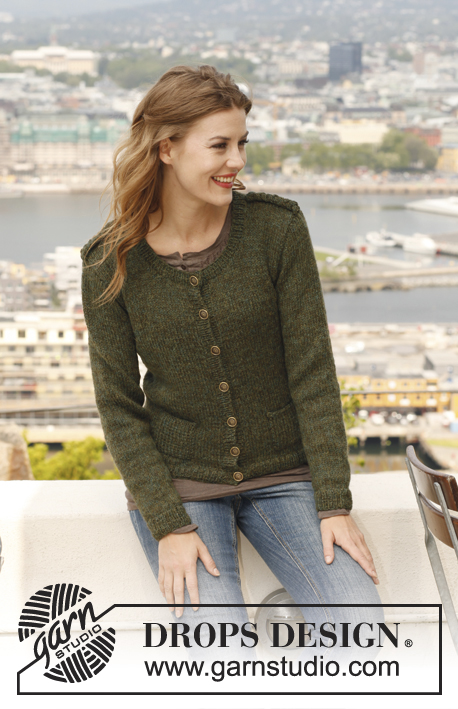
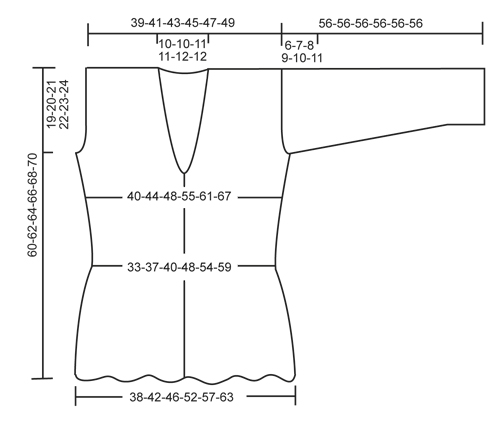
Knitted DROPS fitted jacket with lace pattern and shawl collar in ”Karisma”. Size: XS - XXXL.
DROPS 141-6 |
|||||||||||||||||||
|
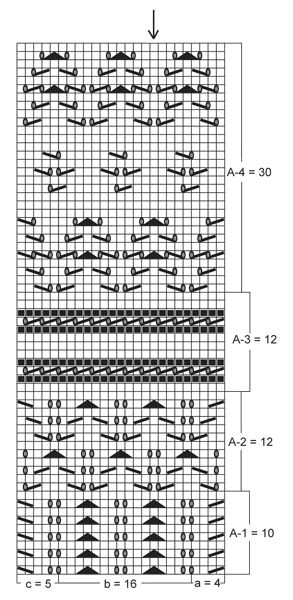
GARTER ST (back and forth on needle): K sts on all rows. BUTTONHOLES: Bind off for buttonholes on right band. 1 buttonhole = K tog third and fourth st from mid front and make 1 YO. Bind off for buttonholes when piece measures: SIZE XS/S: 6, 13, 20, 27, 34 and 40 cm / 2⅜",5⅛",8",10⅝",13⅜" and 15¾". SIZE M: 6, 13, 20, 27, 34 and 41 cm / 2⅜",5⅛",8",10⅝",13⅜" and 16⅛". SIZE L: 6, 14, 21, 28, 35 and 42 cm / 2⅜",5½",8¼",11",13¾" and 16½". SIZE XL: 6, 14, 22, 29, 36 and 43 cm / 2⅜",5½",8¾",11⅜",14¼" and 17". SIZE XXL: 6, 14, 22, 30, 37 and 44 cm / 2⅜",5½",8¾",11¾",14½" and 17¼". SIZE XXXL: 6, 14, 22, 30, 38 and 45 cm / 2⅜",5½",8¾",11¾",15" and 17¾". PATTERN: See diagrams A-1 to A-4. Diagrams show all rows seen from RS. DECREASE TIP (applies to neck): Dec from RS inside all sts in garter st, i.e. band + the sts inc for collar. Dec as follows on the left side, before all sts in garter st: K 2 tog. Dec as follows on the right side, after all sts in garter st: Slip 1 st as if to K, K 1, psso. ---------------------------------------------------------- BODY: Worked back and forth on circular needle from mid front. Loosely cast on 211-231-251-281-311-341 sts (includes 5 band sts in each side towards mid front) on circular needle size 4 mm / US 6 with Karisma. Work first row as follows (= WS): K 5, K 2 tog, * K 7, slip 1 st as if to K, K 2 tog, psso *, repeat from *-* until 14 sts remain, K 7, K 2 twisted tog, K 5 = 171-187-203-227-251-275 sts. K 2 rows over all sts. Insert 2 markers in the piece; 45-49-53-59-65-71 sts in from each side (= 81-89-97-109-121-133 sts between markers on back piece). Continue as follows: 5 band sts in GARTER ST (see explanation above), work diagram A-1 as follows: Diagram a over 4 sts, diagram b over 152-168-184-208-232-256 sts and diagram c over 5 sts, then 5 band sts in garter st. Work A-1 one time vertically. AT THE SAME TIME when piece measures 6 cm / 2⅜", beg to bind off for BUTTONHOLES – see explanation above! REMEMBER THE GAUGE! Then work diagram A-2 the same way (bands are worked in garter st the entire time), repeat A-2 a total of 3 times vertically. Continue with diagram A-3 – AT THE SAME TIME on 1st row dec 12-12-12-8-8-8 sts evenly (dec 6-6-6-4-4-4 sts over back piece and 3-3-3-2-2-2 sts over each front piece, do not dec over bands) = 159-175-191-219-243-267 sts, also dec 12-12-12-8-8-8 sts evenly on last row in A-3 - distribute the dec the same way as previous dec = 147-163-179-211-235-259 sts. When A-3 has been worked 1 time vertically, work A-4 1 time vertically. After A-4, piece measures approx. 32 cm / 12½". Continue with A-3 – AT THE SAME TIME on 1st row inc 16 sts evenly (8 sts over back piece and 4 sts over each front piece) = 163-179-195-227-251-275 sts. Also inc the same way on last row in A.3 = 179-195-211-243-267-291 sts. When A-3 has been worked one time, continue with A-2 (inc for collar will beg before A-2 is done – read explanation below). COLLAR: At the same time when piece measures 39-40-41-42-43-44 cm / 15¼"-15¾"-16⅛"-16½"-17"-17¼", beg inc for collar in each side towards mid front. Inc by making 1 YO inside outermost sts in garter st in each side - on next row K YO twisted to avoid holes. Repeat inc every other row until 15-15-15-18-18-18 sts have been inc in each side, i.e. there are a total of 20-20-20-23-23-23 sts in garter st in each side. Work A-2 until piece measures approx. 41-42-43-44-45-46 cm / 16⅛"-16½"-17"-17¼"-17¾"-18" - stop after one full repetition. Then work first row in A-3 as follows: Inc for collar and work band as before, dec 1 st for neck – SEE DECREASE TIP, work until 2-3-3-4-4-5 sts remain before marker in the side, bind off 4-6-6-8-8-10 sts for armhole, work until 2-3-3-4-4-5 sts remain before next marker, bind off 4-6-6-8-8-10 sts for armhole, work until 2 sts remain before band, dec 1 st for neck – SEE DECREASE TIP, work band and inc for collar as before. Finish each part separately. LEFT FRONT PIECE: Read all of the following section before continuing! PATTERN: Continue with A-3 until diagram has been worked 1 time vertically, then work A-4 one time (work the sts that do not fit up towards neck when dec for neck are worked in stockinette st), then work A-3 one more time and then work in stockinette st until finished measurements - 1 st at the edge towards armhole is worked in garter st the entire time. ARMHOLE: At the same time bind off for armhole at beg of every row from the side as follows: 2 sts 0-0-0-2-3-4 times and then 1 st 0-0-2-3-5-6 times. COLLAR AND NECK: Continue inc for collar, repeat dec for neck every other row 4 more times and then every 4th row 5-5-6-6-7-7 times. After inc for collar and dec for neck, there are 50-53-54-59-60-62 sts on needle. When piece measures 60-62-64-66-68-70 cm / 23⅝"-24⅜"-25¼"-26"-26¾"-27½", bind off the first 30-33-34-36-37-39 sts from RS for shoulder, work the rest of row (= 20-20-20-23-23-23 sts remain for collar). Then work in garter st over collar as follows: * 2 rows over only the outermost 15-15-15-18-18-18 sts (towards mid front), 2 rows over all sts *, repeat from *-* until collar measures approx. 5½-5½-6-6-6½-6½ cm / 2¼"-2¼"-2⅜"-2⅜"-2½"-2½" on inside along the shortest side (it will then measure the double in the outer side), slip sts on a stitch holder. RIGHT FRONT PIECE: Work as left front piece but reversed. When casting/binding off the shoulder sts, this is done from WS to avoid cutting the thread to work the collar. BACK PIECE: = 81-87-95-109-121-131 sts. Bind off for armholes in each side as on front piece = 81-87-91-95-99-103 sts. AT THE SAME TIME finish A-3 with outermost sts in each side in garter st, continue with A-4 one time vertically (count outwards so that st marked with 1 arrow in diagram is mid back, work the sts in each side that do not fit the pattern in stockinette st). Then work A-3 one more time before continuing in stockinette st until finished measurements. When piece measures 58-60-62-64-66-68 cm / 22¾"-23⅝"-24⅜"-25¼"-26"-26¾", bind off the middle 19-19-21-21-23-23 sts for neck and finish each shoulder separately. Bind off 1 st on next row from neck = 30-33-34-36-37-39 sts remain on each shoulder. Bind off when piece measures 60-62-64-66-68-70 cm / 23⅝"-24⅜"-25¼"-26"-26¾"-27½". SLEEVE: Worked back and forth on needle. Loosely cast on 63-63-63-73-73-73 sts (incl 1 edge st in each side) on needle size 4 mm / US 6 with Karisma. Work first row as follows (= WS): K 1, K 2 tog, * K 7, slip 1 st as if to K, K 2 tog, psso *, repeat from *-* until 10 sts remain, K 7, K 2 twisted tog, K 1 = 51-51-51-59-59-59 sts. K 2 rows over all sts. Work as follows (1st row = RS): 1 edge st in garter st, work diagram A-1 as follows: Diagram a over 4 sts, diagram b over 40-40-40-48-48-48 sts and diagram c over 5 sts, finish with 1 edge st in garter st. Work A-1 one time vertically. READ ALL OF THE FOLLOWING SECTION BEFORE CONTINUING! PATTERN: Continue with A-2 the same way four times vertically, then work A-3 one time, A-4 one time (count outwards so that st marked with 1 arrow in diagram is on the middle of sleeve), A-3 one time and then A-2 until finished measurements. INCREASE: At the same time when piece measures 12-12-14-14-16-16 cm / 4¾"-4¾"-5½"-5½"-6¼"-6¼", inc 1 st in each side. Repeat inc every 4½-3½-2½-2½-2-1½ cm / 1¾"-1¼"-⅞"-⅞"-¾"-½" 8-10-12-11-14-17 more times = 69-73-77-83-89-95 sts – work the inc sts in stockinette st until they fit the pattern. SLEEVE CAP: When piece measures 50-49-48-47-46-45 cm / 19¾"-19¼"-19"-18½"-18"-17¾" (shorter measurements in the larger sizes because of longer sleeve cap and wider shoulders), bind off for sleeve cap at beg of every row in each side: 4 sts 1 time, then 2 sts in each side until piece measures 55 cm / 21½"" in all sizes (make sure that the pattern is not displaced when binding off, work the sts that do not fit in stockinette st), finally bind off 3 sts 1 time in each side before binding off the remaining sts. The piece now measures approx. 56 cm / 22" in all sizes. ASSEMBLY: Sew the shoulder seams. Sew the collar tog mid back with grafting/kitchener sts and sew it to the back piece. Sew sleeve seams inside 1 edge st and sew in the sleeves. Sew on buttons. |
|||||||||||||||||||
Diagram explanations |
|||||||||||||||||||
|
|||||||||||||||||||
 |
|||||||||||||||||||
 |
|||||||||||||||||||
Have you finished this pattern?Tag your pictures with #dropspattern #evalunacardigan or submit them to the #dropsfan gallery. Do you need help with this pattern?You'll find 13 tutorial videos, a Comments/Questions area and more by visiting the pattern on garnstudio.com. © 1982-2026 DROPS Design A/S. We reserve all rights. This document, including all its sub-sections, has copyrights. Read more about what you can do with our patterns at the bottom of each pattern on our site. |
|||||||||||||||||||


With over 40 years in knitting and crochet design, DROPS Design offers one of the most extensive collections of free patterns on the internet - translated to 17 languages. As of today we count 324 catalogs and 12290 patterns - 12280 of which are translated into English (US/in).
We work hard to bring you the best knitting and crochet have to offer, inspiration and advice as well as great quality yarns at incredible prices! Would you like to use our patterns for other than personal use? You can read what you are allowed to do in the Copyright text at the bottom of all our patterns. Happy crafting!
Post a comment to pattern DROPS 141-6
We would love to hear what you have to say about this pattern!
If you want to leave a question, please make sure you select the correct category in the form below, to speed up the answering process. Required fields are marked *.