
Popular categories
Looking for a yarn?


Comments / Questions (92)
![]() Margarita Mikalsen wrote:
Margarita Mikalsen wrote:
Jag har kommit fram till den delen där man delar upp stickningen, men förstår inte riktigt hur man går vidare. Ska man slätsticka när man tar av maskor till framstycke och lägger upp nya? Kommer det inte att förstöra mönstret? Om man istället fortsätter direkt med A1 medan man tar av maskor till framstycke kommer inte mönstret att bli snett? Och hur blir det då med de nya som man tar upp? Skulle jag kunna få lite mer detaljerad beskrivning i hur man går tillväga i denna moment?
06.01.2015 - 00:50DROPS Design answered:
Hej Margarita, nej du sätter m på en tråd i varje sida och stickar först ryggen med samma mönster. Sedan sätter du tillbaka m från tråden på stickan och fortsätter samma mönster. Lycka till!
04.02.2015 - 15:44Carol Gualtieri wrote:
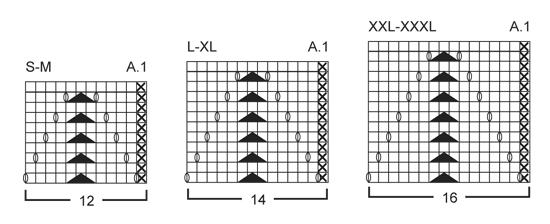
I’m confused about the A.1. diagram. The first row requires a yarnover in the beginning and a yarnover at the end, so do you knit or purl between those yarnovers. In looking at the diagram again, the box with the X through it can either be a purl or knit, depending on the side so my guess would be a purl (RS) and knit if it is on the WS - is this correct? ...
02.01.2015 - 17:43DROPS Design answered:
Dear Mrs Gualtieri, diagram starts (from RS) with P1, YO, then K to the double dec in the middle of diagram, K to last st in repeat and YO. The white squares are stocking st (K from RS, P from WS), and the X is reverse st st (P fom RS, K from WS). Happy knitting!
03.01.2015 - 14:47
![]() Virginie D'Orléans wrote:
Virginie D'Orléans wrote:
Bonsoir Pr lire le diagramme coté envers on le lit de gauche a droite ou de droite a gauche comme pr l'endroit?
03.11.2014 - 18:35DROPS Design answered:
Bonjour Virginie, quand on tricote en allers et retours, les rangs sur l'envers se lisent de gauche à droite - voir aussi ici. Bon tricot!
04.11.2014 - 08:47
![]() Angela wrote:
Angela wrote:
Hallo liebes Drops Design Team, ich würde diese Jacke gerne als Pullunder stricken, und zwar genauso wie sie ist, allerdings mit V-Ausschnitt. Wäre das machbar? Was müsste ich dabei bedenken? Vielen Dank für Ihre Hilfe! :-)
02.11.2014 - 19:21DROPS Design answered:
Liebe Angela, leider können wir die Anleitung nicht entsprechend umschreiben. Wegen des Musters wären grössere Umrechnungen nötig. Dürfen wir Sie bitten, in unserer Musterdatenbank ein passendes Modell auszusuchen?
10.11.2014 - 08:52
![]() Damiana wrote:
Damiana wrote:
He comenzado ha tejer el patrón y me encuentro con el siguiente problema: en cada vuelta del esquema aumento 2p (2 lazadas) pero solo reduzco 1 p(2 puntos juntos del derecho), con lo cual en cada vuelta del derecho la labor me ha aumentado tantos puntos como veces se repite el esquema.¿Lo he entendido yo mal o hay algún error en la explicación.
06.08.2014 - 17:42DROPS Design answered:
Hola Damiana. No hay ningún error. En cada repetición se trabaja 2 HEB (lazadas) y 2 pts dism ( desl 1 pt como de derecho, 2 pjd, pasar el pt desl por encima).
08.08.2014 - 15:17Nashwaahmed wrote:
I knitted this jacket and it turned out to be really beautiful just before blocking the finished measurement was 75 cm "for size medium" after blocking it and pinning it on blocking board it reached 85 cm and i was ok with this extra 10 cm but after i let it air dried and trying it on the jacket stretches even more to reach 96 cm, and when i lay it flat it returns again to 85 cm so what's the problem ?
02.06.2014 - 21:40DROPS Design answered:
Because of the weight of the yarn the jacket streches longer when wearing.
03.06.2014 - 10:55
![]() Beatrice wrote:
Beatrice wrote:
Bonjour, j'ai fais ce modèle qui est facile à faire. le petit souci, je trouve des moutons de laine partout.....
21.10.2013 - 10:37
![]() Rabe wrote:
Rabe wrote:
Warum muß man nach dremBündchen 29 M abnehmen ?? Sonst muß man nach dem Bündchen immer zunehmen.
03.09.2013 - 20:15DROPS Design answered:
Liebe Frau Rabe, bei einigen unserer Modelle haben unsere Designerinnen ein weites Bündchen entworfen - so auch hier. Selbstverständlich können Sie das Bündchen mit weniger Maschen stricken, wenn Ihnen das besser gefällt.
06.09.2013 - 07:41
![]() Maiken wrote:
Maiken wrote:
Forstykke: Skal de 12 m som er satt på tråden strikkes med videre som vanlig (og dermed bare brukes som merke til opplukking til halsen)?
07.03.2013 - 21:53DROPS Design answered:
Du skal strikke de 12 m först, da saetter du dem paa en traad og lader dem side her til du skal strikke KRAGE. Det er ikke til merke.
21.03.2013 - 10:05
![]() Gesine wrote:
Gesine wrote:
Ich hab dieses Modell gestern fertig bekommen. Allerdings wollte ich gerne eine Jacke mit Ärmeln. Deshalb habe ich Armlöcher und Ärmel aus der Anleitung 132-9 kombiniert. Die Ärmel hab ich im gleichen Lochmuster wie die Weste gestrickt, die Taschen allerdings weg gelassen. Ist wunderschön geworden! Als nächstes bekommt mein Mann die Jacke 85-13. DROPS macht süchtig!!!
27.02.2013 - 08:23
|
|||||||||||||
Best West#bestwestjacket |
|||||||||||||
|
|
|||||||||||||
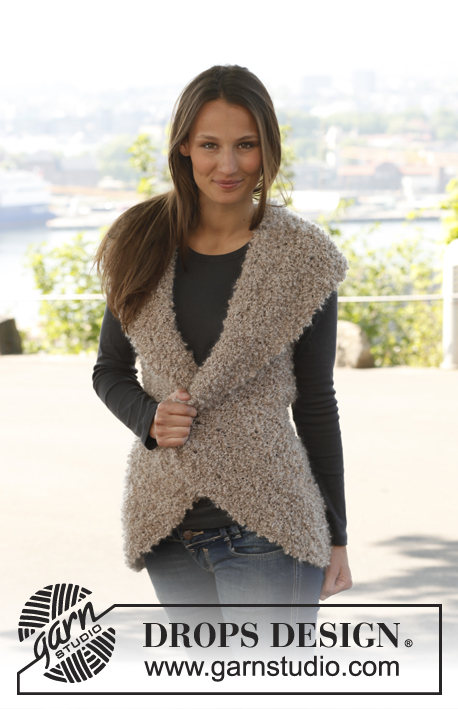
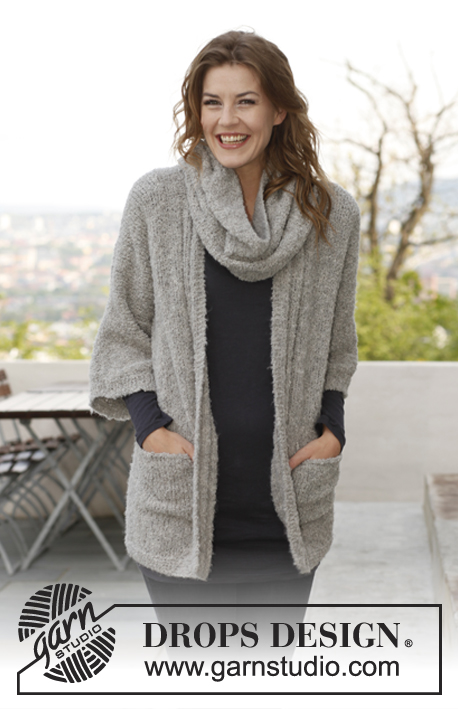
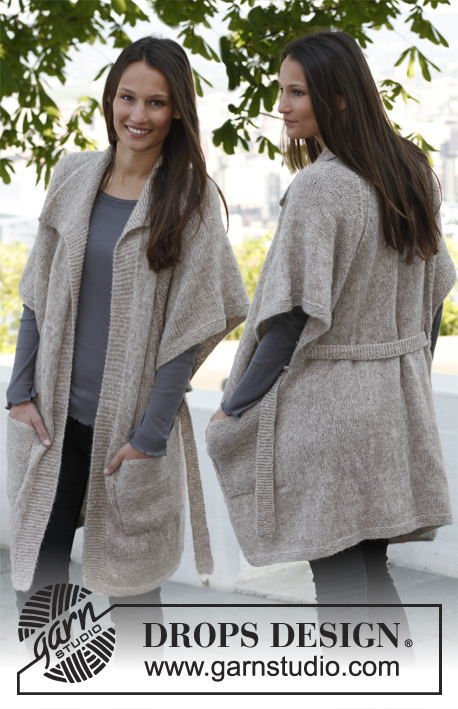
Knitted DROPS jacket with lace pattern in ”Andes”. Size: S - XXXL.
DROPS 142-13 |
|||||||||||||
|
GARTER ST (back and forth on needle): K sts on all rows. PATTERN: See diagram A.1. Diagram shows all rows in pattern seen from RS. NOTE! See diagram for size. ---------------------------------------------------------- BODY: Worked back and forth on circular needle. Cast on 148-148-172-172-196-196 sts on circular needle size 7 mm / US 10.75 with Andes. P 1 row from WS, then work as follows - from RS: 1 edge st in GARTER ST - see explanation above, * K 2, P 2 *, repeat from *-*, finish with K 2 and 1 edge st in garter st. Work rib until piece measures 8 cm / 3⅛". Switch to circular needle size 8 mm / US 11. K 1 row from RS while at the same time dec 25-25-29-29-33-33 sts evenly = 123-123-143-143-163-163 sts. P 1 row from WS. Then work as follows from RS: 1 edge st, repeat diagram A.1 a total of 10 times, finish with P 1 (K on rows from WS) and 1 edge st. Continue this pattern until piece measures 46-47-48-49-50-51 cm / 18"-18½"-19"-19¼"-19¾"-20" / 18"-18½"-19"-19¼"-19¾"-20". Slip the first 31-31-36-36-41-41 sts and the last 31-31-36-36-41-41 sts on stitch holders for front piece = 61-61-71-71-81-81 sts remain on needle. BACK PIECE: = 61-61-71-71-81-81 sts. Continue with A.1 (the half repetition in each side is worked in stockinette st) AT THE SAME TIME cast on 7-7-8-8-9-9 sts at the end of the next 2 rows = 75-75-87-87-99-99 sts. Work as follows from RS: 1 edge st in garter st, repeat A.1 a total of 6 times, P 1, 1 edge st in garter st. When piece measures 70-72-74-76-78-80 cm / 27½"-28⅜"-29⅛"-30"-30¾"-31½, bind off the middle 25-25-29-29-33-33 sts for neck = 25-25-29-29-33-33 sts remain on each shoulder/sleeve. Bind off when piece measures 72-74-76-78-80-82 cm / 28⅜"-29⅛"-30"-30¾"-31½"-32¼". RIGHT FRONT PIECE: = 31-31-36-36-41-41 sts. Continue with A.1, cast on 8-8-9-9-10-10 new sts at the end of row from RS = 39-39-45-45-51-51 sts. Then work as follows - seen from RS: 1 edge st in garter st, A.1 a total of 3 times, P 1 (K on rows from WS), 1 edge st in garter st. When piece measures 64-66-68-70-72-74 cm / 25¼"-26"-26¾"-27½"-28⅜"-29⅛", slip 8-8-10-10-12-12 sts towards mid front on a stitch holder (work them first), then bind off for neck at beg of every row from neck: 2 sts 2 times and 1 st 2 times - work the sts that do not fit one whole repetition of A.1 in stockinette st when binding off = 25-25-29-29-33-33 sts remain on shoulder/sleeve. Continue the pattern upwards, bind off when piece measures 72-74-76-78-80-82 cm / 28⅜"-29⅛"-30"-30¾"-31½"-32¼". LEFT FRONT PIECE: Work as right front piece but reversed. ASSEMBLY: Sew shoulder/sleeve seams. BAND: Pick up 94-98-102-106-110-114 sts along right front piece inside 1 edge st on circular needle size 7 mm / US 10.75. K 1 row, then work as follows from RS: 1 edge st in garter st, * K 2, P 2 *, repeat from *-*, finish with K 2 and 3 sts in garter st. When band measures 4-4-4-5-5-5 cm / 1½"-1½"-1½"-2"-2"-2", bind off for 6-6-6-6-7-7 buttonholes evenly – top buttonhole should be 1 cm / ⅜" from the top and bottom hole should be approx. 6 cm / 2⅜" from bottom edge. 1 BUTTONHOLE = P 2 tog (seen from RS) and cast on 1 new st on next row over this st. Work until band measures 8-8-9-9-10-10 cm / 3⅛"-3⅛"-3½"-3½"-4"-4", bind off with K over K and P over P. Work the same way on left front piece but do not bind off for buttonhole. COLLAR: From RS pick up 70-70-74-74-78-78 sts around the neck (includes sts on stitch holders and over bands) on circular needle size 7 mm / US 10.75. K 1 row. K 1 row from RS while AT THE SAME TIME inc 22 sts evenly = 92-92-96-96-100-100 sts. Continue to work as follows (1st row = from WS): 3 sts in garter st, * K 2, P 2 *, repeat from *-*, finish with K 2 and 3 sts in garter st. Continue like this until rib measures 15 cm / 6". Bind off sts with K over K and P over P. SLEEVE EDGE: Worked back and forth on circular needle. Pick up 66-66-70-70-74-74 sts inside 1 edge st at the edge of sleeve on circular needle size 7 mm / US 10.75. K 1 row, then work as follows: 1 edge st in garter st, * K 2, P 2 *, repeat from *-* and finish with 1 edge st in garter st. Continue like this until piece measures 8 cm / 3⅛", bind off with K over K and P over P. ASSEMBLY: Sew underarm seam inside 1 edge st. Sew the buttons on to left band. POCKET: Cast on 19-19-21-21-23-23 sts on needle size 8 mm / US 11 with Andes. K 4 rows, then work as follows - from RS: 3 sts in garter st, A.1, P 1 (K on rows from WS), 3 sts in garter st. Continue this pattern until piece measures 15 cm / 6", P 1 row from WS while adjusting the no of sts to 20-20-20-20-24-24. Then work as follows from RS: 3 sts in garter st, * K 2, P 2 *, repeat from *-* and finish with K 2 and 3 sts in garter st. Continue until pocket measures 18 cm / 7", bind off with K over K and P over P. Work another pocket and sew them on to the front pieces of jacket, directly above the rib at the bottom and approx. in the middle of front piece. |
|||||||||||||
Diagram explanations |
|||||||||||||
|
|||||||||||||
 |
|||||||||||||
 |
|||||||||||||
Have you finished this pattern?Tag your pictures with #dropspattern #bestwestjacket or submit them to the #dropsfan gallery. Do you need help with this pattern?You'll find 11 tutorial videos, a Comments/Questions area and more by visiting the pattern on garnstudio.com. © 1982-2026 DROPS Design A/S. We reserve all rights. This document, including all its sub-sections, has copyrights. Read more about what you can do with our patterns at the bottom of each pattern on our site. |
|||||||||||||


With over 40 years in knitting and crochet design, DROPS Design offers one of the most extensive collections of free patterns on the internet - translated to 17 languages. As of today we count 325 catalogs and 12298 patterns - 12288 of which are translated into English (US/in).
We work hard to bring you the best knitting and crochet have to offer, inspiration and advice as well as great quality yarns at incredible prices! Would you like to use our patterns for other than personal use? You can read what you are allowed to do in the Copyright text at the bottom of all our patterns. Happy crafting!
Post a comment to pattern DROPS 142-13
We would love to hear what you have to say about this pattern!
If you want to leave a question, please make sure you select the correct category in the form below, to speed up the answering process. Required fields are marked *.