
Popular categories
Looking for a yarn?


Comments / Questions (35)
![]() Iallerve wrote:
Iallerve wrote:
Compresse di stromectolo doctors who prescribe ivermectin at no cost
24.11.2021 - 23:11
![]() Aorzhzd wrote:
Aorzhzd wrote:
Ivermectin for dogs stromectol ivermectin
20.11.2021 - 22:25
![]() Sagponna wrote:
Sagponna wrote:
Anxiety over the counter medication
12.06.2021 - 11:20
![]() Ivermectin Dosage wrote:
Ivermectin Dosage wrote:
Ivermectin cream
08.05.2021 - 16:29
![]() Easetle wrote:
Easetle wrote:
Ivermectina dosis en humanos
07.05.2021 - 08:30
![]() Vidalista 20mg wrote:
Vidalista 20mg wrote:
Vidalista
10.03.2021 - 08:57
![]() Agdz42k wrote:
Agdz42k wrote:
Canadian pharmaceuticals online
10.01.2021 - 08:54
![]() Flma04 wrote:
Flma04 wrote:
Find gp in my area warning signs of heat stroke viagra without a doctor prescription agn33b
01.11.2020 - 12:46
![]() Teresa MAS PINTO wrote:
Teresa MAS PINTO wrote:
"If you would like a tighter waist band, you can work thin elastic with the strand for the first 3 cm" How to do that? Should I stretch the elastic while I am working with it?
14.09.2020 - 12:48DROPS Design answered:
Hi Teresa, No, you do not need to stretch the elastic while working with it. The fact it is worked into the material will give you a tighter waist band. Happy crafting!
15.09.2020 - 08:21
![]() Ree Esmus wrote:
Ree Esmus wrote:
Question about put 5 stitches on holders 1 and 3." If, while I am knitting back and forth, I keep putting 5 stitches from each end of the row onto holders, there will be gaps where the stitches have been taken off of the main needle and put on holders 1 and 3. I do not know how to put unstitched stitches on the holders without it leaving a big gap between the stitches. Should I use a "short rows" technique? I appreciate any help you can provide. Thank you.
12.08.2020 - 00:11DROPS Design answered:
Dear Mrs Esmus, correct, you can use the short rows technique, ie work the first 5 sts at the beg of row then slip them on a thread/insert any marker to mark these stitches and at the end of the row towards these sts, you should remember to turn before these 5 sts. Or you can work these 5 sts and slip them on a thread, continue working row as before - see under the relevant videos how to put sts on a thread and how to move sts from the thread back on needle. Happy knitting!
12.08.2020 - 08:06
|
|
Marilyn Tan |
|
|
|
|
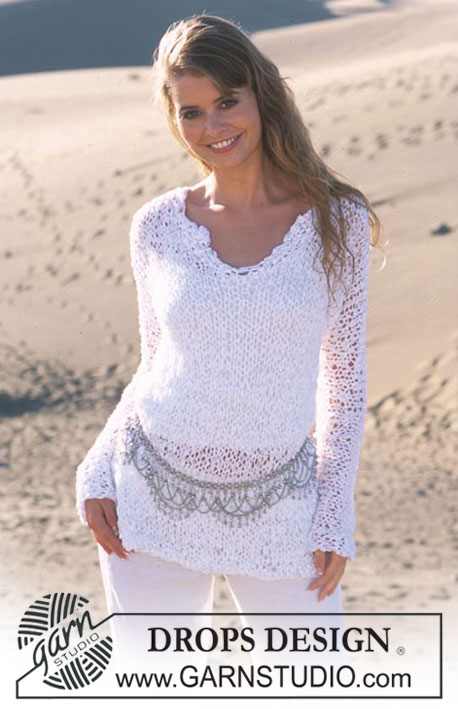
DROPS Crocheted bikini-top in Safran and Knit Shorts in Paris
DROPS 90-22 |
|
|
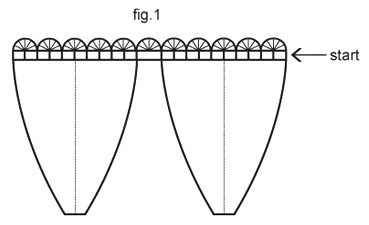
BIKINI-TOP: Crochet gauge: 22 dc x 11 rows = 10 x 10 cm. Crochet tips: At the beginning of every row ch 3 replaces 1 dc and every row ends with 1 sl st in the ch 3 at the beginning of previous row. Increasing tips: Inc 2 dc by crocheting 3 dc in dc with marker. Bikini-top: The piece is crocheted from the bottom up in 2 pieces, then put together with a lace lower edge. 1st piece: Ch 42-48-54. 1st row: 1 dc in 5th ch from hook, * skip over 1 ch, 1 dc in each of the 2 following ch *, repeat * - * and finish with 1 dc in the last ch = 27-31-35 dc. Put a marker in the center dc and move the marker up each row. Continue to crochet 1 dc in each dc – read Crochet tips – and at the same time inc 2 dc at marker on the following 4-4-5 rows – see Increasing tips = 35-39-45 dc. Now begin decreasing at center of piece: 1st row: 16-18-21 dc, skip over 3 dc, 16-18-21 dc, turn the work. 2nd row: 15-17-20 dc, skip over 2 dc, 15-17-20 dc, turn the work. 3rd row: 14-16-19 dc, skip over 2 dc, 14-16-19 dc, turn the work. Continue decreasing in this manner, by skipping over the 2 center dc (there will be 1 dc less at each side of center after every row). When 4 dc remain cut yarn and fasten = a total of 20-22-26 rows, the piece measures approx. 18-20-24 cm. Crochet an identical 2nd piece. Then crochet a row of ch-loops to join the 2 sides together – see Fig.1. Start at one side of one piece and from wrong side: 1 sc in first dc, ch 5 (= 1 dc + ch 2), skip over 2 dc, * 1 dc in the next dc, ch 2, skip over 2 dc *, repeat * - * a total of 7-9-11 times and finish with 1 dc in last dc, but for Size S skip over 3 dc instead of 2 dc two times and for Size L skip over 1 dc instead of 2 dc two times = 8-10-12 ch-loops, then ch 3, 1 dc in first dc on the next piece, * ch 2, skip over 2 dc, 1 dc in the next dc *, repeat * - * as on 1st piece = 18-22-26 dc on row, turn the work. Next row (= lace edge): ch 1, skip over 2 ch, * in the next dc crochet: 2 dc, 1 tr, 1 dtr, ch 2, 1 dtr, 1 tr and 2 dc, skip over 2 ch, 1 dc and ch 2 *, repeat * - * a total of 3-4-5 times, in the next dc crochet: 2 dc, 1 tr, 1 dtr, ch 2, 1 dtr, 1 tr and 2 dc, skip over 2 ch, 1 dc and ch 1, in the next ch (= center ch-loop between the 2 pieces) crochet: 2 dc, 1 tr, 1 dtr, ch 2, 1 dtr, 1 tr and 2 dc, skip over 1 ch, 1 dc and ch 2, * in the next dc crochet: 2 dc, 1 tr, 1 dtr, ch 2, 1 dtr, 1 tr and 2 dc, skip over 2 ch, 1 dc and ch 2 *, repeat * - * a total of 3-4-5 times, in the next dc crochet: 2 dc, 1 tr, 1 dtr, ch 2, 1 dtr, 1 tr and 2 dc, skip over 2 ch and finish with 1 sl st in ch 3 at the beginning of previous row. Ribbon: Thread the wide ribbon through the ch-loops at lower edge and tie in back. Thread each of the narrow ribbons through the hole at the top of each bra piece, fold in half, then tie at the back of the neck. Decorate with a small silk flower at center front. SHORTS: Sizes: S - M - L Hip measurements: 90/94 - 96/100 - 102/106 cm [35-⅜"/37" - 37.75"/39-⅜" - 40-⅛"/41.75"] The shorts should fit snugly, make the appropriate size for you. Materials: DROPS PARIS from Garnstudio 200-200-250 gr nr 17, natural DROPS 4.5 mm [US 7] short circular needles, or size needed to obtain correct gauge. Accessories: approx. 3 meters natural white ribbon (approx. 10 mm width) for band around stomach Gauge: 24 sts x 23 rows in rib = 10 x 10 cm (unstretched) Rib: * K 1, P 1 *, repeat * - *. Body: Cast on 160-170-180 sts on smaller short circular needles; join and place a marker at the join. Knit rib (if you wish to have a tighter rib at top of shorts, knit together with a strand of elastic for the first 3 cm). When the piece measures 22-25-28 cm divide sts on 3 st holders as follows: 32-35-37 sts on st holder-1 (= front right leg), put 15 sts on st holder-2 (= crotch front) and put 32-35-37 sts on st holder-3 (= left front leg) = 81-85-91 sts remain on needles (= back). Now continue with rib back and forth on needles over sts on back and put the outermost sts at each side onto st holder-1 and st holder-3 as follows: * Put the 5-4-4 outermost sts at the beginning of row (seen from the right side) onto st holder-1, knit rib to last 5-4-4 sts and put these onto st holder-3, turn and knit back over all sts *, repeat * - * a total of 5-6-7 times. On the next row (= right side) put the outermost 8-11-10 sts at the beginning of row onto st holder-1 and the 8-11-10 sts at end of row onto st holder-3 = 15 sts remain on needles, bind off in rib (there are now 65-70-75 sts on st holder-1 and st holder-3). Alternatively, put the 15 sts on a st holder and join with crotch (below) in Kitchener st. Crotch: Put the 15 sts from st holder-2 back on needles and knit rib back and forth until crotch measures 11-13-15 cm, bind off in rib. Sew crotch edge to edge to the 15 sts bound off on back. Or join with Kitchener st if you have put those sts on a st holder (see above). Right leg: Put the 65-70-75 sts on st holder-1 on a short circular needle, then pick up 21-26-29 sts along crotch edge = 86-96-104 sts. Join and knit rib until leg measures 4-4-5 cm (from picked up sts). Bind off loosely in rib. Left leg: Knit the same as the right. Ribbon: Wrap a ribbon 2 times around stomach for decoration and make a knot at the back. |
|
 |
|
Have you finished this pattern?Tag your pictures with #dropspattern or submit them to the #dropsfan gallery. Do you need help with this pattern?You'll find 13 tutorial videos, a Comments/Questions area and more by visiting the pattern on garnstudio.com. © 1982-2026 DROPS Design A/S. We reserve all rights. This document, including all its sub-sections, has copyrights. Read more about what you can do with our patterns at the bottom of each pattern on our site. |

With over 40 years in knitting and crochet design, DROPS Design offers one of the most extensive collections of free patterns on the internet - translated to 17 languages. As of today we count 324 catalogs and 12177 patterns - 12167 of which are translated into English (US/in).
We work hard to bring you the best knitting and crochet have to offer, inspiration and advice as well as great quality yarns at incredible prices! Would you like to use our patterns for other than personal use? You can read what you are allowed to do in the Copyright text at the bottom of all our patterns. Happy crafting!
Post a comment to pattern DROPS 90-22
We would love to hear what you have to say about this pattern!
If you want to leave a question, please make sure you select the correct category in the form below, to speed up the answering process. Required fields are marked *.