
Popular categories
Looking for a yarn?


Comments / Questions (97)
![]() Stefanie wrote:
Stefanie wrote:
Hallo, ich habe den Pullover soweit fertig und möchte nun noch den Hals stricken. Wo sind die Markierungen die ich für den Halsausschnitt brauche? Ich habe Markierungen in der hinteren und der vorderen Mitte. Oder sind die Raglanmarkierungen gemeint zwischen Ärmel und Rumpf? In der hinteren Mitte beginnen und stricken bis 12-13-14-15-16-17 M vor der vorderen Markierung, wenden, Faden anziehen, stricken bis 12-13-14-15-16-17 M vor der Markierung der anderen Seite, wenden.
08.09.2025 - 10:56DROPS Design answered:
Liebe Stefanie, Sie haben ja an der Passe sowohl Raglanmarkierer als auch je 1 Markierer in der mittleren Masche des Vorderteils und in der mittleren Masche des Rückenteils gesetzt. Diese letzten Markierer sind gemeint, also die an der vorderen und hinteren Mitte. Gutes Gelingen - und entschuldigen Sie bitte die späte Antwort!
24.10.2025 - 10:48
![]() Ana Margarida Oliveira wrote:
Ana Margarida Oliveira wrote:
Gostaria de saber se as frente costas é tricotado em circular e como ponho os marcadores? Obrigado
19.03.2025 - 18:38DROPS Design answered:
Boa tarde, Sim, a pea tricota-se em circular e coloca-se 2 marcadores, um de cada lado. Por xemplo, se fizer o tamanho S, conta 81 malhas, põe 1 marcador aqui (entre 2 malhas)81 mal, depois, conta mais 81 malhas e põe o outro marcador aqui. Estes marcadores defimem os lados da camisola. Bons tricôs!
21.03.2025 - 16:29
![]() Helén W wrote:
Helén W wrote:
Hur gör jag när jag har stickat 54 cm och satt 29 m på en tråd, börjar jag maska av för halsen samtidigt eller hur gör jag, har svårt att tyda mönstret.
13.02.2025 - 16:29DROPS Design answered:
Hej Helen, ja når du har sat maskerne på en tråd, starter aflukningen til hals i starten af hver pind i hver side :)
18.02.2025 - 09:59
![]() Helén W wrote:
Helén W wrote:
Det är inte några mer minskningar som ska göras än dom vid markörerna alltså 4 st.
30.01.2025 - 18:08DROPS Design answered:
Hej Helén. Jo, det står om minskningar både före och efter markörerna så totalt 8 minskningar om du gör minskning både före och efter varje alla 4 markörer för raglan (vid övergångar mellan fram- & bakstycke och ärmar). 4 av dessa minskningar hör då till ärmarna och 4 hör till fram -& bakstycke. Se gärna våra videor om raglanminskningar. Mvh DROPS Design
31.01.2025 - 10:00
![]() Helén Wideslätt wrote:
Helén Wideslätt wrote:
Jag håller på att sticka oket på denna tröja, samtidigt som jag gör raglan minskningar för ärmarna står det att jag ska minska varannat varv på fram- och bakstycke, men jag förstår inte var på fram- och bakstycke jag ska göra minskningarna?
29.01.2025 - 19:17DROPS Design answered:
Hej Helén. Du gör alla minskningar till raglan vid markörerna "MINSKNINGSTIPS (gäller raglan): Från rätsidan: Minska så här efter markören: Sticka 1 rm, lyft 1 m som om den skulle stickas rät, 1 rm, drag den lyfta m över. Minska så här 3 m före markören: Sticka 2 rm tills och sticka 1 rm. Från avigsidan: Minska så här efter markören: Sticka 1 am och 2 am tills. Minska så här 3 m före markören: Sticka 2 m vridet aviga tills och 1 am." Mvh DROPS Design
30.01.2025 - 08:06
![]() Elise wrote:
Elise wrote:
Bonjour, Je tricote ma 1ere manche. Pour les augmentations après le diagramme, il est inscrit augmenter après et avant le marqueur...on ne laisse pas de maille? il n\'y aura pas de mailles entre ces 2augmentations . Ne devrait on pas plutôt augmenter après le marqueur, tricoter le rang et augmenter de nouveau à une maille du marqueur en fin de rang? Merci de votre éclairage et merci pour ce fabuleux site! Cordialement Elise Auvray
05.01.2025 - 15:04DROPS Design answered:
Bonjour Elise, en fonction de votre nombre de mailles vous pouvez augmenter dans la dernière maille (cf cette vidéo ou bien de part et d'autre de la maille centrale au bien de part et d'autre des 2 mailles au milieu sous la manche - retrouvez différentes techniques d'augmentations ici, choisissez celle qui vous convient le mieux. Notez que l'on augmente en général à la fin du tour + au début du tour suivant. Bon tricot!
06.01.2025 - 10:17
![]() Rosa Morandini wrote:
Rosa Morandini wrote:
Come posso fare il carre intero in rotondo senza vedere le diminuzione
22.12.2024 - 20:21DROPS Design answered:
Buonasera Rosa, le diminuzioni sono lavorate in corrispondenza dei passaggi tra il corpo e le maniche: ci può spiegare meglio il suo problema? Buon lavoro!
26.12.2024 - 22:57
![]() Claudia Cornea wrote:
Claudia Cornea wrote:
Ciao potete aiutarmi per favore in questa parte qui, non capisco bene le diminuzioni da fare. Faccio la taglia S. ALLO STESSO TEMPO, diminuire per il raglan, ad ogni passaggio tra il davanti / dietro e le maniche, come segue - vedere il SUGGERIMENTO PER LE DIMINUZIONI e IL SUGGERIMENTO PER IL LAVORO: SULLA MANICA: Lavorare 1-1-0-1-0-1 giro prima di iniziare a diminuire. Diminuire ora ogni 4 giri per un totale di 4-3-3-3-2-0 volte e poi ogni 2 giri per un totale di 17-20-22-23-27-31 volte.
03.05.2024 - 22:47DROPS Design answered:
Buonasera Claudia, deve considerare il numero indicato per la sua taglia. Se dovesse ancora avere bisogno di aiuto, può spiegarci meglio il suo problema? Buon lavoro!
16.06.2024 - 21:47
![]() Pascale wrote:
Pascale wrote:
Bonjour, J’aimerai faire ce pull mais j’ai de la laine Drops NORD . Si je prends le nombre de mailles donné ici avec des aiguilles 4 pour la taille L (par exemple ) est ce que j’aurai un pull correspondant à la taille S avec ma laine NORD et des aiguilles 3 ? Merci
21.04.2024 - 07:07DROPS Design answered:
Bonjour Pascale, DROPS Nord appartient au groupe de fils A mais ce modèle a été tricoté en Lima, groupe de fils B, autrement dit, Nord n'est pas ici une alternative possible car vous n'aurez pas la même tension et vous devrez recalculer entièrement le modèle en vous basant sur votre échantillon. Retrouvez ici tous les modèles du groupe de fils A (seul ou bien avec un autre fil) que vous pouvez tricoter en Nord (utilisez le convertisseur si besoin). Bon tricot!
22.04.2024 - 08:10
![]() Vanessa Pohl wrote:
Vanessa Pohl wrote:
Halllo, hatte am Ende zu viele Maschen übrig . Laut original Anleitung muss man keine Maschen für vor und Rückseite abn: Nun 4-3-0-0-0-0 x in jeder 4. Rd, 17-20-27-28-25-23 x in jeder 2. Rd und 0-0-0-0-10-16 x in jeder Rd abn. Laut ihrer Antwort muss man 28x4 Maschen abn. Die Anleitung ist fehlerhaft. Ich kann jetzt alles wieder aufmachen! So viel Arbeit für umsonst. Bin sehr verärgert! V. Pohl
04.03.2024 - 10:12DROPS Design answered:
Liebe Frau Pohl, es wird jeweils 2 Maschen beim Vorder- + 2 Maschen beim Rückenteil = 4 Masche 28 Mal abgenommen + 2 Maschen bei jeder Ärmel = 4 Maschen für die Ärmel abgenommen, die Abnahmen werden an einem unterschiedlichen Rythmus beim Vorder/Rückenteil ou bei den Ärmeln gestrickt : XL = Ärmel: 3 Mal in jeder 4. Runde + 23 Mal in jeder 2. Runde (je 2 Maschen bei jeder Ärmel) und gleichzeitig Vorder/Rückenteil: 28 Mal in jeder 2. Runde. (jeweils 2 Maschen für Vorder + 2 Maschen für Rückenteil). Viel Spaß beim stricken!
04.03.2024 - 10:20
|
|||||||||||||
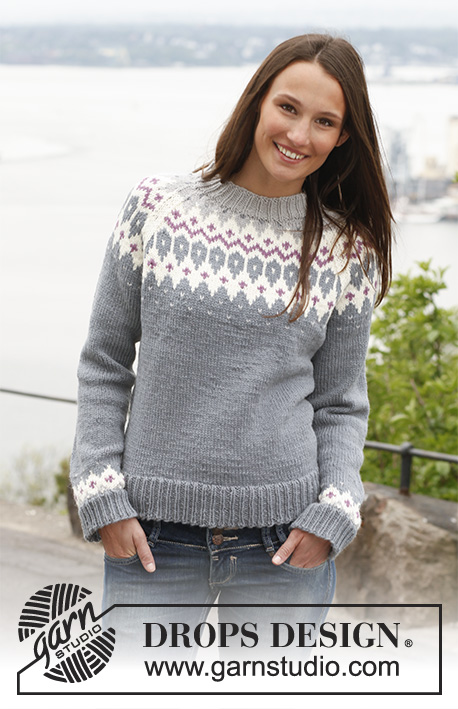
Diamond Rose#diamondrosesweater |
|||||||||||||
 |
 |
||||||||||||
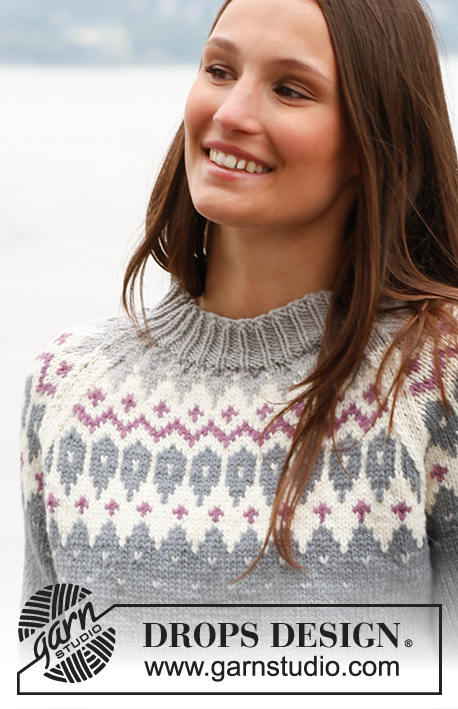
Knitted DROPS jumper with raglan and pattern in "Lima". Size: S - XXXL.
DROPS 141-41 |
|||||||||||||
|
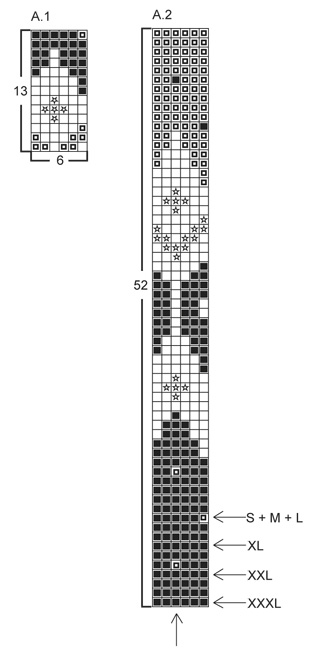
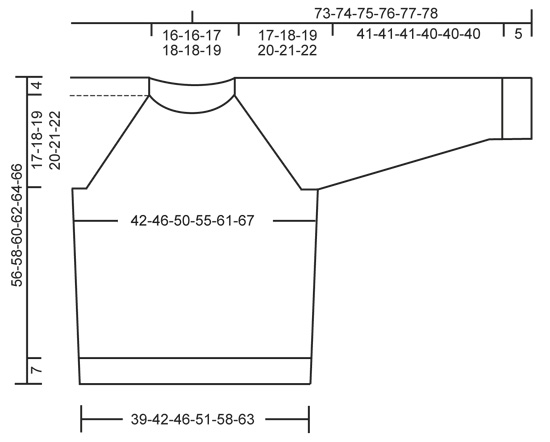
PATTERN: See diagrams A.1 and A.2. Work entire pattern in stockinette st. PATTERN TIP: The 4 sts in each raglan line are worked in the base color in which A.2 is worked, i.e. first medium gray, then off white and finally light gray (see picture). DECREASE TIP (applies to raglan): From RS: Dec as follows after marker: K 1, slip 1 st as if to K, K 1, psso. Dec as follows 3 sts before marker: K 2 tog and K 1. From WS: Dec as follows after marker: P 1 and P 2 tog. Dec as follows 3 sts before marker: P 2 twisted tog and P 1. KNITTING TIP: If knitting gauge is incorrect in height and the knitting is too tight, the raglan dec will be too short and the armholes too small. This can be adjusted by working 1 extra row without dec evenly spaced between dec. If the piece is worked too loosely, dec more often than written in pattern. ---------------------------------------------------------- BODY: Cast on 195-213-234-258-291-321 sts on circular needle size 3 mm / US 2.5 with medium gray. K 1 round, then work rib (= K 1/P 2). When rib measures 7 cm / 2¾", switch to circular needle size 4 mm / US 6. Continue in stockinette st while AT THE SAME TIME dec 33-35-40-44-49-55 sts evenly on 1st round = 162-178-194-214-242-266 sts. Insert 1 marker in each side (= 81-89-97-107-121-133 sts between markers on front and back piece). When piece measures 9-9-10-10-10-10 cm / 3½"-3½"-4"-4"-4"-4", inc 1 st on each side of both markers (= 4 sts inc). Repeat inc every 7-7-7-8-8-8 cm / 2¾"-2¾"-2¾"-3⅛"-3⅛"-3⅛" 3 more times = 178-194-210-230-258-282 sts. When piece measures 35-36-37-38-39-40 cm / 13¾"-14¼"-14½"-15"-15¼"-15¾", bind off 8-8-8-10-10-10 sts in each side for armholes (i.e. 4-4-4-5-5-5 sts on each side of both markers) = 81-89-97-105-119-131 sts remain on front and back piece. Put piece aside and knit the sleeves. SLEEVE: Cast on 51-54-54-57-60-63 sts on double pointed needles size 3 mm / US 2.5 with medium gray. K 1 round, then work rib (= K 1/P 2). When rib measures 5 cm / 2", switch to double pointed needles size 4 mm / US 6. K 1 round while AT THE SAME TIME dec 9-12-6-9-6-9 sts evenly = 42-42-48-48-54-54 sts. Insert 1 marker at beg of round (= mid under sleeve). Now work PATTERN according to diagram A.1. After A.1 work with medium gray. AT THE SAME TIME on 1st round after A.1, inc 1-3-1-3-1-1 st evenly = 43-45-49-51-55-55 sts. When piece measures 11-12-12-11-13-11 cm / 4½"-4¾"-4¾"-4½"-5"-4½", inc 1 st on each side of marker mid under sleeve. Repeat inc every 3-2½-2½-2½-2-2 cm / 1"-⅞"-⅞"-⅞"-¾"-¾" 11-12-12-13-14-16 more times = 67-71-75-79-85-89 sts. When piece measures 46-46-46-45-45-45 cm / 18"-18"-18"-17¾"-17¾"-17¾", bind off 8-8-8-10-10-10 sts mid under sleeve (i.e. 4-4-4-5-5-5 sts on each side of marker) = 59-63-67-69-75-79 sts. Insert 1 marker in the middle st on round (= mid on top of sleeve). Put piece aside and knit another sleeve. YOKE: Slip sleeves on to same circular needle as body where armholes were bind off = 280-304-328-348-388-420 sts. Now insert 1 marker in every transition between sleeves and body (= 4 markers). In addition insert 1 marker in the middle st on front and back piece (sleeves already have 1 marker in the middle st). READ ALL OF THE FOLLOWING SECTION BEFORE CONTINUING: Now work PATTERN according to diagram A.2 – READ PATTERN TIP. NOTE: St with marker on front and back piece and on sleeves should fit st with arrow in diagram. Count out towards the side (i.e. pattern will not fit in transitions between body and sleeves). AT THE SAME TIME dec for raglan in every transition between body and sleeves as follows - READ DECREASE TIP and KNITTING TIP: ON SLEEVE: Work 1-1-0-1-0-1 round before dec beg. Now dec every 4th round a total of 4-3-3-3-2-0 times and then every other round a total of 17-20-22-23-27-31 times (= 17 sts remain on sleeve in all sizes). ON BODY: Work 1-1-0-1-0-1 round before dec beg. Now dec every 4th round a total of 4-3-0-0-0-0 times, every other round a total of 17-20-27-28-25-23 times and then every round/row a total of 0-0-0-0-10-16 times. AT THE SAME TIME when piece measures 50-52-54-56-58-60 cm / 19¾"-20½"-21¼"-22"-22¾"-23⅝", slip the middle 25-29-29-35-35-39 sts on a stitch holder for neck and work piece back and forth on needle. Then bind off for neck at beg of row in each side as follows: bind off 2 sts 1 time and then 1 st until raglan dec is done. After all dec for raglan and bind off for neck approx. 79-83-83-89-89-93 sts remain on the needle and piece measures approx. 56-58-60-62-64-66 cm / 22"-22¾"-23⅝"-24⅜"-25¼"-26" from shoulder and down. ELEVATION IN BACK OF NECK: Beg mid back and work around the neck on circular needle size 4 mm / US 6 with light gray, AT THE SAME TIME pick up new sts on each side of sts on stitch holder at the front and slip the 25-29-29-35-35-39 sts on stitch holder back on needle so that there are approx. 112-120-120-132-132-140 sts on needle. Insert 1 marker mid front. Work in stockinette st while AT THE SAME TIME dec evenly to 80-82-84-88-90-92 sts on 1st round. Then work back and forth while AT THE SAME TIME working an elevation at the back of neck as follows - NOTE: On every turn, slip 1st st, tighten thread and then work: Beg mid back and work until 12-13-14-15-16-17 sts remain before marker mid front, turn, tighten thread and work until 12-13-14-15-16-17 sts remain before marker in the other side. Turn, tighten thread and work until 19-20-21-22-23-24 sts remain before marker, turn, tighten thread and work until 19-20-21-22-23-24 sts remain before marker in the other side. Turn and work until 26-27-28-29-30-31 sts remain before marker, turn, tighten thread and work until 26-27-28-29-30-31 sts remain in the other side. Turn, tighten thread and work until 33-34-35-36-37-38 sts remain before marker, turn, tighten thread and work until 33-34-35-36-37-38 sts remain before marker in the other side. Turn, tighten thread and work until mid back. NECK EDGE: Switch to circular needle size 3 mm / US 2.5 and K 1 round (in the round over all sts) while AT THE SAME TIME inc evenly 96-99-102-105-108-111 sts. Work rib (= K 1/P 2) until rib measures 4 cm / 1½". Then loosely bind off with K over K and P over P. ASSEMBLY: Sew the openings under the sleeves. |
|||||||||||||
Diagram explanations |
|||||||||||||
|
|||||||||||||
 |
|||||||||||||
 |
|||||||||||||
Have you finished this pattern?Tag your pictures with #dropspattern #diamondrosesweater or submit them to the #dropsfan gallery. Do you need help with this pattern?You'll find 12 tutorial videos, a Comments/Questions area and more by visiting the pattern on garnstudio.com. © 1982-2026 DROPS Design A/S. We reserve all rights. This document, including all its sub-sections, has copyrights. Read more about what you can do with our patterns at the bottom of each pattern on our site. |
|||||||||||||


With over 40 years in knitting and crochet design, DROPS Design offers one of the most extensive collections of free patterns on the internet - translated to 17 languages. As of today we count 324 catalogs and 12245 patterns - 12235 of which are translated into English (US/in).
We work hard to bring you the best knitting and crochet have to offer, inspiration and advice as well as great quality yarns at incredible prices! Would you like to use our patterns for other than personal use? You can read what you are allowed to do in the Copyright text at the bottom of all our patterns. Happy crafting!
Post a comment to pattern DROPS 141-41
We would love to hear what you have to say about this pattern!
If you want to leave a question, please make sure you select the correct category in the form below, to speed up the answering process. Required fields are marked *.