
Popular categories
Looking for a yarn?


Comments / Questions (36)
![]() NettyHermans wrote:
NettyHermans wrote:
Als ik 49 losse heb voor het armsgat,hoe kan ik daar dan 41stokjes haken ????
10.07.2013 - 07:52DROPS Design answered:
Hoi Netty, je slaat 8 l gelijkmatig over zodat je 41 stk hebt bij elk armsgat.
11.07.2013 - 13:24
![]() Netty wrote:
Netty wrote:
Ik ben opnieuw begonnen met fabel. In de winkel van Schouten mag ik altijd komen als ik vragen heb. Dit bolerootje vind ik zo leuk,ik blijf gewoon doorgaan tot ik het voor elkaar heb. Vr.groeten Netty
07.07.2013 - 16:34
![]() Netty wrote:
Netty wrote:
Ik ben opnieuw begonnen met fabel. In de winkel van Schouten mag ik altijd komen als ik vragen heb. Dit bolerootje vind ik zo leuk,ik blijf gewoon doorgaan tot ik het voor elkaar heb. Vr.groeten Netty
07.07.2013 - 16:34
![]() Netty Hermansl wrote:
Netty Hermansl wrote:
Wat doe ik aan het einde van de eerste toer????? Wat doe ik met de overgebleven losse? Ik heb al een jurkje gehaakt en was fantastisch Gr. Netty
06.06.2013 - 21:55DROPS Design answered:
Hoi Netty. Je zou niet lossen overhouden aan het eind van de toer. Ik kan het beter controleren als je zou willen melden welke maat je haakt? Alvast bedankt.
12.06.2013 - 13:32
![]() Marga wrote:
Marga wrote:
Ik ben met de achterkant begonnen. Als je wat tussen de sterretjes staat herhaalt, krijg je gaatjes. Op het plaatje zie ik drie rijen mt gaatjes, maar daarover lees ik niks over in het patroon. Ik begrijp van het patroon als je dan 75 stokjes heb, de rest van het achterpand zonder gaatjes moet haken. Of heb ik het mis?
17.05.2013 - 22:18DROPS Design answered:
Hoi Marga. Het patroon klopt. Je hebt eerst het achterpand gehaakt. Je haakt hier 1 stk in elk stk - behalve in de eerste toer. Je haakt daar 1 stk in elke 5 l + 1 overslaan om het opzetrandje elastisch te houden. De gaatjes op de foto horen bij het rand van het werk (Toer 1).
29.05.2013 - 17:04
![]() Marga wrote:
Marga wrote:
Ik wil dit vestje breien, op het patroon staat proeflapje van 23stx12 toeren is 10x10 cm. Op de omwikkel van de bol staat 26stx34 toeren is 10x10 cm. Wat moet ik nu aanhouden om het vest passend te maken?
17.05.2013 - 14:25DROPS Design answered:
Je moet de stekenverhouding aanhouden zoals aangegeven in het patroon. De stekenverhouding op de wikkel is een standaard, als je bijv een ander patroon wilt gebruiken met deze verhouding.
21.05.2013 - 12:22
![]() Severine wrote:
Severine wrote:
Bonjour je ne comprend pas bien les explications pour la bordure j'ai déja fait mon carré de 18cm ainsi que mes carrés je fais le modèles pour 11/12 ans merci d'avance
15.04.2013 - 13:45DROPS Design answered:
Bonjour Séverine, une fois que le dos et que vos 30 carrés sont faits, vous assemblez ces carrés bord à bord en une longue bande comme indiqué, puis vous assemblez au dos en suivant les indications + le schéma. Terminez avec la bordure picot. Bon crochet !
15.04.2013 - 16:17
![]() Daniela wrote:
Daniela wrote:
Hallo! Sehr schöner Bolero, leider musste ich die runde mit den squares wieder abtrennen, da nicht erwähnt wird wie man sie richtig annäht, sodass oben bei Kragen und unten im Rücken jeweils die "schöne" rechte Seite der squares zu sehen ist., Hab jetzt bis zum Ärmelloch beidseitig oben zuerst die rechte Seite, dann eine 180 grad Drehung des unteren Teils angenäht! Nun passt es! LG, macht weiter so, Daniela
15.01.2013 - 16:52Eva wrote:
In case where a pattern like this has a complex shape, please could you label the parts of the drawings. In this case I do not see where the edge finishes and the motifs begin. I am sure it would help many people. Lovely pattern which I hope to make soon.
09.11.2012 - 00:12
![]() Trees wrote:
Trees wrote:
Ik begrijp niet dat je het achterpand moet opzetten met 67 lossen, in de eerste toer steken moet overslaan tot 55 st, maar als je dan de rand moet haken dat er in het patroon staat dat je zowel aan de bovenkant als de onderkant 55 st moet haken, terwijl je onderkant uit 67 lossen bestond. Ik kan wel gewoon stokjes boven de stokjes haken (55) maar wat heeft het voor zin dan kon je toch gewoon met 54 plus 3 lossen voor het eerste st opzetten ipv 67 lossen?
07.08.2012 - 11:11DROPS Design answered:
Haakt u de eerste toer zoals beschreven: Haak 1 stk in de 4e l van de haak, 1 stk in iedere van de volgende 3 l, * sla 1 l over, 1 stk in iedere van de volgende 5 l *, herhaal van *-* de rest van de toer, dan eindigt u op 55 stk. Door meer meer lossen op te zetten, wordt de opzetrand wat losser.
03.09.2012 - 13:00
|
|
Tilda#tildavest |
|
 |
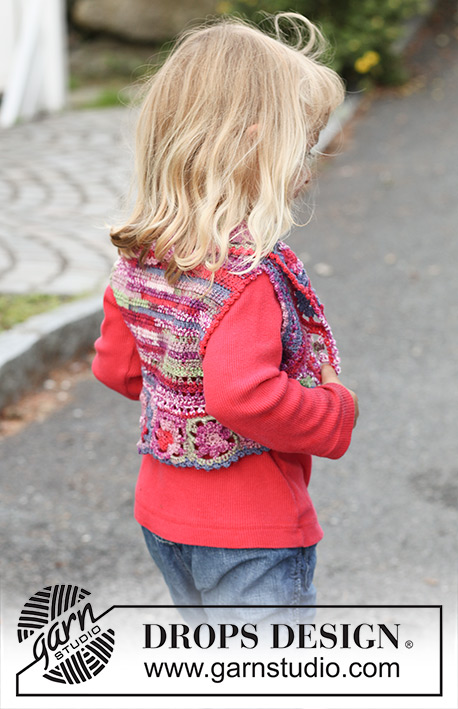 |
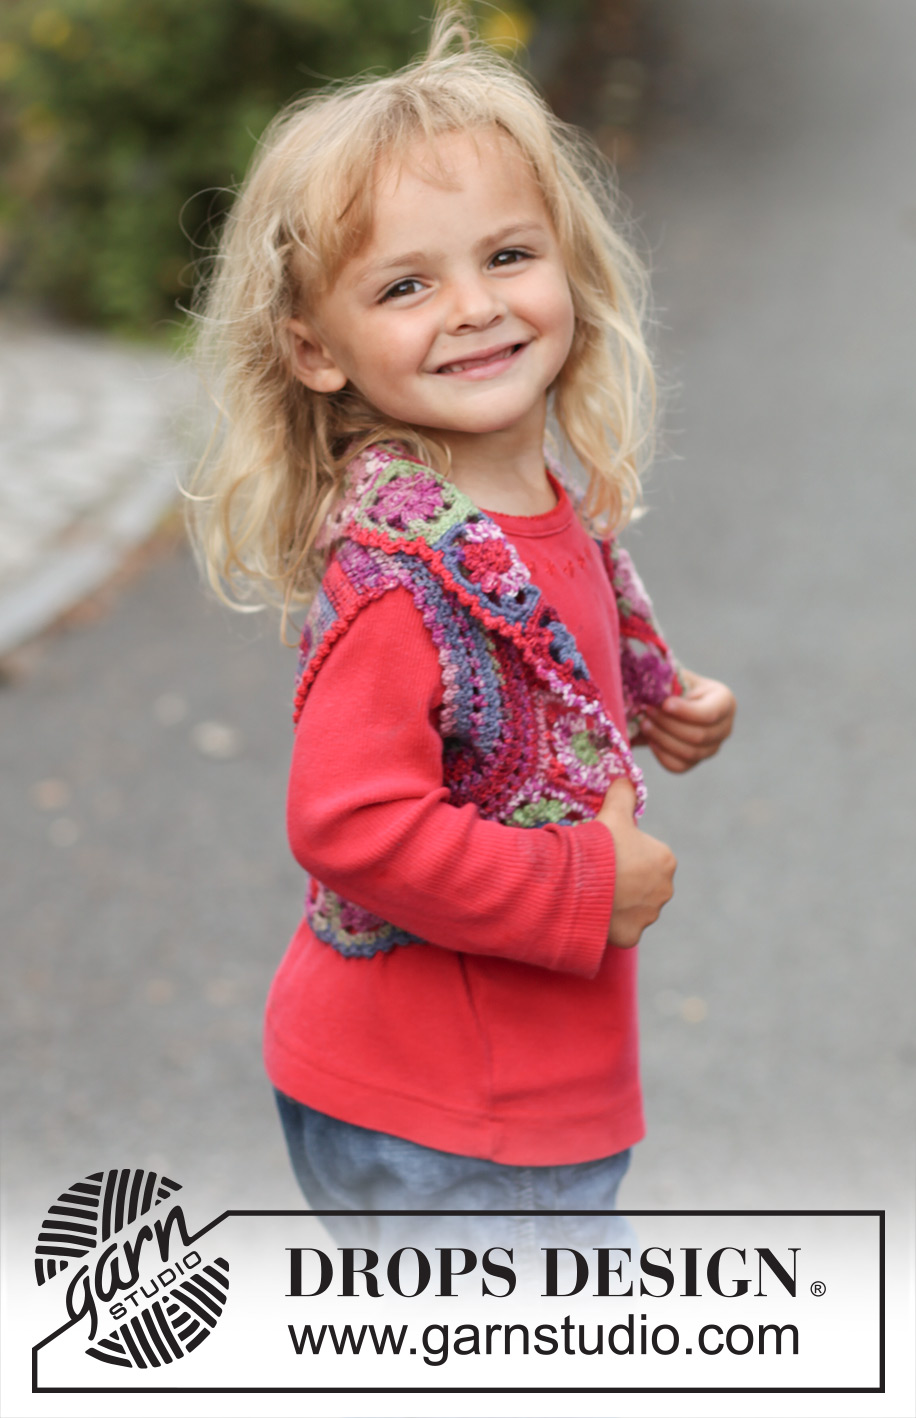
Crochet DROPS bolero in "Fabel". Size 3 - 12 years.
DROPS Children 22-29 |
|
|
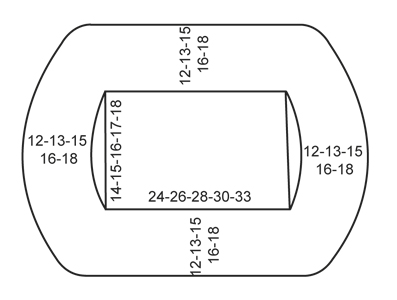
CROCHET INFO: Replace first dc on every row/round with ch 3. Finish every round with 1 sl st in 3rd ch from beg of round. INCREASE TIP: Inc by working 2 dc in 1 st. --------------------------------------------------------- BACK PIECE: Worked back and forth - SEE CROCHET INFO! Chain 67-73-79-85-91 loosely on hook size 3 mm / C with Fabel. Work 1 dc in 4th ch from hook, 1 dc in each of the next ch 3, * skip ch 1, 1 dc in each of the next 5 ch *, repeat from *-* the rest of the row = 55-60-65-70-75 dc. Then work 1 dc in every dc back and forth until piece measures 14-15-16-17-18 cm / 5½"-6"-6¼"-6¾"-7". EDGE PIECE: Work 1 dc in each of the 55-60-65-70-75 dc at the top along back piece, then ch 39-42-44-46-49 (= armhole), 1 dc in each of the 55-60-65-70-75 dc at the bottom along back piece and then ch 39-42-44-46-49 (= armhole), finish with 1 sl st in first dc on round. On next round work 1 dc in every dc at the top and at the bottom of back and around every ch-band work 33-35-37-39-41 dc = 176-190-204-218-232 dc in total. Continue in the round as follows: ROUND 1: 1 dc in first dc (replaced with 3 ch), * ch 1, skip 1 dc, 1 dc in next dc *, repeat from *-* and finish with ch 1, skip 1 dc and 1 sl st in 3rd ch from beg of round. ROUND 2: 1 dc in every dc and 1 dc in every ch. Repeat these 2 rounds upwards - AT THE SAME TIME when edge measures approx. 3-3-3-4-4 cm / 1"-1"-1"-1½"-1½" (adjust so that next round is a round with dc only), inc 16-20-24-29-34 dc evenly - READ INCREASE TIP - repeat inc when piece measures approx. 5-6-7-7-8 cm / 2"-2½"-2¾"-2¾"-3⅛" = 208-230-252-276-300 dc. Work until edge measures approx. 7-8-10-11-13 cm / 2¾"-3⅛"-4"-4⅜"-5⅛". Put piece aside. CROCHET SQUARE: Chain 4 on hook size 3 mm / C with Fabel, form a ring with 1 sl st in first ch. ROUND 1: 8 sc in ch-ring, finish with 1 sl st in first sc from beg of round. ROUND 2: 1 sl st in first sc, * ch 3, in same sc as sl st work 2 dc but wait with last pull through on each dc until both have been worked, make 1 YO and pull yarn through all 3 loops on hook, ch 3, 1 sl st in same sc as both dc were worked, 1 sl st in next sc *, repeat from *-* until 1 sc remains, work as follows in this sc: 1 sl st, ch 3, then 3 dc but wait with last pull through on each dc until all 3 have been worked, make 1 YO and pull yarn through all 4 loops on hook (= 8 leaves). ROUND 3: * ch 4, at the top of next leaf work 1 dc + ch 2 + 1 dc (= corner), ch 5, 1 sc at the top of next leaf, ch 5, at the top of next leaf work 1 dc + ch 2 + 1 dc (= corner), ch 4, 1 sc at the top of next leaf, ch 4, at the top of next leaf work 1 dc + ch 2 + 1 dc (= corner), ch 3, 1 sc at the top of next leaf, ch 3, at the top of next leaf work 1 dc + ch 2 + 1 dc (= corner), ch 4, 1 sl st in first ch from beg of round. ROUND 4: In the 4-ch-spaces work 4 sc, in the 5-ch-space work 5 sc, in the 3-ch-space work 3 sc and in the 2-ch-space in every corner work 1 sc, ch 3, 1 sc = a total of 40 sc around the square, finish with 1 sl st in first sc, cut the yarn. Two of the sides are the same width - approx. 5 cm / 2", 1 side is narrower - approx. 4½ cm / 1¾" and 1 side is wider - approx. 5½ cm / 2¼". Work 20-22-24-26-30 squares. Sew the squares tog in one long strip – sew edge to edge – make sure that the shorter sides are placed against the same side and that the longer sides are placed against the opposite side so that the strip is curved. Begin by fastening the 2 middle squares on the strip mid back at the top of edge piece – sew edge to edge along the shortest side on the squares. Continue to sew down the one side and until mid back at the bottom of edge piece, then sew the other side of the strip on – make sure not sew too tightly when sewing on the strip. If more or less squares are needed this must be adjusted before the last 2 squares are sewn tog mid back. PICOT BORDER: Work on hook size 3 mm / C with Fabel at the edge around the entire strip of crochet squares. Beg in the first square that was sewn on at the back of neck and work as follows: 1 sc in the second st on square, * 1 picot (= ch 3, 1 sc in first ch), skip 1 sc, 1 sc in next sc *, repeat from *-* (there should be approx. 5 picots along every square + 1 in the transition to next square), finish with 1 sl st in first sc from beg of round. Work picot border the same way around the armholes. |
|
 |
|
Have you finished this pattern?Tag your pictures with #dropspattern #tildavest or submit them to the #dropsfan gallery. Do you need help with this pattern?You'll find 7 tutorial videos, a Comments/Questions area and more by visiting the pattern on garnstudio.com. © 1982-2026 DROPS Design A/S. We reserve all rights. This document, including all its sub-sections, has copyrights. Read more about what you can do with our patterns at the bottom of each pattern on our site. |
|


With over 40 years in knitting and crochet design, DROPS Design offers one of the most extensive collections of free patterns on the internet - translated to 17 languages. As of today we count 325 catalogs and 12298 patterns - 12288 of which are translated into English (US/in).
We work hard to bring you the best knitting and crochet have to offer, inspiration and advice as well as great quality yarns at incredible prices! Would you like to use our patterns for other than personal use? You can read what you are allowed to do in the Copyright text at the bottom of all our patterns. Happy crafting!
Post a comment to pattern DROPS Children 22-29
We would love to hear what you have to say about this pattern!
If you want to leave a question, please make sure you select the correct category in the form below, to speed up the answering process. Required fields are marked *.