
Popular categories
Looking for a yarn?


Comments / Questions (30)
Elena wrote:
A que se llama p.a?? que punto es?
06.05.2012 - 19:51DROPS Design answered:
Elena, p.a. es la abreviatura de punto alto. Al final de las instrucciones puedes ver el video tutorial de este punto.
06.05.2012 - 20:34Iulya wrote:
Je veux cet modelle
13.01.2012 - 14:48
![]() DROPS Design NL wrote:
DROPS Design NL wrote:
Beste Alike. Jij moet minderen voor de armsgaten aan het begin en einde van iedere toer, dus ja aan beide kanten van het werk. Veel haakplezier verder.
29.08.2011 - 10:16
![]() Alike wrote:
Alike wrote:
Even een vraagje. Bij maat XL moet je met 19 cm gaan minderen. Alleen vraagje of ik aan beide kanten 7 steken minderen? Ik denk zelf van wel maar ik ben er niet helemaal zeker van. Alvast bedankt.
28.08.2011 - 22:28
![]() DROPS Design NL wrote:
DROPS Design NL wrote:
In toer 7 heb je weer bubbels, maar hier de eerste bubbel na 3 stk. Op deze manier komen de bubbels dus ook goed te zitten op het achterpand. Succes.
11.07.2011 - 11:13
![]() DROPS Design NL wrote:
DROPS Design NL wrote:
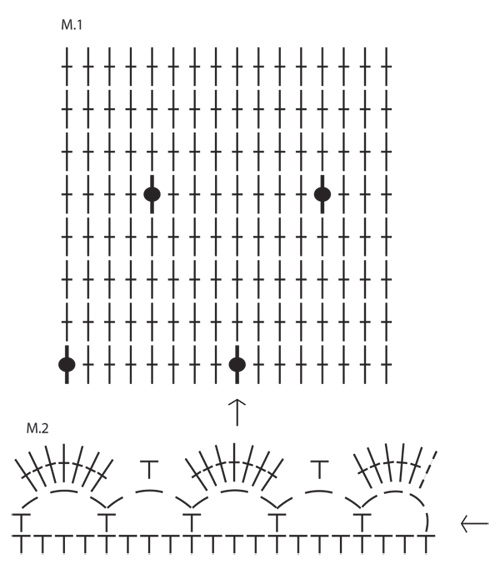
Hoi Marijke. Je haakt maat L en hebt na toer 2 83 stk. Je haakt dan verder volgens de teltekening M.1. Zoals hier te zien is haak je eerst 7 stk, dan 1 bubbel, 7 stk, bubbel enzo. Dwz, aan het eind van de toer = 10 bubbels en 3 stk na het laatste bubbel.
11.07.2011 - 11:12
![]() Marijke wrote:
Marijke wrote:
Ik brei en haak heel veel van jullie patroon nu ben ik aan het haken maat l jammer dat je de achterkant niet kan zien of het wel goed gaat mijn vraag is je heb 83 stk daar de helft van is 41.5 is moet eerst stokjes haken en dan bobbel en dan weer stokjes voor de eerste rij hoeveel bobbel moeten er zitten totaal eerste toer ik heb er zelf negen en de tweede toer ook negen recht onder elkaar klopt dit ik hoop van wel snap er niks van
11.07.2011 - 11:08
![]() Gorgana wrote:
Gorgana wrote:
Thank you so much for replying i can continue with my project now very grateful
25.02.2011 - 00:25
![]() DROPS Design wrote:
DROPS Design wrote:
Gorgana, UK version has treble and bobbles only when working M.1.
24.02.2011 - 17:42Gorgana wrote:
I am having a problem reading the explanation to the diagram. i can't tell if it is trebble or dc cause the lines are joined can anyone help please
24.02.2011 - 10:12
|
|||||||||||||
Sandy Bubbles#sandybubblesvest |
|||||||||||||
 |
 |
||||||||||||
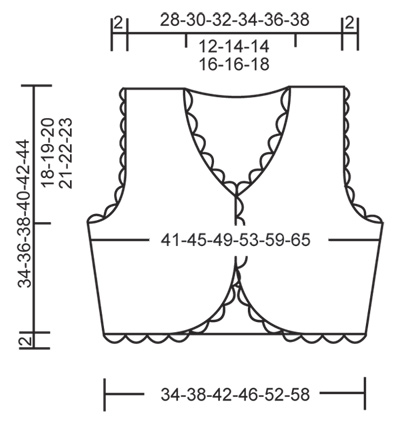
Crochet DROPS vest with bobbles and lace edges in "Muskat". Size: S - XXXL.
DROPS 130-31 |
|||||||||||||
|
CROCHET INFO: Replace first dc at beg of every dc row with ch 3, finish the row with 1 dc in 3rd ch from beg of previous row. PATTERN: See diagram M.1 and M.2. NOTE: 1st row in M.1 = RS. INCREASE TIP 1 (when inc 2 dc for rounded front edge): Inc 2 dc for rounded front edge at the end of every row towards mid front as follows: Work ch 4, turn piece, work 1 dc in 4th ch from hook (there are now 2 dc at beg of row = 3 ch + 1 dc), then continue working row as before. At the end of next row towards mid front, work 1 hdc in last dc (instead of 1 dc in last dc) before inc new sts for rounded front edge. This is done to avoid a very jagged edge on the rounded front edge. INCREASE TIP 2 (when inc 1 dc): Inc 1 dc by working 2 dc in same dc. DECREASE TIP 1: Dec 1 dc by working 2 dc tog as follows: Work 1 dc but wait with last YO and pull through (= 2 sts on hook), work next dc but pull last YO through all 3 sts on hook (= dec 1 dc). DECREASE TIP 2: When dec several dc at the same time at the armhole, dec as follows: At beg of row: Replace no of dc to be dec with 1 sl st in every dc. At end of row: Turn piece when no of dc to be dec remains and continue working as before. -------------------------------------------------------- BACK PIECE: Ch 91-102-112-123-139-155 on hook size 3.5 mm/E/4 with Muskat. WORK 1ST ROW FROM RS AS FOLLOWS: 1 dc in 4th ch from hook, * skip 1 ch, 1 dc in each of the next 3 ch *, repeat from *-* until 3-2-4-3-3-3 ch remain, skip 1 ch and finish with 1 dc in each of the last 2-1-3-2-2-2 ch = 67-75-83-91-103-115 dc on row, turn piece. 2ND ROW (= WS): READ CROCHET INFO! Work 1 dc in every dc, turn piece. Continue to work M.1 - NOTE: Arrow in diagram marks mid back, i.e. there should be 1 bobble in the middle st mid back, count out towards the side to find where to start in diagram. AT THE SAME TIME when piece measures 2-3-3-4-5-6 cm / ¾"-1⅛"-1⅛"-1½"-2"-2⅜", inc 1 dc in each side - READ INCREASE TIP 2. Repeat the inc in each side on every other row a total of 7 times = 81-89-97-105-117-129 dc. When piece measures 16-17-18-19-20-21 cm / 6¼"-6¾"-7"-7½"-8"-8¼", dec for armholes at the beg and end of every row (i.e. dec from both RS and WS) - READ DECREASE TIP 2: 5-5-7-7-10-12 dc 1 time, 2 dc a total of 3-4-4-4-4-5 times and then 1 dc a total of 2-2-2-4-5-5 times = 55-59-63-67-71-75 dc. When piece measures 32-34-36-38-40-42 cm / 12½"-13⅜"-14¼"-15"-15¾"-16½", work shoulder as follows: Work 17-17-19-19-21-21 dc at beg of row, turn piece, dec 1 dc at beg of row by working the first 2 dc tog and work the rest of the row = 16-16-18-18-20-20 dc. Cut and fasten the thread, the piece measures approx. 34-36-38-40-42-44 cm / 13⅜"-14¼"-15"-15¾"-16½"-17¼". Repeat along the other shoulder. RIGHT FRONT PIECE: Worked back and forth with start from mid front. READ ALL OF THE FOLLOWING SECTION BEFORE CONTINUING! Ch 30-34-36-42-48-54 on hook size 3.5 mm/E/4 with Muskat. WORK 1ST ROW FROM RS AS FOLLOWS: 1 dc in 4th ch from hook, * skip ch 1, 1 dc in each of the next 3 ch *, repeat from *-* until 2-2-4-2-4-2 ch remain, skip 1 ch and finish with 1 dc in each of the last 1-1-3-1-3-1 ch = 21-24-26-30-35-39 dc on row, turn piece. 2ND ROW (= WS): READ CROCHET INFO! Work 1 dc in every dc while AT THE SAME TIME inc 2 dc at the end of row towards mid front - READ INCREASE TIP 1. INC IN THE SIDE AND MID FRONT: When piece measures 2-3-3-4-5-6 cm / ¾"-1⅛"-1⅛"-1½"-2"-2⅜", inc 1 dc in the side - READ INCREASE TIP 2. Repeat inc in the side on every other row a total of 7 times. AT THE SAME TIME after 2nd row, work M.1 - NOTE: The last bobble towards the side should be as many dc from side as on back piece, count outwards from the side to find where to start in the diagram from mid front. AT THE SAME TIME inc at the end of every row towards mid front as follows: Inc 2 dc a total of 4-4-5-5-5-6 times (incl inc on 2nd row), and then 1 dc a total of 4-5-5-5-6-6 times - READ INCREASE TIP 2. NECKLINE: AT THE SAME TIME when piece measures 15-16-17-18-19-20 cm / 6"-6¼"-6¾"-7"-7½"-8" / 6"-6¼"-6¾"-7"-7½"-8", dec 1 dc towards mid front - READ DECREASE TIP 1. Repeat dec towards mid front on every row (i.e. from both RS and WS) a total of 8-10-10-13-13-15 times, then on every other row a total of 3-3-3-2-2-2 times. ARMHOLES: AT THE SAME TIME when piece measures 16-17-18-19-20-21 cm / 6¼"-6¾"-7"-7½"-8"-8¼" (measured in the side), dec for armhole in the side on every row (i.e. from both RS and WS) as on back piece. After all dec for neckline and armhole are done, 16-16-18-18-20-20 dc remain on row. Continue the pattern until piece measures 34-36-38-40-42-44 cm / 13⅜"-14¼"-15"-15¾"-16½"-17¼" - adjust so that front and back piece are the same length. Fasten off. LEFT FRONT PIECE: Work as right front piece but reversed, i.e. start from the side. ASSEMBLY: Sew the shoulder seams edge to edge with neat little stitches. Sew side seams edge to edge the same way. CROCHET LACE EDGE: Work a lace edge around both armholes on with Muskat as follows: ROUND 1: Start from RS and work 1 sc in first st, * ch 1, skip 1 dc, 1 sc in next dc *, repeat from *-* the entire round - NOTE: This round should even out the armhole, skip more or fewer sts if needed. ROUND 2: Work 1 sc in every sc and 1 sc in every ch the entire round while AT THE SAME TIME adjusting the no of sc so that it can be divided by 8. ROUND 3 + 4: Work M.2 - NOTE: Start on the round marked with an arrow in the diagram. Finish 3rd round with 1 sl st in 2nd ch from beg of round and finish 4th round with 1 sl st in 3rd ch from beg of round. Work the same lace edge around the entire opening of the vest - NOTE: Make sure that the edge is even and pretty around the entire opening. |
|||||||||||||
Diagram explanations |
|||||||||||||
|
|||||||||||||
 |
|||||||||||||
 |
|||||||||||||
Have you finished this pattern?Tag your pictures with #dropspattern #sandybubblesvest or submit them to the #dropsfan gallery. Do you need help with this pattern?You'll find 9 tutorial videos, a Comments/Questions area and more by visiting the pattern on garnstudio.com. © 1982-2026 DROPS Design A/S. We reserve all rights. This document, including all its sub-sections, has copyrights. Read more about what you can do with our patterns at the bottom of each pattern on our site. |
|||||||||||||


With over 40 years in knitting and crochet design, DROPS Design offers one of the most extensive collections of free patterns on the internet - translated to 17 languages. As of today we count 325 catalogs and 12298 patterns - 12288 of which are translated into English (US/in).
We work hard to bring you the best knitting and crochet have to offer, inspiration and advice as well as great quality yarns at incredible prices! Would you like to use our patterns for other than personal use? You can read what you are allowed to do in the Copyright text at the bottom of all our patterns. Happy crafting!
Post a comment to pattern DROPS 130-31
We would love to hear what you have to say about this pattern!
If you want to leave a question, please make sure you select the correct category in the form below, to speed up the answering process. Required fields are marked *.