
Popular categories
Looking for a yarn?


Comments / Questions (30)
![]() Crochet Vest wrote:
Crochet Vest wrote:
Name it fancy bobble cropped vest.
30.06.2019 - 21:18Nir Halfon wrote:
Hello, When working on the Right Front Piece towards mid front do I use increase tip 1 only once for row 2? or for every row towards mid front. Later instructions state I should use increase tip 2. Thanks, Nir
19.02.2018 - 22:59DROPS Design answered:
Dear Mrs Halfon, increase tip 1 is made at the end of row from WS to increase 2 sts towards mid front. Increase tip 2 is used when increasing 1 st for the side. Happy crocheting!
20.02.2018 - 08:42Raji Ajith wrote:
Hello... I need help for increasing tip 1.. To start row with ,4 chain and DC in the 4 th chain... 2 DC made... end of next row did I have to put 2dc and 1 hdc I. The last DC... or only 1 hdc Thank you
12.07.2016 - 11:21DROPS Design answered:
Dear Mrs Ajith, at the end of row towards mid front, work 1 hdc in the last dc (instead of 1 dc in last dc), turn and inc as before with 4 ch, 1 dc in 4th chain from hook, 1 dc in next dc, etc. Happy crocheting!
12.07.2016 - 13:10
![]() Constanze wrote:
Constanze wrote:
Ich habe ein Verständnisproblem beim Rückenteil. Dort steht nach x cm während des Noppenteils Maschen aufnehmen soll - soweit okay. Dass hätte ich jetzt über die 16 cm gemacht. Was hat das mit den 7x 97 Stäbchen auf sich ?
04.08.2014 - 17:23DROPS Design answered:
Liebe Constanze, wenn die Arbeit 3 cm misst, nehmen beidseitig je 1 Stb zu, diese Zunahmen wiederholen Sie in jeder 2. R. Insgesamt arbeiten Sie diese Zunahmen 7x, d.h. Sie haben dann insgesamt 14 Stb zugenommen. Vorher hatten Sie ja 83 Stb, nach den Zunahmen haben Sie dann 97 Stb insgesamt. Bei einer Gesamtlänge von 18 cm arbeiten Sie dann die Armausschnitte, darauf bezieht sich nämlich die nächste Maßangabe, sie hat mit den Zunahmen nichts zu tun.
04.08.2014 - 19:58
![]() Tamara wrote:
Tamara wrote:
Ik zou het gilet graag maken voor mijn dochters, ze hebben maat 110-116 en 128. Ik heb alleen geen idee hoe ik dit patroon kan omrekenen naar kindermaten. Kan iemand mij daar mee helpen, of is er een versie voor kinderen beschikbaar?
30.03.2014 - 16:31DROPS Design answered:
Hoi Tamara. We hebben helaas niet een soortgelijk patroon voor kinderen. Je kan het patroon kleiner maken met hulp van de haakstekenverhouding (aantal stk in de breedte x toeren in de hoogte per 10 x 10 cm). Je weet hoe groot de kleinste maat is en kan vervolgens minder rekenen. Ik kan je helaas niet helpen met individuele aanpassingen, maar je mag ook altijd vragen bij jouw DROPS verkooppunt of één van de vele handwerkforums. Veel haakplezier.
01.04.2014 - 17:53
![]() Rumpel wrote:
Rumpel wrote:
Please help me with the right front piece, i don't understand much.how to inc tip 1 on 2nd row? does it mean that making 1 more dc in the next row, not 2nd row?
14.08.2013 - 03:19DROPS Design answered:
Dear Rumpel, at beg of row from mid front, you will inc making 4 ch, 1 dc in 4th ch from hook (=first 3 ch= 1st dc (us - uk tr), we have here 2 dc), at the end of row from side towards mid front, crochet 1 hdc (us - uk htr) in the last dc to get a smoother curve. Happy crocheting!
14.08.2013 - 09:59
![]() Wijntje wrote:
Wijntje wrote:
Er staat in het patroon: 1 stk in de 4e l van de haak, * sla 1 l over, 1 stk in iedere van de volgende 3 l *, herhaal herhaal van *-*... Je haakt dus eerst 1 stk in de 4 l. Daarna sla je eerst 1 l over en haakt 1 stk in IEDERE van de volgende 3 l. Je haakt dus in elke 3 l 1 st een slaat elke 4e l over. Volgens mij klopt dit niet ik kom niet aan het aantal stokjes en het staat bol omdat er te veel lossen worden overgeslagen
14.04.2013 - 13:52DROPS Design answered:
Het patroon klopt. Bijvoorbeeld maat S. Je hebt 91 l. Haak 1 stk in de 4 l van de nld (= 2 stk). Dan sla je 1 l over en 1 stk in elk van de volgende 3 l (= 3 stk per 4 l), dat wordt 21 keer 3 stk per 4 l (= 63 stk) en je hebt dan ook 2 l. Hier haak je 1 stk in elke l = 67 stk op de toer. Bekijk ook of je stekenverhouding correct is ;o). Veel haakplezie verder.
16.04.2013 - 21:19
![]() Ntref wrote:
Ntref wrote:
Hallo,ik snap he niet zo goed! er staat 1L overslaan dan in de 3e L stk en herhaal dus dat is eigenlijk in elke 4eL een stokje maar dan krijg ik te weinig stokjes?
02.12.2012 - 12:24DROPS Design answered:
Er staat in het patroon: 1 stk in de 4e l van de haak, * sla 1 l over, 1 stk in iedere van de volgende 3 l *, herhaal herhaal van *-*... Je haakt dus eerst 1 stk in de 4 l. Daarna sla je eerst 1 l over en haakt 1 stk in IEDERE van de volgende 3 l. Je haakt dus in elke 3 l 1 st een slaat elke 4e l over.
03.12.2012 - 15:47
![]() Michelle Meyers wrote:
Michelle Meyers wrote:
Re: Inc Tip 1. It seems like you are increasing at the beginning of the row which starts at the mid front. To increase 9 times (for Med) it would require a minimum of 19 rows which would exceed the 16 cm length at which neckline decreases begin. What am I missing?
06.09.2012 - 01:00DROPS Design answered:
Dear Mrs Meyers, Inc Tip 1 includes both inc at beg of row and at the end of row towards mid front. So that you will inc each row. Happy Crocheting !
12.11.2012 - 11:18
![]() Deloris wrote:
Deloris wrote:
I need a chart for the sides. Is one available?
09.07.2012 - 12:13
|
|||||||||||||
Sandy Bubbles#sandybubblesvest |
|||||||||||||
 |
 |
||||||||||||
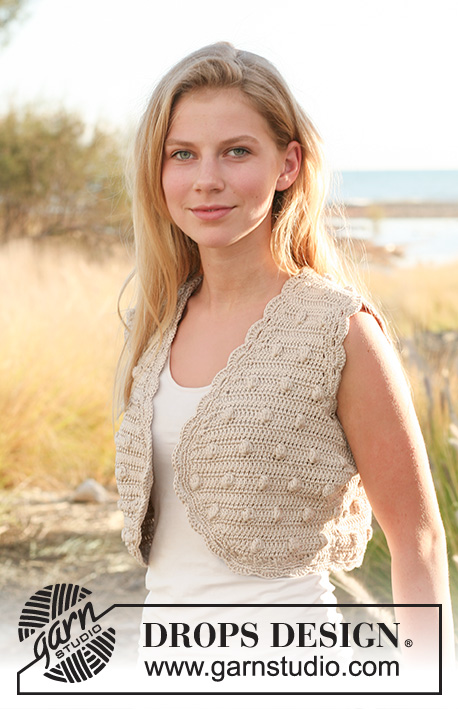
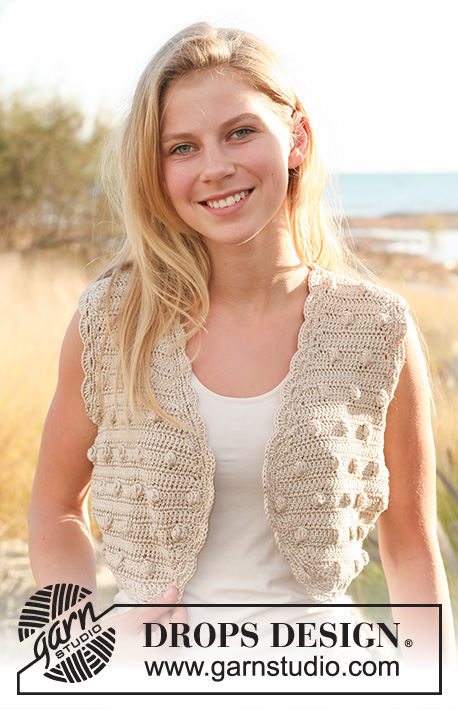
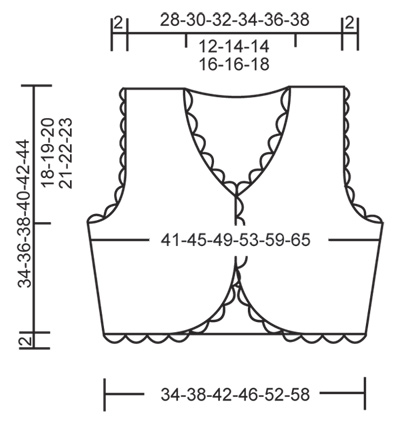
Crochet DROPS vest with bobbles and lace edges in "Muskat". Size: S - XXXL.
DROPS 130-31 |
|||||||||||||
|
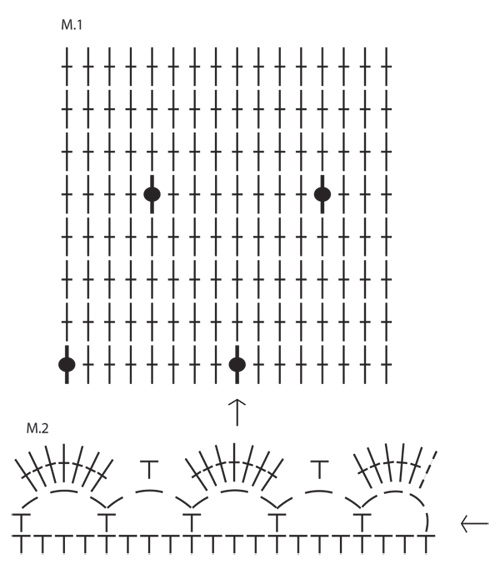
CROCHET INFO: Replace first dc at beg of every dc row with ch 3, finish the row with 1 dc in 3rd ch from beg of previous row. PATTERN: See diagram M.1 and M.2. NOTE: 1st row in M.1 = RS. INCREASE TIP 1 (when inc 2 dc for rounded front edge): Inc 2 dc for rounded front edge at the end of every row towards mid front as follows: Work ch 4, turn piece, work 1 dc in 4th ch from hook (there are now 2 dc at beg of row = 3 ch + 1 dc), then continue working row as before. At the end of next row towards mid front, work 1 hdc in last dc (instead of 1 dc in last dc) before inc new sts for rounded front edge. This is done to avoid a very jagged edge on the rounded front edge. INCREASE TIP 2 (when inc 1 dc): Inc 1 dc by working 2 dc in same dc. DECREASE TIP 1: Dec 1 dc by working 2 dc tog as follows: Work 1 dc but wait with last YO and pull through (= 2 sts on hook), work next dc but pull last YO through all 3 sts on hook (= dec 1 dc). DECREASE TIP 2: When dec several dc at the same time at the armhole, dec as follows: At beg of row: Replace no of dc to be dec with 1 sl st in every dc. At end of row: Turn piece when no of dc to be dec remains and continue working as before. -------------------------------------------------------- BACK PIECE: Ch 91-102-112-123-139-155 on hook size 3.5 mm/E/4 with Muskat. WORK 1ST ROW FROM RS AS FOLLOWS: 1 dc in 4th ch from hook, * skip 1 ch, 1 dc in each of the next 3 ch *, repeat from *-* until 3-2-4-3-3-3 ch remain, skip 1 ch and finish with 1 dc in each of the last 2-1-3-2-2-2 ch = 67-75-83-91-103-115 dc on row, turn piece. 2ND ROW (= WS): READ CROCHET INFO! Work 1 dc in every dc, turn piece. Continue to work M.1 - NOTE: Arrow in diagram marks mid back, i.e. there should be 1 bobble in the middle st mid back, count out towards the side to find where to start in diagram. AT THE SAME TIME when piece measures 2-3-3-4-5-6 cm / ¾"-1⅛"-1⅛"-1½"-2"-2⅜", inc 1 dc in each side - READ INCREASE TIP 2. Repeat the inc in each side on every other row a total of 7 times = 81-89-97-105-117-129 dc. When piece measures 16-17-18-19-20-21 cm / 6¼"-6¾"-7"-7½"-8"-8¼", dec for armholes at the beg and end of every row (i.e. dec from both RS and WS) - READ DECREASE TIP 2: 5-5-7-7-10-12 dc 1 time, 2 dc a total of 3-4-4-4-4-5 times and then 1 dc a total of 2-2-2-4-5-5 times = 55-59-63-67-71-75 dc. When piece measures 32-34-36-38-40-42 cm / 12½"-13⅜"-14¼"-15"-15¾"-16½", work shoulder as follows: Work 17-17-19-19-21-21 dc at beg of row, turn piece, dec 1 dc at beg of row by working the first 2 dc tog and work the rest of the row = 16-16-18-18-20-20 dc. Cut and fasten the thread, the piece measures approx. 34-36-38-40-42-44 cm / 13⅜"-14¼"-15"-15¾"-16½"-17¼". Repeat along the other shoulder. RIGHT FRONT PIECE: Worked back and forth with start from mid front. READ ALL OF THE FOLLOWING SECTION BEFORE CONTINUING! Ch 30-34-36-42-48-54 on hook size 3.5 mm/E/4 with Muskat. WORK 1ST ROW FROM RS AS FOLLOWS: 1 dc in 4th ch from hook, * skip ch 1, 1 dc in each of the next 3 ch *, repeat from *-* until 2-2-4-2-4-2 ch remain, skip 1 ch and finish with 1 dc in each of the last 1-1-3-1-3-1 ch = 21-24-26-30-35-39 dc on row, turn piece. 2ND ROW (= WS): READ CROCHET INFO! Work 1 dc in every dc while AT THE SAME TIME inc 2 dc at the end of row towards mid front - READ INCREASE TIP 1. INC IN THE SIDE AND MID FRONT: When piece measures 2-3-3-4-5-6 cm / ¾"-1⅛"-1⅛"-1½"-2"-2⅜", inc 1 dc in the side - READ INCREASE TIP 2. Repeat inc in the side on every other row a total of 7 times. AT THE SAME TIME after 2nd row, work M.1 - NOTE: The last bobble towards the side should be as many dc from side as on back piece, count outwards from the side to find where to start in the diagram from mid front. AT THE SAME TIME inc at the end of every row towards mid front as follows: Inc 2 dc a total of 4-4-5-5-5-6 times (incl inc on 2nd row), and then 1 dc a total of 4-5-5-5-6-6 times - READ INCREASE TIP 2. NECKLINE: AT THE SAME TIME when piece measures 15-16-17-18-19-20 cm / 6"-6¼"-6¾"-7"-7½"-8" / 6"-6¼"-6¾"-7"-7½"-8", dec 1 dc towards mid front - READ DECREASE TIP 1. Repeat dec towards mid front on every row (i.e. from both RS and WS) a total of 8-10-10-13-13-15 times, then on every other row a total of 3-3-3-2-2-2 times. ARMHOLES: AT THE SAME TIME when piece measures 16-17-18-19-20-21 cm / 6¼"-6¾"-7"-7½"-8"-8¼" (measured in the side), dec for armhole in the side on every row (i.e. from both RS and WS) as on back piece. After all dec for neckline and armhole are done, 16-16-18-18-20-20 dc remain on row. Continue the pattern until piece measures 34-36-38-40-42-44 cm / 13⅜"-14¼"-15"-15¾"-16½"-17¼" - adjust so that front and back piece are the same length. Fasten off. LEFT FRONT PIECE: Work as right front piece but reversed, i.e. start from the side. ASSEMBLY: Sew the shoulder seams edge to edge with neat little stitches. Sew side seams edge to edge the same way. CROCHET LACE EDGE: Work a lace edge around both armholes on with Muskat as follows: ROUND 1: Start from RS and work 1 sc in first st, * ch 1, skip 1 dc, 1 sc in next dc *, repeat from *-* the entire round - NOTE: This round should even out the armhole, skip more or fewer sts if needed. ROUND 2: Work 1 sc in every sc and 1 sc in every ch the entire round while AT THE SAME TIME adjusting the no of sc so that it can be divided by 8. ROUND 3 + 4: Work M.2 - NOTE: Start on the round marked with an arrow in the diagram. Finish 3rd round with 1 sl st in 2nd ch from beg of round and finish 4th round with 1 sl st in 3rd ch from beg of round. Work the same lace edge around the entire opening of the vest - NOTE: Make sure that the edge is even and pretty around the entire opening. |
|||||||||||||
Diagram explanations |
|||||||||||||
|
|||||||||||||
 |
|||||||||||||
 |
|||||||||||||
Have you finished this pattern?Tag your pictures with #dropspattern #sandybubblesvest or submit them to the #dropsfan gallery. Do you need help with this pattern?You'll find 9 tutorial videos, a Comments/Questions area and more by visiting the pattern on garnstudio.com. © 1982-2026 DROPS Design A/S. We reserve all rights. This document, including all its sub-sections, has copyrights. Read more about what you can do with our patterns at the bottom of each pattern on our site. |
|||||||||||||


With over 40 years in knitting and crochet design, DROPS Design offers one of the most extensive collections of free patterns on the internet - translated to 17 languages. As of today we count 324 catalogs and 12290 patterns - 12280 of which are translated into English (US/in).
We work hard to bring you the best knitting and crochet have to offer, inspiration and advice as well as great quality yarns at incredible prices! Would you like to use our patterns for other than personal use? You can read what you are allowed to do in the Copyright text at the bottom of all our patterns. Happy crafting!
Post a comment to pattern DROPS 130-31
We would love to hear what you have to say about this pattern!
If you want to leave a question, please make sure you select the correct category in the form below, to speed up the answering process. Required fields are marked *.