
Popular categories
Looking for a yarn?


Comments / Questions (7)
![]() Nicole wrote:
Nicole wrote:
DIMINUTIONS 2 (pour les bretelles devant) : diminuer sur l'endroit de la façon suivante : 1 m end, 3 m ens à l'end, tricoter ensuite à l'end jusqu'à la m avec le marqueur, faire 1 jeté, tricoter la m avec le marqueur, faire 1 jeté, Dans les explications il est écrit : tricoter la maille avec le marqueur. Qu'entendez vous par ce I? La maille avant le marqueur ? Il est supposé n'y avoir qu'un seul marqueur à la moitié du travail. Merci beaucoup pour votre aide.
04.08.2025 - 23:44DROPS Design answered:
Bonjour Nicole, lorsque vous commencez le 1er côté, vous mettez un marqueur dans la maille au milieu des 39-59 m; vous allez ensuite diminuer 2 m au début + 2 m à la fin de chaque rang sur l'endroit, et, en même temps, augmenter 1 m de chaque côté de la maille centrale = celle avec le marqueur, ainsi, vous ne diminuez que 2 m au total par rang de diminutions. Si vous regardez bien la photo, vous vouez au milieu de chaque bretelle une démarcation, c'est la maille centrale et les augmentations de chaque côté. Bon tricot!
05.08.2025 - 08:51
![]() Simon wrote:
Simon wrote:
Bjr, je viens de finir le devant droit bretelle sans problème mais les explications pour la bretelle gauche ne donnent pas le même motif diminution emmanchure qu il faut tricoter sur l endroit. Quelle est la technique ? Merci par avance, cordialement.
26.04.2023 - 10:08DROPS Design answered:
Bonjour Mme Simon, les diminutions des brettelles devant se font de la même façon pour les 2 devants - cf - DIMINUTIONS-2 (reformulé légèrement): autrement dit, vous diminuez 1 m à 1 m des bords sur l'endroit et faites 1 jeté de chaque côté de la maille avec le marqueur, au rang suivant, tricotez toutes les mailles à l'endroit (et les jetés torse à l'endroit). Bon tricot!
26.04.2023 - 11:27
![]() Josie wrote:
Josie wrote:
Bonjour Je voudrais réaliser ce top en safran. Mon échantillon correspond à celui qui est préconisé. Seul bémol ! Le dos de ma carrure est de 55 cms, mais le devant 65 cms à cause de la poitrine. Que me conseillez vous SVP ? Merci beaucoup et bonne semaine à vous.
17.05.2022 - 16:24DROPS Design answered:
Bonjour Josie, mesurez un top similaire que vous avez et dont vous aimez la forme pour vérifier les mesures à plat pour vous permettre de faire des ajustements si besoin. Toutefois, Safran est du groupe A alors que Muskat est du groupe B, les deux fils ne sont donc pas interchangeables d'ordinaire, prenez bien ça en compte. Bon tricot!
18.05.2022 - 08:09
![]() Laura wrote:
Laura wrote:
Hei, onko takakappale saman mallinen kuin etukappale? Kuvan mukaan on, mutta ohjeesta y mmärtäisin ,että ei 😮
19.05.2020 - 20:33DROPS Design answered:
Takakappale poikkeaa etukappaleesta siinä, että takakappaleessa ei tehdä rintakuppeja.
20.11.2020 - 14:16
![]() Cecile wrote:
Cecile wrote:
De uitleg over het gehaakte deel is niet zo duidelijk en volgens mij komt het ook niet overeen met de werkkelijkheid van de foto, want daar zijn eerst gaatjes gehaakt boven het gebreide en dat zie ik niet terug in de afbeelding, is dit wel juist?
11.06.2018 - 09:31DROPS Design answered:
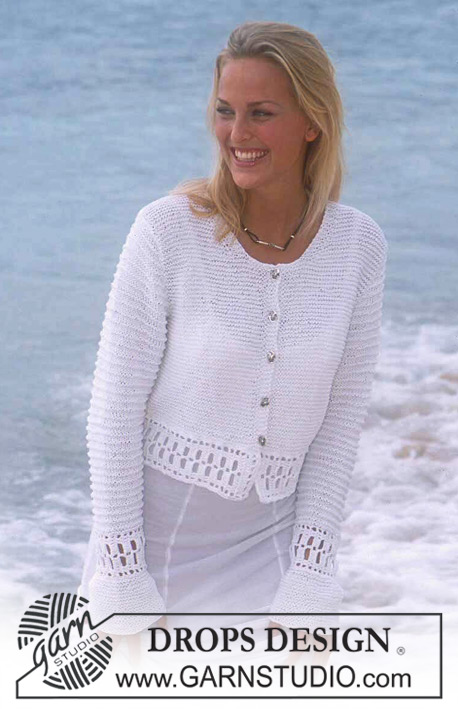
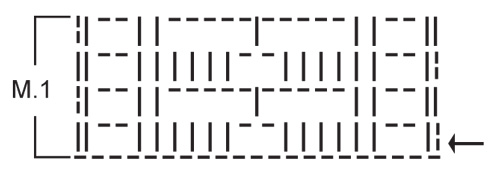
Dag Cecile, De gehaakte rand wordt overdwars gebreid, dus je begint a.h.w. aan de ene zijnaad en haakt naar de andere zijnaad. Je herhaalt patroon M.1 steeds in de hoogte tot de rand ongeveer zo hoog is als de breedte van het voor/achterpand. De gaatjes zitten ook in dit haakpatroon.
12.06.2018 - 09:51
![]() M. B. wrote:
M. B. wrote:
Die Höhe der Häkelborte ist nicht ersichtlich - es fehlt die genaue Zentimeter-Angabe.
18.04.2014 - 13:29DROPS Design answered:
Danke für den Hinweis, die Anleitung wurde an dieser Stelle nun korrigiert. Viel Spaß beim Weiterhäkeln!
22.04.2014 - 10:52
![]() Audrey Lovejoy-Findlay wrote:
Audrey Lovejoy-Findlay wrote:
I'd love to make this top but I find the crochet instructions rather scant - I wonder if you'd be able to supply some more detailed ones?
15.05.2012 - 11:17DROPS Design answered:
If using original Drops yarn you can be sure to get help from the store where you purchase the yarn. Our stores are specialized in the DROPS patterns and can help also by phone and email.
17.05.2012 - 20:40
|
||||||||||
DROPS 78-5 |
||||||||||
|
|
||||||||||
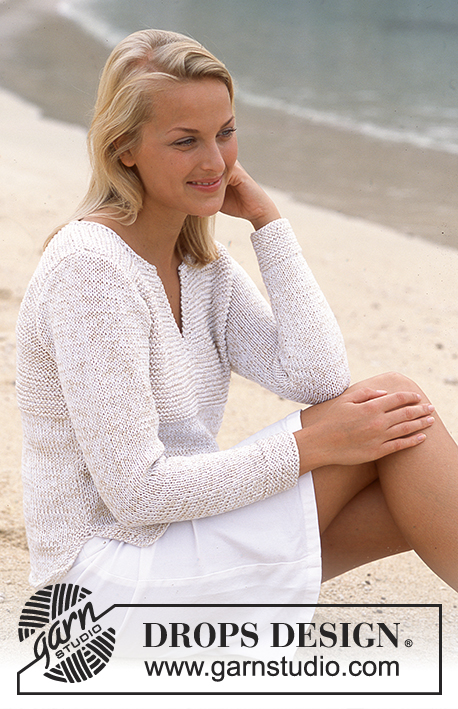
DROPS Top in Muskat
DROPS 78-5 |
||||||||||
|
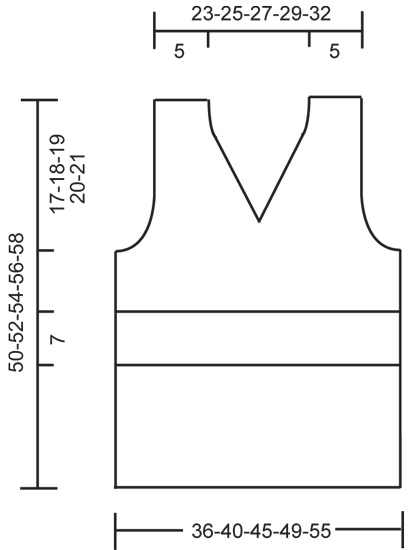
Gauge: 22 sts x 40 rows in garter st = 10 x 10 cm. Garter st, when knitting flat: Knit all sts, all rows. Crocheted border: See chart. The pattern is seen from the right side. Decreasing tips-1 (for back): All decs are made from right side. Dec 1 st inside 1 edge st knit in garter st as follows: After 1 edge st: K 2 tog. Before 1 edge st: Slip 1 st as if to knit, K 1, psso. Decreasing tips-2 (for strap shaping on front): All decs are made on right side rows as follows: K 1, K 3 tog, then knit to st with marker, yo, knit st with the marker, yo, knit until 4 sts remain, sl 1, K 2 tog, psso, K 1. On wrong side rows: K all sts, but the yarnovers from previous row should be twisted. Front: The front is comprised of 2 knit pieces and 1 crocheted piece, sewn together. 1st Front piece: Cast on 80-88-100-108-120 sts and knit garter st. When the piece measures 14-15-16-17-18 cm bind off all sts. Crocheted border: Loosely ch 23 (incl. 2 ch for turning). Then crochet Pattern 1 following chart until border measures approx. 2 cm shorter than width on front, fasten off – finish after 1 complete repeat of chart. Sew border to bound-off edge on the 1st front piece - stretch border slightly when sewing on and sew edge to edge with small sts. 2nd front piece: Cast on 80-88-100-108-120 sts and knit garter st. When piece measures approx. 5 cm sew cast-on edge to crocheted border in the same manner as to first piece. When the piece measures 33-34-35-36-37 cm dec 1 st at each side, then put half the sts on a st holder (= 39-43-49-53-59 sts). 1st side: Put a marker in the center st of the 39-43-49-53-59 sts. Knit garter st – at the same time dec and inc to form a triangle - see knitting tips-2 – this decreases 2 sts per row. Dec in this manner every other row a total of 14-16-19-21-24 times = 11 sts remain. Continue in garter st on these 11 sts until the piece measures approx. 30-31-31-32-33 cm from where half the sts were put on st holder (the band is sewn to back later). 2nd side: Put sts on st holder back on needles and knit the same as the 1st side. Back: Knit and crochet in 3 pieces as for front. 1st back piece: Knit the same as for front. Crocheted border: Crochet the same as for front, sew to 1st piece as on front. 2nd back piece: Cast on 80-88-100-108-120 sts and knit garter st. When piece measures approx. 5 cm sew cast-on edge to crocheted border in the same manner as to first piece. When the piece measures 33-34-35-36-37 cm bind off 7 sts at each side = 66-74-86-94-106 sts. Dec 1 st for armhole at each side every other row a total of 8-10-13-15-18 times - see knitting tips-1 = 50-54-60-64-70 sts remain. The piece measures approx. 37-39-42-44-46 cm - bind off all sts. Assembly: Sew side seams. Sew bands to back. |
||||||||||
Diagram explanations |
||||||||||
|
||||||||||
 |
||||||||||
 |
||||||||||
Have you finished this pattern?Tag your pictures with #dropspattern or submit them to the #dropsfan gallery. Do you need help with this pattern?You'll find 12 tutorial videos, a Comments/Questions area and more by visiting the pattern on garnstudio.com. © 1982-2026 DROPS Design A/S. We reserve all rights. This document, including all its sub-sections, has copyrights. Read more about what you can do with our patterns at the bottom of each pattern on our site. |
||||||||||


With over 40 years in knitting and crochet design, DROPS Design offers one of the most extensive collections of free patterns on the internet - translated to 17 languages. As of today we count 325 catalogs and 12298 patterns - 12288 of which are translated into English (US/in).
We work hard to bring you the best knitting and crochet have to offer, inspiration and advice as well as great quality yarns at incredible prices! Would you like to use our patterns for other than personal use? You can read what you are allowed to do in the Copyright text at the bottom of all our patterns. Happy crafting!
Post a comment to pattern DROPS 78-5
We would love to hear what you have to say about this pattern!
If you want to leave a question, please make sure you select the correct category in the form below, to speed up the answering process. Required fields are marked *.