
Popular categories
Looking for a yarn?


Comments / Questions (82)
![]() Nadine wrote:
Nadine wrote:
Ik begrijp iets niet onder het kopje HAKEN, bij het LIJF. Je haakt hier steeds 18 lossen (maat S) onder de oksels, waar de mouwen moeten komen. Deze lossen worden een lusje. Telt de 1e losse mee als steek? (is eigenlijk een hv om te beginnen na het overslaan vd steken). Als ik dan in de volgende steek begin met stokjes (zoals beschreven) kom ik op het eind 2 steken tekort. Moet ik het lusje lossen in dezelfde steek beginnen en eindigen? Bij voorbaat dank voor uw antwoord. Mvg,
17.08.2019 - 18:04DROPS Design answered:
Dag Nadine,
Je haakt eerst stokjes, dan haak je 16 lossen, je slaat 60 steken over. Je telt dus 60 steken en haakt het volgende stokje in de 61e steek. Je moet de lus dus niet in dezelfde steek beginnen en eindigen, maar je slaat 60 steken over,
16.10.2019 - 10:24
![]() Marths wrote:
Marths wrote:
I can't figure out what weight yarn you are calling for to make Afternoon Romance sweater. I'm leaving for vacation and would like to take this with me.
09.07.2019 - 12:56DROPS Design answered:
Dear Marths, the sweater s knitted from DROPS Paris yarn, which is between sport and DK weight, 150 meters / 50 gramm balls. It belongs to the DROPS yarn group A, and can be substituted with yarns from the same yarn goup. here are some alternatives. However, you should always make a gauge swatch, wash, check the stitch cound and make adjustments accordingly. Happy Knitting!
09.07.2019 - 13:29
![]() Nadine wrote:
Nadine wrote:
Die zoektermen heb ik al gebruikt. Haken, top, dames, cremekleur, het staat er niet tussen. Worden patronen ook wel eens verwijderd door Drops? Als ik op de foto op Pinterest klik staat er: Stimmen Sie für die neue DROPS Kollektion! ~ DROPS Design. Kan het zijn dat het patroon nog moet worden uitgegeven, maar alleen nog de foto op de website staat? mvg
07.03.2019 - 22:31DROPS Design answered:
Dag Nadine,
Het kan inderdaad zo zijn dat dit patroon nog niet gepubliceerd is op de site en dat deze foto gewoon gebruikt is als promotiefoto om te stemmen op de patronen. Het stemmen is in januari geweest en de patronen die veel stemmen hebben gekregen worden als eerste gepubliceerd.
15.03.2019 - 19:03
![]() Nadine wrote:
Nadine wrote:
Als je op de foto klikt in pinterest kom je helaas niet bij het patroon, zoals anders wel het geval is, maar op de homepagina van Drops. Ik heb heel lang gezocht maar kan het patroon niet op de site vinden. Bij voorbaat dank voor uw moeite. Vriendelijke groet,
07.03.2019 - 08:28
![]() Nadine wrote:
Nadine wrote:
Op pinterest kwam ik een patroon tegen van Drops maar er staat geen naam of nummer bij. Het lijkt op dit vestje Afternoon Romance. Het is een gehaakte top, volledig in cremekleur, met een ronde pas erop, een beetje zoals de jurkjes uit de film The Sound of Music. De top heeft geen mouwen en het ronde gedeelte lijkt er bovenop gehaakt. Onderaan de pas en onderaan de boord zit hetzelfde schulprandje als bij dit vestje. Ik zou het zo ontzettend graag willen maken, heeft u het patroon voor mij?
06.03.2019 - 22:14DROPS Design answered:
Dag Nadine,
We hebben meer dan 7000 patronen op de site. Je kan het beste even zoeken op bijvoorbeeld 'haken' en 'top' en je kunt ook op kleur zoeken :)
07.03.2019 - 20:33
![]() Marianna wrote:
Marianna wrote:
Ich häckle diese wunderschöne Jäckchen in der Grösse S. Und meine Frage ist welche 3,5 cm des Ärmels soll ich an Armloch annähen? Die Ärmel bestehen doch aus 63 Stb, die aus Passe der 60 Stb. gehäckelt werden. Was mache ich mit 16 Lm?
03.08.2018 - 21:23DROPS Design answered:
Liebe Marianna, die 3,5 auf beiden Seiten der Ärmel ganz oben werden mit den neuen Luftmaschen unter den Ärmel zusammengenäht. Viel Spaß beim häkeln!
06.08.2018 - 08:43
![]() Lisa Wallmüller wrote:
Lisa Wallmüller wrote:
Hallo, bei Dem Rückenteil soll man 68 Maschen überspringen. Soll man diese einfach auslassen? Oder wie funktioniert das überspringen? Danke für die Hilfe!
21.10.2017 - 08:02DROPS Design answered:
Liebe Frau Wallmüller, diese 68 M überspringen Sie für jeden Ärmel, und Sie häkeln 20 Lm (unter jedem Ärmel). Diese neue 20 M häkeln Sie wie beschrieben, und die 68 M häkeln Sie dann später für die Ärmel. Viel Spaß beim häkeln!
23.10.2017 - 09:46
![]() Stephanie wrote:
Stephanie wrote:
As someone who lamentably cannot sew sleeves so that they end up smooth & even (despite starting from the wrist), I'm thinking of minimizing the scope for error by working them in the round after 4.5cm. But: is there an important reason why they should be worked back and forth all the way down? Or would this variant be OK?
09.10.2017 - 01:05DROPS Design answered:
Dear Stephanie, sleeves are worked back and forth to keep same texture as on body. You can work them back and forth joining them together at the end of each row with a slip st (crochet together each row) and work alternately from RS and from WS without any seam. Happy crocheting!
09.10.2017 - 09:32
![]() Coutarel wrote:
Coutarel wrote:
Pour les manches on relève 68 B on ne fait rien sur les mailles en l'air (20 m) puis on augmente de 3, est ce que c'est ça
23.09.2017 - 17:50DROPS Design answered:
Bonjour Mme Coutarel, tout à fait c'est bien ça, voir aussi réponse précédente. Bon crochet!
25.09.2017 - 10:01
![]() Coutarel wrote:
Coutarel wrote:
J'en suis à réaliser les manches, je ne comprends pas vus dites crocheter 71 B pour la manches mais les 71 B représentent les mailles en l'air, les autre mailles elles sont ou dans vos calculs, la manche ne fait pas que 71 B. merci pour votre réponse je fais le gilet en blanc
23.09.2017 - 07:58DROPS Design answered:
Bonjour Mme Coutarel, en taille L vous avez 68 mailles pour les manches (lors de la séparation des manches), vous augmentez 3 B à intervalles réguliers = 71 B. Les mailles en l'air sous la manche ne sont pas crochetées, lors de l'assemblage de la manche, on va coudre les 4.5 premiers cm de la manche à ces mailles en l'air. Bon crochet!
25.09.2017 - 09:41
|
||||||||||||||||
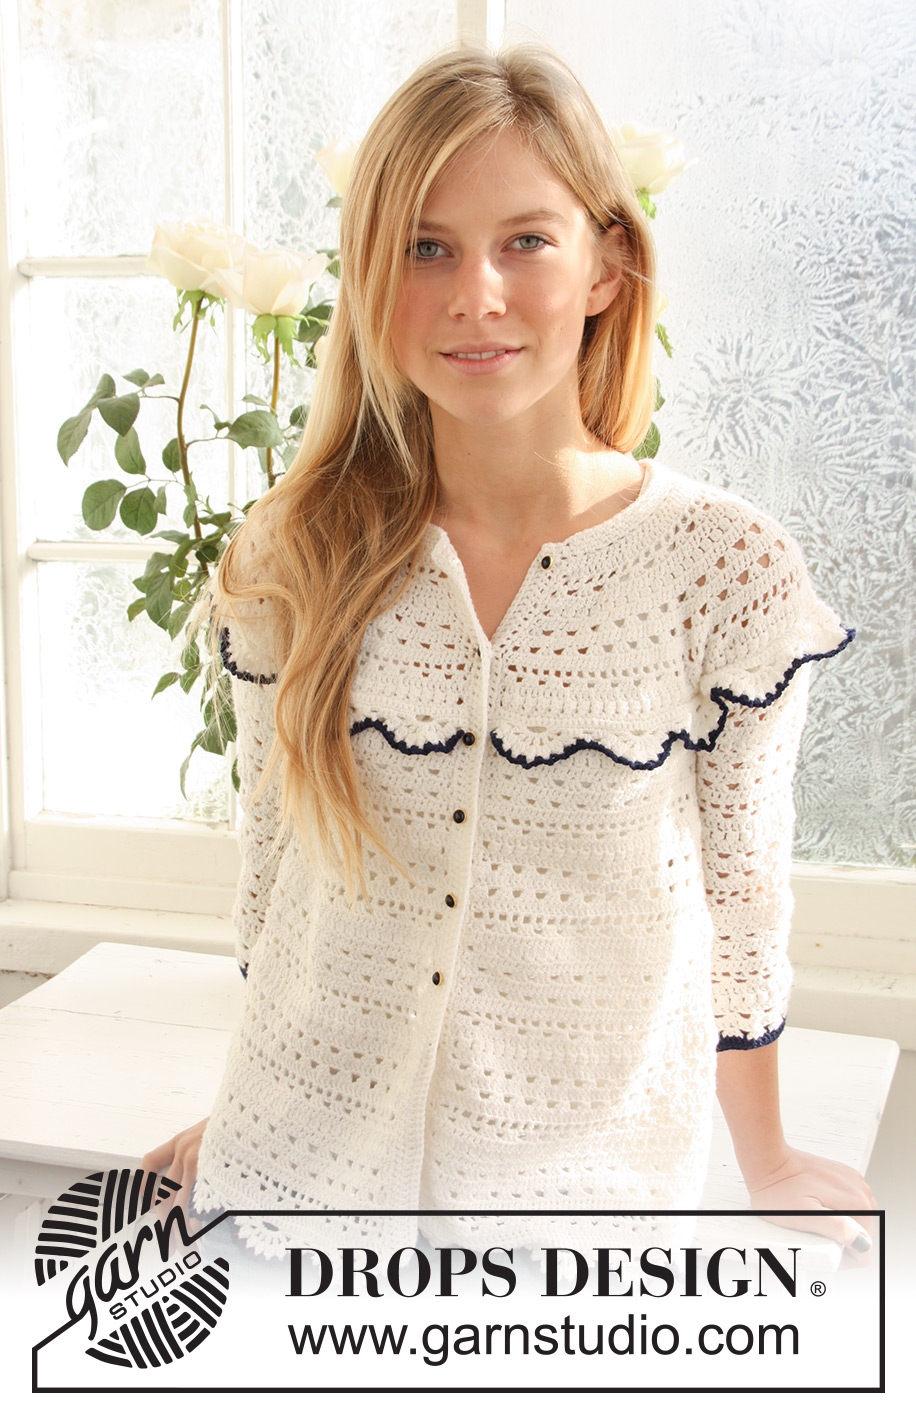
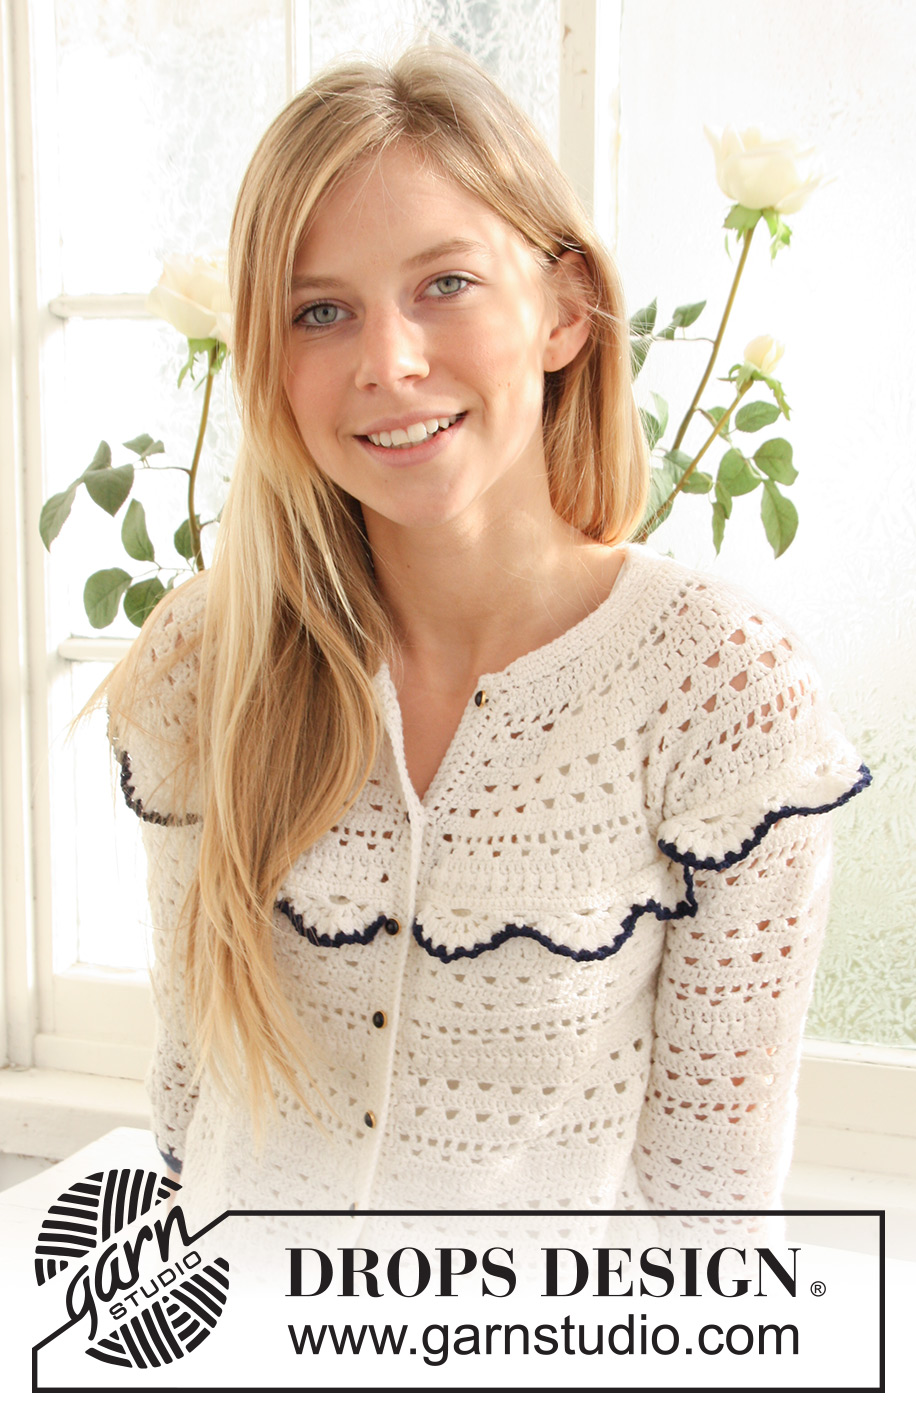
Afternoon Romance#afternoonromancecardigan |
||||||||||||||||
 |
 |
|||||||||||||||
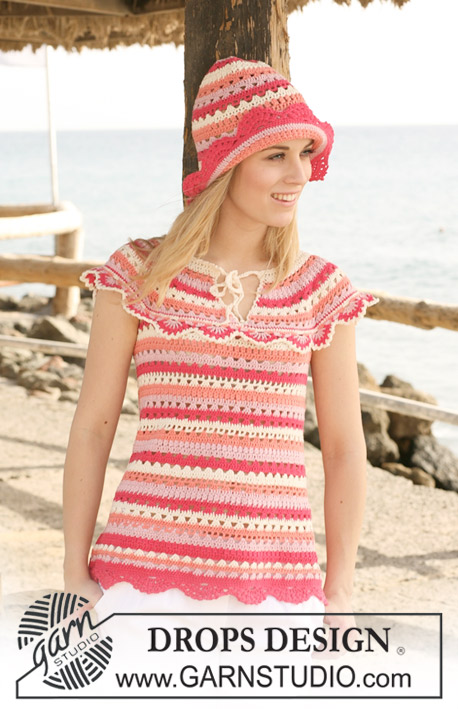
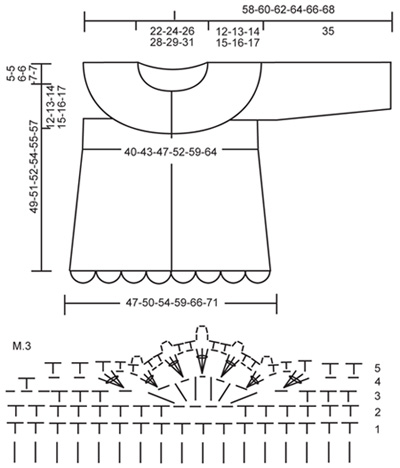
Crochet DROPS jacket with stripes and lace pattern in ”Safran”. Size XS - XXL.
DROPS 120-60 |
||||||||||||||||
|
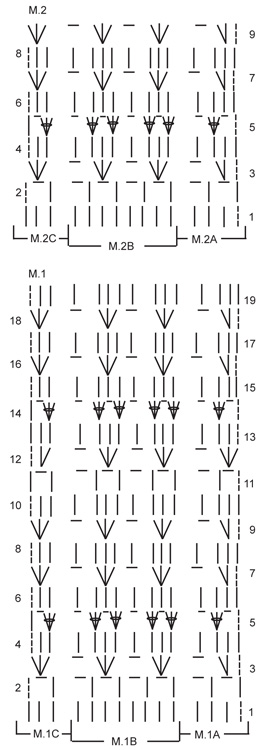
PATTERN: See diagram M.1 to M.3. STRIPES: Crochet stripes as follows: * 1 row off-white, 2 rows ice blue, 2 rows light blue/purple, 2 rows denim blue, 1 row off-white *, repeat from *-*. INCREASING TIP-1: Make all inc on rows in diagram with dc only (= row 1, 4, 6 or 8). Inc by working 2 dc in 1 dc. INCREASING TIP-2: Inc 1 sc by working 2 sc in 1 sc. DECREASING TIP: Make all dec on rows in diagram with dc only (= row 1, 4, 6 or 8). Dec 1 dc by working 1 dc but wait with the last pull-through (= 2 sts on hook). Crochet next dc but when doing the last pull-through pull thread through all sts on hook. 1 dec dc. CROCHET TIP: Replace 1 dc with 3 ch and 1 sc with 1 ch at beg of row. -------------------------------------------------------- -------------------------------------------------------- WHITE JACKET: Crochet the jacket the same way as the striped jacket but without stripes. On the sleeves crochet the 2 last rows with sc with navy blue. On lace borders crochet last row in M.3 with navy blue. STRIPED JACKET YOKE: Jacket is crochet from top down, back and forth from mid front. READ ALL OF THIS SECTION BEFORE BEG! Ch 139-150-160-171-182-192 with hook size 3 mm / C and off-white. Crochet 1 dc in 4th ch from hook and continue as follows: * skip 1 ch, crochet 1 dc in each of the next 3 ch *, repeat from *-* and finish with skip 1 ch and 1 dc in each of the last 2-1-3-2-1-3 ch = 103-111-119-127-135-143 dc. Turn piece. Work next row as follows (beg on row marked 1 in M.1): M.1A, repeat M.1B 12-13-14-15-16-17 times and finish with M.1C. AT THE SAME TIME crochet STRIPES - see above. AT THE SAME TIME on row 1 in diagram inc 32 dc evenly - see INCREASING TIP-1 = 135-143-151-159-167-175 dc. Repeat the inc on row 4 = 167-175-183-191-199-207 dc, on row 6 = 199-207-215-223-231-239 dc and on row 8 = 231-239-247-255-263-271 dc. Continue in M.1 and Stripes. AT THE SAME TIME on row 10 inc 40-48-32-32-32-32 dc evenly = 271-287-279-287-295-303 dc. SIZE XS + S: Continue in M.1 and Stripes until row 13-14 inclusive. Piece now measures approx 12-13 cm / 4¾"-5⅛". SIZE M: Continue in M.1 and Stripes. AT THE SAME TIME on row 13 inc 32 dc evenly = 311. Continue to row 16 inclusive. Piece now measures approx 14 cm / 5½". SIZE L + XL: Continue in M.1 and Stripes. AT THE SAME TIME on row 13 inc 24-32 dc evenly = 311-327 dc, and on row 15 inc 32-40 dc evenly = 343-367 dc. Continue to row 17 inclusive. Piece now measures approx 15-16 cm / 6"-6¼". Size XXL: Continue in M.1 and Stripes. AT THE SAME TIME on row 13 inc 32 dc evenly = 335 dc, and on row 15 inc 32 dc evenly = 367 dc, and on row 17 inc 40 dc evenly = 407 dc. Continue to row 19 inclusive. Piece now measures approx 17 cm / 6¾". BODY PIECE: Insert a marker, and now measure piece from here. Continue with Stripes as before and crochet next row as follows (from mid front) – see CROCHET TIP: Crochet 1 dc in each of the first 37-40-43-49-53-59 sts, skip 60-62-68-72-76-84 sts, ch 16-18-20-20-28-28, crochet 1 dc in each of the next 77-83-89-101-109-121 sts (= back piece), skip 60-62-68-72-76-84 sts, ch 16-18-20-20-28-28, crochet 1 dc in each of the last 37-40-43-49-53-59 sts. There are now a total of 183-199-215-239-271-295 sts on round. Continue in Stripes and M.2 as follows (NOTE! beg on row 2 in diagram): M.2C, M.2B on the next 176-192-208-232-264-288 sts, M.2A. Continue like this until piece measures approx 15 cm / 6" from marker (adjust so that next row in M.2 is a row with dc only). Now inc 8 dc evenly - see INCREASING TIP-1 – and repeat the inc on approx every 6 cm / 2⅜" a total of 4 times = 215-231-247-271-303-327 sts. When all inc are complete piece measures approx 33 cm / 13" from marker. Continue in M.2 and Stripes until stripe pattern is completed. Now continue in M.2 and crochet the next 3 stripes as follows: 1 row off-white, 1 row ice blue, 1 row light blue/purple. Now crochet 1 row denim blue, AT THE SAME TIME inc 4-5-6-16-1-11 dc evenly = 219-236-253-287-304-338 dc. LACE BORDER: Now crochet a border along bottom edge with denim blue as follows: Crochet M.3 on all sts. NOTE! Beg on row marked 1 in diagram, on the last repeat crochet on the remaining 15 sts to make pattern identical both sides towards mid front. See CROCHET TIP! After M.3 cut and fasten thread. LACE BORDER ON YOKE: Beg mid front with denim blue. Crochet 1 sc in each dc round the last row on yoke = 271-287-311-343-367-407 sc. Continue in M.3, beg on row marked 1 in diagram and AT THE SAME TIME on first row inc 50-51-44-46-56-50 sc evenly - see INCREASING TIP = 321-338-355-389-423-457 sc. NOTE! On the last repeat crochet on the remaining 15 sts to make pattern identical both sides towards mid front. AT THE SAME TIME crochet stripes as follows: row 1: off-white, row 2: ice blue, row 3: light blue/purple, row 4: denim blue, row 5: off-white. After M.3 cut and fasten thread. SLEEVE: Sleeve is worked back and forth under lace border on yoke. Continue with Stripes and M.2 as on body piece. NOTE! Cut the thread for each stripe, thread end to be used when sewing sleeve seam tog. First part of sleeve is sewn to the edge under sleeve on body piece – see ASSEMBLY Crochet 63-63-71-79-79-87 dc with denim blue on sleeve under lace border in the same sts in which lace border was crochet (i.e. crochet in the 60-62-68-72-76-84 dc skipped on body piece, at the same time inc 3-1-3-7-3-3 dc evenly). Insert a marker, and measure sleeve from here. Continue back and forth in Stripes as follows: M.2A, repeat M.2B on the next 56-56-64-72-72-80 sts, M.2C. AT THE SAME TIME when piece measures approx 7 cm / 2¾" from marker (adjust to a row in M.2 with dc only) dec 4 dc evenly - see DECREASING TIP = 59-59-67-75-75-83 dc. Continue as before. When sleeve measures approx 25 cm / 9¾" from marker (adjust to a row in M.2 with dc only) dec 4 dc evenly = 55-55-63-71-71-79 dc. Continue in Stripes and M.2 until there are 4 vertical repeats of M.2, sleeve now measures approx 33 cm / 13" from marker. Now crochet 1 dc in each dc with ice blue, then 1 sc in each dc with light blue/purple, and then 1 row denim blue with 1 sc in each sc. Cut and fasten thread. Crochet the other sleeve in the same way. LEFT FRONT BAND: Beg at the top of left front piece. Crochet with hook size 3 mm / C and denim blue as follows - see CROCHET TIP: Crochet 1 sc in corner and continue down along front piece as follows * ch 1, skip approx 0.5 to 1 cm/ ¼"-⅜", 1 sc * repeat from *-* and finish with 1 sc at bottom of front piece before lace border. Turn piece. Crochet 1 dc in each sc and in each ch back to neckline. Turn piece. Crochet 1 dc in each dc. Turn piece. Crochet 1 sc in each dc back to neck. Cut and fasten thread. RIGHT FRONT BAND: Crochet like left front band, but mirrored, i.e. beg at bottom edge. NECKLINE: Beg mid front, in corner on right front band. Crochet with hook size 3 mm / C and denim blue on front band and continue round neck as follows: 1 sc, * ch 1, skip approx 0.5 to 1 cm/ ¼"-⅜", 1 sc *, repeat from *-* and finish with 1 sc in corner on left front piece. Turn piece. Crochet 1 sc in each ch and 1 ch over each sc round neck. Turn piece. Crochet 1 sc in each ch and ch 1 over each sc. Turn piece. Crochet 1 sc in each ch and ch 1 over each sc round neck until 30 sts remain on right front piece (= 15 sc and 15 ch). Turn piece. Crochet 1 sc in each ch and ch 1 over each sc round the neck until 30 sts remain on left front piece. Turn piece. Crochet 1 sc in each ch and ch 1 over each sc round neck until 50 sts remain on right front piece (= 25 sc and 25 ch). Turn piece. Crochet 1 sc in each ch and ch 1 over each sc until 50 sts remain on left front piece. Cut the thread. Beg mid front on right front piece. Crochet 1 sc in each ch and ch 1 over each sc round the whole neck to mid front on left front piece. Cut and fasten thread. ASSEMBLY: Sew under arm seam tog, edge to edge, with thread ends from color changes. Sew the top 3.5-4-4.5-4.5-6-6 cm / 1¼"-1½"-1¾"-1¾"-2⅜"-2⅜" to the edge under sleeve on body piece. Sew buttons to left front band. Place the top button approx 1 cm / ⅜" from top of neckline, the bottom one approx 9 to 12 cm / 3½"-4¾" from bottom edge and the remaining 5 with approx 6.5-7-7-7-7.5-7.5 cm / 2½"-2¾"-2¾"-2¾"-2⅞"-2⅞" between each. Use second dc row on right front band as buttonholes |
||||||||||||||||
Diagram explanations |
||||||||||||||||
|
||||||||||||||||
 |
||||||||||||||||
 |
||||||||||||||||
Have you finished this pattern?Tag your pictures with #dropspattern #afternoonromancecardigan or submit them to the #dropsfan gallery. Do you need help with this pattern?You'll find 7 tutorial videos, a Comments/Questions area and more by visiting the pattern on garnstudio.com. © 1982-2026 DROPS Design A/S. We reserve all rights. This document, including all its sub-sections, has copyrights. Read more about what you can do with our patterns at the bottom of each pattern on our site. |
||||||||||||||||


With over 40 years in knitting and crochet design, DROPS Design offers one of the most extensive collections of free patterns on the internet - translated to 17 languages. As of today we count 324 catalogs and 12291 patterns - 12281 of which are translated into English (US/in).
We work hard to bring you the best knitting and crochet have to offer, inspiration and advice as well as great quality yarns at incredible prices! Would you like to use our patterns for other than personal use? You can read what you are allowed to do in the Copyright text at the bottom of all our patterns. Happy crafting!
Post a comment to pattern DROPS 120-60
We would love to hear what you have to say about this pattern!
If you want to leave a question, please make sure you select the correct category in the form below, to speed up the answering process. Required fields are marked *.