
Popular categories
Looking for a yarn?


Comments / Questions (50)
![]() Ursel wrote:
Ursel wrote:
Hallo liebes Drops Team, ich finde diesen Rock ganz toll, aber wie viele Maschen schlage ich pro Viereck an? Ich weiß nur, dass man bei diesen Dominoecken eine ungerade Maschenzahl braucht. Gruß, Ursel
21.05.2015 - 10:36DROPS Design answered:
Die Anleitung beginnt unter der gestrichelten Linie bei "ROCK", dort finden Sie auch die Angaben zum Maschenanschlag und wie Sie die Maschen, die Sie zunächst für den gesamten Rockumfang anschlagen, auf die einzelnen Vierecke aufteilen. Es sind am Anfang 29-31-33 M pro Viereck, später werden es mit den Abnahmen dann weniger, das sehen Sie dann bei der jeweiligen Runde (in der 5. "Runde" erfolgen die ersten Abnahmen).
21.05.2015 - 11:00
![]() ET-1955 wrote:
ET-1955 wrote:
Hallo liebes Drops-Team, verstehe ich es richtig, dass ich nach jedem Viereck den Faden abschneiden muss? Freundliche Grüße Erika
11.05.2015 - 10:10DROPS Design answered:
Ja genau, das ist richtig. Die Fäden vernähen Sie am besten zwischendurch einfach immer mal wieder, dann ist es am Ende nicht so viel Arbeit und sieht dann auch schon "fertiger" aus - für mich hat sich diese Methode jedenfalls gut bewährt. :-)
11.05.2015 - 22:14
![]() Klazina wrote:
Klazina wrote:
Waarom wordt bij dit patroon in de tailleband bijna op het laatst nog 5 steken geminderd?
06.04.2015 - 13:31DROPS Design answered:
Beste Klazina, dat wordt gedaan om de tailleband aan de bovenkant iets smaller te maken.
06.04.2015 - 15:22
![]() Schneider wrote:
Schneider wrote:
Ik heb de eerste 14 blokken gebreid en dan zou de maat moeten zijn 62cm onderaan, is dat berekend echt van punt tot punt of in het midden van het domino vierkant,volgens de tekening in het midden van het dominovierkant. Ik kom van punt tot punt wel uit op 62 cm, maar veel groter (69cm) als ik echt van het midden van het domino vierkant meet, en dat is volgens mij uiteindelijk wel het totaal oppervlak van de voorkant. Proeflapje was precies goed,ik ben bang dat hij te groot uitvalt, Klazina.
08.02.2015 - 01:04DROPS Design answered:
Hoi Klazina. De lengte is gemeten van punt van de vierkant (laagste punt van de rok) tot bovenkant. Probeer eventueel de rok aan om te zien hoe die valt.
10.02.2015 - 15:09
![]() Klazina wrote:
Klazina wrote:
Als je dit patroon heen en weer breid moet je toch een naad krijgen? Wanneer sluit je de steken dan. met vr groet
27.01.2015 - 02:39DROPS Design answered:
Hoi Klazina. Nee, je krijgt geen naad. Je breit de vierkantjes heen en weer, maar als je verder gaat en steeds steken opneemt aan de zijkanten voor nieuwe vierkantjes zal de rok zelf in de rondte worden gebreid.
27.01.2015 - 11:26
![]() Mandy wrote:
Mandy wrote:
Wenn ich in der 1. Reihe 14 quadrate habe und in der 2. Reihe immer ein Quadrat zwischen den quadraten der vorreihe arbeiten soll, komme ich nur auf 13. Wie kommt man dann auf 14? Was muss ich tun?
09.09.2013 - 07:16DROPS Design answered:
Liebe Mandy, es sind immer gleich viele Dominoecken, sonst würde der Rock ja enger werden. Die Quadrate sitzen immer zwischen denen der "Vorrunde", sind also quasi nur etwas verschoben.
09.09.2013 - 10:18Lina Lucchi wrote:
Just wanna know if this skirt is knitted in a round? It's a beautiful pattern & I love the color too. Was reading the pattern to understand before purchasing the yarn.
21.06.2013 - 07:51DROPS Design answered:
Dear Mrs Lucchi, dominos are worked back and forth, and joined together in the round until vent for mid back. Happy knitting!
21.06.2013 - 10:04
![]() Nina wrote:
Nina wrote:
Ik heb net de steken opgezet en de eerste nld gebreid, wat blijkt: de rok moet schijnbaar heen en weer gebreid worden en niet rond zoals ik aan het doen ben, balen, nu kan ik 462 steken terugsteken......
28.02.2012 - 20:16
![]() Anna-Karin wrote:
Anna-Karin wrote:
Jag kan sticka dominorutor, men vad jag menade i mitt inlägg den 20/1 är att jag tror att det står tvärt om i mönstret. Jag har nu gjort flera varv och jag kan inte få det till något annat än att man måste börja plocka maskor på den ruta som är nr2 (till höger från rätsidan) för att det första varvet man stickar är från avigsidan.
03.02.2012 - 11:32
![]() DROPS Design wrote:
DROPS Design wrote:
Videoen er bar en innføring om hvordan man strikker en domino rute. Følg oppskriften om hvordan man strikker dominorutene sammen.
30.01.2012 - 09:48
|
|
Shifting Bricks#shiftingbricksskirt |
|
|
|
|
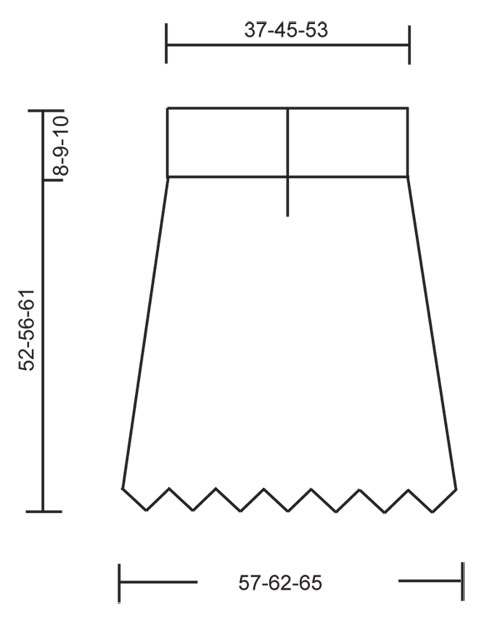
Knitted DROPS skirt with Domino squares in ”Delight”. Size S - XXL.
DROPS 121-5 |
|
|
WHOLE DOMINO SQUARE: Row 1 (= from WS): K all sts. Row 2 (= from RS): K row to 1 st before st with marker, slip 1 st as if to K, K2 tog, psso, work remaining sts on row. Repeat row 1 and 2, i.e. dec 2 sts in the middle of square on every other row until there is 1 st left on needle, cut the thread and pull it through the last st. HALF DOMINO SQUARE (vertical) with front band: Row 1 (= from WS): K sts, AT THE SAME TIME dec 2 sts evenly (do not dec on front band). Row 2 (= from RS): K sts on row until 8 sts remain (includes front band), K2 tog, 6 front band sts. Row 3 (= WS): K all sts. Repeat row 2 and 3, i.e. dec 1 st (towards front band) on every other row until there is 1 st (+ 6 front band sts) left on needle. Cut the thread and pull it through the last st. Slip the 6 front band sts on a stitch holder. HALF DOMINO SQUARE (vertical) without front band: Row 1 (= from WS): K sts, AT THE SAME TIME dec 2 sts evenly. Row 2 (= from RS): K2 tog, work remaining sts on row. Row 3 (= WS): K all sts. Repeat row 2 and 3, i.e. dec 1 st on every other row until there is 1 st left on needle. Cut the thread and pull it through the last st. HALF DOMINO SQUARE (horizontal): Work like whole domino square, but in addition to the dec in the middle of square, slip the last st at the end of every row on a stitch holder. Continue until there are 3-5-5 sts left on needle. SIZE S/M: 3 sts left on needle (= 4 sts on stitch holder each side). K 1 row from WS on the 3 sts. Work next row (= from RS) as follows: slip 1 st as if to K, K2 tog, psso. Cut the thread and pull it through the last st. SIZE L/XL + XXL: 5 sts left on needle (= 4-5 sts on stitch holder each side). K 1 row from WS and slip the last st at the end of row on stitch holder. Work next row (from RS) as follows: slip 1 st as if to K, K2 tog, psso. Slip the last st at the end of row on stitch holder (= 5-6 sts on stitch holder each side). Cut the thread and pull it through the last st. BUTTONHOLES: Make buttonholes on front band. 1 buttonhole = bind off 3rd and 4th front band st and cast on 2 new sts on next row. Make buttonholes when front band measures: SIZE S/M: 1, 4, 7, 10 and 13 cm / ½",1½",2¾",4" and 5⅛". SIZE L/XL: 1, 4, 8, 11 and 14 cm / ½",1½",3⅛",4⅜" and 5½". SIZE XXL: 1, 4, 8, 12 and 16 cm / ½",1½",3⅛",4¾" and 6¼". -------------------------------------------------------- All squares worked in garter st - i.e. K all rows. SKIRT: Beg by casting on sts for the full width of the bottom of skirt, then continue with squares back and forth on circular needle. ROW 1: Cast on 434-462-490 sts on circular needle size 3 mm / US 2or3 with Delight. K 1 row from WS and work next row from RS as follows: K 14-15-16, * slip 1 st as if to K, K2 tog, psso, K 28-30-32 *, repeat from *-* a total of 13 times and finish with slip 1 st as if to K, K2 tog, psso and K 14-15-16 = 406-434-462 sts. Now work WHOLE DOMINO SQUARE - see above. Beg with the first 29-31-33 sts on row. Insert a marker in the middle of the 29-31-33 sts. Continue as described above. When domino square is finished, work in the same way on the next 29-31-33 sts and repeat across the row until there are 14 squares on Row 1. ROW 2: Pick up 14-15-16 sts along the edge on square 1 on Row 1. Then pick up 1 st between the first and the second square, insert a marker in this st, then pick up 14-15-16 sts along the edge on den second square on Row 1 = 29-31-33 sts on needle. Continue with whole domino square. Work in the same way between all squares from Row 1 = 14 domino squares on Row 2. ROW 3: Like row 2. ROW 4: Like row 2. ROW 5: Pick up sts as described for Row 2, but on first row (= from WS) dec 2 sts evenly on all squares = 27-29-31 sts. Continue with whole domino square as before. Work in the same way between all squares from Row 4 = 14 domino squares on Row 5. ROW 6: Pick up 13-14-15 sts along the edge on the first square on Row 5. Then pick up 1 st between the first and the second square, insert a marker in this st, then pick up 13-14-15 sts along the edge on the second square on Row 5 = 27-29-31 sts on needle. Continue with whole domino square. Work in the same way between all squares from Row 5 = 14 domino squares on Row 6. ROW 7: Like row 6. ROW 8: Like row 6. ROW 9: Pick up sts as described for Row 6, but on first row (= from WS) dec 4 sts evenly on all squares = 23-25-27 sts. Continue with whole domino square as before. Work in the same way between all squares from Row 8 = 14 domino squares on Row 9. ROW 10: Pick up 11-12-13 sts along the edge on the first square on Row 9. Then pick up 1 st between the first and the second square, insert a marker in this st, then pick up 11-12-13 sts along the edge on the second square on Row 9 = 23-25-27 sts on needle. Continue with whole domino square. Work in the same way between all squares from Row 9 = 14 domino squares on Row 10. ROW 11: Piece is now to be divided mid back and you knit 2 half squares. Pick up 11-12-13 sts along the edge on the first square and pick up 1 st between the first and the second square on Row 10 = 12-13-14 sts. Then cast on 6 new sts (= front band) = 18-19-20 sts. Continue with half domino square (vertical) with front band - see above. AT THE SAME TIME when front band measures approx 1 cm / ½", make BUTTONHOLES - see above. When the half square is finished, pick up 1 st between the first and the second square on Row 10. Now pick up 11-12-13 sts along the edge on the second square = 12-13-14 sts. Now work half domino square (vertical) without front band - see above. When the half square is finished continue as follows: Pick up 11-12-13 sts along the other edge on second square on Row 10. Then pick up 1 st between the second and the third square, insert a marker in this st, then pick up 11-12-13 sts along the edge on den third square on Row 10 = 23-25-27 sts on needle. Continue with whole domino square, but on row 1 (= from WS) dec 4-4-2 sts evenly = 19-21-25 sts. Continue with whole domino square as before. Work in the same way between all the squares from Row 10 = 13 whole domino squares and 2 half domino squares on Row 11. ROW 12: Pick up 9-10-12 sts along the edge on the second half square from Row 11. Then pick up 1 st between the half and the whole square, insert a marker in this st, then pick up 9-10-12 sts along the edge on the whole square = 19-21-25 sts. Work half domino square (horizontal) - see above. Work in the same way between all squares from Row 11 = 14 half domino squares on Row 12. WAIST BAND: Beg from RS on the right side of piece on the first half domino square on Row 12, and work row as follows: * work sts from stitch holder (= 4-5-6 sts) back on needle, pick up 3 sts between stitch holders, work sts from the second stitch holder (= 4-5-6 sts) back on needle, pick up 1 st between squares *, repeat from *-* and finish by working the 6 front bands sts back on needle = 174-202-230 sts. K 1 row from WS. K 1 row from RS, AT THE SAME TIME inc 15-25-35 sts evenly = 189-227-265 sts. Continue back and forth on needle (NOTE! remember to make buttonholes on front band) until waist band measures approx 6-7-8 cm / 2½"-2¾"-3". On next row from RS dec 5 sts evenly (do not dec on front band) = 184-222-260 sts. Continue until waist band measures approx 8-9-10 cm / 3"-3½"-4". Bind off. ASSEMBLY: Sew on buttons. |
|
 |
|
Have you finished this pattern?Tag your pictures with #dropspattern #shiftingbricksskirt or submit them to the #dropsfan gallery. Do you need help with this pattern?You'll find 9 tutorial videos, a Comments/Questions area and more by visiting the pattern on garnstudio.com. © 1982-2026 DROPS Design A/S. We reserve all rights. This document, including all its sub-sections, has copyrights. Read more about what you can do with our patterns at the bottom of each pattern on our site. |


With over 40 years in knitting and crochet design, DROPS Design offers one of the most extensive collections of free patterns on the internet - translated to 17 languages. As of today we count 325 catalogs and 12298 patterns - 12288 of which are translated into English (US/in).
We work hard to bring you the best knitting and crochet have to offer, inspiration and advice as well as great quality yarns at incredible prices! Would you like to use our patterns for other than personal use? You can read what you are allowed to do in the Copyright text at the bottom of all our patterns. Happy crafting!
Post a comment to pattern DROPS 121-5
We would love to hear what you have to say about this pattern!
If you want to leave a question, please make sure you select the correct category in the form below, to speed up the answering process. Required fields are marked *.