DROPS Delight
DROPS Delight
75% Wool, 25% Polyamide
Discontinued
find alternatives
DROPS SS24

Shifting Bricks

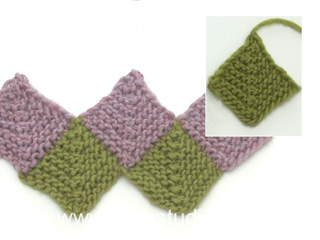
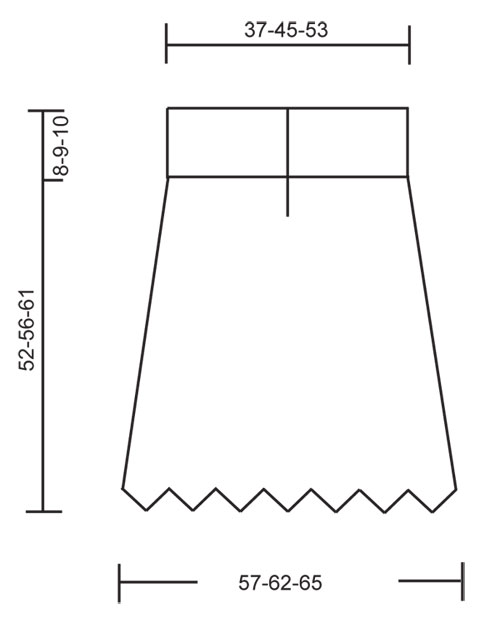
Knitted DROPS skirt with Domino squares in ”Delight”. Size S - XXL.

DROPS 121-5
DROPS design: Pattern no DE-018
--------------------------------------------------------
Size: S/M - L/XL - XXL
Finished measurements:
Waist: 74-90-106 cm / 29"-35½"-41 3/4"
Full length: 52-56-61 cm / 20½"-22"-24"

Materials: DROPS DELIGHT from Garnstudio
250-300-350 g color no 07, beige/blue mix

DROPS CIRCULAR NEEDLE (80 cm / 32'') size 3 mm /US 2or3- or size needed to get 24 sts x 48 rows in garter st = 10 x 10 cm / 4'' x 4''.

DROPS SHELL BUTTON, no 525: 5 pcs.

-------------------------------------------------------

Alternative Yarn – See how to change yarns here
Yarn Groups A to F – Use the same pattern and change the yarn here
Yarn usage using an alternative yarn – Use our yarn converter here

-------------------------------------------------------

DROPS Delight
DROPS Delight
75% Wool, 25% Polyamide
Discontinued
find alternatives

Pattern instructions

NOTE: This pattern is written in American English. All measurements in charts are in cm. For conversion from inches to cm - click here. There are different terms for crocheting in American and British English. If this pattern includes crochet, click for "crochet terms" here. For this pattern in British English, please click here.
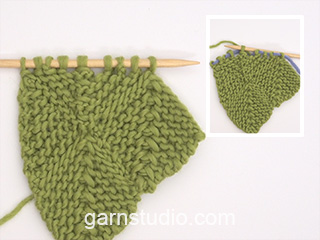
WHOLE DOMINO SQUARE:
Row 1 (= from WS): K all sts.
Row 2 (= from RS): K row to 1 st before st with marker, slip 1 st as if to K, K2 tog, psso, work remaining sts on row.
Repeat row 1 and 2, i.e. dec 2 sts in the middle of square on every other row until there is 1 st left on needle, cut the thread and pull it through the last st.

HALF DOMINO SQUARE (vertical) with front band:
Row 1 (= from WS): K sts, AT THE SAME TIME dec 2 sts evenly (do not dec on front band).
Row 2 (= from RS): K sts on row until 8 sts remain (includes front band), K2 tog, 6 front band sts.
Row 3 (= WS): K all sts.
Repeat row 2 and 3, i.e. dec 1 st (towards front band) on every other row until there is 1 st (+ 6 front band sts) left on needle. Cut the thread and pull it through the last st. Slip the 6 front band sts on a stitch holder.

HALF DOMINO SQUARE (vertical) without front band:
Row 1 (= from WS): K sts, AT THE SAME TIME dec 2 sts evenly.
Row 2 (= from RS): K2 tog, work remaining sts on row.
Row 3 (= WS): K all sts.
Repeat row 2 and 3, i.e. dec 1 st on every other row until there is 1 st left on needle. Cut the thread and pull it through the last st.
HALF DOMINO SQUARE (horizontal):
Work like whole domino square, but in addition to the dec in the middle of square, slip the last st at the end of every row on a stitch holder. Continue until there are 3-5-5 sts left on needle.
SIZE S/M: 3 sts left on needle (= 4 sts on stitch holder each side). K 1 row from WS on the 3 sts. Work next row (= from RS) as follows: slip 1 st as if to K, K2 tog, psso. Cut the thread and pull it through the last st.
SIZE L/XL + XXL: 5 sts left on needle (= 4-5 sts on stitch holder each side). K 1 row from WS and slip the last st at the end of row on stitch holder. Work next row (from RS) as follows: slip 1 st as if to K, K2 tog, psso. Slip the last st at the end of row on stitch holder (= 5-6 sts on stitch holder each side). Cut the thread and pull it through the last st.

BUTTONHOLES:
Make buttonholes on front band.
1 buttonhole = bind off 3rd and 4th front band st and cast on 2 new sts on next row. Make buttonholes when front band measures:
SIZE S/M: 1, 4, 7, 10 and 13 cm / ½",1½",2 3/4",4" and 5 1/8".
SIZE L/XL: 1, 4, 8, 11 and 14 cm / ½",1½",3 1/8",4 3/8" and 5½".
SIZE XXL: 1, 4, 8, 12 and 16 cm / ½",1½",3 1/8",4 3/4" and 6 1/4".
--------------------------------------------------------

All squares worked in garter st - i.e. K all rows.

SKIRT:
Beg by casting on sts for the full width of the bottom of skirt, then continue with squares back and forth on circular needle.

ROW 1:
Cast on 434-462-490 sts on circular needle size 3 mm / US 2or3 with Delight. K 1 row from WS and work next row from RS as follows: K 14-15-16, * slip 1 st as if to K, K2 tog, psso, K 28-30-32 *, repeat from *-* a total of 13 times and finish with slip 1 st as if to K, K2 tog, psso and K 14-15-16 = 406-434-462 sts.
Now work WHOLE DOMINO SQUARE - see above. Beg with the first 29-31-33 sts on row. Insert a marker in the middle of the 29-31-33 sts. Continue as described above.
When domino square is finished, work in the same way on the next 29-31-33 sts and repeat across the row until there are 14 squares on Row 1.

ROW 2:
Pick up 14-15-16 sts along the edge on square 1 on Row 1. Then pick up 1 st between the first and the second square, insert a marker in this st, then pick up 14-15-16 sts along the edge on den second square on Row 1 = 29-31-33 sts on needle. Continue with whole domino square.
Work in the same way between all squares from Row 1 = 14 domino squares on Row 2.

ROW 3:
Like row 2.

ROW 4:
Like row 2.

ROW 5:
Pick up sts as described for Row 2, but on first row (= from WS) dec 2 sts evenly on all squares = 27-29-31 sts. Continue with whole domino square as before. Work in the same way between all squares from Row 4 = 14 domino squares on Row 5.

ROW 6:
Pick up 13-14-15 sts along the edge on the first square on Row 5. Then pick up 1 st between the first and the second square, insert a marker in this st, then pick up 13-14-15 sts along the edge on the second square on Row 5 = 27-29-31 sts on needle. Continue with whole domino square.
Work in the same way between all squares from Row 5 = 14 domino squares on Row 6.

ROW 7:
Like row 6.

ROW 8:
Like row 6.

ROW 9:
Pick up sts as described for Row 6, but on first row (= from WS) dec 4 sts evenly on all squares = 23-25-27 sts. Continue with whole domino square as before. Work in the same way between all squares from Row 8 = 14 domino squares on Row 9.

ROW 10:
Pick up 11-12-13 sts along the edge on the first square on Row 9. Then pick up 1 st between the first and the second square, insert a marker in this st, then pick up 11-12-13 sts along the edge on the second square on Row 9 = 23-25-27 sts on needle. Continue with whole domino square.
Work in the same way between all squares from Row 9 = 14 domino squares on Row 10.

ROW 11:
Piece is now to be divided mid back and you knit 2 half squares.
Pick up 11-12-13 sts along the edge on the first square and pick up 1 st between the first and the second square on Row 10 = 12-13-14 sts. Then cast on 6 new sts (= front band) = 18-19-20 sts. Continue with half domino square (vertical) with front band - see above.
AT THE SAME TIME when front band measures approx 1 cm / ½'', make BUTTONHOLES - see above.
When the half square is finished, pick up 1 st between the first and the second square on Row 10. Now pick up 11-12-13 sts along the edge on the second square = 12-13-14 sts. Now work half domino square (vertical) without front band - see above. When the half square is finished continue as follows:
Pick up 11-12-13 sts along the other edge on second square on Row 10. Then pick up 1 st between the second and the third square, insert a marker in this st, then pick up 11-12-13 sts along the edge on den third square on Row 10 = 23-25-27 sts on needle. Continue with whole domino square, but on row 1 (= from WS) dec 4-4-2 sts evenly = 19-21-25 sts. Continue with whole domino square as before.
Work in the same way between all the squares from Row 10 = 13 whole domino squares and 2 half domino squares on Row 11.

ROW 12:
Pick up 9-10-12 sts along the edge on the second half square from Row 11. Then pick up 1 st between the half and the whole square, insert a marker in this st, then pick up 9-10-12 sts along the edge on the whole square = 19-21-25 sts. Work half domino square (horizontal) - see above.
Work in the same way between all squares from Row 11 = 14 half domino squares on Row 12.

WAIST BAND:
Beg from RS on the right side of piece on the first half domino square on Row 12, and work row as follows: * work sts from stitch holder (= 4-5-6 sts) back on needle, pick up 3 sts between stitch holders, work sts from the second stitch holder (= 4-5-6 sts) back on needle, pick up 1 st between squares *, repeat from *-* and finish by working the 6 front bands sts back on needle = 174-202-230 sts. K 1 row from WS. K 1 row from RS, AT THE SAME TIME inc 15-25-35 sts evenly = 189-227-265 sts. Continue back and forth on needle (NOTE! remember to make buttonholes on front band) until waist band measures approx 6-7-8 cm / 2½"-2 3/4"-3". On next row from RS dec 5 sts evenly (do not dec on front band) = 184-222-260 sts. Continue until waist band measures approx 8-9-10 cm / 3"-3½"-4". Bind off.

ASSEMBLY:
Sew on buttons.

Diagram

diagram measurements
Do you have a question? See a list of frequently asked questions (FAQ)

Knitting tension is what determines the final measurements of your work, and is usually measured per 10 x 10 cm. It is provided like so: number of stitches in width x number of rows in height - eg: 19 stitches x 26 rows = 10 x 10 cm.

The knitting tension is very individual; some people knit/crochet loosely while others work tightly. You adjust the knitting tension with the needle size, which is why the suggested needle size only serve as a guide! You need to adjust this (up or down) to ensure that YOUR knitting tension matches the knitting tension provided in the pattern. If you work with a different knitting tension than provided you will have a different yarn consumption, and your work will have different measurements than what the pattern suggests.

The knitting tension also determines which yarns can replace each other. As long as you achieve the same knitting tension you can replace one yarn with another.

See DROPS lesson: How to measure your tension/gauge

See DROPS video: How to make a gauge tension swatch

The required amount of yarn is provided in grams, eg: 450 g. To calculate how many balls you’ll need you first need to know how many grams are in 1 ball (25g, 50g or 100g). This information is available if you click on the individual yarn quality on our pages. Divide the amount required with the amount of each ball. For example, if each ball is 50g (the most common amount), the calculation will be as follows: 450 / 50 = 9 balls.

The important thing when changing from one yarn to another is that the knitting/crochet tension remains the same. This is so that the measurements of the finished piece will be the same as on the sketch provided. It is easier to achieve the same knitting tension using yarns from the same yarn group. It is also possible to work with multiple strands of a thinner yarn to achieve the knitting tension of a thicker one. Please try our yarn converter. We recommend you to always work a test swatch.

Please NOTE: when changing yarn the garment might have a different look and feel to the garment in the photo, due to individual properties and qualities of each yarn.

See DROPS lesson: Can I use a different yarn than the one mentioned in the pattern?

All our yarns are categorised into yarn groups (from A to F) according to thickness and knitting tension – group A contains the thinnest yarns and group F the thickest. This makes it easier for you to find alternative yarns to our patterns, should you wish to switch yarn. All yarns within the same group have a similar knitting tension and can easily replace each other. However, different yarn qualities have different structures and properties which will give the finished work a unique look and feel.

Click here for an overview of the yarns in each yarn group

At the top of all our patterns you’ll find a link to our yarn converter, which is a helpful tool should you wish to use a different yarn than suggested. By filling in the yarn quality you wish to replace, the amount (in your size) and number of strands, the converter will present good alternative yarns with the same knitting tension. Additionally it will tell you how much you’ll require in the new qualities and whether you’ll need to work with multiple strands. Most skeins are 50g (some are 25g or 100g).

If the pattern is worked with multiple colours, every colour will have to be converted separately. Similarly, if the pattern is worked with several strands of different yarns (for example 1 strand Alpaca and 1 strand Kid-Silk) you will have to find alternatives for each, individually.

Click here to see our yarn converter

Since different yarns have different qualities and textures we have chosen to keep the original yarn in our patterns. However, you can easily find options among our available qualities by using our yarn converter, or simply pick a yarn from the same yarn group.

It is possible that some retailers still have discontinued yarns in stock, or that someone has a few skeins at home that they would like to find patterns for.

The yarn converter will provide both alternative yarn as well as required amount in the new quality.

If you think it's hard to decide what size to make, it can be a good idea to measure a garment you own already and like the size of. Then you can pick the size by comparing those measures with the ones available in the pattern's size chart.

You'll find the size chart at the bottom of the pattern.

See DROPS lesson: How to read size chart

The needle size provided in the pattern serves only as a guide, the important thing is to follow the knitting tension. And since knitting tension is very individual, you will have to adjust the needle size to ensure that YOUR tension is the same as in the pattern – maybe you’ll have to adjust 1, or even 2 needle sizes, up or down to achieve the correct tension. For this, we recommend that you work test swatches.

Should you work with a different knitting tension than the one provided, the measurements of the finished garment might deviate from the measurement sketch.

See DROPS lesson: How to measure your tension/gauge

See DROPS video: How to make a gauge tension swatch

Working a garment top-down provides more flexibility and room for personal adjustment. For example it is easier to try the garment on while working, as well as making adjustments to length of yoke and shoulder caps.

The instructions are carefully explaining every step, in the correct order. Diagrams are adjusted to the knitting direction and are worked as usual.

The diagram depicts all rows/rounds, and every stitch seen from the right side. It is read from bottom to top, from right to left. 1 square = 1 stitch.

When working back and forth, every other row is worked from the right side and every other row is worked from the wrong side. When working from the wrong side, the diagram will have to be worked reversed: from left to right, knit stitches are purled, purl stitches are knit etc.

When working in the round every round is worked from the right side and the diagram are worked from right to left on all rounds.

See DROPS lesson: How to read knitting diagrams

The diagram depicts all rows/rounds, and every stitch seen from the right side. It is worked from bottom to top, from right to left.

When working back and forth every other row is worked from the right side: from right to left and every other row is worked from the wrong side: from left to right.

When working in the round, every row in the diagram are worked from the right side, from right to left.

When working a circular diagram you start in the middle and work your way outwards, counter clockwise, row by row.

The rows usually start with a given number of chain stitches (equivalent to the height of the following stitch), this will either be depicted in the diagram or explained in the pattern.

See DROPS lesson: How to read crochet diagrams

Instructions for working several diagrams after each other on the same row/round, will often be written like so: “work A.1, A.2, A.3 a total of 0-0-2-3-4 times". This means you work A.1 once, then A.2 is worked once, and A.3 is repeated (in width) the number of times provided for your size – in this case like so: S = 0 times, M = 0 times, L=2 times, XL= 3 times and XXL = 4 times.

The diagrams are worked as usual: begin with the first row in A.1, then work the first row in A.2 etc.

See DROPS lesson: How to read knitting diagrams

See DROPS lesson: How to read crochet diagrams

The total width of the garment (from wrist-to-wrist) will be larger in the larger sizes, despite the actual sleeves being shorter. The larger sizes have longer sleeve caps and wider shoulders, so there will be a good fit in all sizes.

The measurement sketch/schematic drawing provides information regarding the full length of the garment. If it’s a jumper or a jacket the length is measured from the highest point on the shoulder (usually closest to the neckline), and straight down to the bottom of the garment. It is NOT measured from the tip of shoulder. Similarly, the length of yoke is measured from the highest point on the shoulder and down to where yoke is split into body and sleeves.

See DROPS lesson: How to read a schematic drawing

Diagrams are often repeated on the round or in height. 1 repeat is the diagram the way it appears in the pattern. If it says to work 5 repeats of A.1 in the round, then you work A.1 a total of 5 times after/next to each other in the round. If it says to work 2 repeats of A.1 vertically/in height you work the entire diagram once, then begin again at the start and work the entire diagram one more time.

Chain stitches are slightly narrower than other stitches and to avoid working the cast-on edge too tight, we simply chain more stitches to begin with. The stitch count will be adjusted on the following row to fit the pattern and measurement sketch.

The rib edge is more elastic and will contract slightly compared to, for example, stocking stitch. By increasing before the rib edge, you avoid a visible difference in width between the rib edge and the rest of the body.

It’s very easy to cast off too tightly, and by making yarn overs while casting off (and simultaneously casting these off) you avoid a too tight cast off edge.

See DROPS video: How to bind off with yarn overs (yo)

To achieve an even increase (or decrease) you can increase on, for example: every 3rd and 4th row alternately, like so: work 2 rows and increase on the 3rd row, work 3 rows and increase on the 4th. Repeat this until the increase is complete.

See DROPS lesson: Increase or decrease 1 st on every 3rd and 4th row alternately

Should you prefer to work in the round instead of back and forth, you may of course adjust the pattern. You’ll need to add steeks mid-front (usually 5 stitches), and follow the instructions. When you would normally turn and work from the wrong side, simply work across the steek and continue in the round. At the end you’ll cut the piece open, pick up stitches to work bands, and cover the cut edges.

See DROPS video: How to knit steeks and cut open

Should you prefer to work back and forth instead of in the round, you may of course adjust the pattern so you work the pieces separately and then assemble them at the end. Divide the stitches for the body in 2, add 1 edge stitch in each side (for sewing) and work the front and back pieces separately.

See DROPS lesson: Can I adapt a pattern for circular needles into straight needles?

Pattern repeats can vary slightly in the different sizes, in order to get the correct proportions. If you’re not working the exact same size as the garment in the photo, yours might deviate slightly. This has been carefully developed and adjusted so that the complete impression of the garment is the same in all sizes.

Make sure to follow instructions and diagrams for your size!

If you have found a pattern you like which is available in women’s size it’s not very difficult to convert it to men’s size. The biggest difference will be the length of sleeves and body. Start working on the women size that you think would fit across the chest. The additional length will be worked right before you cast off for the armhole/sleeve cap. If the pattern is worked top-down you can add the length right after the armhole or before the first decrease on sleeve.

Regarding additional yarn amount, this will depend on how much length you add, but it is better with a skein too many than too few.

All yarns will have excess fibres (from production) that might come off as lint or shedding. Brushed yarns (ie hairier yarns) have more of these loose, excess fibres, causing more shedding.

Shedding also depends on what is worn under or over the garment, and whether this pulls at the yarn fibres. It’s therefore not possible to guarantee that there will be no shedding

Below are some tips on how to get the best result when working with hairier yarns:

1. When the garment is finished (before you wash it) shake it vigorously so the looser hairs come off. NOTE: do NOT use a lint roller, brush or any method that pulls at the yarn.

2. Place the garment in a plastic bag and put it in your freezer - the temperature will cause the fibres to become less attached to each other, and excess fibres will come off easier.

3. Leave in the freezer for a few hours before taking it out and shaking it again.

4. Wash the garment according to the instructions on the yarn label.

Pilling is a natural process that happens to even the most exclusive of fibers. It's a natural sign of wear and tear that is hard to avoid, and that is most visible in high friction areas of your garment like a sweater's arms and cuffs.

You can make your garment look as new by removing the pilling, using a fabric comb or a pill/lint remover.

Still can't find the answer you need? Then scroll down and leave your question so one of our experts can try to help you. This will be done normally within 5 to 10 working days.
In the meantime, you can read the questions and answers that others have left to this pattern or join the DROPS Workshop on Facebook to get help from fellow knitters/crocheters!

Post a comment to pattern DROPS 121-5

We would love to hear what you have to say about this pattern!

If you want to leave a question, please make sure you select the correct category in the form below, to speed up the answering process. Required fields are marked *.

Comments / Questions (50)

country flag Sara wrote:

I'm struggling with Row 11 and the creation of the front band. What do the created stitches from the half square in Row 11 provide when picking up the stitches for the front band? I will need to do decreases, rather than increases as stated, to make the skirt fit. As I don't understand the point of these extra 6 stitches from row 11, I don't know if I can omit them without some issue. This is my first skirt and never done a waistband before. Thanks!

09.07.2023 - 15:38

DROPS Design answered:

Dear Sara, the front band stitches create a certain pattern and is used for the HALF DOMINO SQUARE with front band motif. This is necessary to make the band for the buttonholes. If you remove the stitches for the front band then you won't have a specific space for adding the buttonholes to the piece. Happy knitting!

10.07.2023 - 17:58

country flag Limor Noy wrote:

Can't wait to make this! i want to buy a patch skirt, or a peasant skirt. the price is outrageous! i have this urge to make or knit a harlequin skirt. this will do the job. thank you i used to go to tivioli and watch the harlequin and the baker and it's coming back now. i was a child then, thank you. can't wait to knit it.

03.10.2019 - 06:36

country flag Johanna wrote:

Vielen Dank für die rasche Antwort! Das erklärt alles. Den Spaß beim Stricken hab ich - zumal jetzt ja das Ende schon absehbar ist... :-)

17.01.2019 - 17:36

country flag Johanna wrote:

(Fortsetzung) Aber mit 11 R. (R. 12 sind ja nur halbe E. und gibt keine Höhe mehr), kommt man doch nicht auf 52 cm... Kann es sein, dass da ein Fehler ist?

17.01.2019 - 08:57

DROPS Design answered:

siehe Antwort unten.

17.01.2019 - 09:36

country flag Johanna wrote:

Obwohl die Maschenprobe exakt gepasst hat, erreiche ich mit 12 Runden Dominoecken nicht die 52 cm aus der Maßskizze, sondern nur ca. 45 cm. Das Verhältnis Länge/Breite macht das auch plausibel: Die Breite von 7 Ecken unten entspr. 57 cm: Dann müssten 7 E. übereinander (also 14 R.!) auch 57 cm entsprechen, bzw. (weil die E. kleiner werden) vielleicht 52 cm. (Fortsetzung folgt...)

17.01.2019 - 08:57

DROPS Design answered:

Liebe Johanna, die 52 cm in der Maßskizze sind die gesamte Höhe vom Rock, dh 44 cm von den Dominoquadraten + 8 cm für den Bund. Viel Spaß beim stricken!

17.01.2019 - 09:36

country flag Johanna wrote:

Sehe ich das richtig, dass die Bundweite bei Größe S/M etwa 74 cm und bei L/XL etwa 90 cm beträgt? - Da bin ich mit meiner Konfektionsgröße 40 wohl eher bei S/M, weil der Bund wahrscheinlich eher ausleiert, als dass er enger wird... Dann muss ich vielleicht mal noch überlegen, wie ich kreativ die Länge ein wenig anpasse... Oder habe ich irgendwo einen Denkfehler in meiner Überlegung?

28.11.2018 - 23:50

DROPS Design answered:

Liebe Johanna, Sie sind ja richtig, Umfang wird bei dem Bund 74 cm in der 1. Größe, 90 cm in der 2. Größe und 106 cm bei der 3. Größe. Hier lesen Sie mehr über die Maßskizze. Viel Spaß beim stricken!

29.11.2018 - 09:58

country flag Liesel wrote:

Ich würde den Rock gerne etwas länger haben, geht das so einfach oder muss ich da was besonderes beachten?

16.09.2018 - 14:59

DROPS Design answered:

Liebe LIesel, leider können wir nich jede Anleitung nach jedem individuellen Anfrage anpassen, Sie können aber gerne Kontakt mit Ihrem DROPS Laden aufnehmen, Sie werden Ihnen weiterhelfen - auch telefonisch oder per E-Mail. Viel Spaß beim stricken!

17.09.2018 - 09:17

Shasha wrote:

Hi! how would I make this skirt in a bigger size? how should I adjust the pattern? I hope it's possible this pattern is lovely!

08.04.2018 - 01:10

DROPS Design answered:

Dear Shasha, we are unfortunately not able to adapt every single pattern to each individual request. Please feel free to contact the store where you bought the yarn for any further assistance - even per mail or telephone. Happy knitting!

09.04.2018 - 13:33

country flag Charlotte wrote:

Er det slik å forstå at den 14.ruten på Rad2 strikkes over 14. og 1. rute på Rad1, slik at man da strikker rundt, og ikke må sy sammen skjørtet etterpå?

15.07.2015 - 15:39

DROPS Design answered:

Hei Charlotte. Ja, firkanterne selv strikkes frem og tilbage, men firkanterne strikkes rundt, der kommer ingen söm ved firkanterne.

07.08.2015 - 14:54

country flag Ursel wrote:

Hallo liebes Drops Team, ich finde diesen Rock ganz toll, aber wie viele Maschen schlage ich pro Viereck an? Ich weiß nur, dass man bei diesen Dominoecken eine ungerade Maschenzahl braucht. Gruß, Ursel

21.05.2015 - 10:36

DROPS Design answered:

Die Anleitung beginnt unter der gestrichelten Linie bei "ROCK", dort finden Sie auch die Angaben zum Maschenanschlag und wie Sie die Maschen, die Sie zunächst für den gesamten Rockumfang anschlagen, auf die einzelnen Vierecke aufteilen. Es sind am Anfang 29-31-33 M pro Viereck, später werden es mit den Abnahmen dann weniger, das sehen Sie dann bei der jeweiligen Runde (in der 5. "Runde" erfolgen die ersten Abnahmen).

21.05.2015 - 11:00