
Popular categories
Looking for a yarn?


Comments / Questions (58)
![]() Anita wrote:
Anita wrote:
Hej, både min mor og jeg strikker meget, men vi har virkelig kæmpet med den raglan. På fotoet ligger der en fin række med 2 retmasker. Ligemeget hvor grundigt, vi følger opskriften, kommer der 4 i vores række. Altså meget bred og meget grim - for at sige det pænt. Desuden kommer maskeantallet heller ikke til at passe. En af min mors meget strikkekyndige veninder har nu lige læst opskriften igennem, og hun påstår, at der er en fejl. Kan I også se det? Mvh Anita
10.02.2018 - 17:33DROPS Design answered:
Hej Anita, I hver raglanovergang har du 3 ret (mærketråden sidder i den midterste) og 1 vrang på hver side af de 3 ret (ialt 5 masker). Du tager ind ved at strikke de 2 masker før og efter vrangmasken sammen. De to masker før strikker du ret sammen og de to masker efter strikker du sammen ved at tage 1 m løst af p som om den skulle strikkes ret, 1 ret, løft den løse maske over. God fornøjelse!
19.02.2018 - 14:36
![]() Alessia Sapiente wrote:
Alessia Sapiente wrote:
Scusate non riesco a capire questo passaggio: SPRONE: Inserire un segnapunti nella 1° e ultima m sul dietro e nell’ultima m di ogni davanti (verso le maniche) = 4 segnapunti Potete aiutarmi? Grazie
03.02.2018 - 07:51DROPS Design answered:
Buongiorno Alessia. Quando riporta tutte le maglie sugli stessi ferri circolari, inserisce un segnapunti nelle quattro maglie che precedono/seguono le maniche: quindi nella prima maglia e nell'ultima maglia del dietro, e per i davanti, nella maglia del davanti subito prima / subito dopo le maglie della corrispondente manica. Buon lavoro!
03.02.2018 - 09:05
![]() LEMONNIER ELIANE wrote:
LEMONNIER ELIANE wrote:
Je suis une tricoteuse expérimentée. Je fais le modèle DROPS 122-31 n°X-356. Pour le point fantaisie, après réflexion et échantillon, j'en conclus que c'est le point de sable. Si c'est le cas vos explications sont trop compliquées par rapport au résultat. Je ne suis pas au 1er de vos modèles, et vos explications pour le point fantaisie sont pas très claires.
24.03.2017 - 17:16DROPS Design answered:
Bonjour Mme Lemonnier, dans ce point fantaisie, on alterne 1 m jersey endroit et 1 m point mousse, la m en jersey va se tricoter à l'end sur l'end et à l'env sur l'env, alors que la m point mousse va se tricoter tous les rangs à l'endroit. Bon tricot!
24.03.2017 - 17:21
![]() Sandra wrote:
Sandra wrote:
Auch versteh ich nicht, wie ich beim Vorderteil bzw Rückenteil abnehme und separat an den Ärmeln? Wie ich die Markierungen diesbezüglich setzen muss. In der Anleitung steht auch das zwischen den abnehmen 5 Maschen normal gestrickt werden. Verstehe nicht wie das mit nur 4 Markierungen zu machen ist??
13.01.2016 - 17:10DROPS Design answered:
Die Markierer kennzeichnen ja die Übergänge zwischen: Vorderteil/Ärmel, Ärmel/Rückenteil, Rückenteil/Ärmel und Ärmel/Vorderteil (= 4 Markierer). Die Abnahmen machen Sie wie unter Abnahmetipp beschrieben vor und nach den Markierern, also liegt die eine Abnahme jeweils am Ärmel und die andere am Vorder- bzw. Rückenteil. Nun müssen Sie darauf achten, dass Sie die Abnahme, die am Ärmel liegt, in dem Rhythmus machen, wie es für die Ärmel beschrieben ist, und die Abnahmen an den Vorderteilen/Rückenteil, wie es entsprechend dafür beschrieben ist.
29.01.2016 - 10:29
![]() Sandra wrote:
Sandra wrote:
Hallo. Ich hoffe sie können mir weiter helfen, bin schon ganz verzweifelt. Ich habe alle Maschen auf einer rundnadel und möchte mit der raglanabnahme beginnen, aber ich verstehe nicht wo ich die Markierung anbringen muss. Und was mit vor der Markierung und nach der Markierung gemeint ist. Bitte helfen Sie mir. Lg sandra
13.01.2016 - 16:38DROPS Design answered:
Liebe Sandra, vielleicht hilft Ihnen eins der Videos zu Raglan weiter, schauen Sie mal im Kopf neben dem Foto unter "Videos", dort ist das Prinzip der Raglanabnahmen erklärt.
29.01.2016 - 10:24Selma wrote:
Merci pour vos precisions!
13.03.2015 - 10:04Selma wrote:
Les marqueurs places en debut et fin de dos sont -ils places sur les cotes au bord dos (point fantaisie) ? simplement ou sur le dos+les cotes au point mousse?
12.03.2015 - 18:47DROPS Design answered:
Bonjour Selma, pour le dos, on a 1 marqueur dans la 1ère m du dos et l'autre marqueur dans la dernière m du dos (quand vous reprenez toutes les mailles sur la même aiguille circulaire, avant de commencer le raglan). Le marqueur de chaque devant se trouve dans la dernière m du devant, juste avant/après la manche. La m avec le marqueur est la m au milieu des 3 m end à chaque raglan. Bon tricot!
13.03.2015 - 09:25Selma wrote:
Bonsoir a vous et merci pour les precedentes precisions.autre chose que je ne comprends pas:j'ai fais ma 1ere diminution sur le devant gauche au niveau du 1er marqueur,j'arrive donc sur la manche gauche(debut)quelle diminution doit on faire,je ne m'y retrouve plus .Au total on a bien 8diminutions?merci d'avance.
12.03.2015 - 16:27DROPS Design answered:
Bonjour Selma, vous diminuez pour le raglan avant ou après le marqueur, pour le raglan devant droit, sur l'endroit: vous diminuez avant le marqueur, pour les manches et le dos, vous diminuez après le marqueur (début manche/dos) et avant le marqueur (fin manche/dos), et pour le devant gauche, après le marqueur - cf Diminutions (raglan) au début des explications. On diminue différemment sur le dos/les devants et sur les manches, soit juste sur les manches (= 4 dim) ou partout (8 dim). Bon tricot!
12.03.2015 - 17:47Selma wrote:
Bonjour.je ne comprend pas l'indication donnee entre parantheses juste avant l'astuce tricot:(tricoter les 5 m. entre les diminutions............................tricoter les mailles restantes en pt. fantaisie), ? et a quel niveau du raglan cela doit etre fait?merci d'avance pour vos explications.
08.03.2015 - 11:14DROPS Design answered:
Bonjour Selma, les 5 m des 4 raglans se tricotent ainsi sur l'endroit: 1 m env, 3 m end (le marqueur se trouve dans la 2ème de ces 3 m), 1 m env - et sur l'envers: 1 m end, 3 m env, 1 m end - sur les rangs sans diminutions pour le raglan, tricotez ces 5 m ainsi sur l'endroit et sur l'envers, et la/les maille avant/après en point fantaisie. Bon tricot!
09.03.2015 - 09:30Selma wrote:
Bonsoir,j'ai un probleme au niveau des diminutions manches.faut il suivre l'indication des diminutions raglan sur l'envers(je precise que je commence le 1er rang de l'empiecement)?Faut il commencer la dim. de la manche a 4m. avant la maille avec marqueur?qui est la derniere maille du devant?merci d'avance.
07.03.2015 - 21:07DROPS Design answered:
Bonjour Selma, on a 4 marqueurs: 1 dans la 1ère et la dernière m du dos et de chacun des devants. Les diminutions du raglan se trouvent au début des explications (cf DIMINUTIONS (raglan)) - Mais on diminue différemment dans les manches et dans le dos/devant, le 1er rang va se tricoter sur l'endroit. Bon tricot!
09.03.2015 - 09:14
|
|
Arianna#ariannacardigan |
|
|
|
|
DROPS jacket with raglan in ”Alaska”. Size S to XXXL.
DROPS 122-31 |
|
|
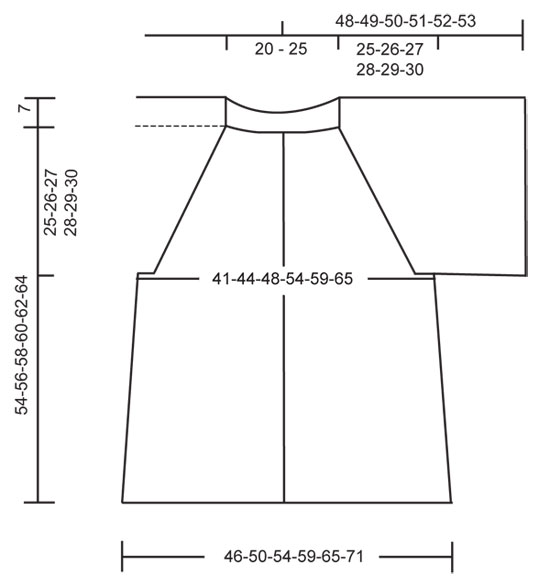
GARTER ST (back and forth on needle): K all rows. PATTERN: Row 1 (from RS): * K1, 1 garter st *, repeat from *-*. Row 2 (from WS): * 1 garter st, P1 *, repeat from *-*. Repeat row 1 and 2 (= garter st over garter st and K over K) DECREASING TIP (applies to raglan): From RS: Dec as follows before marker: Beg 4 sts before st with marker: K2 tog, P1, K3 (marker sits in the second of these 3 sts), P1. Dec as follows after marker: Beg 2 sts before marker: P1, K3 (marker sits in the second of these 3 sts), P1, slip 1 st as if to K, K1, psso. From WS: Before marker: Beg 4 sts before st with marker: P2 tog into back of loop, K1, P3 (marker sits in the second of these 3 sts), K1. After marker: Beg 2 sts before marker: K1, P3 (marker sits in the second of these 3 sts), K1, P2 tog. (Work the 5 sts between the dec like this even it is not a row with dec, the remaining sts continue in pattern). KNITTING TIP: If your knitting gauge is too tight in the height the raglan will be too short and the armhole too small. You may compensate for this by working 2 extra rows without dec with regular intervals between the dec. BUTTONHOLES: Make buttonholes on right front band. 1 buttonhole = work 4th and 5th st tog and make 1 YO. Make buttonholes when piece measures: Size S: 5, 15, 25, 35 and 45 cm / 2",6",9¾",13¾" and 17¾". Size M: 5, 13, 21, 29, 38 and 47 cm / 2", 5⅛",8¼",11⅜",15" and 18½". Size L: 5, 13, 22, 31, 40 and 49 cm / 2", 5⅛",8¾",12¼",15¾" and 19¼". Size XL: 5, 13, 22, 31, 40 and 49 cm / 2", 5⅛",8¾",12¼",15¾" and 19¼". Size XXL: 5, 14, 23, 32, 41 and 51 cm / 2",5½",9",12½",16⅛" and 20". Size XXXL: 5, 13, 21, 29, 37, 45 and 54 cm / 2", 5⅛",8¼",11⅜",14½",17¾" and 21¼". --------------------------------------------------------- JACKET: Worked back and forth on circular needle. Cast on 177-191-201-223-241-263 sts on circular needle size 5 mm / US 8 with Alaska. K 3 rows and work next row from RS as follows: 10 GARTER STS – see above, PATTERN – see above – on the next 29-33-35-41-45-51 sts, 20 garter sts, pattern on the next 59-65-71-81-91-101 sts, 20 garter sts, pattern on the next 29-33-35-41-45-51 sts, finish with 10 garter sts. Work the 10 sts each side in garter st throughout. Continue in pattern like this. AT THE SAME TIME when piece measures 5 cm / 2" make BUTTONHOLES – see above – on right front band. REMEMBER THE GAUGE! Insert 2 markers in piece, 49-53-55-61-65-71 sts in from each side (Back piece = 79-85-91-101-111-121 sts). When piece measures 8 cm / 3" dec 1 st each side of both markers by K2 tog from RS. Repeat the dec on every 4-4-4.5-4.5-5-5 cm / 1½"-1½"-1¾"-1¾"-2"-2" a total of 5 times = 157-171-181-203-221-243 sts. When piece measures 29-30-31-32-33-34 cm / 11⅜"-11¾"-12¼"-12½"-13"-13⅜" - adjust so that next row is from WS – bind off 10 sts mid under sleeve each side (5 sts each side of marker) = 137-151-161-183-201-223 sts. Put piece aside. SLEEVE: Worked back and forth on circular needle. Cast on 115-117-121-125-127-131 sts (includes 1 edge st each side) on circular needle size 5 mm / US 8. K 3 rows and work next row from RS as follows: 1 edge st in garter st, 1 garter st, pattern until 1 st remain, finish with 1 edge st in garter st. When piece measures 13-13-12-12-11-11 cm / 5⅛"-5⅛"-4¾"-4¾"-4⅜"-4⅜" bind off 6 sts at the beg of the next 2 rows, beg from RS = 103-105-109-113-115-119 sts. Put piece aside and knit the other sleeve. YOKE: Slip sleeves on the same circular needle as body piece where bind off for armholes = 343-361-379-409-431-461 sts. Insert a marker in first and last st on back piece and in last st on each front piece (towards the sleeves) = 4 markers. READ ALL OF THE FOLLOWING SECTION BEFORE CONTINUING! Continue in Pattern, AT THE SAME TIME dec for RAGLAN as follows – See DECREASING TIP and KNITTING TIP: ON BODY PIECE (make all dec from RS): Dec on every 6th row a total of 8-5-2-0-0-0 times, on every 4th row 3-8-13-14-11-10 times and on every other row 0-0-0-4-11-15 times, ON SLEEVE (make dec from RS and from WS): Dec on every other row (i.e. on every row from RS) a total of 17-18-18-19-19-20 times, then on every row a total of 22-22-24-25-26-27 times. AT THE SAME TIME when piece measures 46-48-50-50-52-54 cm / 18"-19"-19¾"-19¾"-20½"-21¼" slip 10-12-12-12-12-15 sts towards mid front on a stitch holder for neck. Bind off to shape the neckline at beg of row each side as follows: 2 sts 5 times and 1 st 2-2-2-5-5-5 times. After all dec are complete there are 6 sts left on each front piece, 37-39-41-45-47-51 sts left on back piece and 25 sts left on each sleeve = a total of 99-101-103-107-109-113 sts. Cut the thread. Work next row from RS and mid front as follows: K all sts, AT THE SAME TIME pick up 14-14-14-18-18-18 sts on each neckline and slip sts on stitch holders back on needle = 147-153-155-167-169-179 sts (includes sts on stitch holders). On next row from WS K all sts, AT THE SAME TIME dec 41-43-41-49-47-53 sts evenly = 106-110-114-118-122-126 sts. K 3 rows on all sts. Change to circular needle size 4.5 mm / US 7. P 1 row from WS, AT THE SAME TIME inc 31-33-35-37-39-41 sts evenly (do not inc on front bands) = 137-143-149-155-161-167 sts. Work next row as follows - from RS: 10 garter sts, rib K3/P3 until 13 sts remain, finish with K3 and 10 garter sts. Continue in rib and garter st. Bind off with K over K and P over P when neckline measures 14-14-14-15-15-15 cm / 5½"-5½"-5½"-6"-6"-6". ASSEMBLY: Sew sleeve seams inside 1 edge st. Sew the opening under sleeves. Sew buttons on left front piece. |
|
 |
|
Have you finished this pattern?Tag your pictures with #dropspattern #ariannacardigan or submit them to the #dropsfan gallery. Do you need help with this pattern?You'll find 26 tutorial videos, a Comments/Questions area and more by visiting the pattern on garnstudio.com. © 1982-2026 DROPS Design A/S. We reserve all rights. This document, including all its sub-sections, has copyrights. Read more about what you can do with our patterns at the bottom of each pattern on our site. |


With over 40 years in knitting and crochet design, DROPS Design offers one of the most extensive collections of free patterns on the internet - translated to 17 languages. As of today we count 325 catalogs and 12298 patterns - 12288 of which are translated into English (US/in).
We work hard to bring you the best knitting and crochet have to offer, inspiration and advice as well as great quality yarns at incredible prices! Would you like to use our patterns for other than personal use? You can read what you are allowed to do in the Copyright text at the bottom of all our patterns. Happy crafting!
Post a comment to pattern DROPS 122-31
We would love to hear what you have to say about this pattern!
If you want to leave a question, please make sure you select the correct category in the form below, to speed up the answering process. Required fields are marked *.