
Popular categories
Looking for a yarn?


Comments / Questions (106)
![]() Montesse Anette wrote:
Montesse Anette wrote:
Guten Morgen, ich habe eine Frage zu der Passe. Die Abnehmschritte sind mir klar. Was ich nicht verstehe sind die cm. In jeder Vorderreihe wird im linken Bereich jeweils eine Masche abgenommen (bei jedem cm total 8 Mal wiederholen ?) und dann sprechen die nach 2 cm M2 über M1 stricken. Heisst das, dass ich nach dem Abnehmen noch 4 Reihen stricken muss, bevor ich mit M2 beginne ? Wenn Sie mir da bitte helfen könnten. Der Rest ist klar und es wird eine tolle Jacke. Danke
03.07.2020 - 08:05DROPS Design answered:
Liebe Frau Montesse, die Abnahmen wiederholen Sie in jedem 1 cm insgesamt 8 Mal (3. Größe), aber gleichzeitig (dh alle diese Abnahmen Sind nich fertig, aber wenn Sie die 2. Abnahmen stricken = nach 2 cm M.1), stricken Sie M.2 über M.1 (passen Sie die Zöpfe übereinander an) und die Abnahmen im linken Bereich wie zuvor weiterstricken. Viel Spaß beim stricken!
03.07.2020 - 08:37
![]() Amalia Rubio wrote:
Amalia Rubio wrote:
The yarn used in “Little chestnut “ is this a fingering weight?
25.06.2020 - 19:52DROPS Design answered:
Dear Mrs Rubio, this set is worked with DROPS Alpaca - click here to read more about the yarn and order. Happy knitting!
26.06.2020 - 07:35
![]() Elisabeth Huber wrote:
Elisabeth Huber wrote:
Erklären sie bitte die Abnahmen in der passe genauer, wie soll ich verstehen abwechselnd li. u re Seite wie kommen sie auf eine Abahme vom 114 Maschen Danke liebe Grüße Elisabeth Huber
16.12.2019 - 21:30DROPS Design answered:
Liebe Frau Huber, bei der 1. Abnahmen stricken Sie die 2 letzten linken Maschen zusammen, bei der nächsten Abnahmen stricken Sie die 2 ersten linken Maschen zusammen, und so wiederholen, nächstes Mal die 2 letzten (=auf der linken Seite vom li-Partien) und nächstes Mal die 2 ersten (= auf der rechten Seite vom li-Partien) usw. Nur in die 11-12 M.li-Partien abnehmen. Viel Spaß beim stricken!
17.12.2019 - 09:21
![]() France wrote:
France wrote:
Ok merci mais la première diminution vous dîtes dans les 11 mailles diminuer 2 mailles ensemble env reste 9 mailles? Après une diminution reste 10 mailles ? C’est 2 diminution par section env ?
26.10.2019 - 22:01DROPS Design answered:
Bonjour France, quand vous tricotez: 2 m ens à l'env, 9 m env = il reste 10 m envers dans la section qui en avait 11. Vous tricotez ensuite ces 10 m env ainsi: 8 m env, 2 m ens à l'env = vous tricotez 10 m env en diminuant 1 m = il reste 9 m env. et ainsi de suite. Bon tricot!
04.11.2019 - 12:19
![]() France wrote:
France wrote:
Bonjour je ne comprends pas j’ai besoin d’aide empiècement : j’ai 256 m je diminue combien de mailles dans chaque section envers et combien de section envers il y a ? Après le premier tour combien de mailles restante ?
24.10.2019 - 01:53DROPS Design answered:
Bonjour France, vous tricotez: 5 m point mousse, 2 m env, (M.1, 11 m env) x 10, M.1, 2 m env, 5 m point mousse = vous avez 10 sections de 11 m env chacune. Vous diminuez dans ces sections de 11 m env; la 1ère fois au début: 2 m ens à l'env, 9 m env, puis la fois suivante à la fin: 8 m env, 2 m ens à l'env, la 3ème fois: 2 m ens à l'env, 7 m env, la 4ème fois: 6 m env, 2 m ens à l'env et ainsi de suite jusqu'à ce qu'il reste 4 m env (vous avez diminué 7 fois 1 m env dans chaque section de 11 m env. En même temps, vous tricotez M.2 au-dessus de M.1 (= il reste 8 m dans chaque M.2), il reste 142 m au total. Bon tricot!
24.10.2019 - 10:44
![]() Wager Heidemarie wrote:
Wager Heidemarie wrote:
Meine Frage betrifft die Passe: Wo genau sind die vielen Abnahmen, wenn ich nur 8x auf der rechten und linken Voderseite abnehme (gesamt 16) und bei M2 je 4 Maschen (12x4=48 Maschen) sind insgesamt 290 - 64 = 226 . Laut Anleitung 154. Wo muss ich noch abnehmen?
10.09.2019 - 13:37DROPS Design answered:
Liebe Frau Wager, in die 3. Größe nehmen Sie nur in die 12-linke-Maschen-Partien = es sind dann 12 M - 8 = 4 linke Maschen zwischen jedem M.1 = 11 Abnahme pro Abnahmereihe - Dann nehmen Sie 4 M in jedem M.2 x 12 = 48 Abnahme - Es waren 290 M - 88 M - 48 M = 154 M. Viel Spaß beim stricken!
10.09.2019 - 14:44
![]() Maria wrote:
Maria wrote:
Hola! Creo que hay un error con los aumentos de la manga, dice que hay que aumentar 7 veces cada 5 CMS pero la manga debe medir 19 CMS. Cuántos puntos deben ser al final? para hacer mi propio cálculo, por favor. Estoy trabajando talla 6-9 meses
27.08.2019 - 07:30DROPS Design answered:
Hola Maria. El patrón está correcto. El primer aumento se trabaja a 5 cm desde el inicio. Los siguientes aumentos se repiten cada 5 VUELTAS.
31.08.2019 - 21:11
![]() Claudia wrote:
Claudia wrote:
Hallo, ich bin nun an der Passe, soweit alles klar aber wenn ich bei der linken Partie 11 Maschen stricken und gleichzeitig 1 Masche jeweils abnehmen soll, habe ich dann 10 Maschen weil ich Masche 10 und 11 zusammen stricke oder 11 weil ich Masche 11 und 12 zusammen stricke?
07.06.2019 - 16:46DROPS Design answered:
Liebe Claudia, wenn Sie bei der Passe abnehmen, nehmen Sie in die linken Partie ab, dh bei der 1. Abnahmen stricken Sie die 10. und 11. Linke Masche zusammen (= 10 li Maschen bleiben), bei der nächsten Abnahmen stricken Sie die 1. und 2. linke Maschen zusammen (= 9 li Maschen bleiben), bei der 3. Abnahmen stricken Sie die 8. und 9. Maschen zusammen (= 8 li Maschen) und so weiter. Viel Spaß beim stricken!
11.06.2019 - 09:30
![]() Claudia wrote:
Claudia wrote:
Ich bin nun in der R am Vorder-Rückenteil in der das Zopfmuster M3 wiederholt wird aber was ist mit dem ersten und letzten M1 Zopf? Laut Diagramm werden über M1 ja noch 2 Reihen mehr gestrickt bevor dieser wieder an der Reihe ist. Stricke ich da rechts/links über diese Maschen?
10.05.2019 - 17:36DROPS Design answered:
Liebe Claudia, M.3 wird über 4 Reihen wiederholt, dh wenn M.3 einmal in der Höhe gestrickt wird, wiederholen Sie das Diagram ab der 1. Reihe. Gleichzeitig stricken Sie M.1 wie im Diagram, dh über 6 Reihen = bei der 5. Reihe in M.1 stricken Sie die 1. Reihe vom 2. Rapport M.3 usw. Viel Spaß beim stricken!
13.05.2019 - 08:37
![]() France Alarie wrote:
France Alarie wrote:
Pull Lors du retour « envers » ne doit on pas tricoter les mailles comment elles se presentent Ce n’est pas mentionné ainsi mais seulement « continuer en point fantaisie » Merci
17.04.2019 - 05:01DROPS Design answered:
Bonjour Mme Alarie, vous continuez en point fantaisie ainsi avec la répartition des mailles comme indiquée, (avec les torsades de M.1) - sur l'envers, les mailles se tricotent effectivement comme elles se présentent. Bon tricot!
23.04.2019 - 11:06
|
||||||||||||||||||||||||||||||||||
Little Chestnut#littlechestnutjacket |
||||||||||||||||||||||||||||||||||
 |
 |
|||||||||||||||||||||||||||||||||
Set of knitted jacket with raglan sleeves, hat and booties with cables, for baby and children in DROPS Alpaca
DROPS Baby 19-17 |
||||||||||||||||||||||||||||||||||
|
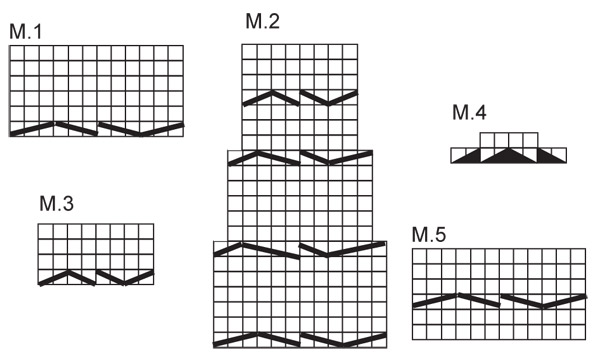
JACKET: GARTER ST (back and forth on needle): K all rows. GARTER ST (in the round): K 1 round, P 1 round. PATTERN: See diagram M.1 to M.4. Diagrams show the pattern from RS. BUTTONHOLES: Make buttonholes on right front band. 1 buttonhole = bind off 3rd and 4th front band st and cast on 2 new sts on return row. Make buttonholes when piece measures: SIZE 1/3 months: 4, 9, 14, 19 and 24 cm / 1½", 3½", 5½", 7½" and 9½". SIZE 6/9 months: 2, 8, 14, 20 and 26 cm / 3/4", 3 1/8", 5½", 8" and 10 1/4". SIZE 12/18 months: 3, 8, 14, 19, 25 and 30 cm / 1 1/8", 3 1/8", 5½", 7½", 9 3/4" and 11 3/4". SIZE 2 years: 4, 10, 16, 22, 28 and 34 cm / 1½", 4" 6 1/4", 8 3/4", 11" and 13 3/8". SIZE 3/4 years: 3, 10, 17, 24, 31 and 38 cm / 1 1/8", 4", 6 3/4", 9½", 12 1/4" and 15". -------------------------------------------------------- -------------------------------------------------------- BODY PIECE: Worked back and forth on circular needle from mid front. Cast on 139-151-170 (183-192) sts on circular needle size 2.5 mm / US 1½ with Alpaca. K 4 rows, AT THE SAME TIME on 4th row inc 17-19-14 (15-20) sts evenly = 156-170-184 (198-212) sts. Work next row as follows (from RS): 5 GARTER STS - see above (= front band), P2, M.1, * P6, M.3 *, repeat from *-* on the next 112-126-140 (154-168) sts, finish with P6, M.1, P2 and 5 GARTER STS (= front band). Continue in pattern like this until piece measures 7-7-7 (8-8) cm / 2 3/4"-2 3/4"-2 3/4" (3 1/8"-3 1/8"). NOTE! Remember BUTTONHOLES - see above. On next row from RS work 21 sts each side as before, K remaining sts, AT THE SAME TIME dec 9-13-8 (9-14) sts evenly on these sts = 147-157-176 (189-198) sts. On next row from WS work 21 sts each side as before, K remaining sts. Continue as follows (from RS): 5 garter sts, P2, M.1, P2, stockinette st on the next 105-115-134 (147-156) sts, P2, M.1, P2 and 5 garter sts. Continue in pattern like this until piece measures 17-18-21 (24-27) cm / 6 3/4"-7"-8 1/4" (9½"-10 5/8"). Work next row as follows (from RS): 21 sts as before, 14-18-24 (26-29) stockinette sts (= right front piece), bind off 8 sts for armhole, 61-63-70 (79-82) stockinette sts (= back piece), bind off 8 sts for armhole, 14-18-24 (26-29) stockinette sts and 21 sts as before (= left front piece) = 131-141-160 (173-182) sts left on needle. Cut the thread, put piece aside and knit the sleeves. SLEEVE: Worked in the round. Cast on 36-38-40 (42-44) sts on double pointed needles size 2.5 mm / US 1½ with Alpaca. Insert a marker at beg of round (= mid under sleeve). Work 4 rounds GARTER ST – see above. Continue in stockinette st. AT THE SAME TIME when piece measures 5 cm / 2'' inc 1 st each side of marker, and repeat the inc on every 6-5-5 (6-6) round a total of 6-7-9 (10-12) times = 48-52-58 (62-68) sts. Continue until piece measures 18-19-21 (25-29) cm / 7"-7½"-8 1/4" (9 3/4"-11 3/8"). Now bind off 8 sts mid under sleeve (= 4 sts each side of marker) = 40-44-50 (54-60) sts. Put piece aside and knit the other sleeve. YOKE: Slip sleeves on the same circular needle as body piece where bind off for armhole = 211-229-260 (281-302) sts. NOW MEASURE PIECE FROM HERE! On next row from WS work 21 sts each side as before, K remaining sts, AT THE SAME TIME inc 22-27-30 (33-36) sts evenly on these sts = 233-256-290 (314-338) sts. Continue as follows (as seen from RS): 5 garter st, P2, * M.1, P 11-11-12 (12-12) sts *, repeat from *-* a total of 9-10-11 (12-13) times and finish with M.1, P2 and 5 garter sts. AT THE SAME TIME dec from RS on the right and left side alternately of each P-section (dec by P2 tog, NOTE! do not dec in P2 each side) on every 1 cm / 3/8'' a total of 6-7-8 (9-9) times. AT THE SAME TIME when piece measures 1-1-2 (3-4) cm / 3/8"-3/8"-3/4" (1 1/8"-1½") work M.2 over all sts in M.1 (work remaining as before). After 1 vertical repeat of M.2 continue with M.3. After all dec are complete there are 139-142-154 (154-165) sts on needle. Continue until piece measures approx 7-8-9 (10-11) cm / 2¾''-3 1/8''-3½'' (4''-4 3/8''), adjust to a full vertical repeat. Now work M.4 over M.3 (work remaining sts as before) = 99-98-106 (102-109) sts. After 1 vertical repeat of M.4 K 1 row from RS on all sts, AT THE SAME TIME dec 13-10-14 (6-9) sts evenly = 86-88-92 (96-100) sts. K 1 row from WS, K 1 row from RS, K 1 row from WS and bind off loosely. ASSEMBLY: Sew openings under sleeves. Sew on buttons. -------------------------------------------------------- HAT: GARTER ST (in the round): K 1 round, P 1 round. PATTERN: See diagram M.1 to M.4. Diagrams show the pattern from RS. Worked in the round, from bottom up. With Alpaca and circular needle size 2.5 mm / US 1 cast on 95-100-105 (110-120) sts. Work 8 rounds GARTER ST- see above. Work next round as follows: * K1, 1 YO, K2, 1 YO, K2, 1 YO, K2, 1 YO, K1, P 11-12-13 (14-16) *, repeat from *-* a total of 5 times = 115-120-125 (130-140) sts. On next round work K over K and P over P - K all YO into back of loop to avoid a hole (= K12, P 11-12-13 (14-16)). Continue as follows: * M.1, P 11-12-13 (14-16) *, repeat from *-* a total of 5 times. REMEMBER THE GAUGE! When piece measures approx 7-8-9 (10-11) cm / 2¾''-3 1/8''-3½'' (4''-4 3/8'') (adjust to a full repeat) work M.2 over M.1. NOTE! Change to double pointed needles size 2.5 mm / US 1 when there are too few sts for circular needle. After 1 vertical repeat of M.2 work M.3 over M.2. AT THE SAME TIME when piece measures 10-11-12 (13-14) cm / 4''-4 3/8''-4¾'' (5 1/8''-5½'') dec 2 sts in each P-section, dec by P tog the 2 first sts and P tog the 2 last sts in each P-section. Dec on every 1 cm / 3/8'' a total of 4 times = 55-60-65 (70-80) sts. Now work M.4 over M.3 = 35-40-45 (50-60) sts. On next round K all sts, AT THE SAME TIME K2 tog across the round = 18-20-23 (25-30) sts. Cut the thread and pull it through remaining sts on needle, tighten and fasten. Hat measures approx 14-15-16 (17-18) cm / 5½"-6"-6 1/4" (6 3/4"-18"). -------------------------------------------------------- BOOTIES: PATTERN: See diagram M.5. Diagram shows the pattern from RS. SEED ST: Round 1: * K1, P1 *, repeat from *-*. Round 2: K over P and P over K. Repeat round 2. -------------------------------------------------------- BOOTIE: Piece worked in the round on double pointed needles, from top down. Cast on 50-50-54 (58-62) sts on double pointed needles size 2.5 mm / US 1 with Alpaca. K 1 round on all sts and continue as follows: SIZE 1/3 months + 6/9 months + 2 years: K1, * P2/K2 *, repeat from *-* on the next 16-16-20 sts, P2, M.5 (= 12 sts), * P2/K2 *, repeat from *-* on the next 16-16-20 sts, P2, K1. SIZE 12/18 months + 3/4 years: P1, * K2/P2 *, repeat from *-* on the next 20-24 sts, M.5 (= 12 sts), * P2/K2 *, repeat from *-* on the next 20-24 sts, P1. Continue like this until piece measures 6-7-7 (8-8) cm / 2 3/8"-2 3/4"-2 3/4" (3 1/8"-3 1/8"). K 1 round on all sts, AT THE SAME TIME dec 4 sts evenly on round - do not dec on the 16 sts on upper foot (= M.5 + P2 each side) = 46-46-50 (54-58) sts. Keep the 16 sts on upper foot on needle and slip remaining 30-30-34 (38-42) sts on a stitch holder. Continue in M.5 with P2 each side back and forth on needle for 3-3.5-4 (5-6) cm / 1 1/8"-1 1/4"-1½" (2"-2 3/8"). On next row from RS dec 4 sts on M.5 = 12 sts left on upper foot. Now pick up 6-8-8 (10-14) sts on the side of upper foot, slip sts from stitch holder back on needle and pick up 6-8-8 (10-14) sts on the other side of upper foot = 54-58-62 (70-82) sts. Continue in SEED ST - see above - in the round on all sts for 1.5-2-2.5 (3-3.5) cm / ½"-3/4"-7/8" (1 1/8"-1 1/4"), and now P 1 round on all sts. Bind off all sts except the 12 sts on upper foot mid front. Work 9-10-11 (13-14) cm / 3½"-4"-4 3/8" (5 1/8"-5½") seed st back and forth on needle on these sts for sole. Bind off and sew sole to side pieces, sew edge to edge to avoid a chunky seam. |
||||||||||||||||||||||||||||||||||
Diagram explanations |
||||||||||||||||||||||||||||||||||
|
||||||||||||||||||||||||||||||||||
 |
||||||||||||||||||||||||||||||||||
 |
||||||||||||||||||||||||||||||||||
Have you finished this pattern?Tag your pictures with #dropspattern #littlechestnutjacket or submit them to the #dropsfan gallery. Do you need help with this pattern?You'll find 27 tutorial videos, a Comments/Questions area and more by visiting the pattern on garnstudio.com. © 1982-2026 DROPS Design A/S. We reserve all rights. This document, including all its sub-sections, has copyrights. Read more about what you can do with our patterns at the bottom of each pattern on our site. |
||||||||||||||||||||||||||||||||||


With over 40 years in knitting and crochet design, DROPS Design offers one of the most extensive collections of free patterns on the internet - translated to 17 languages. As of today we count 324 catalogs and 12278 patterns - 12268 of which are translated into English (US/in).
We work hard to bring you the best knitting and crochet have to offer, inspiration and advice as well as great quality yarns at incredible prices! Would you like to use our patterns for other than personal use? You can read what you are allowed to do in the Copyright text at the bottom of all our patterns. Happy crafting!
Post a comment to pattern DROPS Baby 19-17
We would love to hear what you have to say about this pattern!
If you want to leave a question, please make sure you select the correct category in the form below, to speed up the answering process. Required fields are marked *.