DROPS Alpaca
DROPS Alpaca
100% Alpaca
from 3.65 € /50g
Get the yarn to make this pattern from 18.25€.

The yarn cost is calculated from the pattern’s smallest size and the yarn’s cheapest product type. Looking for an even better price? You might find it on the DROPS Deals!

DROPS SS24

Little Chestnut

Set of knitted jacket with raglan sleeves, hat and booties with cables, for baby and children in DROPS Alpaca

DROPS Baby 19-17
DROPS design: Pattern no Z-075-by-Z-076-by-Z-077-by
--------------------------------------------------------
JACKET:
Size: 1/3 - 6/9 - 12/18 months (2 - 3/4) years
Finished measurements:
Size in cm: 50/56- 62/68- 74/80 (86/92-98/104)
Materials: DROPS ALPACA from Garnstudio
JACKET:
150-150-150-200-200 g no 618, eco dark beige

DROPS DOUBLE POINTED NEEDLES AND CIRCULAR NEEDLE (60 cm) size 2.5 mm - or size needed to get 26 sts x 34 rows in stocking st = 10 x 10 cm.

DROPS WOODEN BUTTON, BURNT, no 513: 5-5-6 (6-6) pcs.

------------------------------------------------------
HAT:
Size: 1/3 - 6/9 - 12/18 months (2 - 3/4) years
Head circumference:
approx 40/42 - 42/44 - 44/46 (48/50 - 50/52) cm
Materials: DROPS ALPACA from Garnstudio
50 g for all sizes color no 618, eco dark beige

DROPS DOUBLE POINTED NEEDLES and CIRCULAR NEEDLE (40 cm) size 2.5 mm - or size needed to get 26 sts x 34 rows in stocking st = 10 x 10 cm.
--------------------------------------------------------
BOOTIES:
Size: 1/3 - 6/9 - 12/18 months (2 - 3/4) years
To fit foot length: 10 - 11 - 12 (14 - 16) cm
Materials: DROPS ALPACA from Garnstudio
50 g for all sizes color no 618, light beige mix

DROPS DOUBLE POINTED NEEDLES size 2.5 mm - or size needed to get 26 sts x 34 rows in stocking st = 10 x 10 cm

-------------------------------------------------------

Alternative Yarn – See how to change yarns here
Yarn Groups A to F – Use the same pattern and change the yarn here
Yarn usage using an alternative yarn – Use our yarn converter here

-------------------------------------------------------

DROPS Alpaca
DROPS Alpaca
100% Alpaca
from 3.65 € /50g
Get the yarn to make this pattern from 18.25€.

The yarn cost is calculated from the pattern’s smallest size and the yarn’s cheapest product type. Looking for an even better price? You might find it on the DROPS Deals!

Pattern instructions

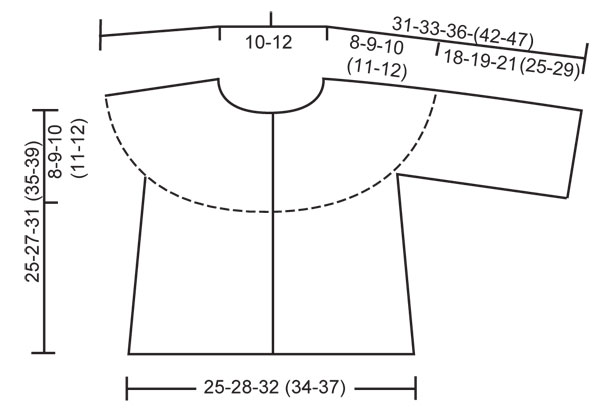
GARTER ST (back and forth on needle):
K all rows.
GARTER ST (in the round): K 1 round, P 1 round.
PATTERN:
See diagram M.1 to M.4. Diagrams show the pattern from RS.
BUTTONHOLES:
Make buttonholes on right front band.
1 buttonhole = cast off 3rd and 4th front band st and cast on 2 new sts on return row.
Make buttonholes when piece measures:
SIZE 1/3 months: 4, 9, 14, 19 and 24 cm
SIZE 6/9 months: 2, 8, 14, 20 and 26 cm
SIZE 12/18 months: 3, 8, 14, 19, 25 and 30 cm
SIZE 2 years: 4, 10, 16, 22, 28 and 34 cm
SIZE 3/4 years: 3, 10, 17, 24, 31 and 38 cm
--------------------------------------------------------
--------------------------------------------------------

BODY PIECE:
Worked back and forth on circular needle from mid front.
Cast on 139-151-170 (183-192) sts on circular needle size 2.5 mm with Alpaca. K 4 rows, AT THE SAME TIME on 4th row inc 17-19-14 (15-20) sts evenly = 156-170-184 (198-212) sts. Work next row as follows (from RS): 5 GARTER STS - see above (= front band), P2, M.1, * P6, M.3 *, repeat from *-* on the next 112-126-140 (154-168) sts, finish with P6, M.1, P2 and 5 GARTER STS (= front band). Continue in pattern like this until piece measures 7-7-7 (8-8) cm. NOTE! Remember BUTTONHOLES - see above.
On next row from RS work 21 sts each side as before, K remaining sts, AT THE SAME TIME dec 9-13-8 (9-14) sts evenly on these sts = 147-157-176 (189-198) sts. On next row from WS work 21 sts each side as before, K remaining sts.
Continue as follows (from RS): 5 garter sts, P2, M.1, P2, stocking st on the next 105-115-134 (147-156) sts, P2, M.1, P2 and 5 garter sts.
Continue in pattern like this until piece measures 17-18-21 (24-27) cm. Work next row as follows (from RS): 21 sts as before, 14-18-24 (26-29) stocking sts (= right front piece), cast off 8 sts for armhole, 61-63-70 (79-82) stocking sts (= back piece), cast off 8 sts for armhole, 14-18-24 (26-29) stocking sts and 21 sts as before (= left front piece) = 131-141-160 (173-182) sts left on needle. Cut the thread, put piece aside and knit the sleeves.

SLEEVE:
Worked in the round. Cast on 36-38-40 (42-44) sts on double pointed needles size 2.5 mm with Alpaca. Insert a marker at beg of round (= mid under sleeve). Work 4 rounds GARTER ST – see above. Continue in stocking st. AT THE SAME TIME when piece measures 5 cm inc 1 st each side of marker, and repeat the inc on every 6-5-5 (6-6) round a total of 6-7-9 (10-12) times = 48-52-58 (62-68) sts. Continue until piece measures 18-19-21 (25-29) cm. Now cast off 8 sts mid under sleeve (= 4 sts each side of marker) = 40-44-50 (54-60) sts.
Put piece aside and knit the other sleeve.

YOKE:
Slip sleeves on the same circular needle as body piece where cast off for armhole = 211-229-260 (281-302) sts. NOW MEASURE PIECE FROM HERE! On next row from WS work 21 sts each side as before, K remaining sts, AT THE SAME TIME inc 22-27-30 (33-36) sts evenly on these sts = 233-256-290 (314-338) sts. Continue as follows (as seen from RS):
5 garter st, P2, * M.1, P 11-11-12 (12-12) sts *, repeat from *-* a total of 9-10-11 (12-13) times and finish with M.1, P2 and 5 garter sts. AT THE SAME TIME dec from RS on the right and left side alternately of each P-section (dec by P2 tog, NOTE! do not dec in P2 each side) on every 1 cm a total of 6-7-8 (9-9) times. AT THE SAME TIME when piece measures 1-1-2 (3-4) cm work M.2 over all sts in M.1 (work remaining as before). After 1 vertical repeat of M.2 continue with M.3. After all dec are complete there are 139-142-154 (154-165) sts on needle. Continue until piece measures approx 7-8-9 (10-11) cm, adjust to a full vertical repeat. Now work M.4 over M.3 (work remaining sts as before) = 99-98-106 (102-109) sts. After 1 vertical repeat of M.4 K 1 row from RS on all sts, AT THE SAME TIME dec 13-10-14 (6-9) sts evenly = 86-88-92 (96-100) sts. K 1 row from WS, K 1 row from RS, K 1 row from WS and cast off loosely.

ASSEMBLY:
Sew openings under sleeves. Sew on buttons.
--------------------------------------------------------

HAT:

GARTER ST (in the round): K 1 round, P 1 round.
PATTERN:
See diagram M.1 to M.4. Diagrams show the pattern from RS.
--------------------------------------------------------
--------------------------------------------------------

HAT:
Worked in the round, from bottom up. Cast on 95-100-105 (110-120) sts on circular needle size 2.5 mm with Alpaca. Work 8 rounds GARTER ST- see above. Work next round as follows: * K1, 1 YO, K2, 1 YO, K2, 1 YO, K2, 1 YO, K1, P 11-12-13 (14-16) *, repeat from *-* a total of 5 times = 115-120-125 (130-140) sts. On next round work K over K and P over P - K all YO into back of loop to avoid a hole (= K12, P 11-12-13 (14-16)). Continue as follows: * M.1, P 11-12-13 (14-16) *, repeat from *-* a total of 5 times.
REMEMBER THE KNITTING TENSION! When piece measures approx 7-8-9 (10-11) cm (adjust to a full repeat) work M.2 over M.1. NOTE! Change to double pointed needles size 2.5 mm when there are too few sts for circular needle. After 1 vertical repeat of M.2 work M.3 over M.2.
AT THE SAME TIME when piece measures 10-11-12 (13-14) cm dec 2 sts in each P-section, dec by P tog the 2 first sts and P tog the 2 last sts in each P-section. Dec on every 1 cm a total of 4 times = 55-60-65 (70-80) sts. Now work M.4 over M.3 = 35-40-45 (50-60) sts. On next round K all sts, AT THE SAME TIME K2 tog across the round = 18-20-23 (25-30) sts. Cut the thread and pull it through remaining sts on needle, tighten and fasten. Hat measures approx 14-15-16 (17-18) cm.
--------------------------------------------------------

BOOTIES:

PATTERN:
See diagram M.5. Diagram shows the pattern from RS.
MOSS ST:
Round 1: * K1, P1 *, repeat from *-*.
Round 2: K over P and P over K. Repeat round 2.
--------------------------------------------------------
--------------------------------------------------------

BOOTIE:
Piece worked in the round on double pointed needles, from top down.
Cast on 50-50-54 (58-62) sts on double pointed needles size 2.5 mm with Alpaca. K 1 round on all sts and continue as follows:
SIZE 1/3 months + 6/9 months + 2 years:
K1, * P2/K2 *, repeat from *-* on the next 16-16-20 sts, P2, M.5 (= 12 sts), * P2/K2 *, repeat from *-* on the next 16-16-20 sts, P2, K1.
SIZE 12/18 months + 3/4 years:
P1, * K2/P2 *, repeat from *-* on the next 20-24 sts, M.5 (= 12 sts), * P2/K2 *, repeat from *-* on the next 20-24 sts, P1.
Continue like this until piece measures 6-7-7 (8-8) cm.
K 1 round on all sts, AT THE SAME TIME dec 4 sts evenly on round - do not dec on the 16 sts on upper foot (= M.5 + P2 each side) = 46-46-50 (54-58) sts. Keep the 16 sts on upper foot on needle and slip remaining 30-30-34 (38-42) sts on a stitch holder. Continue in M.5 with P2 each side back and forth on needle for 3-3.5-4 (5-6) cm. On next row from RS dec 4 sts on M.5 = 12 sts left on upper foot. Now pick up 6-8-8 (10-14) sts on the side of upper foot, slip sts from stitch holder back on needle and pick up 6-8-8 (10-14) sts on the other side of upper foot = 54-58-62 (70-82) sts. Continue in MOSS ST - see above - in the round on all sts for 1.5-2-2.5 (3-3.5) cm, and now P 1 round on all sts. Cast off all sts except the 12 sts on upper foot mid front. Work 9-10-11 (13-14) cm moss st back and forth on needle on these sts for sole. Cast off and sew sole to side pieces, sew edge to edge to avoid a chunky seam.

This pattern has been corrected.

Updated online: 12.06.2014
New yarnamount - JACKET:
150-150-150-200-200 g no 618, eco dark beige

Diagram

symbols = K from RS, P from WS
symbols = slip 3 sts on cable needle behind piece, K3, K3 from cable needle
symbols = slip 3 sts on cable needle in front of piece, K3, K3 from cable needle
symbols = slip 3 sts on cable needle behind piece, K3, K2 tog and K1 from cable needle
symbols = slip 3 sts on cable needle in front of piece, K2 tog, K1, K3 from cable needle
symbols = slip 3 sts on cable needle behind piece, K2, K2 tog and K1 from cable needle
symbols = slip 2 sts on cable needle in front of piece, K2 tog, K1, K2 from cable needle
symbols = slip 2 sts on cable needle behind piece, K2, K2 from cable needle
symbols = slip 2 sts on cable needle in front of piece, K2, K2 from cable needle
symbols = slip 1 st as if to K, K1, psso
symbols = K2 tog
diagram
diagram

Each of our patterns has specific tutorial videos to help you.

Do you have a question? See a list of frequently asked questions (FAQ)

Knitting tension is what determines the final measurements of your work, and is usually measured per 10 x 10 cm. It is provided like so: number of stitches in width x number of rows in height - eg: 19 stitches x 26 rows = 10 x 10 cm.

The knitting tension is very individual; some people knit/crochet loosely while others work tightly. You adjust the knitting tension with the needle size, which is why the suggested needle size is only meant as a guide! You need to adjust this (up or down) to ensure that YOUR knitting tension matches the knitting tension provided in the pattern. If you work with a different knitting tension than provided you will have a different yarn consumption, and your work will have different measurements than what the pattern suggests.

The knitting tension also determines which yarns can replace each other. As long as you achieve the same knitting tension you can replace one yarn with another.

See DROPS lesson: How to measure your tension/gauge

See DROPS video: How to make a gauge tension swatch

The required amount of yarn is provided in grams, eg: 450 g. To calculate how many balls you’ll need you first need to know how many grams are in 1 ball (25g, 50g or 100g). This information is available if you click on the individual yarn quality on our pages. Divide the amount required with the amount of each ball. For example, if each ball is 50g (the most common amount), the calculation will be as follows: 450 / 50 = 9 balls.

The important thing when changing from one yarn to another is that the knitting/crochet tension remains the same. This is so that the measurements of the finished piece will be the same as on the sketch provided. It is easier to achieve the same knitting tension using yarns from the same yarn group. It is also possible to work with multiple strands of a thinner yarn to achieve the knitting tension of a thicker one. Please try our yarn converter. We recommend you to always work a test swatch.

Please NOTE: when changing yarn the garment might have a different look and feel to the garment in the photo, due to individual properties and qualities of each yarn.

See DROPS lesson: Can I use a different yarn than the one mentioned in the pattern?

All our yarns are categorised into yarn groups (from A to F) according to thickness and knitting tension – group A contains the thinnest yarns and group F the thickest. This makes it easier for you to find alternative yarns to our patterns, should you wish to switch yarn. All yarns within the same group have a similar knitting tension and can easily replace each other. However, different yarn qualities have different structures and properties which will give the finished work a unique look and feel.

Click here for an overview of the yarns in each yarn group

At the top of all our patterns you’ll find a link to our yarn calculator, which is a helpful tool should you wish to use a different yarn than suggested. By filling in the yarn quality you wish to replace, the amount (in your size) and number of strands, the calculator will present good alternative yarns with the same knitting tension. Additionally it will tell you how much you’ll require in the new qualities and whether you’ll need to work with multiple strands. Most skeins are 50g (some are 25g or 100g).

If the pattern is worked with multiple colours, every colour will have to be calculated separately. Similarly, if the pattern is worked with several strands of different yarns (for example 1 strand Alpaca and 1 strand Kid-Silk) you will have to find alternatives for each, individually.

Click here to see our yarn calculator

Since different yarns have different qualities and textures we have chosen to keep the original yarn in our patterns. However, you can easily find options among our available qualities by using our yarn calculator, or simply pick a yarn from the same yarn group.

It is possible that some retailers still have discontinued yarns in stock, or that someone has a few skeins at home that they would like to find patterns for.

The yarn calculator will provide both alternative yarn as well as required amount in the new quality.

If you think it's hard to decide what size to make, it can be a good idea to measure a garment you own already and like the size of. Then you can pick the size by comparing those measures with the ones available in the pattern's size chart.

You'll find the size chart at the bottom of the pattern.

See DROPS lesson: How to read size chart

The needle size provided in the pattern serves only as a guide, the important thing is to follow the knitting tension. And since knitting tension is very individual, you will have to adjust the needle size to ensure that YOUR tension is the same as in the pattern – maybe you’ll have to adjust 1, or even 2 needle sizes, up or down to achieve the correct tension. For this, we recommend that you work test swatches.

Should you work with a different knitting tension than the one provided, the measurements of the finished garment might deviate from the measurement sketch.

See DROPS lesson: How to measure your tension/gauge

See DROPS video: How to make a tension/gauge swatch

Working a garment top-down provides more flexibility and room for personal adjustment. For example it is easier to try the garment on while working, as well as making adjustments to length of yoke and shoulder caps.

The instructions are carefully explaining every step, in the correct order. Diagrams are adjusted to the knitting direction and are worked as usual.

The diagram depicts all rows/rounds, and every stitch seen from the right side. It is read from bottom to top, from right to left. 1 square = 1 stitch.

When working back and forth, every other row is worked from the right side and every other row is worked from the wrong side. When working from the wrong side, the diagram will have to be worked reversed: from left to right, knit stitches are purled, purl stitches are knit etc.

When working in the round every round is worked from the right side and the diagram are worked from right to left on all rounds.

See DROPS lesson: How to read knitting diagrams

The diagram depicts all rows/rounds, and every stitch seen from the right side. It is worked from bottom to top, from right to left.

When working back and forth every other row is worked from the right side: from right to left and every other row is worked from the wrong side: from left to right.

When working in the round, every row in the diagram are worked from the right side, from right to left.

When working a circular diagram you start in the middle and work your way outwards, counter clockwise, row by row.

The rows usually start with a given number of chain stitches (equivalent to the height of the following stitch), this will either be depicted in the diagram or explained in the pattern.

See DROPS lesson: How to read crochet diagrams

Instructions for working several diagrams after each other on the same row/round, will often be written like so: “work A.1, A.2, A.3 a total of 0-0-2-3-4 times". This means you work A.1 once, then A.2 is worked once, and A.3 is repeated (in width) the number of times provided for your size – in this case like so: S = 0 times, M = 0 times, L=2 times, XL= 3 times and XXL = 4 times.

The diagrams are worked as usual: begin with the first row in A.1, then work the first row in A.2 etc.

See DROPS lesson: How to read knitting diagrams

See DROPS lesson: How to read crochet diagrams

The total width of the garment (from wrist-to-wrist) will be larger in the larger sizes, despite the actual sleeves being shorter. The larger sizes have longer sleeve caps and wider shoulders, so there will be a good fit in all sizes.

The measurement sketch/schematic drawing provides information regarding the full length of the garment. If it’s a jumper or a jacket the length is measured from the highest point on the shoulder closest to the neckline, and straight down to the bottom of the garment. It is NOT measured from the tip of shoulder. Similarly, the length of yoke is measured from the highest point on the shoulder and down to where yoke is split into body and sleeves.

On a jacket measures are never taken along bands, unless specifically stated. Always measure inside band stitches when measuring the length.

See DROPS lesson: How to read a schematic drawing

Diagrams are often repeated on the round or in height. 1 repeat is the diagram the way it appears in the pattern. If it says to work 5 repeats of A.1 in the round, then you work A.1 a total of 5 times after/next to each other in the round. If it says to work 2 repeats of A.1 vertically/in height you work the entire diagram once, then begin again at the start and work the entire diagram one more time.

Chain stitches are slightly narrower than other stitches and to avoid working the cast-on edge too tight, we simply chain more stitches to begin with. The stitch count will be adjusted on the following row to fit the pattern and measurement sketch.

The rib edge is more elastic and will contract slightly compared to, for example, stocking stitch. By increasing before the rib edge, you avoid a visible difference in width between the rib edge and the rest of the body.

It’s very easy to cast off too tightly, and by making yarn overs while casting off (and simultaneously casting these off) you avoid a too tight cast off edge.

See DROPS video: How to bind off with yarn overs (yo)

To achieve an even increase (or decrease) you can increase on, for example: every 3rd and 4th row alternately, like so: work 2 rows and increase on the 3rd row, work 3 rows and increase on the 4th. Repeat this until the increase is complete.

See DROPS lesson: Increase or decrease 1 st on every 3rd and 4th row alternately

Should you prefer to work in the round instead of back and forth, you may of course adjust the pattern. You’ll need to add steeks mid-front (usually 5 stitches), and follow the instructions. When you would normally turn and work from the wrong side, simply work across the steek and continue in the round. At the end you’ll cut the piece open, pick up stitches to work bands, and cover the cut edges.

See DROPS video: How to knit steeks and cut open

Should you prefer to work back and forth instead of in the round, you may of course adjust the pattern so you work the pieces separately and then assemble them at the end. Divide the stitches for the body in 2, add 1 edge stitch in each side (for sewing) and work the front and back pieces separately.

See DROPS lesson: Can I adapt a pattern for circular needles into straight needles?

Pattern repeats can vary slightly in the different sizes, in order to get the correct proportions. If you’re not working the exact same size as the garment in the photo, yours might deviate slightly. This has been carefully developed and adjusted so that the complete impression of the garment is the same in all sizes.

Make sure to follow instructions and diagrams for your size!

If you have found a pattern you like which is available in women’s size it’s not very difficult to convert it to men’s size. The biggest difference will be the length of sleeves and body. Start working on the women size that you think would fit across the chest. The additional length will be worked right before you cast off for the armhole/sleeve cap. If the pattern is worked top-down you can add the length right after the armhole or before the first decrease on sleeve.

Regarding additional yarn amount, this will depend on how much length you add, but it is better with a skein too many than too few.

All yarns will have excess fibres (from production) that might come off as lint or shedding. Brushed yarns (ie hairier yarns) have more of these loose, excess fibres, causing more shedding.

Shedding also depends on what is worn under or over the garment, and whether this pulls at the yarn fibres. It’s therefore not possible to guarantee that there will be no shedding

Below are some tips on how to get the best result when working with hairier yarns:

1. When the garment is finished (before you wash it) shake it vigorously so the looser hairs come off. NOTE: do NOT use a lint roller, brush or any method that pulls at the yarn.

2. Place the garment in a plastic bag and put it in your freezer - the temperature will cause the fibres to become less attached to each other, and excess fibres will come off easier.

3. Leave in the freezer for a few hours before taking it out and shaking it again.

4. Wash the garment according to the instructions on the yarn label.

Pilling is a natural process that happens to even the most exclusive of fibers. It's a natural sign of wear and tear that is hard to avoid, and that is most visible in high friction areas of your garment like a sweater's arms and cuffs.

You can make your garment look as new by removing the pilling, using a fabric comb or a pill/lint remover.

Still can't find the answer you need? Then scroll down and leave your question so one of our experts can try to help you. This will be done normally within 5 to 10 working days.
In the meantime, you can read the questions and answers that others have left to this pattern or join the DROPS Workshop on Facebook to get help from fellow knitters/crocheters!

You might also like...

Post a comment to pattern DROPS Baby 19-17

We would love to hear what you have to say about this pattern!

If you want to leave a question, please make sure you select the correct category in the form below, to speed up the answering process. Required fields are marked *.

Comments / Questions (96)

country flag Mirka wrote:

”SAMANAIKAISESTI kun työn pituus on 2cm, neulo piirroksen M.1 jokaisen mallikerran kohdalla mallineuletta piirroksen M.2 mukaisesti (muilla silmukoilla neulotaan kuten aiemmin). \r\nKun olet neulonut piirroksen M.2 loppuun, jatka neulomalla mallineuletta piirroksen M.3 mukaisesti.” Neulon 3.kokoa. Kun työtä on 2cm, jatketaanko M2 kuviota siltä kerrokselta, mihin M1 kuviossa jäätiin, vai aloitetaanko M2 alusta? Vaikka tuossa tapauksessa M1 jäisi kesken ja palmikkokuvio lyhyemmäksi?

26.10.2023 - 09:50

DROPS Design answered:

Jos neuletiheytesi on oikea, työn pituus tulisi olla n. 2 cm, kun olet neulonut yhden piirroksen M.1 mallikerran. Neulo mallikerta loppuun ennen kuin aloitat piirroksen M.2 mallineuleen.

26.10.2023 - 18:18

country flag Nadine wrote:

Er moeten voor de kleinste maat knoopsgaten gebreid worden bij 4, 9, 14, 19 en 24 cm. Vanaf 17 cm wordt er echter afgekant voor de armsgaten. Vervolgens staat er bij de pas (nadat de mouwen gebreid zijn) dat er vanaf nu vanaf de pas gemeten moet worden. Op welke afstand moeten de knoopsgaten dan komen na het begin van de pas? Of wordt daarvoor wel vanaf het begin gemeten?

04.07.2023 - 20:01

DROPS Design answered:

Dag Nadine,

De knoopsgaten blijf je inderdaad vanaf het begin meten. Er zit dus steeds 5 cm tussen elk knoopsgat.

06.07.2023 - 21:02

country flag Emily wrote:

Nachtrag: um bei der Passe nach allen Abnahmen von 256 auf 142 Maschen zu kommen müsste ich theoretisch in jeder Links-Partie 7x eine Masche abnehmen, nicht nur am Vorderteil. Dann macht es auch Sinn, wegen der Symmetrie abwechselnd rechts und links abzunehmen. Ist das richtig?

18.01.2023 - 10:37

DROPS Design answered:

Liebe Emily, ja es wird in jedem 11-linken-Maschen abgenommen (nur nicht die 2 linken Maschen innerhalb der Blende werden nicht abgenommen). Sie stricken (M.1 (= 12 M), 11 Maschen links) x 10 Mal (2. Größe) - es werden 1 Masche links in jedem von diesen 11 linken Maschen abgenommen: (insgesamt 10 Maschen abgenommen in der Reihe x 7 Mal insgesamt = 70 Abnahmen); im Diagramm M.2 nehmen Sie auch 4 Maschen ab x 11 Rapporte = 44 Abnahmen. Es waren 256-70-44 = 142 Maschen übrig. Viel Spaß beim stricken!

18.01.2023 - 16:46

country flag Emily wrote:

Ich habe genau nach Anleitung gestrickt, bin mit der Passe und M3 fertig, habe aber noch fast 200 Maschen auf der Nadel. Jetzt die Frage: auf der Vorderseite sind jeweils zwei Links-Partien, muss ich bei beiden insgesamt 8x eine Masche abnehmen? Und was bedeutet abwechselnd auf der linken und rechten Seite abnehmen? Dann habe ich aber immer noch viel zu viele Maschen auf der Nadel. Das ist so frustrierend, leider ist die Anleitung da nicht ganz klar

18.01.2023 - 10:21

DROPS Design answered:

Liebe Emily, es wird in jeder links-Parti mit 11-11-12 (12-12) Maschen links jeweils abgenommen - das 1. Mal nehmen Sie am Anfang vom links-Parti (= 2 Maschen links zusammen und die letzten linke Maschen links stricken), das nächste Mal nehmen Sie am Ende vom links-Parti (= stricken Sie links bis 2 Maschen links übrig sind, dann stricken Sie diese 2 letzten Maschen links zusammen). - Beachten Sie auch, daß Maschen im M.2 auch abgenommen werden (die Zöpfe werden von 12 M in jedem M.2 bis auf 8 Maschen abgenommen) - uns später wird es noch in M.4 abegenommen. Hoffentlich kann das Ihnen weiterhelfen.

18.01.2023 - 16:35

country flag Gabriele Roth wrote:

Liebes Expertenteam, im Moment stricke ich gerade die Jacke für meine Enkelin aus der o.a. Anleitung. Ich bin jetzt so weit, dass ich die Passe stricken kann, komme allerdings mit den beschriebenen Abnahmen "in jeder linken Partie" nicht zurecht. Für Ihre Unterstützung wäre ich Ihnen sehr dankbar und verbleibe schon einmal mit den besten Wünschen für ein schönes Weihnachtsfest! Viele Grüße Gabriele Roth

22.12.2022 - 15:48

DROPS Design answered:

Liebe Frau Roth, bei der Passe sind die linke Partie die 11-12 Maschen links zwischen jedem M.1/Zopf - diese linke Maschenanzahl wird man abnehmen (mit 2 M links zusammen). Viel Spaß beim stricken!

23.12.2022 - 08:19

country flag Bea Janssens wrote:

Maat 6/9 maanden. De pas: 256 steken. dan minderen in elk averecht deel. ik heb 10 averechte delen . bij mindering van 1 steek afwisselend aan de rechter en linkerkant van het deel... na iedere centimeter. totaal 7 keer. is 7 keer 10 steken geeft totaal 256 - 70 =186. in het patroon staan dat er na alle minderingen 142 steken staan... wat lees ik verkeerd? groet Bea

28.02.2022 - 14:55

DROPS Design answered:

Dag Bea,

Tegelijkertijd met het minderen brei je M.2 boven M.1. In het begin heeft M.2 12 steken en op het eind 8 steken, wat een verschil van 4 steken is Je hebt M.2 11 keer op de toer in totaal, dus door het breien van M.2 heb je nog eens 44 steken minder op de toer.

02.03.2022 - 12:18

country flag Beatrix Wittmann wrote:

Habe alle Maschen inc. Ärmel auf der Nadel. Jetzt muss ich laut Schrift 22 Naschen aufnehmen. Nur am Rückenteil, oder auch an beiden Vorderteilen???

21.02.2022 - 18:35

DROPS Design answered:

Liebe Frau Wittmann, diese Zunahmen stricken Sie zwischen die 5 Blende-Maschen beiseitig, dh 211-10=201 M + 22 = 223 M + 10 Blende-Maschen = 233 Maschen. Hier wird es erklärkt, wie man regelmäßig verteilt zunimmt. Viel Spaß beim stricken!

22.02.2022 - 09:23

country flag Bea Janssens wrote:

Ik kom niet uit bij het begin van de pas van het vestje. maat 6 - 9 maanden. Er staan 256 steken op de naald. begin = 5,2 en 12 = 19 steken. daarna 11 steken en 12 steken patroon M1 = 13 = 23 10 keer herhalen = 10 keer 23 is 230 19+230 + 19 is 268. en geen 256... Het minderen moest aan beide kanten....???? Deze snap ik ook niet. Hopelijk kunnen jullie helpen, Groet Bea

19.02.2022 - 14:45

DROPS Design answered:

Dag Bea,

Je breit eerst 5 ribbelsteken, dan 2 averecht, dan herhaal je 9 keer M.1 (= 12 steken) + 11 averecht, dus 10 x (12 + 11) = 230 steken. Tot slot M.1 (= 12 steken) en 2 averecht. Totaal kom je dan op 256 steken.

21.02.2022 - 11:55

country flag Marion wrote:

Ich komme mit der Passe nicht klar, \r\n GLEICHZEITIG nach 1-1-2 (3-4) cm M2 über M1 stricken (die restlichen M. wie gehabt). Nachdem M2 einmal in der Höhe gestrickt ist mit M3 weiterfahren. wie ist das gemeint?

01.03.2021 - 14:46

DROPS Design answered:

Liebe Marion, ja genau, M.2 wird nur einmal in der Höhe gestrickt - es wird auch wie im Diagram abgenommen. Viel Spaß beim stricken!

01.03.2021 - 14:52

country flag Elizabeth wrote:

Ik lees nu dat er maar 1 naald in ribbelsteek moet en daar na wordt het pas tricot steek.

04.01.2021 - 16:40