
Popular categories
Looking for a yarn?


Comments / Questions (44)
![]() Stephanie wrote:
Stephanie wrote:
In the sleeve instructions, regarding sleeve cap shaping: could you confirm “2 sets each side until piece measures....”. Decrease 2 stitches at beginning and end of every row?
22.08.2019 - 06:28DROPS Design answered:
Dear Stephanie, you won't decrease 2 sts on each side but cast off 2 sts at the beginning of every row (= both from RS and from WS) until sleeve measures 57-60 cm. Happy knitting!
22.08.2019 - 09:41
![]() Stephanie wrote:
Stephanie wrote:
The shoulder shaping info for the sleeves is unclear. It would be helpful if the number of stitches remaining after cast off steps were indicated in the pattern.
22.08.2019 - 06:23DROPS Design answered:
Dear Stephanie, did the previous answer help you? Depending on your tension in height, the number of remaining stitches will be different, that's the reason why there are any given, most important is the height of sleeve cap/sleeve. Happy knitting!
22.08.2019 - 09:48
![]() Cath wrote:
Cath wrote:
Bonjour j'ai commencé de tricoter le dos en taille L .Mon échantillon à 20 mailles donnait un petit 10 cm. Au niveau des cotes j'ai une largeur de 50cm comme sur le patron. Par contre à 5cm de hauteur ma largeur est de 54 cm. ma question: la largeur indiquée sur le patron est elle au niveau des cotes ou du jersey ?
06.07.2018 - 16:39DROPS Design answered:
Bonjour Cath, après les côtes, on doit diminuer 18 m au 1er rang jersey = il reste 102 m soit environ 50 cm. Pensez à bien conserver la même tension que pour votre échantillon pour avoir les bonnes mesures finales indiquées, les côtes resserrent, raison pour laquelle il faut davantage de mailles. Bon tricot!
09.07.2018 - 07:37
![]() MILANO Antonia wrote:
MILANO Antonia wrote:
Je suis entrain de tricoter le dos du modèle 114-9 en taille L. Je suis à 60cm de hauteur totale. Je suis à * tricoter au point mousse les 34m et les autres comme avant.... dois-je comprendre les 34 m centrales ? Merci pour ce joli modèle . En attente de votre aimable réponse.
23.11.2016 - 22:25DROPS Design answered:
Bonjour Mme Milano, c'est tout à fait exact, le mot "centrales" a été ajouté. Bon tricot!
24.11.2016 - 09:51
![]() Clawur wrote:
Clawur wrote:
Ich hab diese Weste als Geburtstagsgeschenk für meine Schwiegermutter in dunkellila gemacht. Sie hat sich sehr gefreut und die Weste sieht toll aus und war auch nicht so schwierig zu stricken.
05.11.2016 - 11:12Bening wrote:
Hi, I'm a bit confused about how to dec the front band. The decreasing tip in the pattern said that we gotta do all the dec in RS. Then dec 1 st on every 4th row. How should I count those rows? Count every rs and ws or only the rs? Thank you
15.03.2016 - 08:42DROPS Design answered:
Dear Mrs Bening, dec on next row from RS, then work 3 rows (= 1 WS row, 1 RS row and 1 WS row), on next row from RS dec again and repeat the dec like this every 4th row. Happy knitting!
15.03.2016 - 09:33
![]() Agneta wrote:
Agneta wrote:
Tack för svar, men frågan kvarstår....avmaskning för armhål som på baksidan börjar ju med 2x4 maskor avmaskas = 8 sedan 2x9= 26 maskor..... Inte 18! Tacksam för hjälp!
26.05.2015 - 10:18DROPS Design answered:
Hej. Det är 4 maskor inte 8 som det börjas med till ärmhål (8 är på bakstycke där det är 4 på varje sida). Det är de 4 maskorna jag skrev om här sist: "minskar 4 maskor, ökar 4 maskor, minskar senare 4 m " Sen avmaskas ytterligare 18 m (2m x 9 ggr) för ärmhål. Lycka till!
27.05.2015 - 10:00
![]() Agneta wrote:
Agneta wrote:
Hej, jag får inte ihop antalet maskor som skall vara kvar efter avmaskning/minskning för armhål och hals på framstycket jag stickar storlek XL....tacksam för hjälp!
23.05.2015 - 19:27DROPS Design answered:
Hej. Du lägger upp 79 m från början, minskar 13 och har då 66 m. Ökning och minskning i sidan som på bakstycket: minskar 4 maskor, ökar 4 maskor, minskar senare 4 m. När M.1 har stickats 1 gång så har det ökats 9 m. Maskantal nu är 71 m. Minskning till hals: 7+6+5 m. Minskning till ärmhål: 18 m. 71-18-18= 35 m. Lycka till!
25.05.2015 - 09:51
![]() Tiny wrote:
Tiny wrote:
In het patroon gaandeweg 9 st. meerderen?? Betekent dat dat de omslagen voor die meerderingen zorgen? Dat is mij dan volstrekt onduidelijk geweest, ik heb die omslagen in de teruggaande toer weer samengebreid. Dát is balen! Betekent alles uithalen! Het zou beter zijn om in de tekst duidelijk te maken dat de omslagen voor stekenvermeerderingen dienen. Graag nog even antwoord of dit de oorzaak is, en toch bedankt voor het reageren.
31.03.2015 - 19:52DROPS Design answered:
Het is inderdaad de oorzaak, heel vervelend nu je al zo ver bent! Maar het staat er echt, de uitleg voor het rondje is: 1 omsl tussen 2 st, brei in de volgende nld de omsl achter in de st. Er staat dus nergens dat deze steek samengebreid moest worden. Succes ermee!
31.03.2015 - 20:38
![]() Tiny wrote:
Tiny wrote:
Ik ben in maat M aan het maken.
30.03.2015 - 22:28DROPS Design answered:
Hallo Tiny, ik weet niet waar je een fout hebt gemaakt, maar het patroon klopt. Je hebt na de boord in Maat M 53 st en in patroon M.1 meerder je gaandeweg 9 st = 62 st. Voor het armsgat kant je in totaal 11 st af, dus 51 st over en voor de hals minder je 5, 6 en 5 st, dus 16 - dan houd je 35 st over. Succes!
31.03.2015 - 10:01
|
||||||||||||||||||||||||||||||||||
Red Mountain#redmountaincardigan |
||||||||||||||||||||||||||||||||||
 |
 |
|||||||||||||||||||||||||||||||||
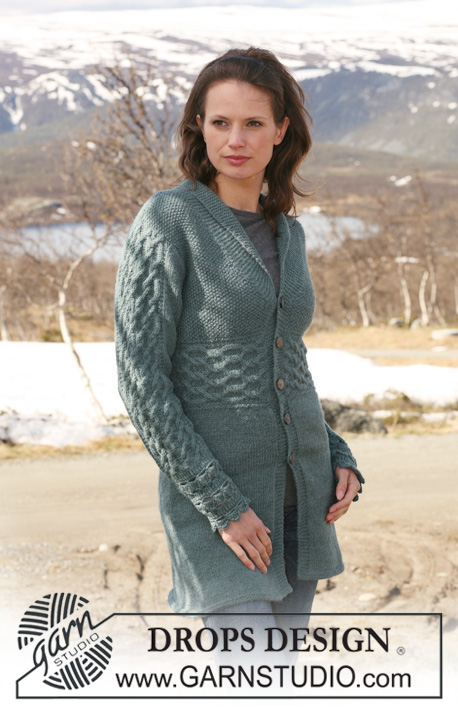
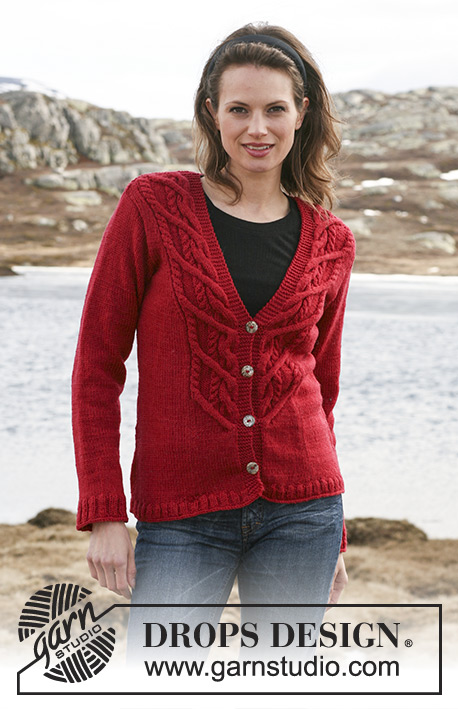
Knitted DROPS jacket with cables in ”Karisma”. Size S – XXXL.
DROPS 114-9 |
||||||||||||||||||||||||||||||||||
|
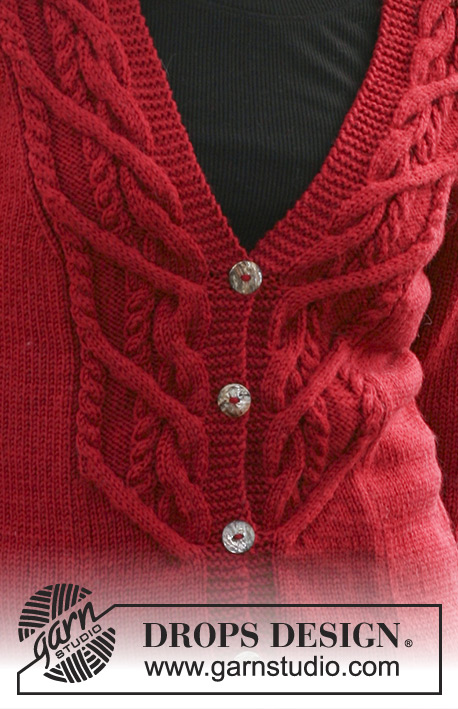
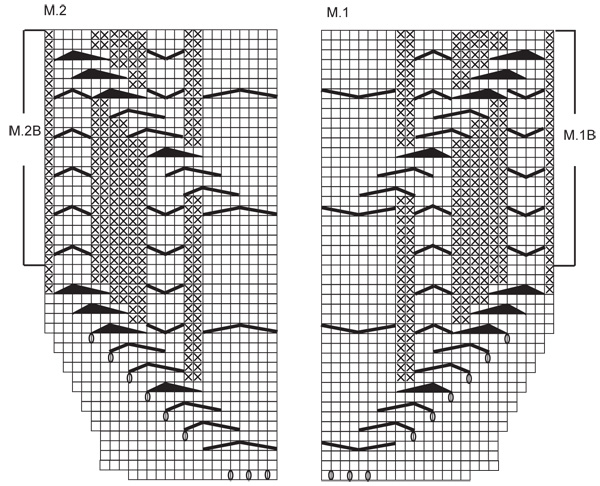
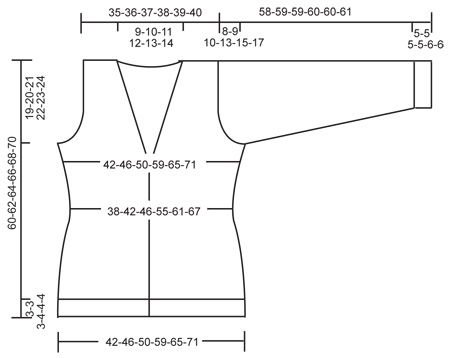
PATTERN: See diagram M.1 and M.2. Diagram shows the pattern from RS. GARTER ST (back and forth on needle): K all rows. DECREASING TIP: Dec for neck inside 6 front band sts and M.1/M.2. Make all dec from RS. Dec as follows before M.1 and 6 front band sts: work row until 2 sts before M.1, K2 tog. Dec as follows after 6 front band sts and M.2: slip 1 st as if to K, K1, psso. BUTTONHOLES: Make buttonholes on right front band. 1 buttonhole = bind off 4th st from mid front and cast on 1 new st on return row. Make buttonholes when piece measures: SIZE S: 7, 15, 23 and 31 cm / 2¾", 6", 9" and 12¼". SIZE M: 8,16,24 and 32 cm / 3⅛", 6¼", 9½" and 12½". SIZE L: 5, 12, 19, 26 and 33 cm / 2", 4¾", 7½", 10¼" and 13". SIZE XL: 6, 13, 20, 27 and 34 cm / 2⅜", 5⅛", 8", 10⅝" and 13⅜". SIZE XXL: 7, 14, 21, 28 and 35 cm / 2¾", 5½", 8¼", 11" and 13¾". SIZE XXXL: 8, 15, 22, 29 and 36 cm / 3⅛", 6", 8¾", 11⅜" and 14¼". -------------------------------------------------------- -------------------------------------------------------- BACK PIECE: Worked back and forth on needle. Cast on 100-112-120-140-156-168 sts (includes 1 edge st each side) on needle size 4 mm / US 6 with Karisma. P 1 row from WS and continue in rib as follows from RS: 1 edge st, * K2, P2 *, repeat from *-* and finish with K2 and 1 edge st. When rib measures 3-3-3-4-4-4 cm / 1⅛"-1⅛"-1⅛"-1½"-1½"-1½" change to needle size 4.5 mm / US 7. K 1 row from RS, AT THE SAME TIME dec 14-18-18-20-24-24 sts evenly = 86-94-102-120-132-144 sts. P 1 row from WS and now continue in stockinette st with 1 edge st each side. REMEMBER THE KNITTING GAUGE! When piece measures 7 cm / 2¾" dec 1 st each side, and repeat the dec on every 5 cm / 2" a total of 4 times = 78-86-94-112-124-136 sts. When piece measures 28 cm / 11" inc 1 st each side, and repeat the inc on every 3-3-4-4-4-5 cm / 1⅛"-1⅛"-1½"-1½"-1½"-2" a total of 4 times = 86-94-102-120-132-144 sts. Continue until piece measures 41-42-43-44-45-46 cm / 16⅛"-16½"-17"-17¼"-17¾"-18". Now bind off for armhole each side at the beg of every row: 4 sts 1 time, 2 sts 2-3-5-9-11-14 times and 1 st 0-1-0-0-1-0 times = 70-72-74-76-78-80 sts. Continue in stockinette st with 1 garter st each side until piece measures 56-58-60-62-64-66 cm / 22"-22¾"-23⅝"-24⅜"-25¼"-26". Now work GARTER ST – see above – on the middle 30-32-34-36-38-40 sts (with remaining sts as before). When piece measures 58-60-62-64-66-68 cm / 22¾"-23⅝"-24⅜"-25¼"-26"-26¾" bind off the middle 16-18-20-22-24-26 sts for neck and complete each shoulder separately with 7 garter sts towards neckline. Bind off 1 st on neckline on next row = 26 sts left on shoulder. Piece now measures approx 59-61-63-65-67-69 cm / 23¼"-24"-24¾"-25½"-26⅜"-27⅛". Work 4 rows garter sts on all sts and bind off loosely. LEFT FRONT PIECE: Worked back and forth on needle. Cast on 59-63-67-79-87-91 sts (includes 1 edge st at the side and 6 front band sts towards mid front) on needle size 4 mm / US 6 with Karisma. P 1 row from WS and continue in rib as follows from RS: 1 edge st, * P2, K2 *, repeat from *-* and finish with 6 front band sts in garter st. When rib measures 3-3-3-4-4-4 cm / 1⅛"-1⅛"-1⅛"-1½"-1½"-1½" change to needle size 4.5 mm / US 7. K 1 row from RS, AT THE SAME TIME dec 10-10-10-13-15-13 sts evenly (do not dec on front band) = 49-53-57-66-72-78 sts. P 1 row from WS (with front band in garter st as before) and now continue in stockinette st with 6 garter sts (front band) towards mid front and 1 edge st at the side. When piece measures 7 cm / 2¾" dec at the side as described for back piece. READ ALL OF THE FOLLOWING SECTION BEFORE CONTINUING! AT THE SAME TIME when piece measures 14-14-15-15-16-16 cm / 5½"-5½"-6"-6"-6¼"-6¼" from cast on row continue as follows starting from WS: 6 front band sts, M.1 (= 16 sts), stockinette st and end with 1 edge st. After 1 vertical repeat of M.1 complete piece in M.1B over M.1. AT THE SAME TIME when piece measures 28 cm / 11" inc at the side as described for back piece. AT THE SAME TIME when piece measures 32-33-34-35-36-37 cm / 12½"-13½"-13⅜"-13¾"-14¼"-14½" work 2 rows on front band sts only (to make the neckline neater) and then continue as before. AT THE SAME TIME when piece measures 33-34-35-36-37-38 cm / 13"-13⅜"-13¾"-14¼"-14½"-15" dec for neck inside front band + M.1 – see DECREASING TIP!: dec 1 st on every other row 4-5-6-7-8-9 times, then 1 st on every 4th row 6 times and then 1 st on every 6th row 5 times. AT THE SAME TIME when piece measures 41-42-43-44-45-46 cm / 16⅛"-16½"-17"-17¼"-17¾"-18" bind off for armhole at the side as described for back piece. When all dec for armhole and neck are complete there are 35 sts left on shoulder. Continue as before until piece measures 59-61-63-65-67-69 cm / 23¼"-24"-24¾"-25½"-26⅜"-27⅛". Now K 1 row on all sts from RS, AT THE SAME TIME dec 9 sts evenly over M.1 = 26 sts. K 1 row from WS and work 2 rows garter st on all sts. Bind off loosely. RIGHT FRONT PIECE: Like left front piece, but mirrored and work M.2 instead of M.1. Remember BUTTONHOLES – see above! SLEEVE: Worked back and forth on needle. Cast on 58-58-62-62-66-66 sts (includes 1 edge st each side) on needle size 4 mm / US 6 with Karisma. P 1 row from WS and continue in rib as follows: 1 edge st, * K2, P2 *, repeat from *-* and finish with 1 edge st. When rib measures 5-5-5-5-6-6 cm / 2"-2"-2"-2"-2⅜"-2⅜" change to needle size 4.5 mm / US 7. K 1 row from RS, AT THE SAME TIME dec 10-8-10-8-12-10 sts evenly = 48-50-52-54-54-56 sts. Continue in stockinette st with 1 edge st each side. When piece measures 9-8-8-7-8-9 cm / 3½"-3⅛"-3⅛"-2¾"-3⅛"-3½" inc 1 st each side, and repeat the inc on every 3.5-3.5-3-2.5-2-1.5 cm / 1¼"-1¼"-1⅛"-⅞"-¾"-½" a total of 11-12-14-16-18-20 times = 70-74-80-86-90-96 sts. When piece measures 50-50-49-47-45-44 cm / 19¾"-19¾"-19¼"-18½"-17¾"-17¼" (less for the larger sizes because of longer sleeve cap and wider shoulder) bind off for sleeve cap each side at the beg of every row: 4 sts 1 time, 2 sts 4-4-4-3-3-2 times and 1 st 1-3-3-9-12-16 times, then 2 sts each side until piece measures 57-58-58-59-59-60 cm / 22½"-22¾"-22¾"-23¼"-23¼"-23⅝", now bind off 4 sts each side 1 time and bind off remaining sts. Piece measures approx 58-59-59-60-60-61 cm / 22¾"-23¼"-23¼"-23⅝"-23⅝"-24". ASSEMBLY: Sew shoulder seams. Set in sleeves. Sew sleeve and side seams inside 1 edge st. Sew on buttons. |
||||||||||||||||||||||||||||||||||
Diagram explanations |
||||||||||||||||||||||||||||||||||
|
||||||||||||||||||||||||||||||||||
 |
||||||||||||||||||||||||||||||||||
 |
||||||||||||||||||||||||||||||||||
Have you finished this pattern?Tag your pictures with #dropspattern #redmountaincardigan or submit them to the #dropsfan gallery. Do you need help with this pattern?You'll find 16 tutorial videos, a Comments/Questions area and more by visiting the pattern on garnstudio.com. © 1982-2026 DROPS Design A/S. We reserve all rights. This document, including all its sub-sections, has copyrights. Read more about what you can do with our patterns at the bottom of each pattern on our site. |
||||||||||||||||||||||||||||||||||


With over 40 years in knitting and crochet design, DROPS Design offers one of the most extensive collections of free patterns on the internet - translated to 17 languages. As of today we count 325 catalogs and 12298 patterns - 12288 of which are translated into English (US/in).
We work hard to bring you the best knitting and crochet have to offer, inspiration and advice as well as great quality yarns at incredible prices! Would you like to use our patterns for other than personal use? You can read what you are allowed to do in the Copyright text at the bottom of all our patterns. Happy crafting!
Post a comment to pattern DROPS 114-9
We would love to hear what you have to say about this pattern!
If you want to leave a question, please make sure you select the correct category in the form below, to speed up the answering process. Required fields are marked *.