
Popular categories
Looking for a yarn?


Comments / Questions (120)
![]() Marja wrote:
Marja wrote:
Hei! Miten yhdistän siististi aina oikein - neuleella neulotut kappaleet? Löytyykö siihen ohjevideo?
26.02.2021 - 23:11
![]() Janie wrote:
Janie wrote:
Puis je remplacer le point mousse par le jersey endroit ?
22.01.2020 - 14:02DROPS Design answered:
Bonjour Janie, l'effet serait totalement différent. Pour tout assistance pour l'adaptation d'un modèle, merci de bien vouloir contacter votre magasin DROPS, même par mail ou téléphone. Bon tricot!
22.01.2020 - 15:37
![]() Danielle Douchet wrote:
Danielle Douchet wrote:
Bonjour Pouvez vous me ramener ce modele que je tricote en - 5- et 5 1/2 se fera en nid d'abeilles et ensuite en vraie cotes anglaises je vous remercie
20.01.2020 - 18:47DROPS Design answered:
Bonjour Mme Douchet, nous ne sommes malheureusement pas en mesure de pouvoir adapter chacun de nos modèles à chaque demande. Pour toute assistance personnalisée, merci de bien vouloir contacter votre magasin (même par mail ou téléphone) ou bien un forum de tricot. Bon tricot!
21.01.2020 - 09:22
![]() Martina wrote:
Martina wrote:
Hallo 👋, ich würde die Jacke gerne ein wenig länger stricken wollen. Sie hätte in meiner Größe 62cm, würde sie gerne ca. 70cm haben wollen. Wie mache ich das am besten? Gruß Martina
01.11.2019 - 11:14DROPS Design answered:
Liebe Martina, leider können wir nicht jede Anleitung nach jeder Anfrage anpassen, gerne wird Ihnen aber Ihr DROPS Laden damit weiterhelfen, auch telefonisch oder per E-Mail. Viel Spaß beim stricken!
04.11.2019 - 14:58
![]() Francoise wrote:
Francoise wrote:
Comment fait on pour avoir une version francaise. Merci à vous.
31.08.2019 - 10:51DROPS Design answered:
Bonjour Françoise, cliquez sur le menu déroulant sous la photo et choisissez "français". Bon tricot!
02.09.2019 - 09:26
![]() Line wrote:
Line wrote:
J'apprécie énormement et j'adore votre site pour le modèle numéro 112-40 quelles longueur d'aiguilles circulaires me conseillez vous pour la bordure afin de relever les 375 mailles don't j'ai besoin Merci et au plaisir Line
23.08.2019 - 21:43DROPS Design answered:
Bonjour Line, si vous n'avez qu'une 80 cm, elle devrait faire l'affaire, si vous en avez une plus longue, vous pouvez l'utiliser. Bon tricot!
26.08.2019 - 08:34
![]() Line wrote:
Line wrote:
Bonjour, au moment des diminutions de l'emmanchure, pour le small dois-je tricoter le rang sans diminution (0 fois 2 mailles ) donc 2 rangs ou sauter cette étape et poursuivre avec (1 fois 1 diminution) sur 2 rangs ? Merci
03.08.2019 - 19:13
![]() Line wrote:
Line wrote:
Bonjour, au moment des diminutions de l'emmanchure, pour le small dois-je tricoter le rang sans diminution (0 fois 2 mailles ) donc 2 rangs ou sauter cette étape et poursuivre avec (1 fois 1 diminution) sur 2 rangs ? Merci
03.08.2019 - 18:55DROPS Design answered:
Bonjour Line. Pour la taille S, vous sautez l’indication 0 fois 2 mailles et poursuivez avec 1 fois 1 diminution. Bon tricot!
03.08.2019 - 19:22
![]() Schuebeler-trippel wrote:
Schuebeler-trippel wrote:
Ich habe mir eine Jacke gestrickt.Kann nur nicht die Blende schricken.
26.02.2019 - 10:20
![]() Ellen wrote:
Ellen wrote:
Hei! Har tenkt å strikke denne Big Merino. Kva pinnestørrelde må eg bruke få? Og må egge ned ein størrelse?
18.01.2019 - 20:00DROPS Design answered:
Hei Ellen. Det som avgjør hvilke garn du bytte ut det oppgitte garnet med er strikkefastheten. Denne jakken har en strikkefasthet på 21 m x 42 p rillestrikk = 10 x 10 cm, og er derfor strikket i garn fra garngruppe B. Big Merino tilhører garngruppe C og har derfor en annen strikkefasthet. Det vil bli vanskelig å bytte til Big Merino, da dette garnet nok er for tykt uansett hvilke pinner du bruker. Du kan selvfølgelig lage en prøvelapp å se om du får den angitte strikkefastheten. Om du strikker med feil strikkefasthet vil målene på plagget bli annerledes enn angitt. God fornøyelse
21.01.2019 - 10:13
|
|
Jamie#jamiecardigan |
|
|
|
|
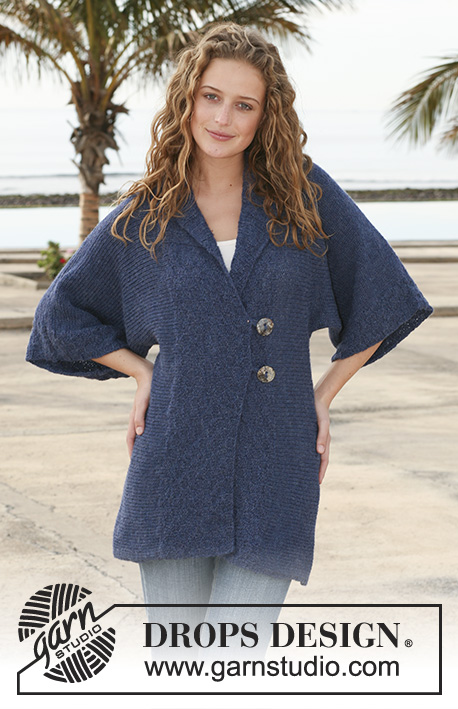
Knitted DROPS Jacket with rib in ”Merino Extra Fine”. Size S - XXXL.
DROPS 112-40 |
|
|
GARTER ST (back and forth on needle): K all rows. BUTTONHOLES: Make buttonholes on right front band. 1 buttonhole: K2 tog and cast on 1 new st on return row. Make buttonholes when piece measures 12, 20 and 28 cm / 4¾", 8" and 11", measured from bottom edge, for all sizes. --------------------------------------------------------- BACK PIECE: Worked back and forth on needle. Cast on 130-142-154-168-184-200 sts (includes 1 edge st each side) on needle size 4 mm / US 6 with Merino. P 1 row from WS and continue in rib, K1-P1, with 1 edge st each side in garter st. REMEMBER THE KNITTING GAUGE. When piece measures 5 cm / 2" dec 1 st each side on every 3 cm / 1⅛" a total of 8 times = 114-126-138-152-168-184 sts. When piece measures 28 cm / 11" continue in garter st – see above. AT THE SAME TIME on first row dec 28-32-34-36-42-46 sts evenly = 86-94-104-116-126-138 sts. When piece measures 40-41-42-43-44-45 cm / 15¾"-16⅛"-16½"-17"-17¼"-17¾" bind off for armhole each side at the beg of every row: 3 sts 1 time, 2 sts 0-1-3-4-6-8 times and 1 st 1-2-2-5-5-6 times = 78-80-82-84-86-88 sts. When piece measures 58-60-62-64-66-68 cm / 22¾"-23⅝"-24⅜"-25¼"-26"-26¾" bind off the middle 16-18-20-22-24-26 sts for neck and complete each shoulder separately. Bind off 1 st on neckline on next row = 30-30-30-30-30-30 sts left on shoulder. Bind off when piece measures 60-62-64-66-68-70 cm / 23⅝"-24⅜"-25¼"-26"-26¾"-27½". RIGHT FRONT PIECE: Cast on 66-72-78-85-93-101 sts (includes 1 edge st at the side and 1 edge st towards mid front) on needle size 4 mm / US 6 with Merino. P 1 row from WS and continue in rib, K1/P1, with 1 edge st each side in garter st. When piece measures 5 cm / 2" dec at the side as described for back piece = 58-64-70-77-85-93 sts. When piece measures 28 cm / 11" continue in garter st, AT THE SAME TIME dec 14-16-17-18-21-23 sts evenly on first row = 44-48-53-59-64-70 sts. When piece measures 35-36-37-38-39-40 cm / 13¾"-14¼"-14½"-15"-15¼"-15¾" bind off to shape the neckline at the beg of row from mid front: 1 st on every 2 cm / ¾" a total of 9-10-11-12-13-14 times. AT THE SAME TIME when piece measures 40-41-42-43-44-45 cm / 15¾"-16⅛"-16½"-17"-17¼"-17¾" bind off for armhole at the side as described for back piece. When all dec are complete there are 31-31-31-31-31-31 sts left on shoulder (incl 1 edge st towards mid front). Bind off when piece measures 60-62-64-66-68-70 cm / 23⅝"-24⅜"-25¼"-26"-26¾"-27½". LEFT FRONT PIECE: Like right front piece, but mirrored. SLEEVE: Worked back and forth on needle. Cast on 66-70-72-74-78-80 sts (includes 1 edge st each side) on needle size 4 mm / US 6 with Merino. Work rib, K1/P1, with 1 edge st each side. When piece measures 8 cm / 3⅛" continue in garter st, AT THE SAME TIME dec 16-18-18-18-20-20 sts evenly on first row = 50-52-54-56-58-60 sts. Now inc 1 st each side, and repeat the inc on every 3.5-2.5-2.5-2-2-1.5 cm / 1¼"-⅞"-⅞"-¾"-¾"-½" a total of 12-14-16-18-19-21 times = 74-80-86-92-96-102 sts. When piece measures 49-48-48-47-46-44 cm / 19¼"-19"-19"-18½"-18"-17¼" – less for the larger sizes because of longer sleeve cap and wider shoulder – bind off for sleeve cap each side at the beg of every row: 3 sts 1 time, 2 sts 4-4-5-5-5-5 times, 1 st 0-1-1-2-5-8 times, then 2 sts each side until piece measures 55-55-56-56-57-57 cm / 21⅝"-21⅝"-22"-22"-22½"-22½", bind off 3 sts each side and bind off remaining sts. Piece measures approx 56-56-57-57-58-58 cm / 22"-22"-22½"-22½"-22¾"-22¾". ASSEMBLY: Sew shoulder seams. Set in sleeves. Sew side and sleeve seams inside 1 edge st. FRONT BANDS: Pick up 375-391-405-421-435-451 sts inside 1 edge st along right front piece, round neckline and down along left front piece. K 1 row from WS and continue as follows: 5 garter sts, rib K1/P1 and finish with K1 and 5 garter sts. When piece measures 3 cm / 1⅛" make BUTTONHOLE on right front band – see above. When piece measures 5 cm / 2" slip 98-101-104-107-110-113 sts each side (= towards bottom edge) on a stitch holder and continue on remaining sts for collar. AT THE SAME TIME slip 6 sts on the stitch holder each side at the end of every row a total of 8-8-8-9-9-9 times = 146-149-152-161-164-167 sts on stitch holder each side. Rib now measures approx 10-10-10-11-11-11 cm / 4"-4"-4"-4⅜"-4⅜"-4⅜" where widest. Slip all sts from stitch holders back on needle and work 1 row rib as before on all sts. Bind off in rib. Sew buttons on left front piece to fit buttonholes. |
|
 |
|
Have you finished this pattern?Tag your pictures with #dropspattern #jamiecardigan or submit them to the #dropsfan gallery. Do you need help with this pattern?You'll find 16 tutorial videos, a Comments/Questions area and more by visiting the pattern on garnstudio.com. © 1982-2026 DROPS Design A/S. We reserve all rights. This document, including all its sub-sections, has copyrights. Read more about what you can do with our patterns at the bottom of each pattern on our site. |


With over 40 years in knitting and crochet design, DROPS Design offers one of the most extensive collections of free patterns on the internet - translated to 17 languages. As of today we count 324 catalogs and 12290 patterns - 12280 of which are translated into English (US/in).
We work hard to bring you the best knitting and crochet have to offer, inspiration and advice as well as great quality yarns at incredible prices! Would you like to use our patterns for other than personal use? You can read what you are allowed to do in the Copyright text at the bottom of all our patterns. Happy crafting!
Post a comment to pattern DROPS 112-40
We would love to hear what you have to say about this pattern!
If you want to leave a question, please make sure you select the correct category in the form below, to speed up the answering process. Required fields are marked *.