
Popular categories
Looking for a yarn?


Comments / Questions (58)
![]() Dani wrote:
Dani wrote:
Bei mir gibt es einen Schlauch. Stimmt das? Habe die Beschreibung auf deutsch und franzoesisch gelesen.
12.12.2013 - 09:23DROPS Design answered:
Liebe Dani, ja der Schuh ist zunächst ein Schlauch - bis zu der Stelle, an der mit Hin-und Rück-R begonnen wird (in der Anleitung unter "Ferse" beschrieben - man braucht oben die Öffnung zum reinschlüpfen.
13.12.2013 - 10:08
![]() Jess wrote:
Jess wrote:
Is there a way to get it in a knitting pattern?!?!
11.12.2013 - 00:28DROPS Design answered:
Dear Jess, I'm sorry this pattern is only available in a crochet pattern, but to help you to start crochet, you'll find all matching videos under tab "videos" at the right side of the picture. Just have a look and what about learning crochet ? Happy crocheting!
11.12.2013 - 09:27
![]() Plet wrote:
Plet wrote:
Oh désolé j'ai compris, mais pas pour les mailles coulées au dos du chausson merci pour vos conseils marieco
10.12.2013 - 23:44
![]() Miriam wrote:
Miriam wrote:
Hola, estoy haciendo este patrón y la estimación de ovillos está mal, de rojo se necesita más de la que pone. gracias
05.12.2013 - 12:16DROPS Design answered:
Hola Miriam. En principio la estimación de ovillos está correcta, a lo mejor en las tallas grandes un poco justa y en caso de que la tensión del tejido sea mas floja de lo indicada puede quedar escasa. En todos casos pasaré tu comentario al departamento de diseño.
06.12.2013 - 21:04
![]() Miriam wrote:
Miriam wrote:
Hola, escribo porque tengo una duda sobre el ptrón. No entiendo la parte del talón. No se cómo seguir. Si me podeis ayudar, o explicarmelo mejor os lo agradezco. Gracias!
04.12.2013 - 18:34DROPS Design answered:
Hola Miriam. Cuando has terminado con la parte de la punta de la zapatilla, comenzamos con la parte del talón. Marcamos el centro del empeine con un marcapuntos (MP). Como tienes el cambio de hilo en la part de la planta del pie, comenzamos a trabajar hasta el MP, giramos y trabajamos toda la fila hasta el otro lado del MP, giramos y continuamos trabajando de ida y vta hasta finalizar las medidas.
06.12.2013 - 21:12
![]() Evangelinedyy wrote:
Evangelinedyy wrote:
ÿþ[
04.12.2013 - 10:07
![]() Britt Kubberød wrote:
Britt Kubberød wrote:
Hvorfor skal arbeide deles når man starter med rødt?
01.12.2013 - 13:18DROPS Design answered:
Hei Britt. Det er rigtigt som der staar i opskriften. Når man begynner med rødt og hekler frem og tilbake er dette FOT, og når man har heklet hele foten og heklet sammen i hæl, begynner man på nytt og hekler SKAFTET rundt, derfor ser det ut som om at man ikke skal dele arbeidet ved rødt.
05.12.2013 - 09:58
![]() Debbie wrote:
Debbie wrote:
I love these slippers, but I'm having trouble with the instuctions for the heel. I dont understand AT THE SAME TIME part. could you please help me with this issue?
30.11.2013 - 05:27DROPS Design answered:
Dear Debbie, when piece measures 7-14 cm (see size), you won't work any more in rounds, you continue back and forth with red, ie work first row in red, but at the end of row, don't join, turn and work 1 row from WS until beg of row, and continue this way, back and forth on all sts until 15-28 cm. Happy crocheting!
30.11.2013 - 10:14
![]() Annabelleuxl wrote:
Annabelleuxl wrote:
ÿþ[
25.11.2013 - 14:29
![]() Irene Frydkjær wrote:
Irene Frydkjær wrote:
Ang. mit spørgsmål om skaftet. der skulle stå: om det virkeligt kunne passe at man ikke skal have flere fm i voksen end i børne størrelserne
30.10.2013 - 10:13DROPS Design answered:
Jo men opskriften stemmer, så bare følg din størrelse! God fornøjelse!
30.10.2013 - 10:21
|
|
Sneaky Santa#sneakysantaslippers |
|
|
|
|
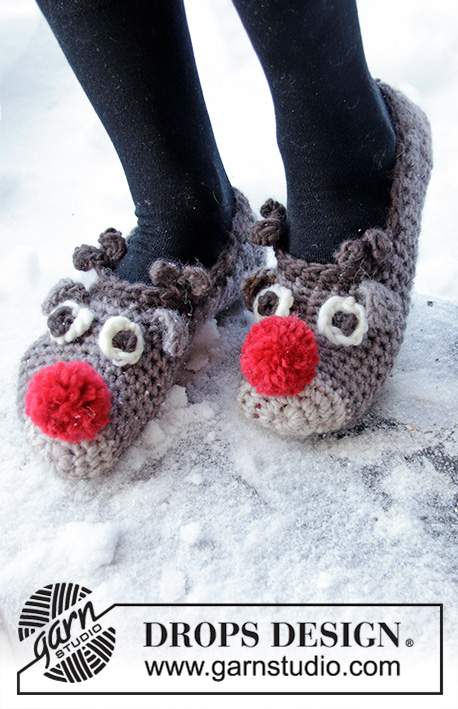
Crochet slippers for baby, children and women in DROPS Snow. Slippers are worked as Santa Claus slippers with eyes, nose and pompoms. Size 4½ - 12. Theme: Christmas
DROPS Extra 0-523 |
|
|
CROCHET INFO: Replace first sc at beg of round/row with 1 ch. Finish each round/row with 1 sl st in ch from beg of round/from beg of previous row. -------------------------------------------------------- -------------------------------------------------------- FOOT: Beg by the toes and crochet with off-white and crochet hook size 7 (8) mm. ROUND 1: Ch 3 and form a ring with 1 sl st in first ch. ROUND 2: Crochet 4-4-5-5 (5-5-6) sc in ring – See CROCHET INFO above! ROUND 3: 2 sc in each sc = 8-8-10-10 (10-10-12) sc. ROUND 4: * 1 sc in first sc, 2 sc in next sc *, repeat from *-* = 12-12-15-15 (15-15-18) sc. ROUND 5-6: 1 sc in each sc. ROUND 7 (this round only applies to size woman 5-12 (EU 35-44)): 1 sc in each sc. ROUND 7 (8): * 1 sc in each of the first 2 sc, 2 sc in next sc *, repeat from *-* = 16-16-20-20 (20-20-24) sc. Continue with 1 sc in each sc. REMEMBER THE CROCHET GAUGE! When piece measures 5-5-6-7 (7-8-10) cm / 2"-2"-2⅜"-2¾" (2¾"-3⅛"-4") change to tan and continue until piece measures 7-8-9-10 (10-12-14) cm / 2¾"-3⅛"-3½"-4"- (4"-4¾"-5½"). HEEL: Change to red, AT THE SAME TIME divide piece and crochet back and forth from mid upper foot – remember CROCHET INFO! When slipper measures 15-17-19-21 (23-25-28) cm / 6"-6¾"-7½"-8¼" (9"-9¾"-11") place it flat and crochet tog mid back with a row of sl sts through both layers. Cut and fasten thread. LEG: Crochet 1 round sc with red round the opening (beg mid front) = approx 22-26-28-30 (26-28-30) sc. Continue in the round with 1 sc in each sc until leg measures approx 3-3-4-4 (5-5-6) cm / 1⅛"-1⅛"-1½"-1½" (2"-2"-2⅜"). Now continue back and forth on only half the sts - i.e. from mid front to mid back - crochet sc, AT THE SAME TIME dec to create a point as follows: * turn with 1 ch, skip first sc and crochet 1 sc in each sc until 1 sc remain *, repeat from *-* until 2 sts remain, cut and fasten thread. ASSEMBLY: Make a small off-white pompom with a diameter of approx 2-2-2-2 (3-3-3) cm / ¾"-¾"-¾"-¾" (1⅛"-1⅛"-1⅛") and attach to the top of the point on leg (= top of Santa’s hat). Fold leg down towards RS. Make another pompom in red and sew it to mid upper foot in the transition between off-white and tan = Santa’s nose. Sew a few black sts above the nose for eyes. Crochet the other slipper in the same way, but when making Santa’s hat crochet on the opposite side of slipper, i.e. crochet from mid back to mid front in order to have the hat at the other side. |
|
Have you finished this pattern?Tag your pictures with #dropspattern #sneakysantaslippers or submit them to the #dropsfan gallery. Do you need help with this pattern?You'll find 10 tutorial videos, a Comments/Questions area and more by visiting the pattern on garnstudio.com. © 1982-2026 DROPS Design A/S. We reserve all rights. This document, including all its sub-sections, has copyrights. Read more about what you can do with our patterns at the bottom of each pattern on our site. |


With over 40 years in knitting and crochet design, DROPS Design offers one of the most extensive collections of free patterns on the internet - translated to 17 languages. As of today we count 325 catalogs and 12298 patterns - 12288 of which are translated into English (US/in).
We work hard to bring you the best knitting and crochet have to offer, inspiration and advice as well as great quality yarns at incredible prices! Would you like to use our patterns for other than personal use? You can read what you are allowed to do in the Copyright text at the bottom of all our patterns. Happy crafting!
Post a comment to pattern DROPS Extra 0-523
We would love to hear what you have to say about this pattern!
If you want to leave a question, please make sure you select the correct category in the form below, to speed up the answering process. Required fields are marked *.