
Popular categories
Looking for a yarn?


Comments / Questions (5)
![]() VU wrote:
VU wrote:
Que dois-je remplir dans project URL\\r\\nMerci
30.10.2024 - 10:40DROPS Design answered:
Bonjour Mme Vu, indiquez l'adresse internet (commençant par https://) de votre photo publiée sur votre blog, site, Facebook, Ravelry etc...
30.10.2024 - 16:35
![]() VU wrote:
VU wrote:
Je voudrais vous envoyer la photo de l’ouvrage que j’ai terminé. Pourriez-vous m’indiquer comment je dois faire. Merci.
29.10.2024 - 13:17DROPS Design answered:
Bonjour Mme Vu, découvrez ici comment partager les photos de vos ouvrages avec nous. Merci d'avance!
29.10.2024 - 17:29
![]() Tinca Postema wrote:
Tinca Postema wrote:
Ik heb 3 vragen: 1 - voorpand: bij 22 cm hoogte mid. 12 steken afkanten voor hals. Doorgaan met patroon met meerderen aan 2 kanten=elke 4 naalden 4 steken meerderen. Voor de halslijn elke 2 naalden 2 steken afkanten. Dus per 4 naalden 4 meerderen en 4 minderen: aantal steken blijft dus gelijk en komt nooit op 20. Wat wordt er precies bedoeld? 2 - En wat wordt er bedoeld met afkanten bij een hoogte van 50 cm? 3 - waarom bij voorpand hals afkanten bij 22 cm en bij rugpand bij 28 cm?
27.11.2021 - 22:20DROPS Design answered:
Dag Tinca,
Aan de zijkanten, dus bij de schouders ga je, na het afkanten van de middelste steken op het voorpand voor de hals, door met het meerderen van steken op dezelfde wijze als je gewend was. Voor de halslijn, kant je daarnaast 2 keer 2 steken af en als je dat gedaan hebt, kant je niet meer af voor de hals, maar brei je door tot je 20 steken hebt. De hals aan de voorkant is lager dan achter, voor een betere pasvorm, vandaar dat je bij het rugpand pas op 28 cm afkant voor de hals.
01.12.2021 - 12:35
![]() Annie wrote:
Annie wrote:
Bonjour! J'aime beaucoup ce mini-poncho. Pouvez-vous me donner plus de détails pour les diminutions de l'encolure? Car pour obtenir 20 mailles pour chaque épaule tout en respectant les augmentations du point de fantaisie, il me semble que les diminutions pour l'encolure ne seront pas suffisantes... À moins que je n'ai pas bien compris l'explication. Merci à l'avance pour votre aide.
15.11.2021 - 20:51DROPS Design answered:
Bonjour Annie, lorsque vous rabattez les mailles de l'encolure, vous avez normalement 24 mailles pour chaque épaule, vous allez continuer encore pendant 8 rangs en rabattant 2 x 2 mailles côté encolure et vous allez encore augmenter 4 x 4 mailles sur le côté = il reste 20 mailles pour l'épaule. Vous devriez ensuite avoir le bon nombre de mailles pour l'encolure, ajustez le nombre au 1er tour si besoin. Bon tricot!
16.11.2021 - 09:05
![]() Flo wrote:
Flo wrote:
Dans le joli modèle 93 4 au rang 4 il faut augmenter de 4 m au lieu de 3m merci
27.12.2012 - 16:51
|
|||||||||||||
DROPS 93-4 |
|||||||||||||
|
|
|||||||||||||
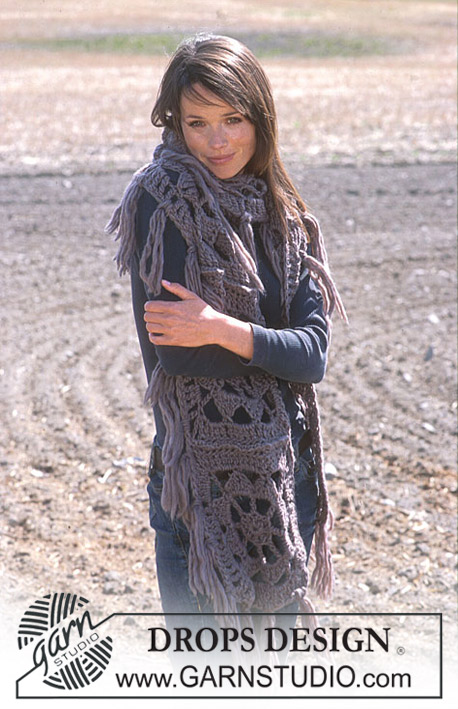
Blackberry stitch Mini-Poncho in Snow
DROPS 93-4 |
|||||||||||||
|
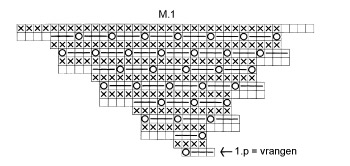
Gauge: 12 sts x 10 rows in Blackberry stitch = approx. 10 x 10 cm. Pattern: See the chart for Model No. 4 on page 11 of Drops No. 93. The 1st row of chart is knit from the wrong side. Rib: * K 3, P 3 *, repeat * - *. Front: Cast on 4 sts and knit as follows: 1st row (= wrong side) – following the chart: P 3 tog, knit 3 sts in 1 st as follows: K 1, P 1, K 1. Row 2 (= right side): P all sts Row 3 (= wrong side): knit 3 sts in 1st st as follows: K 1, P 1, K 1, then P 3 tog, cast on 4 new sts at end of row. Row 4: Turn piece and P back, cast on 4 new sts at end of row, turn piece = 12 sts. Row 5: * P 3 tog, knit 3 sts in 1 st as follows: K 1, P 1, K 1 *, repeat * - * across row, turn piece and P back. Row 7: * knit 3 sts in 1 st as follows: K 1, P 1, K 1, then P 3 tog *, repeat * - * across row and cast on 4 new sts at end of row. Row 8: Turn piece and P back, then cast on 4 new sts at end of row, turn piece = 20 sts. Repeat Rows 5 through 8 or continue following Pattern 1 chart. When the piece measures approx. 22 cm bind off the center 12 sts for the neck – bind off only on P rows. Continue the pattern as before with new sts at each side as before. At the same time bind off 2 sts at each neck edge every other row 2 times – any sts that do not fit into the pattern at neck edge should be K from wrong side and P from right side. When the piece measures approx. 50 cm wide (there should be approx. 20 sts on each shoulder and piece should measure approx. 30 cm vertically from shoulder to point at center front), bind off all sts loosely on a right side row (P sts). Back: Knit the same as the front until the piece measures approx. 28 cm from point at center back. Now bind off the center 20 sts for the neck. Continue the pattern as before until there are 20 sts on each shoulder and piece is the same measurement as front, bind off as on front. Assembly: Sew right shoulder. Collar: Pick up approx. 42 - 48 sts (divisible by 6) around the neck. K 2 rows (1st row = wrong side). Then knit rib – see instructions above. When the piece measures 6 cm inc 4 of the P 3 ribs to P 4 (as seen from the right side) = approx. 46 - 52 sts. When the collar measures approx. 12 - 14 cm bind off all sts loosely in rib. Sew left shoulder and up along the collar – sew in the outermost sts so seam will not be thick. |
|||||||||||||
Diagram explanations |
|||||||||||||
|
|||||||||||||
 |
|||||||||||||
Have you finished this pattern?Tag your pictures with #dropspattern or submit them to the #dropsfan gallery. Do you need help with this pattern?You'll find 15 tutorial videos, a Comments/Questions area and more by visiting the pattern on garnstudio.com. © 1982-2026 DROPS Design A/S. We reserve all rights. This document, including all its sub-sections, has copyrights. Read more about what you can do with our patterns at the bottom of each pattern on our site. |
|||||||||||||


With over 40 years in knitting and crochet design, DROPS Design offers one of the most extensive collections of free patterns on the internet - translated to 17 languages. As of today we count 324 catalogs and 12290 patterns - 12280 of which are translated into English (US/in).
We work hard to bring you the best knitting and crochet have to offer, inspiration and advice as well as great quality yarns at incredible prices! Would you like to use our patterns for other than personal use? You can read what you are allowed to do in the Copyright text at the bottom of all our patterns. Happy crafting!
Post a comment to pattern DROPS 93-4
We would love to hear what you have to say about this pattern!
If you want to leave a question, please make sure you select the correct category in the form below, to speed up the answering process. Required fields are marked *.