
Popular categories
Looking for a yarn?


Comments / Questions (20)
![]() Lola wrote:
Lola wrote:
Bonjour, Je vois que je ne suis pas la seule à qui les augm. à 13+23cm posent problème. Je me considère comme expérimentée. J'ai essayé des dizaines de fois et abîmé une pelote. Selon comment on comprend vos explications, cela ressemble à un éventail, ou alors il y a des trous. Je pourrais "bricoler", mais ce n'est pas satisfaisant... Pourriez-vous faire une explication détaillée, pas à pas, comme d'habitude? Ou une video? Merci!
11.11.2025 - 11:19DROPS Design answered:
Bonjour Lola, vous allez augmenter à chaque fois 1 seul arceau: dans la 1ère maille en début de rang, crochetez (3 ml = 1ère bride) + 4 mailles en l'air (= 1er arceau= augmentation), puis encore 1 bride dans cette même maille = vous avez augmenté 1 arceau en début de rang; à la fin du rang, dans la 4ème maille en l'air du début du rang précédent, crochetez: (1 bride, 4 mailles en l'air, 1 bride) = vous avez augmenté 1 arceau. Répétez à 23 cm, vous aurez le 1er rang du Diag.1 - toutes les tailles = 2 arceaux en plus de chaque côté, soit 3 brides (celle du bord + les 2 augmentations) (sans les groupes de brides). Bon crochet!
11.11.2025 - 16:56
![]() Adèle wrote:
Adèle wrote:
When the piece measures 13 and 23 cm inc 1 ch-loop at each side by crocheting 1 extra ch-loop in the outermost ch-loop at each side (1 ch-loop = 1 dc + ch 4 – at start of row replace 1 dc with ch 3). Greetings. I have just started this project. What does it mean "when piece measures 13 and 23 cm"? Thank you.
20.09.2025 - 20:51DROPS Design answered:
Dear Adèle, it means that you increase once when the piece measures 13cm, then continue working and repeat the increase when the piece measures 23cm. Happy crochetting!
06.10.2025 - 00:27
![]() Pimms wrote:
Pimms wrote:
Ack! The below was meant to be marked as a question. I’m stuck. Here it is again: What exactly is the purpose of diagram no 3 on the sleeves? Why not just do the increases?And why repeat twice—does that mean four rows essentially? I can’t wrap my mind around it…it just makes the sleeve have a strangely inconsistent middle bit in it as far as I can tell? Thanks!
27.05.2025 - 05:18DROPS Design answered:
Dear Pimms, that's the pattern that is shown for the cuffs of the sleeve; you can see that the pattern is slightly different at the cuffs. So you work those 4 rows for a slightly tighter looking cuff than the rest of the sleeve. Happy crochetting!
31.05.2025 - 23:50
![]() Pimms wrote:
Pimms wrote:
What exactly is the purpose of diagram no 3 on the sleeves? Why not just do the increases?And why repeat twice—does that mean four rows essentially? I can’t wrap my mind around it…it just makes the sleeve have a strangely inconsistent middle bit in it as far as I can tell?
27.05.2025 - 05:16
![]() Anne Rylands wrote:
Anne Rylands wrote:
Do you recommend blocking the pieces before joining them, or do you think it unnecessary on this pattern?
19.05.2025 - 16:52DROPS Design answered:
Dear Mrs Rylands, some crocheters block everything some other never, so it might be just a matter of personal choice; do not hesitate to ask you Yarn store, they will be able to assist you if needed, even per mail or telephone. Happy crocheting!
20.05.2025 - 08:56
![]() Felice Meeuwesen wrote:
Felice Meeuwesen wrote:
Ik zou het handig vinden als er een duidelijker omschrijving van het proeflapje kwam. Ik ben al 3x opnieuw begonnen.
15.12.2024 - 12:52
![]() Remei wrote:
Remei wrote:
Cuando pone rematar para sisa se tiene que cerrar puntos o hacer 1pa 4cad1pa como diagrama 1?
15.03.2023 - 08:42DROPS Design answered:
Hola Remei, cuando trabajas a punto normalmente se cierran puntos, pero a ganchillo normalmente se saltan puntos cuando se rematan o trabajas puntos enanos sobre ellos. En este caso, tienes que trabajar el diagrama 1, en donde tienes 4 o 3 arcos (dependiendo de la talla) de los que se saltan 2 o 1 (dependiendo de la talla).
19.03.2023 - 23:02
![]() Remei wrote:
Remei wrote:
No entiendo el diagrama 1, cuando poneis rematar la labor para sisa normalmente se cierran puntos y en este diagrama es como si se hiciera 1pa 4cad 1pa x dos filas y después se continúa con el dibujo, es así?
15.03.2023 - 08:30DROPS Design answered:
Hola Remei, cuando trabajas a punto normalmente se cierran puntos, pero a ganchillo normalmente se saltan puntos cuando se rematan o trabajas puntos enanos sobre ellos. En este caso, tienes que trabajar el diagrama 1, en donde tienes 4 o 3 arcos (dependiendo de la talla) de los que se saltan 2 o 1 (dependiendo de la talla).
19.03.2023 - 23:02
![]() Penny wrote:
Penny wrote:
The increases on the back are done at 13 and 23 cm, but on the from at 8 and 18. Is this correct?
15.02.2023 - 00:42DROPS Design answered:
Dear Penny, yes that's correct, that way, the increases on the sides will be smoother when pieces are sewn together. Happy crocheting!
15.02.2023 - 10:04
![]() Anna wrote:
Anna wrote:
Snälla hjälp 😥 Okej baksida stl s Börjar med 11 grupper Ökar med två = 13 Och sedan minskar med tre på var sida, men ska vara 11 kvar? Jag vet inte var jag feltolkar 😢
14.04.2020 - 00:15DROPS Design answered:
Hei Anna. Du har 11-12-13-15-17 st-grupper (avhengig av hvilken størrelse du hekler). Når arbeidet måler 13 cm økes det 1 lm-bue i hver side = 13-14-15-17-19 st-grupper, når arbeidet måler 23 cm økes det 1 lm-bue i hver side = 15-16-17-19-21 st-grupper. Du har nå økt 2 ganger i hver side. Når arbeidet måler 35-36-37-38-39 cm felles det til ermhull i hver side etter Diag.1 = 9-10-11-11-13 st-grupper tilbake. God Fornøyelse!
17.04.2020 - 14:26
|
||||||||||
Fresh Air |
||||||||||
|
|
||||||||||
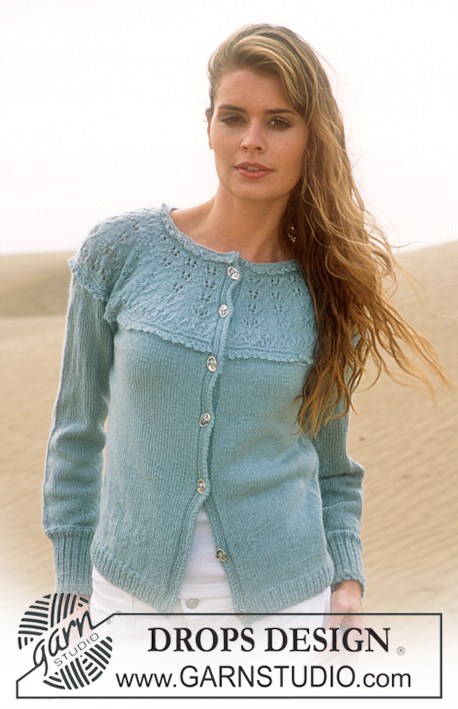
DROPS Crocheted cardigan in Safran
DROPS 88-19 |
||||||||||
|
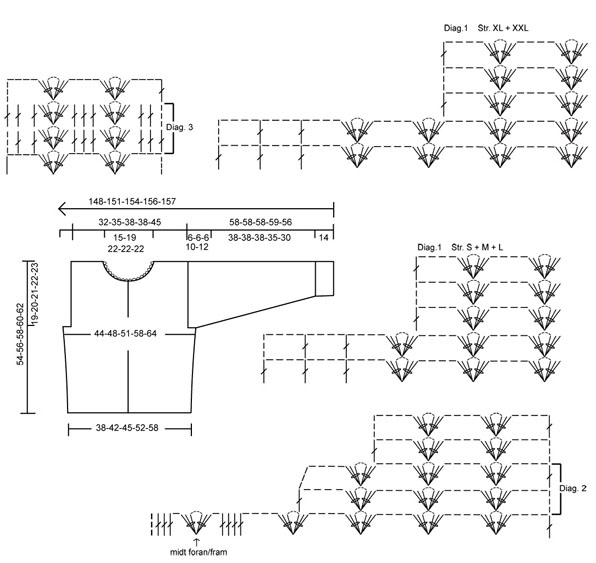
Crochet gauge: 3 repeats in width (1 repeat = 1 ch-loop + 1 dc-group) and 8 rows = approx. 10 x 10 cm. Diagrams: See diagrams. There are two Diagrams 1: one for Sizes S + M + L and one for Sizes XL + XXL. Diagrams 2 and 3 are the same for all sizes. «Midt foran/fram» means «center front». Crochet tips (for 3 dc-tog): Crochet 1 dc, but hold the last loop on the hook, (= 2 loops on hook), 1 new dc in the same st/loop, but hold the last loop on the hook (= 3 loops on hook), 1 new dc in the same st/loop, and now pull the yarn through all 4 loops on hook. Buttonband-tips: So that the buttonbands are not too tight, replace the first dc at the start of every row at the center front edge with ch 4. Back: Ch 115-124-133-151-169. Establish pattern on the first row as follows - read Crochet tips: start in the 16th ch from hook and crochet 3 dc-tog, ch 4 and 3 dc-tog in the same ch, * ch 4, skip over 8 ch, in the next ch: 3 dc-tog, ch 4 and 3 dc-tog *, repeat * - * a total of 10-11-12-14-16 times, ch 4, skip over 8 ch and finish with 1 dc in the last ch = 11-12-13-15-17 dc-groups, turn the work. Now crochet every row as follows: ch 7, in the ch-loop of the first dc-group crochet 3 dc-tog, ch 4 and 3 dc-tog, * ch 4, in the ch-loop in the next dc-group crochet 3 dc-tog, ch 4 and 3 dc-tog *, repeat * - * and finish with ch 4 and 1 dc in 5th ch after last dc-group. When the piece measures 13 and 23 cm inc 1 ch-loop at each side by crocheting 1 extra ch-loop in the outermost ch-loop at each side (1 ch-loop = 1 dc + ch 4 – at start of row replace 1 dc with ch 3). When the piece measures 35-36-37-38-39 cm bind off for armhole at each side following Diagram 1 (use the appropriate diagram for your size) = 9-10-11-11-13 dc-groups remain. Continue in the pattern as before. When the piece measures 53-55-57-59-61 cm bind off for the neck as follows: ch 7, in the ch-loop of first dc-group crochet 3 dc-tog, ch 4 and 3 dc-tog, ch 4, in the ch-loop in the next dc-group crochet 3 dc-tog, ch 4 and 3 dc-tog, finish with ch 4 and 1 dc in the top of the first 3 dc-tog in the next dc-group. Cut yarn and fasten, there are 2 dc-groups remaining on shoulder and the piece measures approx. 54-56-58-60-62 cm. Repeat on the other side of neck. Right front: Ch 70-79-79-88-97 (incl. ch 4 to turn with). Establish pattern on the 1st row as follows (from center front edge): 1 dc in 5th ch from hook, 1 dc in each of the 2 following ch, ch 1, skip over 2 ch, in the next ch crochet 3 dc-tog, ch 4 and 3 dc-tog, ch 1, skip over 2 ch, 1 dc in each of the 4 following sc(= buttonband), * ch 4, skip over 8 ch, in the next ch crochet 3 dc-tog, ch 4 and 3 dc-tog *, repeat * - * a total of 5-6-6-7-8 times, ch 4, skip over 8 ch and finish with 1 dc in last ch = 5-6-6-7-8 dc-groups + button bands, turn the work. 2nd row: ch 7, in the ch-loop in the first dc-group crochet 3 dc-tog, ch 4 and 3 dc-tog, * ch 4, in the ch-loop in the next dc-group crochet 3 dc-tog, ch 4 and 3 dc-tog *, repeat * - * a total of 4-5-5-6-7 times, then ch 4, *1 dc in each of the 4 following dc, ch 1, in the ch-loop in dc-group crochet 3 dc-tog, ch 4 and 3 dc-tog, ch 1, 1 dc in each of the 4 last dc * (* - * = buttonband), turn the work. Repeat 2nd row – read buttonband-tips above. When the piece measures 8 and 18 cm inc 1 ch-loop at the side as on back. When the piece measures 35-36-37-38-39 cm bind off for armhole at the side as on back. When the piece measures 42-44-46-48-50 cm bind off for the neck following Diagram 2 – follow Diagram 2 until only 2 dc-groups remain on shoulder (for all Sizes), then continue as shown on the 2 top rows of Diagram. When the piece measures 54-56-58-60-62 cm, cut yarn and fasten. Left front: Crochet the same as the right, reversing shaping. Sleeve: Ch 79-79-79-88-88. Establish pattern on the first row as follows: start in the 16th ch from hook and crochet 3 dc-tog, ch 4 and 3 dc-tog in that ch, * ch 4, skip over 8 ch, in the next ch crochet 3 dc-tog, ch 4 and 3 dc-tog *, repeat * - * a total of 6-6-6-7-7 times, ch 4, skip over 8 ch and finish with 1 dc in the last ch = 7-7-7-8-8 dc-groups, turn the work. Continue pattern as on Body. When the piece measures 8 cm crochet Diagram 3 twice, then continue regular pattern to finished dimensions. When the piece measures 14 cm inc at one side by crocheting 1 extra ch-loop in the outermost ch-loop, then continue as before. Repeat increase on the other side when the piece measures 19-18-18-17.5-16.5 cm. Repeat inc on alternate sides 3-4-4-4-5 times more every 5-4-4-3.5-2.5 cm (10-8-8-7-5 cm between each inc on the same side). 4-5-5-5-6 ch-loops have been increased at each side. When the piece measures 52-52-52-49-44 cm put a marker at each side (to mark where sleeves will be attached to Body). When the piece measures 58-58-58-59-56 cm (the sleeves are shorter in the larger sizes because of the wider shoulders), cut yarn and fasten. Assembly: Crochet together the shoulders as follows: 1 sl st in first ch-loop on back, ch 3, 1 sc in first ch-loop on front, ch 3, 1 sc in the next ch-loop on back, etc. Crochet the sleeve and side seams in the same manner, then crochet the sleeves into the body (the marker on sleeves should match up with the side on Body). Crocheted edge for neck: Crochet 1 row with ch-loops around the neck as follows (from right side): 1 sc in 1st dc on buttonband, * ch 5, skip over 1 row (or approx. 1 cm), 1 sc in the next dc *, repeat * - * and finish with 1 sl st in last dc – see that the edge is not too tight or too loose. Then crochet 2 rows of sc – on the first row crochet approx. 3 sc in each ch-loop, on the next row crochet 1 sc in each sc from previous row. Sew 6 buttons evenly distributed on left front in the center of the 4 outermost dc on buttonband. Place the top button approx. 1 cm from the top and the bottom approx. 2 cm from bottom edge. Use ch-loops on the right buttonband as buttonholes. |
||||||||||
Diagram explanations |
||||||||||
|
||||||||||
 |
||||||||||
Have you finished this pattern?Tag your pictures with #dropspattern or submit them to the #dropsfan gallery. Do you need help with this pattern?You'll find 4 tutorial videos, a Comments/Questions area and more by visiting the pattern on garnstudio.com. © 1982-2026 DROPS Design A/S. We reserve all rights. This document, including all its sub-sections, has copyrights. Read more about what you can do with our patterns at the bottom of each pattern on our site. |
||||||||||


With over 40 years in knitting and crochet design, DROPS Design offers one of the most extensive collections of free patterns on the internet - translated to 17 languages. As of today we count 324 catalogs and 12290 patterns - 12280 of which are translated into English (US/in).
We work hard to bring you the best knitting and crochet have to offer, inspiration and advice as well as great quality yarns at incredible prices! Would you like to use our patterns for other than personal use? You can read what you are allowed to do in the Copyright text at the bottom of all our patterns. Happy crafting!
Post a comment to pattern DROPS 88-19
We would love to hear what you have to say about this pattern!
If you want to leave a question, please make sure you select the correct category in the form below, to speed up the answering process. Required fields are marked *.