
Popular categories
Looking for a yarn?


Comments / Questions (17)
![]() Marise wrote:
Marise wrote:
Pour A2X je commence par 3 mailles endroit mais à la fin du rang ( 57 mailles ) je termine avec 3 mailles endroit et non 1 maille envers ça décale tout le rang à l'envers le rang à l'envers
04.04.2026 - 16:33DROPS Design answered:
Bonjour Marise, vous en êtes au dos, quand les augmentations sont terminées? Lorsque vous avez vos 57 m (en 3/4 ans), vous tricotez désormais A.1x sur toutes les mailles (sauf 1 maille endroit de chaque côté), lorsque vous tricotez A.2 puis A.2x vous devez également le tricoter avec 1 m endroit de chaque côté. Pour la fin de A.2/A.2x, tricotez ainsi: 1 m lis, répétez 9 fois les 6 m de A.2 puis tricotez la 1ère maille de A.2 et 1 m lis. Bon tricot!
08.04.2026 - 09:49
![]() Janette wrote:
Janette wrote:
I think I understand what Vered is asking. And here is the answer to Vered. A3x is not followed by A3a. A3a was done during separation for the sleeves. In the body repeat A3x only till A3 that includes A3a (done during separation) and A3x measures 5cm. This will create vertical lines without disruption.
16.03.2026 - 22:23
![]() Vered wrote:
Vered wrote:
In BODY of Woodland Wander sweater 4 rows of A3x = 1-2cms, followed by A3a creates a ring around the sweater. It doesn\'t create 5cm vertical lines, so how do you achieve 5cms?
18.02.2026 - 15:20DROPS Design answered:
Dear Vered, you just have to repeat A.3x until whole diagram A.3 (= A.3a + A.3x) measures 5 cm. The rib pattern is made thanks A.3x. Happy knitting!
17.03.2026 - 09:25
![]() Susi wrote:
Susi wrote:
Ich versuche es ein letztes Mal mit einer Frage: ÄRMEL: Wie viele Maschen habe ich bei den verkürzten Reihen nach dem letzten Wenden oben an der Armkugel rechts und links von der Mitte gestrickt?
16.02.2026 - 15:55DROPS Design answered:
Liebe Susi, in Gr. 5/6 Jahre müssten Sie an der einen Seiten 21 Maschen und an der anderen Seite 23 Maschen gestrickt haben. Gutes Gelingen weiterhin!
17.02.2026 - 07:55
![]() Susi wrote:
Susi wrote:
Werden unsere Fragen denn gar nicht mehr gelesen?
16.02.2026 - 08:58
![]() Vered wrote:
Vered wrote:
I wrote to you over 10 days ago! Why haven't you answered yet? I clearly need the proper knitting instructions for the A3x part of the sweater, as previously explained. Please get on with it. I'm stuck!!! Thank you.
15.02.2026 - 15:07DROPS Design answered:
Hi Vered, Could you explain again the problem you are having with the pattern? Your first question was a little unclear. Regards, Drops team.
16.02.2026 - 06:47
![]() Susi wrote:
Susi wrote:
Muster A.3x sieht tatsächlich überhaupt nicht so aus, wie auf den Fotos. Da muß in der Strickschrift etwas falsch sein. Bin verzweifelt und bitte kurzfristig um Korrektur oder Erklärung.!!!
13.02.2026 - 11:43DROPS Design answered:
Liebe Susi, A.3x ist ja eine Art Patentmuster, d.h. Sie stricken 1 Umschlag und heben die nächste Masche ab, beim Abheben stechen Sie von oben nach unten in die Masche ein (wie beim Linksstricken), den Faden halten Sie dabei aber hinter der Arbeit. Dann folgen 2 Linksmaschen. In der nächsten Runde stricken Sie die abgehobene Masche + den Umschlag rechts zusammen, die beiden Linksmaschen stricken Sie rechts. Sie haben also 1 Patentmasche mit 2 kraus rechten Maschen dazwischen. Gutes Gelingen!
18.02.2026 - 22:02
![]() Susi wrote:
Susi wrote:
Bitte doch, meine Frage zu beantworten. Auf dem Video wird auch bei der rechten Schulter von vorne aufgefasst. Also ist die 1. Reihe eine Rückreihe und wird links gestrickt. Nicht rechts wie Sie in der Anleitung schreiben ?
12.02.2026 - 12:17DROPS Design answered:
Liebe Susi, die Rück-Reihe wird wie beschrieben rechts gestrickt, nicht links. Sie soll auf der Vorderseite links erscheinen. Danach folgt ja das Muster.
16.02.2026 - 21:24
![]() Susi wrote:
Susi wrote:
RECHTES VORDERTEIL Ah, ich habe kapiert. Die Richtung für das Auffassen der Maschen ist von hinten... also anders herum vom Rücken in Richtung Ausschnitt, oder ?
12.02.2026 - 12:04
![]() Susi wrote:
Susi wrote:
RECHTES VORDERTEIL Auffassen der Maschen erfolgt in Richtung Ausschnitt. Dann muß doch die nächste Reihe eine linjs gestrickte Rückreihe sein! In der Anleitung steht: 1. Reihe rechts stricken. Das ist doch nicht richtig ?
12.02.2026 - 11:57
|
|||||||||||||||||||
Woodland Wander Sweater#woodlandwandersweater |
|||||||||||||||||||
 |
 |
||||||||||||||||||
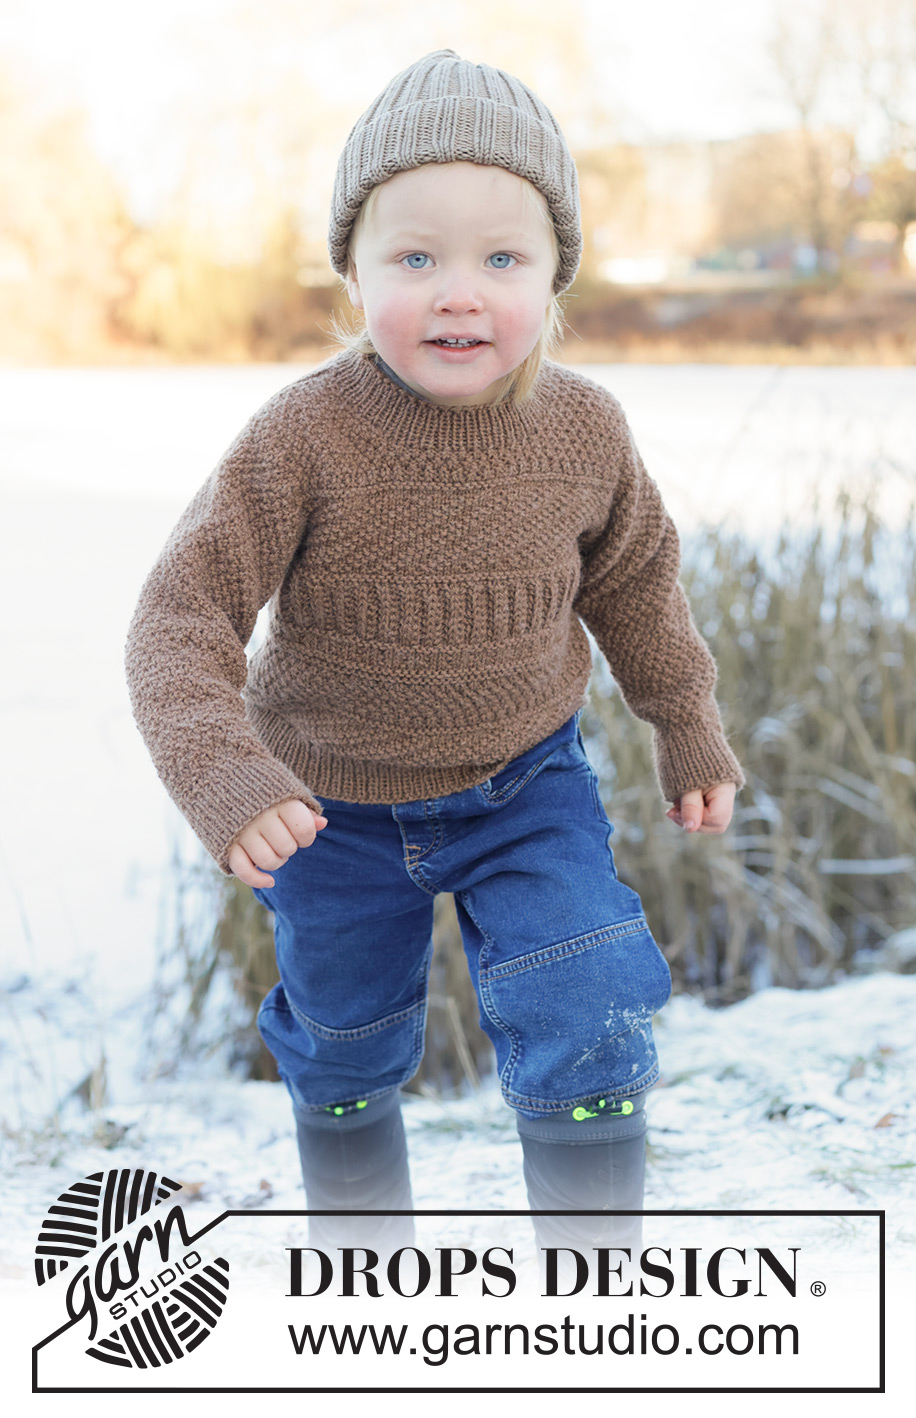
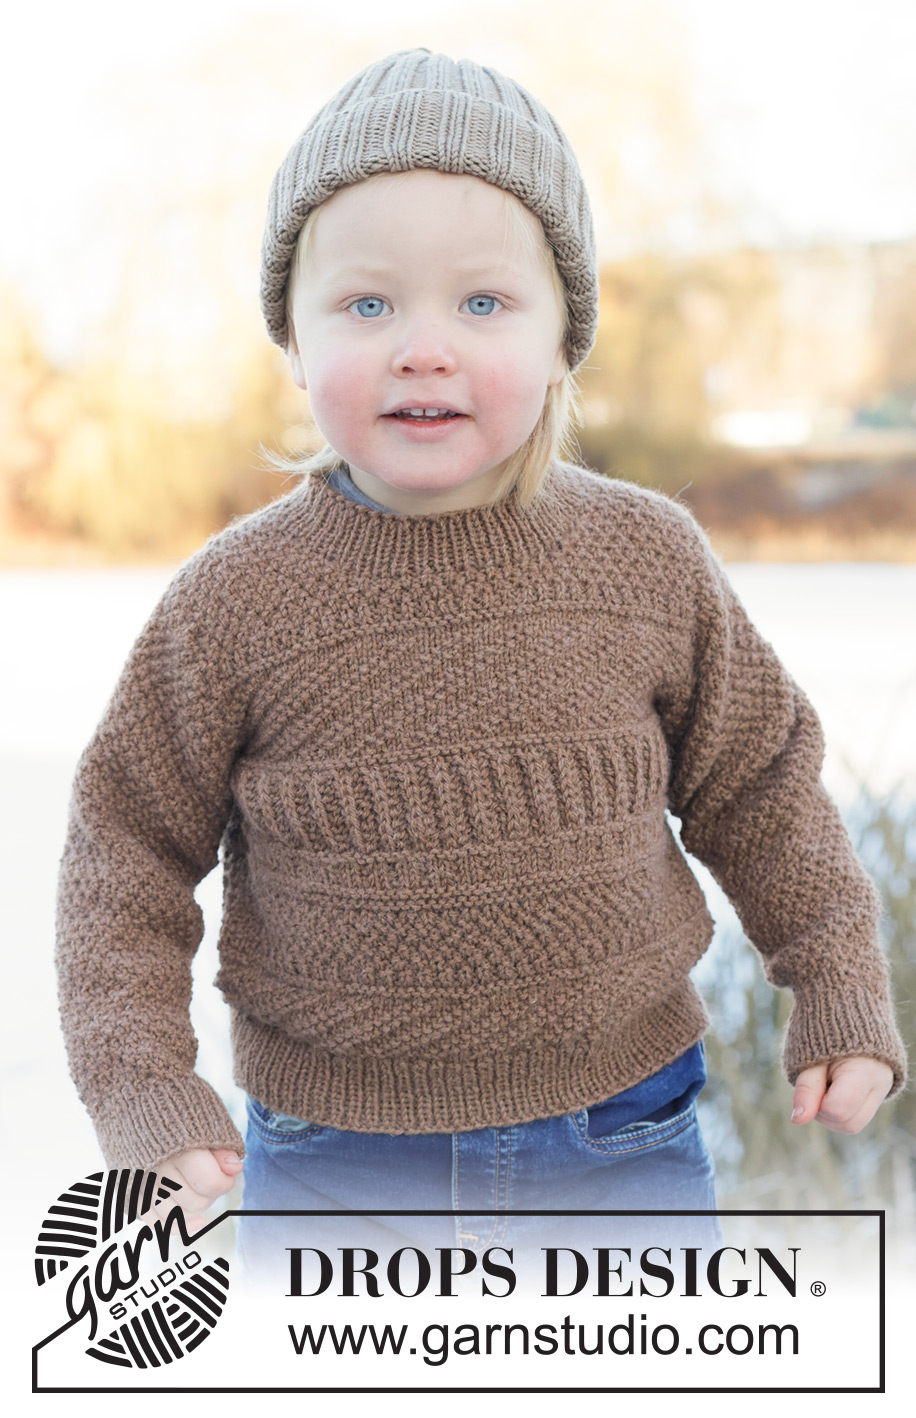
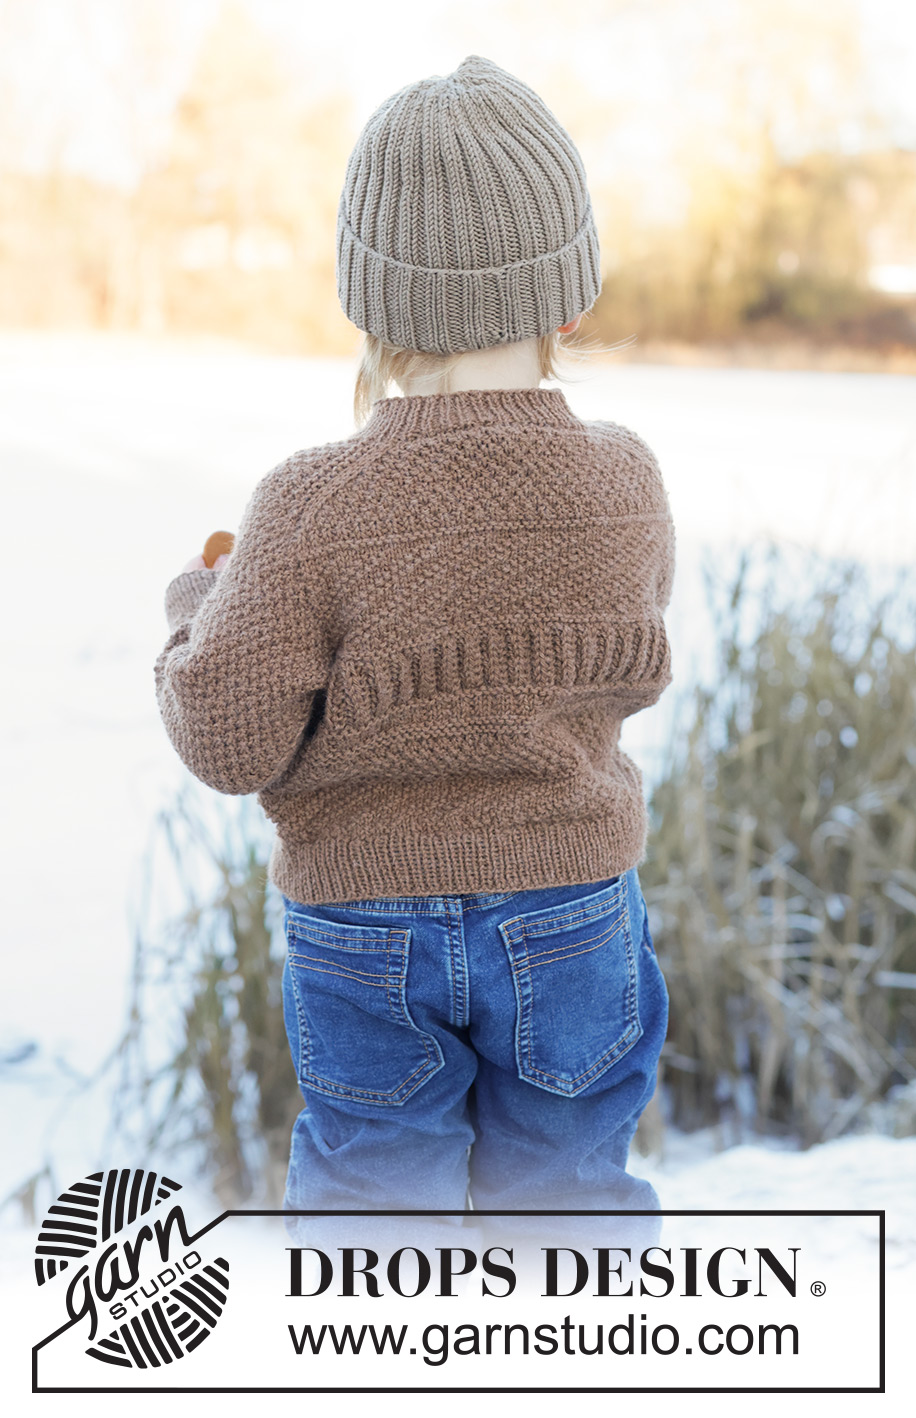
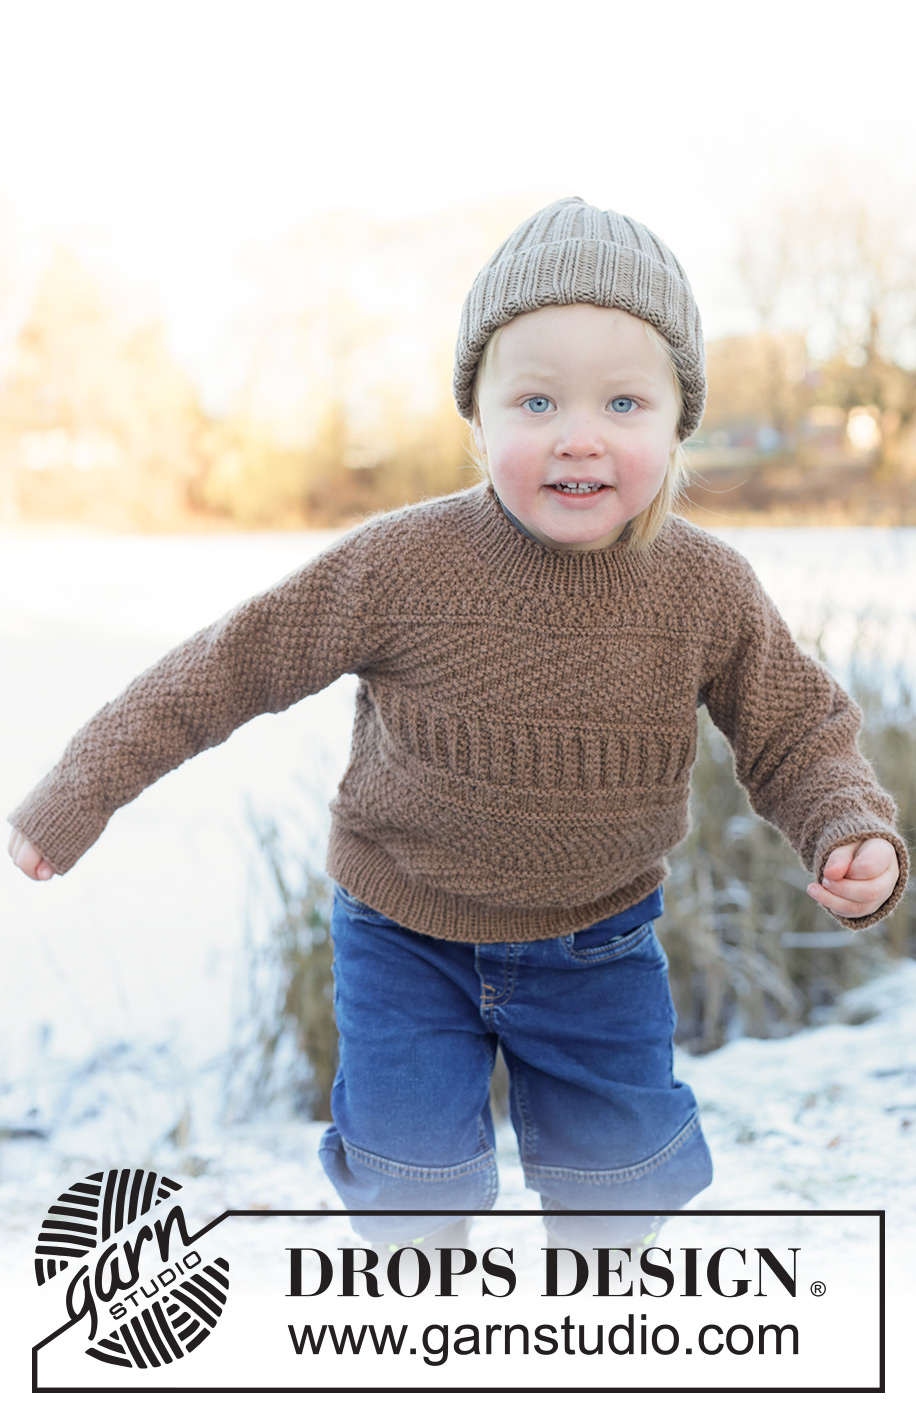
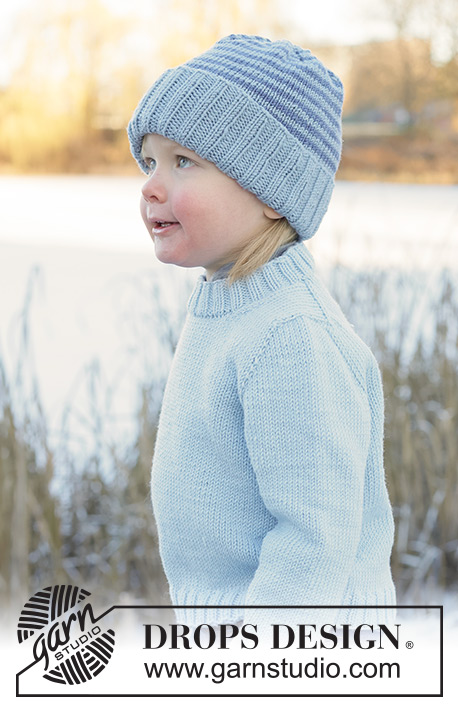
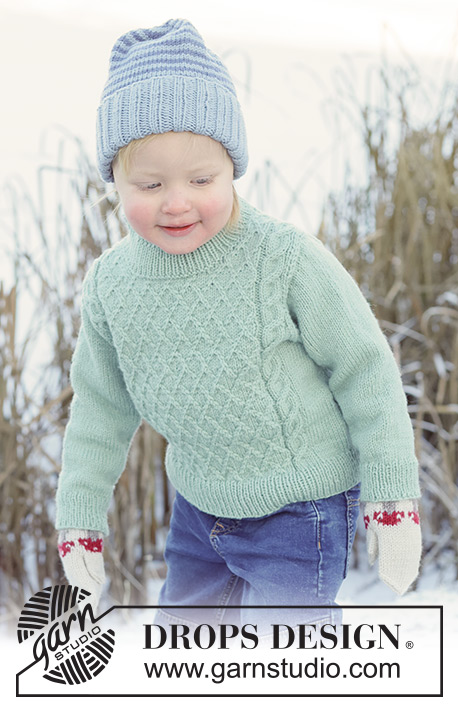
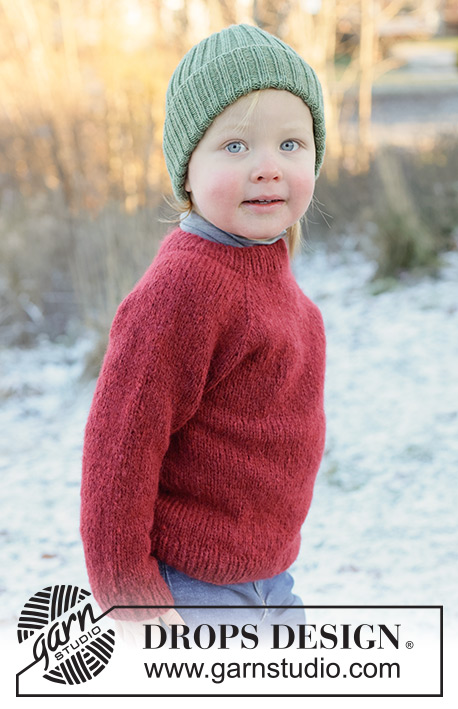
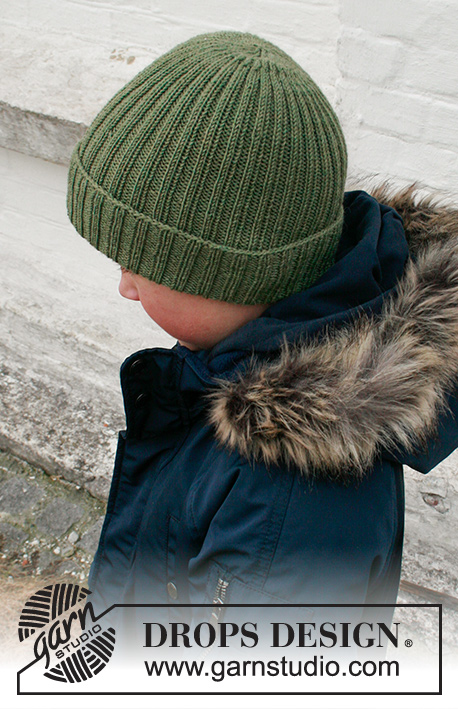
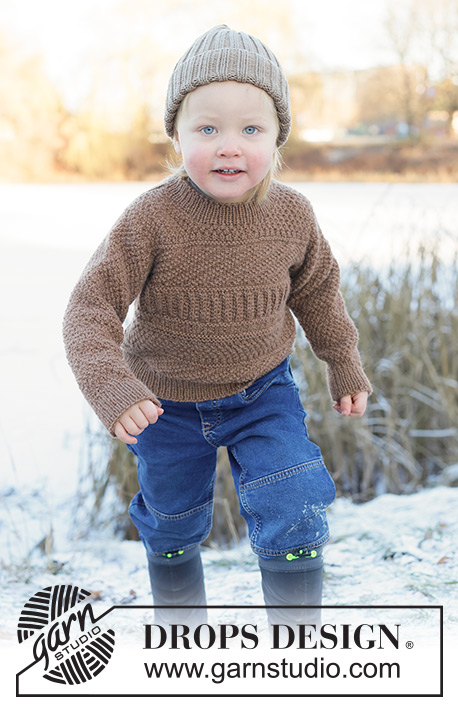
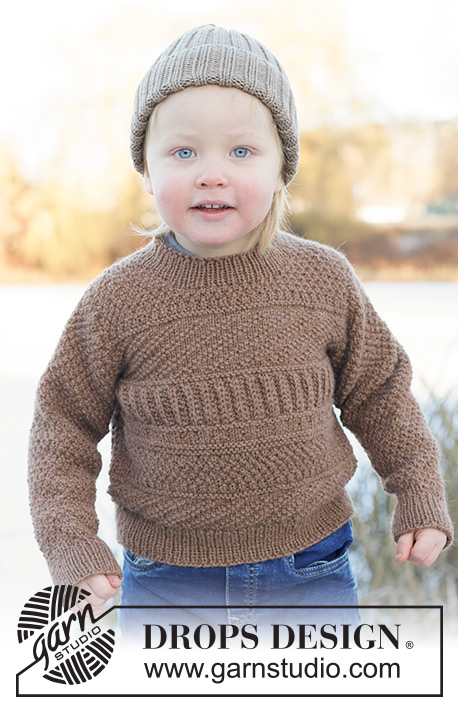
Knitted sweater and hat for children in DROPS Lima. The sweater is worked top down, with European/diagonal shoulders and relief pattern. The hat is worked in the round with rib. Sizes 2 - 14 years.
DROPS Children 50-9 |
|||||||||||||||||||
|
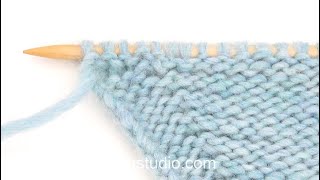
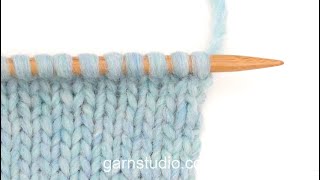
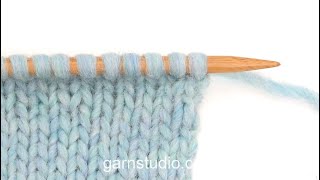
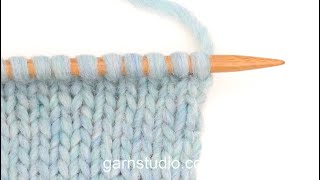
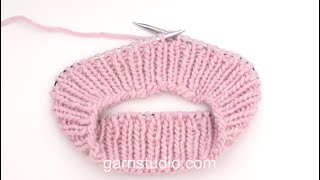
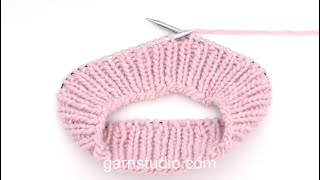
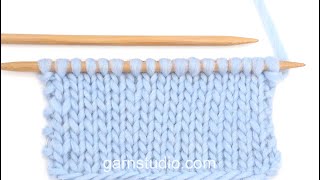
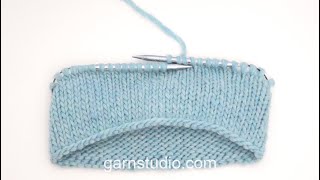
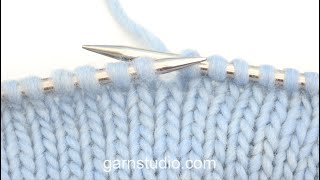
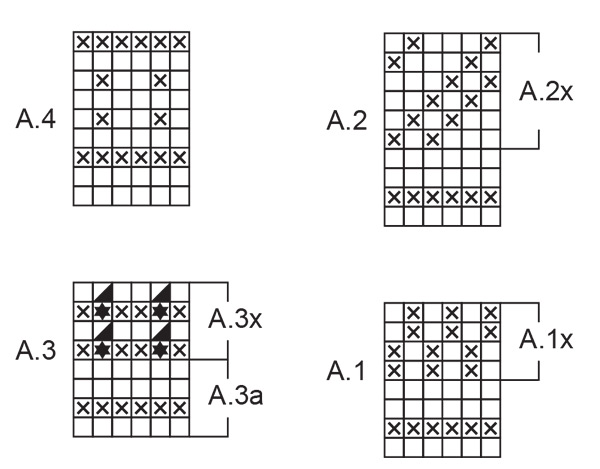
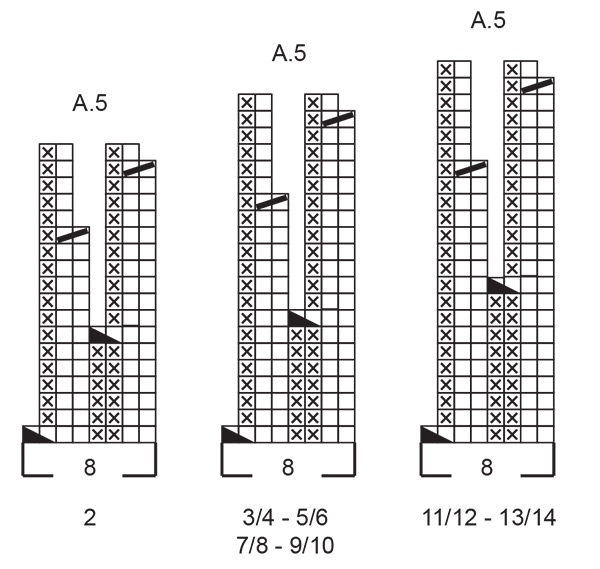
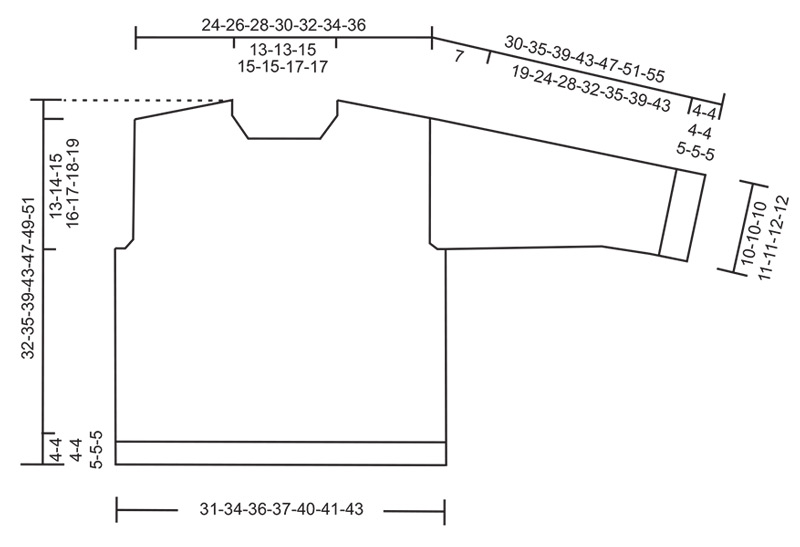
------------------------------------------------------- EXPLANATIONS FOR THE PATTERN: ------------------------------------------------------- PATTERN: See diagrams A.1 to A.5 (A.5 applies to hat). The diagrams show all rows from the right side. Choose diagram for your size. INCREASE TIP-1: INCREASE 1 STITCH TOWARDS THE LEFT - from RIGHT SIDE: Use the left needle to pick up the strand between 2 stitches from the row below, pick up the strand from the front and knit through the stitch loop that is on the back of the needle. INCREASE 1 STITCH TOWARDS THE RIGHT - from RIGHT SIDE: Use the left needle to pick up the strand between 2 stitches from the row below, pick up the strand from the back and knit through the stitch loop that is on the front of the needle. INCREASE TIP-2: INCREASE 1 STITCH TOWARDS THE RIGHT - from WRONG SIDE: Use the left needle to pick up the strand between 2 stitches from the row below, pick up the strand from the back and purl through the stitch loop that is on the front of the needle. INCREASE 1 STITCH TOWARDS THE LEFT - from WRONG SIDE: Use the left needle to pick up the strand between 2 stitches from the row below, pick up the strand from the front and purl through the stitch loop that is on the back of the needle. DECREASE TIP: Decrease 1 stitch on each side of the marker-thread as follows: Work until there are 2 stitches left before the marker-stitch, knit 2 together, knit 1 (marker-stitch), slip 1 stitch knit-wise, knit 1 and pass the slipped stitch over the knitted stitch (2 stitches decreased). KNITTING TIP: When working short rows, there will be a small hole after each turn. This hole can be closed by tightening the strand or using the technique German Short Rows as follows: Slip the first stitch purl-wise, take the strand over the right needle and tighten well from the back (2 loops on the needle). These loops are worked together on the next row. ------------------------------------------------------- START THE PIECE HERE: ------------------------------------------------------- SWEATER – SHORT OVERVIEW OF THE PIECE: The pattern uses both long and short needles; start with the length which fits the number of stitches and change when necessary. The piece is started back and forth, casting on stitches at the back of the neck and working the back piece top down, while increasing stitches on each side until the shoulder stitch-count has been reached. The shoulders are slightly diagonal. The back piece is then worked as far as the armholes. The front piece is worked in 2 sections, knitting up stitches along 1 back shoulder, working pattern and increasing for the neckline. This is repeated on the other shoulder. The 2 front sections are joined when the neckline is finished and the front piece is worked as far as the armholes. The front and back pieces are joined on the same circular needle and the body finished in the round. Stitches are knitted up around the armholes for the sleeves, which are worked back and forth for the sleeve cap, then finished in the round. Stitches are knitted up around the neckline and the neck is worked in the round to finish. BACK PIECE: The piece is worked back and forth on circular needle with PATTERN – see explanation above. Cast on 29-29-33-33-33-37-37 stitches with circular needle size 4 MM = US 6 and DROPS Lima. Work back and forth as follows: ROW 1 (wrong side): Purl. ROW 2 (right side): Read INCREASE TIP-1. Knit 3, increase 1 stitch towards the left, work A.1x (double moss stitch) until there are 3 stitches left on the row, increase 1 stitch towards the right, knit 3. The increased stitches are worked into the pattern on the next row. ROW 3 (wrong side): Read INCREASE TIP-2. Purl 3, increase 1 stitch towards the right, work A.1x (i.e., knit above knit and purl above purl) until there are 3 stitches left on the row, increase 1 stitch towards the left, purl 3. Work ROWS 2 and 3 a total of 6-7-7-8-9-9-10 times (12-14-14-16-18-18-20 rows worked). After the last increase there are 53-57-61-65-69-73-77 stitches. Remember to maintain the knitting gauge. Insert 1 marker outermost on one side. The piece is now measured from here! Work pattern across all stitches, with 1 knitted stitch on each side (i.e., pattern is worked across the 3 outermost stitches on each side). Continue A.1x until the piece measures 1-1-1-1-1-2-2 cm = ⅜"-⅜"-⅜"-⅜"-⅜"-¾"-¾" from the marker on the side. Work A.2, then repeat A.2x. When the piece measures 7-8-9-10-10-11-12 cm = 2¾"-3⅛"-3½"-4"-4"-4⅜"-4¾" from the marker on the side, increase for the armholes as follows: INCREASE FOR ARMHOLES: Work A.3a increasing as follows: ROW 1 (right side): Remember INCREASE TIP-1. Knit 1, increase 1 stitch towards the left, work A.3a until there is 1 stitch left on the row, increase 1 stitch towards the right, knit 1. ROW 2 (wrong side): Knit 1, continue A.3a working the new stitches into the pattern, knit 1. Work ROWS 1 and 2 a total of 2 times (4 rows worked) = 57-61-65-69-73-77-81 stitches. Cut the strand and place the stitches on a stitch holder (the piece measures approx. 8-9-10-11-11-12-13 cm = 3⅛"-3½"-4"-4⅜"-4⅜"-4¾"-5⅛", from the marker on the side). Now work the left front piece along the left back shoulder. LEFT FRONT PIECE: Find the left back shoulder as follows: Lay the back piece flat, right side up, with the stitch holder towards you; left-hand side of piece = left shoulder. Start from the right side by the neck on the left back shoulder and knit up 1 stitch in each row worked, inside the outermost stitch (12-14-14-16-18-18-20 stitches), then knit up 1 stitch outermost on the shoulder (edge stitch) = 13-15-15-17-19-19-21 shoulder-stitches. Insert 1 marker. The piece is measured from here. ROW 1 (wrong side): Knit. ROW 2 (right side): Knit 1, work A.1 until there is 1 stitch left – NOTE! So the pattern matches when the front pieces are joined, begin the pattern in the 2nd-2nd-1st-1st-1st-2nd-1st stitch in A.1, knit 1. ROW 3 (wrong side): Knit 1, continue A.1 until there is 1 stitch left, knit 1. Continue pattern and ROWS 2 and 3. When A.1 is finished in height, repeat A.1x onwards. Work until the piece measures 5-5-6-6-7-6-7 cm = 2"-2"-2⅜"-2⅜"-2¾"-2⅜"-2¾" from the marker. Now increase for the neckline as follows: ROW 1 (right side): Remember INCREASE TIP-1. Knit 1, increase 1 stitch towards the left, work pattern until there is 1 stitch left, knit 1. ROW 2 (wrong side): Knit 1, continue the pattern, knit 1. Work ROWS 1 and 2 a total of 5-5-6-6-6-7-7 times (10-10-12-12-12-14-14 rows worked) = 18-20-21-23-25-26-28 stitches (with the next row from the right side). The piece measures approx. 9-9-10-10-11-11-12 cm = 3½"-3½"-4"-4"-4⅜"-4⅜"-4¾" from the marker. Cut the strand and place the stitches on a stitch holder. Work the right front shoulder as follows. RIGHT FRONT PIECE: Start from the right side by the shoulder on the right back shoulder and knit up 1 stitch outermost on the shoulder (edge stitch), then knit up 1 stitch in each row worked, inside the outermost stitch (12-14-14-16-18-18-20 stitches) = 13-15-15-17-19-19-21 shoulder-stitches. Insert 1 marker. The piece is measured from here. ROW 1 (wrong side): Knit. ROW 2 (right side): Knit 1, work A.1 until there is 1 stitch left, knit 1. ROW 3 (wrong side): Knit 1, continue A.1 until there is 1 stitch left, knit 1. Continue pattern and ROWS 2 and 3. When A.1 is finished in height, repeat A.1x onwards. Work until the piece measures 5-5-6-6-7-6-7 cm = 2"-2"-2⅜"-2⅜"-2¾"-2⅜"-2¾" from the marker. Now increase for the neckline as follows: ROW 1 (right side): Knit 1, continue the pattern until there is 1 stitch left, increase 1 stitch towards the right, remember INCREASE TIP-1, knit 1. ROW 2 (wrong side): Knit 1, continue the pattern, knit 1. Work ROWS 1 and 2 a total of 5-5-6-6-6-7-7 times (10-10-12-12-12-14-14 rows worked) = 18-20-21-23-25-26-28 stitches (with the next row from the right side). The piece measures approx. 9-9-10-10-11-11-12 cm = 3½"-3½"-4"-4"-4⅜"-4⅜"-4¾" from the marker. Make sure the 2 front pieces are the same length, so the patterns match. Now join the 2 front pieces. FRONT PIECE (right and left pieces joined): From the right side, continue pattern across the 18-20-21-23-25-26-28 stitches on the right front piece, cast on 17-17-19-19-19-21-21 stitches for the neckline, continue pattern across the 18-20-21-23-25-26-28 stitches on the left front piece = 53-57-61-65-69-73-77 stitches. Continue A.1x until the piece measures 11-11-11-11-13-14-14 cm = 4⅜"-4⅜"-4⅜"-4⅜"-5⅛"-5½"-5½" from the marker, making sure the pattern fits across the neckline stitches. Work A.2. When A.2 is finished, repeat A.2x in height. When the piece measures 17-18-19-20-22-23-24 cm = 6¾"-7"-7½"-8"-8¾"-9"-9½", increase for the armholes as follows. INCREASE FOR ARMHOLES: Work A.3a increasing as follows: ROW 1 (right side): Remember INCREASE TIP-1. Knit 1, increase 1 stitch towards the left, work A.3a until there is 1 stitch left, increase 1 stitch towards the right, knit 1. ROW 2 (wrong side): Knit 1, continue A.3a, working the new stitches into the pattern, finish with knit 1. Work ROWS 1 and 2 a total of 2 times (4 rows worked) = 57-61-65-69-73-77-81 stitches. The front piece measures approx. 18-19-20-21-23-24-25 cm = 7"-7½"-8"-8¼"-9"-9½"-9¾". Now join the front and back pieces as follows. NOTE: The front piece is longer than the back piece; approx. 3 cm = 1⅛" of the neck-depth will lie on the back piece. BODY: Work A.3 x across the 57-61-65-69-73-77-81 stitches on the back piece, cast on 9-11-10-9-11-10-9 stitches (mid-under the sleeve), work A.3x across the 57-61-65-69-73-77-81 stitches on the front piece (Note: the cast-on stitches under each sleeve are also worked into the pattern on the next round, count out so you begin on the correct stitch in the pattern), cast on 9-11-10-9-11-10-9 stitches (mid-under the sleeve) = 132-144-150-156-168-174-180 stitches. Work A.3x in the round until A.3 (including A.3a) measures 4-4-5-5-6-7-7 cm = 1½"-1½"-2"-2"-2⅜"-2¾"-2¾". The pattern now fits across all the stitches. Work A.4 once in height. Work A.1, then repeat A.1x in height until A.1/A.1x measures 4-4-5-6-7-7-7 cm = 1½"-1½"-2"-2⅜"-2¾"-2¾"-2¾". Work A.2, then repeat A.2x in height until the piece measures 25-28-32-36-40-42-44 from the cast-on edge mid-back. Knit 2 rounds. Change to circular needle size 3 MM = US 2.5. Work rib (knit 1, purl 1), AT THE SAME TIME increase 24-28-32-32-34-34-36 stitches evenly on the first round = 156-172-182-188-202-208-216 stitches. When the rib measures 4-4-4-4-5-5-5 cm = 1½"-1½"-1½"-1½"-2"-2"-2", bind off with rib. The sweater measures approx. 29-32-36-40-44-46-48 cm = 11⅜"-12½"-14¼"-15¾"-17¼"-18"-19" from mid-back and 32-35-39-43-47-49-51 cm = 12½"-13¾"-15¼"-17"-18½"-19¼"-20" from the shoulder. SLEEVES: The sleeve is worked top down. Lay the piece flat and insert 1 marker at the top of the armhole. (NOTE! This is not the same place as the knitted-up row on the front piece but a few cm down the front piece). Use circular needle size 4 MM = US 6 and knit up tightly (or use a smaller needle size). KNIT UP AS FOLLOWS: Start in the middle of the cast-on stitches under the sleeve and knit up 62-66-70-74-78-82-86 stitches around the armhole, with equal numbers of stitches on both sides of the marker. SLEEVE CAP: To give the sleeve a better fit, work A.1x with short rows back and forth, starting from mid-under the sleeve as follows: ROW 1 (right side): Knit to 3 stitches before the marker on top of the sleeve, work A.1x across the next 6 stitches, turn – read KNITTING TIP. ROW 2 (wrong side): Work A.1x across the first 8 stitches, turn. ROW 3 (right side): Work to 2-2-2-2-3-3-3 stitches past the previous turn, turn. ROW 4 (wrong side): Work to 2-2-2-2-3-3-3 stitches past the previous turn, turn. Repeat ROWS 3 and 4 until you have turned a total of 20 times (10 times each side, with the last row from the wrong side). AFTER THE LAST TURN: After working row 4 for the last time, turn and work back to the beginning of the row from the right side (= mid-under the sleeve). Insert 1 marker in the middle of the cast-on stitches; this is used when decreasing under the sleeve. The marker-stitch is always knitted. SLEEVE CONTINUED. Work A.1x in the round across all stitches and decrease under the sleeve - read DECREASE TIP, as follows: After working 1 round, decrease 2 stitches every 1½-2-2-2-2-2½-2½ cm = ½"-¾"-¾"-¾"-¾"-1"-1" a total of 11-12-13-14-15-16-17 times = 40-42-44-46-48-50-52 stitches. Continue working until the sleeve measures 26-31-35-39-42-46-50 cm = 10¼"-12¼"-13¾"-15¼"-16½"-18"-19¾" from the shoulder. Knit 2 rounds. Change to double pointed needles size 3 MM = US 2.5. Work rib (knit 1, purl 1), AT THE SAME TIME increase 8-8-8-10-10-10-10 stitches evenly on the first round = 48-50-52-56-58-60-62 stitches. When the rib measures 4-4-4-4-5-5-5 cm = 1½"-1½"-1½"-1½"-2"-2"-2", bind off with rib. The sleeve measures approx. 30-35-39-43-47-51-55 cm = 11¾"-13¾"-15¼"-17"-18½"-20"-21⅝" from the shoulder. NECK: Use circular needle size 3 MM = US 2.5. Start from the right side on 1 shoulder-line and knit up approx. 84-84-96-96-98-108-112 stitches inside 1 stitch, around the neckline. Knit 1 round and adjust the stitch count if necessary; it must be divisible by 2. Work rib in the round (knit 1, purl 1) for 3-3-3-3-4-4-4 cm = 1⅛"-1⅛"-1⅛"-1⅛"-1½"-1½"-1½". Bind off with rib. ------------------------------------------------------- HAT - SHORT OVERVIEW OF THE PIECE: The hat is worked in the round, bottom up. Start with circular needle and change to double pointed needles when necessary, while decreasing for the top of the hat. HAT: Cast on 100-104-108-112-116-120-128 stitches with double pointed needles/circular needle size 3.5 MM = US 4 and DROPS Lima. Work rib in the round (knit 2, purl 2). Remember to maintain the knitting gauge. When the piece measures 9 cm = 3½", turn and tighten the strand. Continue the rib from the wrong side (this is so the fold-up will be neat). When the hat measures 17-17-18-18-19-20-20 cm = 6¾"-6¾"-7"-7"-7½"-8"-8" (approx. 7-8-8-8-8-9-9 cm = 2¾"-3⅛"-3⅛"-3⅛"-3⅛"-3½"-3½" left to finished length), work the next round as follows: Work A.5, 12-13-13-14-14-15-16 times on the round, finish with the first 4-0-4-0-4-0-0 stitches in A.5. When A.5 is finished in height there are 50-52-54-56-58-60-64 stitches. Continue as follows: ROUND 1: * Knit 2 together, knit 2 *, work from *-* until there are 2-0-2-0-2-0-0 stitches left, knit 2-0-2-0-2-0-0 = 38-39-41-42-44-45-48 stitches. ROUND 2: Knit. ROUND 3: * Knit 1, knit 2 together *, work from *-* until there are 2-0-2-0-2-0-0 stitches left, knit 2-0-2-0-2-0-0 = 26-26-28-28-30-30-32 stitches. ROUND 4: Knit all stitches together 2 and 2 = 13-13-14-14-15-15-16 stitches. Cut the strand, thread it through the remaining stitches, tighten and fasten well. The hat measures approx. 24-25-26-26-27-29-29 cm = 9½"-9¾"-10¼"-10¼"-10⅝"-11⅜"-11⅜". Fold up the bottom 5-5-5-5-5-6-6 cm = 2"-2"-2"-2"-2"-2⅜"-2⅜". The hat measures approx. 19-20-21-21-22-23-23 cm = 7½"-8"-8¼"-8¼"-8¾"-9"-9" with the fold-up. |
|||||||||||||||||||
Diagram explanations |
|||||||||||||||||||
|
|||||||||||||||||||
 |
|||||||||||||||||||
 |
|||||||||||||||||||
 |
|||||||||||||||||||
Have you finished this pattern?Tag your pictures with #dropspattern #woodlandwandersweater or submit them to the #dropsfan gallery. Do you need help with this pattern?You'll find 45 tutorial videos, a Comments/Questions area and more by visiting the pattern on garnstudio.com. © 1982-2026 DROPS Design A/S. We reserve all rights. This document, including all its sub-sections, has copyrights. Read more about what you can do with our patterns at the bottom of each pattern on our site. |
|||||||||||||||||||


With over 40 years in knitting and crochet design, DROPS Design offers one of the most extensive collections of free patterns on the internet - translated to 17 languages. As of today we count 325 catalogs and 12298 patterns - 12288 of which are translated into English (US/in).
We work hard to bring you the best knitting and crochet have to offer, inspiration and advice as well as great quality yarns at incredible prices! Would you like to use our patterns for other than personal use? You can read what you are allowed to do in the Copyright text at the bottom of all our patterns. Happy crafting!
Post a comment to pattern DROPS Children 50-9
We would love to hear what you have to say about this pattern!
If you want to leave a question, please make sure you select the correct category in the form below, to speed up the answering process. Required fields are marked *.