
Popular categories
Looking for a yarn?


Comments / Questions (32)
![]() Laura wrote:
Laura wrote:
3. Ich verstehe nicht, wo am Seitenteil eine Abnahme stattfinden soll. Ich zähle in Diagramm A2 in jeder Reihe die gleiche Anzahl an Maschen.
27.11.2024 - 16:17DROPS Design answered:
Liebe Laura, mit Abnahmen meinte sicher die Designerin das Armausschnitt - siehe auch Maßskizze, dh die Seiten sollen genausogleich sein damit das obere Teil schmaler wird. Viel Spaß beim Häkeln!
28.11.2024 - 09:38
![]() Laura wrote:
Laura wrote:
2. In der Anleitung steht, dass das Seitenteil in der oberen Ecke des zweiten Quadrats begonnen werden soll. Auf den Bildern sehe ich jedoch, dass das Seitenteil dort in der Mitte eines Quadrats beginnt. Der Grafik A2.a entnehme ich, dass die ersten 3 Luftmaschen des Seitenteils in eine Luftmasche des Quadrats gearbeitet werden sollen. Die obere Ecke des Quadrats hat jedoch 2 Luftmaschen. Wo soll ich also anfangen mit dem Seitenteil? Liebe Grüße Laura
27.11.2024 - 15:41
![]() Laura wrote:
Laura wrote:
Hallo, Ich mache Gr. L und verstehe leider gar nicht, wie die Seitenteile gehäkelt werden sollen. 1. In der Anleitung steht, dass das rechte Seitenteil des Rückenteils mit Hinreihen in natur gehäkelt werden soll. Wenn das Rückenteil aber (Vorderseite oben) vor mir liegt, dann müsste ich auf der rechten Seite, wenn ich nach unten häkeln will, mit einer Rückreihe anfangen. Ist hier in der Anleitung das rechte und linke Seitenteil vertauscht?
27.11.2024 - 15:38DROPS Design answered:
Liebe Laura, so sieht es auch bei mir aus, häkeln Sie die Seiten so daß die Abnahmen an der richtigen Stellen erfolgen, ich leite den Hinweis unser Design Team weiter. Vie Spaß beim Häkeln!
27.11.2024 - 16:39
![]() Diane wrote:
Diane wrote:
Goedemiddag Bedankt voor je eerlijke antwoord. Gr.Diane
24.07.2024 - 16:12
![]() Diane wrote:
Diane wrote:
Goedemiddag Hoeveel garen heb ik nodig om dit patroon in een effen kleur ta maken? En hoeveel voor alleen het 1st rondje in elk van de garden squares? In maat large gr.Diane
23.07.2024 - 12:19DROPS Design answered:
Dag Diane,
Eerlijk gezegd weet ik dat niet. Je kunt een vergelijkbaar patroon in hetzelfde garen bekijken, zodat je een idee hebt hoeveel je ongeveer nodig hebt. Vraag je winkel wat de regels zijn m.b.t. het terug sturen van eventueel overgebleven bollen, zodat je wat extra kunt bestellen voor de zekerheid. Als je dan de helft van de vierkantjes gemaakt hebt, kun je m.b.v. een weegschaal bepalen hoeveel je nog nodig hebt.
24.07.2024 - 15:44
![]() Marise wrote:
Marise wrote:
Goedemorgen, Ik wil aan deze hele toffe trui beginnen met haken. Ik kom er (nu al) niet uit met de steken verhouding. Er staat bij dat een proeflap 10x10 cm meet maar niet met hoeveel steken voor haken. Voor breien staat er een stekenverhouding van 19x26 steken in tricot steek . Hoe moet ik dit vertalen naar haken? Haken met vasten/stokjes en hoeveel steken opzetten? Gr. Marise
01.04.2024 - 08:11DROPS Design answered:
Dag Marise,
De trui bestaat uit gehaakte vierkanten en elk vierkant meet 11 keer 11 cm. Dus je kunt 1 vierkant haken als proeflapje. Als je vierkant groter is dan heb je een kleinere haaknaald nodig en als je vierkant kleiner is dan 11 x 11 cm, dan heb je een grotere haaknaald nodig.
03.04.2024 - 21:02
![]() Florence wrote:
Florence wrote:
DROPS 241-16 DROPS Design: Modèle w-893 Garden squares sweaters. Bonjour, je souhaite réaliser le pull réf ci-dessus. Comment calculer ma taille avant de passer commande ? Faut il compter une taille normale (je fais du 38/40). Merci pour votre réponse
14.03.2024 - 19:27DROPS Design answered:
Bonjour Florence, pour trouver votre taille, mesurez un vêtement que vous avez et dont vous aimez la forme et comparez ces mesures à celles du schéma du bas de page - retrouvez plus d'infos ici. Bon crochet!
15.03.2024 - 08:16
![]() Britta wrote:
Britta wrote:
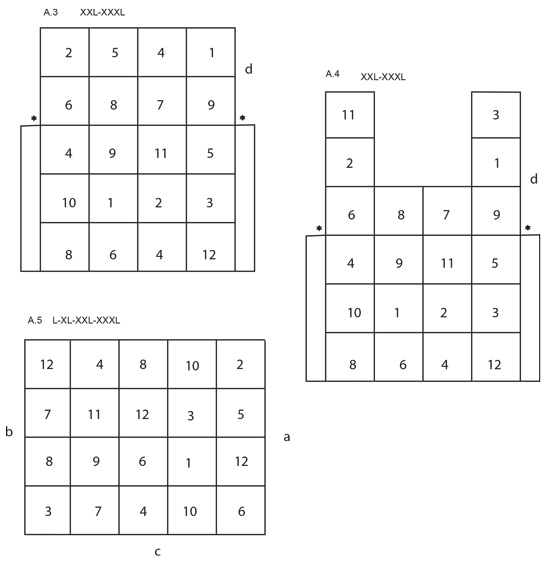
Hi, it say a total of 60 squares for size S and M. Looking at the pics A3, A4 and A5 I caculate 70 squares Where do I get wrong here please?
03.03.2024 - 15:51DROPS Design answered:
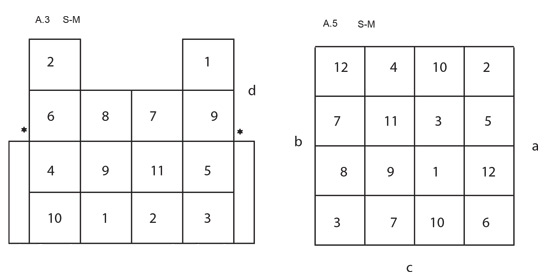
Dear Britta, for sizes S and M, you use A.3 only (the back and front pieces are the same). So you have 14 squares in each body piece (28 in total). Then, you have 16 squares for each sleeve (= 32 in total). 28+32 =60 squares. Happy crochetting!
03.03.2024 - 23:48
![]() Terra wrote:
Terra wrote:
Vad är A4 för S-M?
28.01.2024 - 17:49DROPS Design answered:
Hej Terra, Størrelse S-M hedder A.3 og A.5 :)
02.02.2024 - 12:16
![]() Brenda Cavanagh wrote:
Brenda Cavanagh wrote:
Hello, I am wanting to thank you for the help I received here for the Garden granny square crochet sweater. I had difficulty understanding how to follow the diagram for the sides and back of neck. After your help I'm happy to say that I was able to complete it. I appreciate this prompt and helpful help. Sincerely, Brenda
20.01.2024 - 03:56
|
|||||||||||||||||||||||||
Garden Squares Sweater#gardensquaressweater |
|||||||||||||||||||||||||
 |
 |
||||||||||||||||||||||||
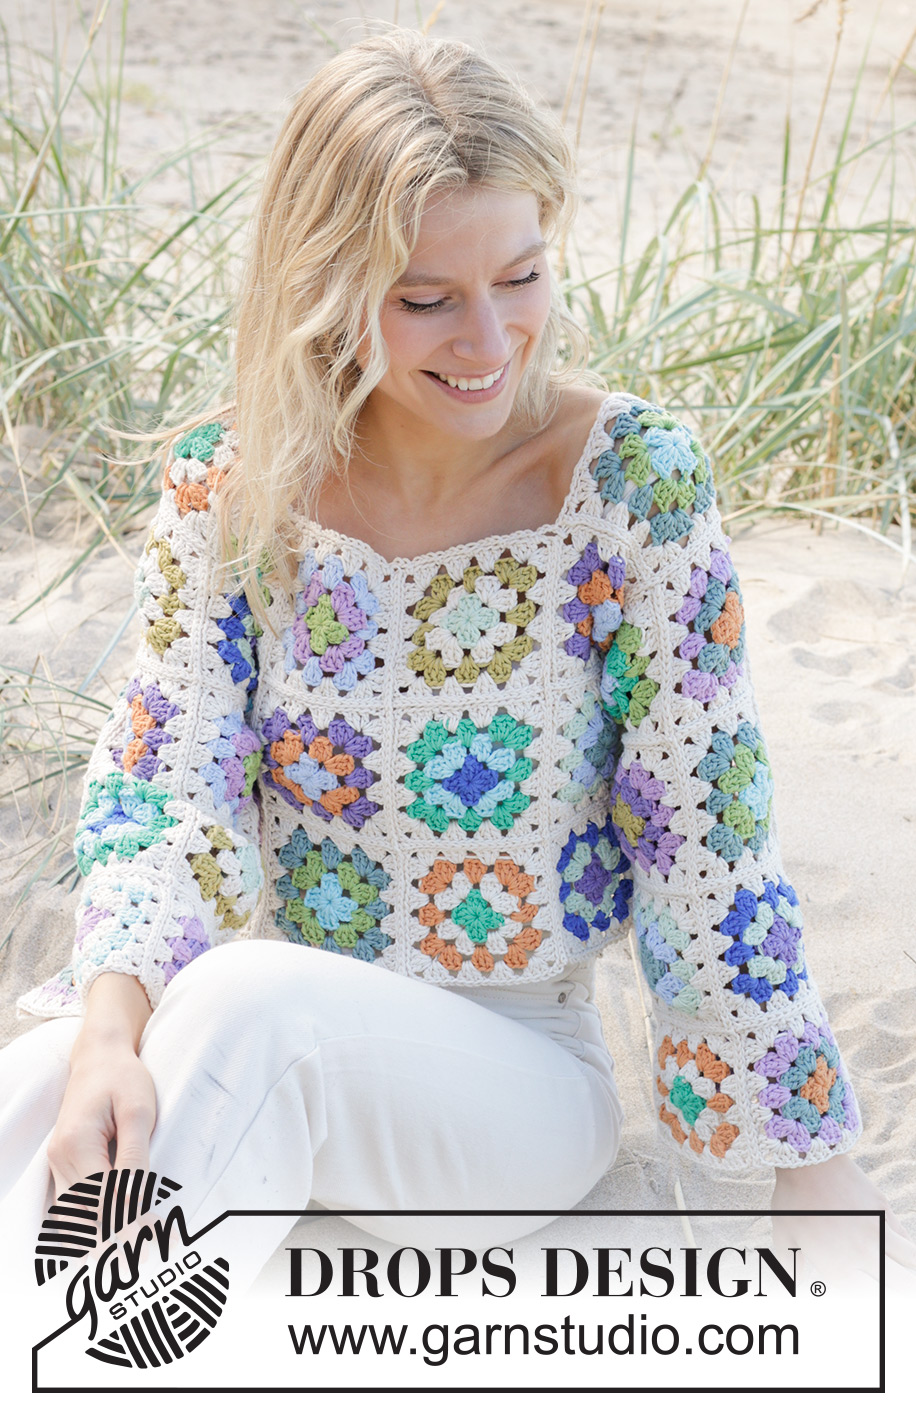
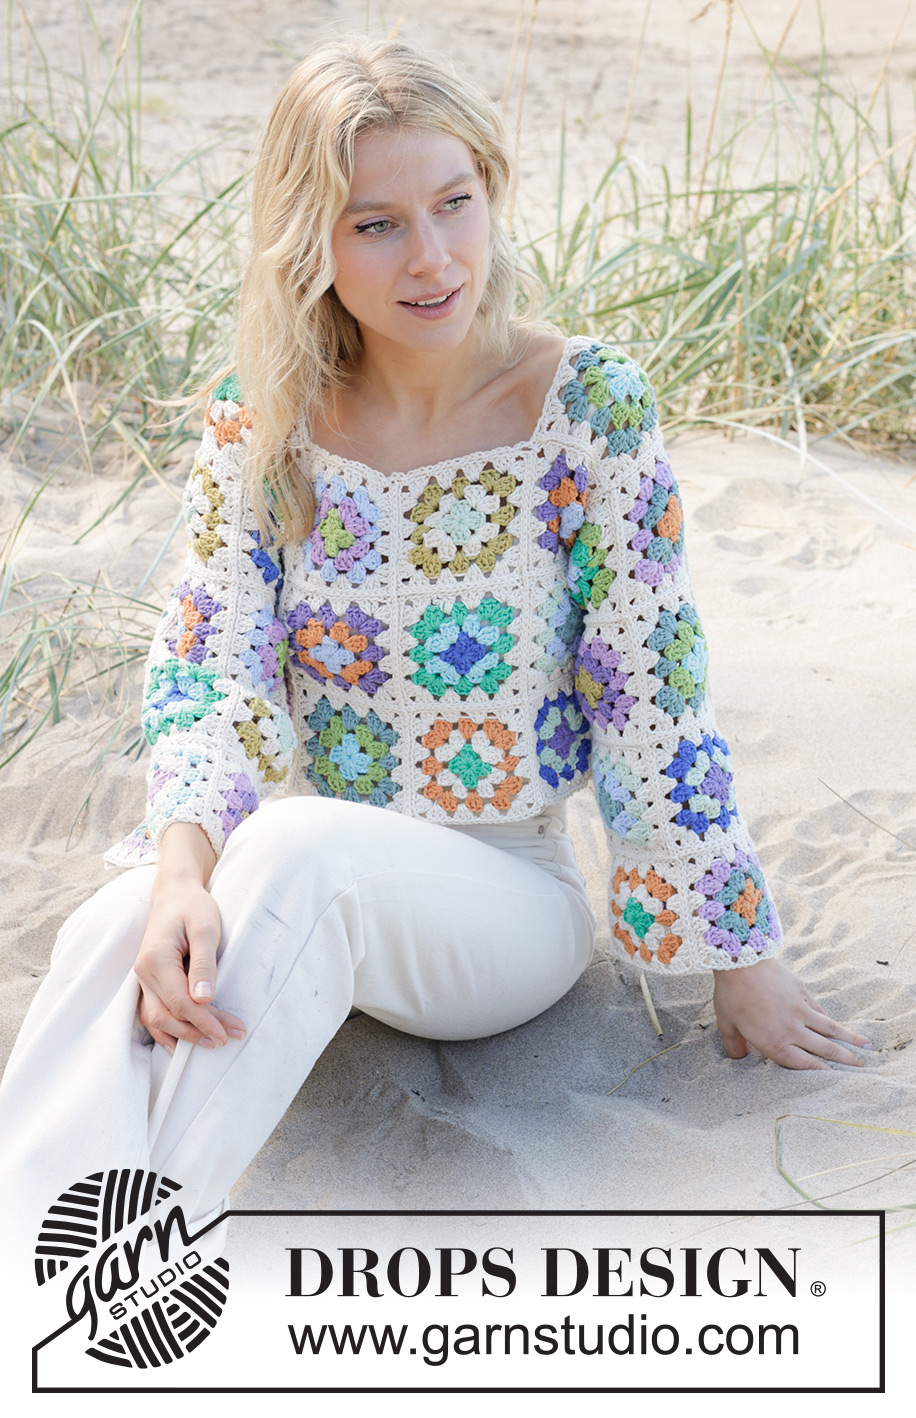
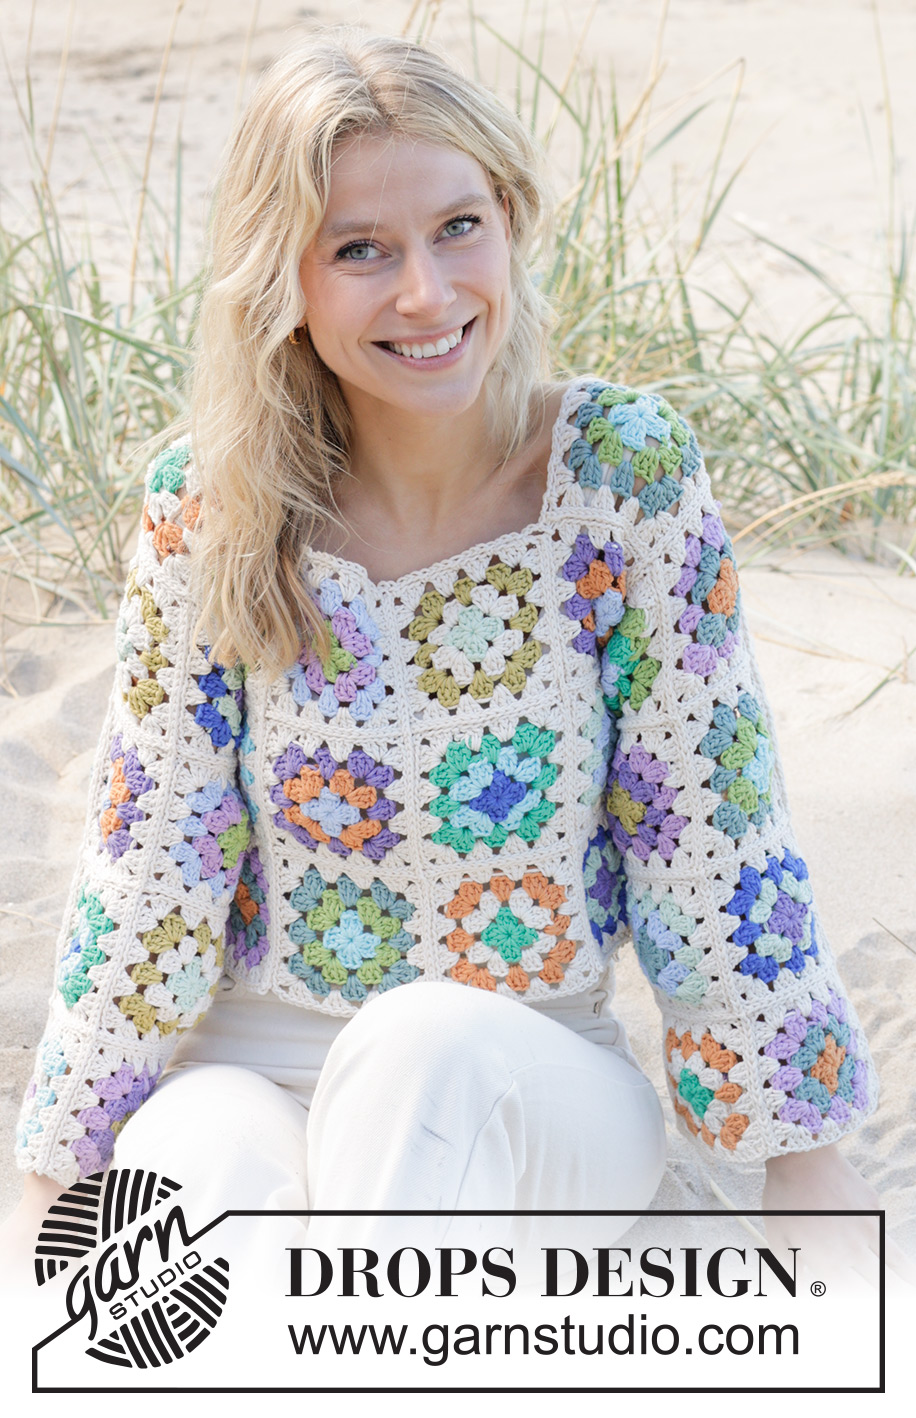
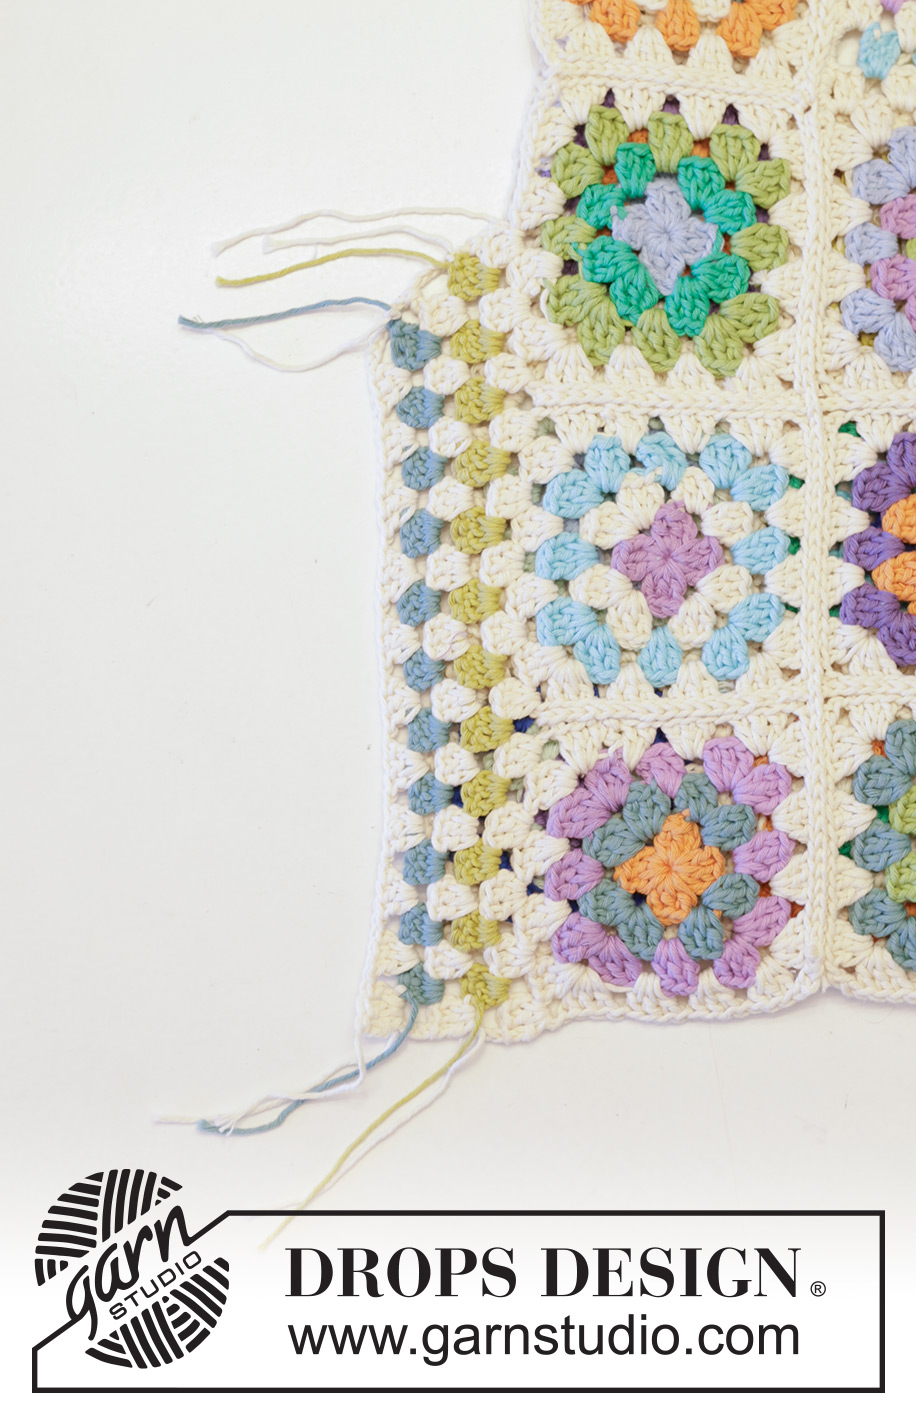
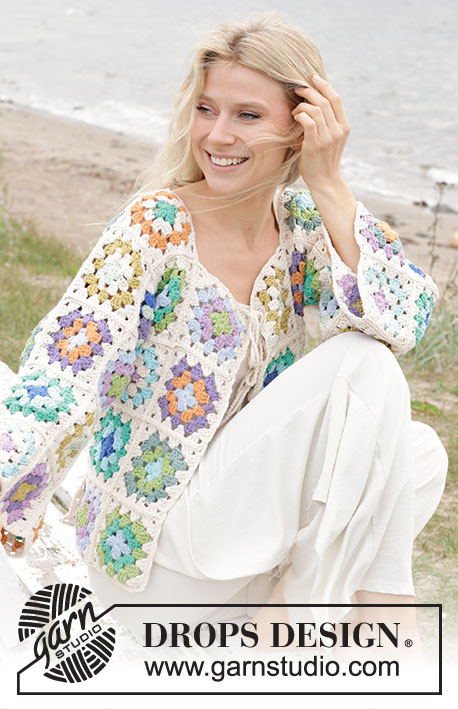
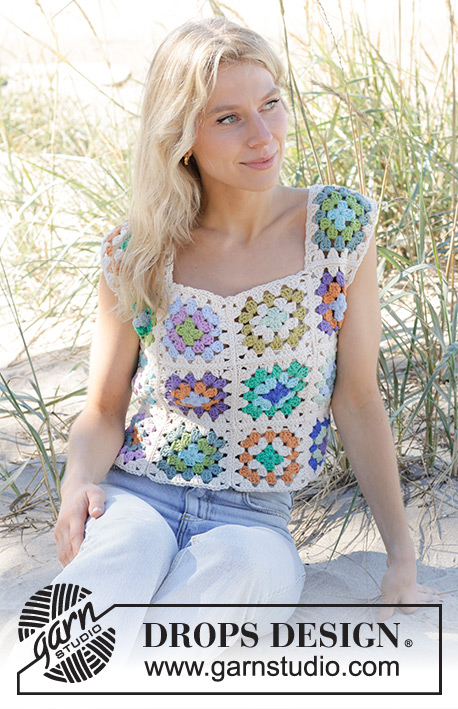
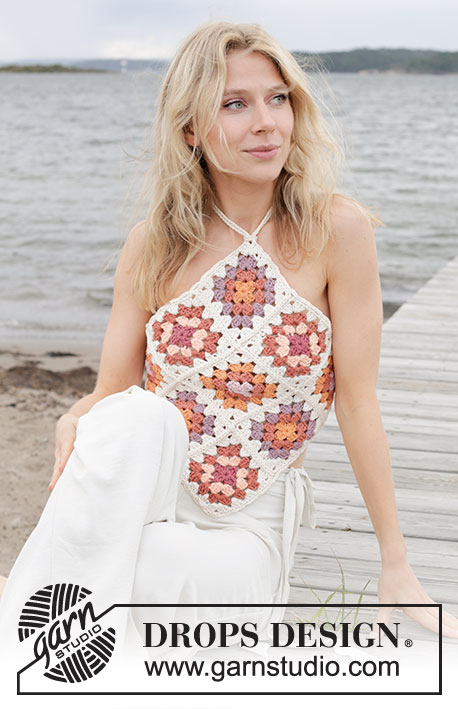
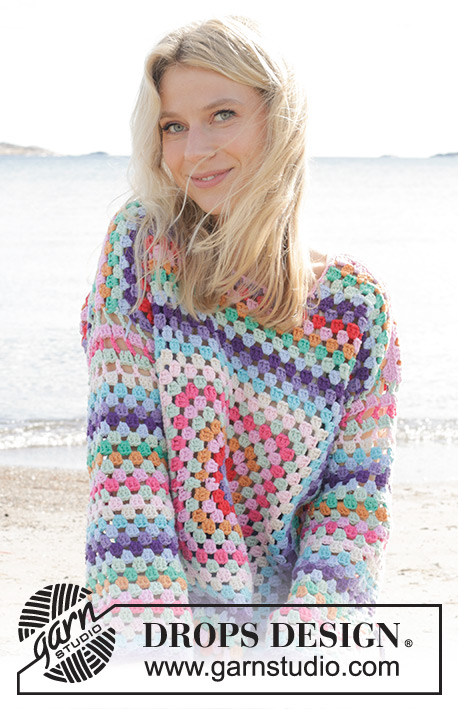
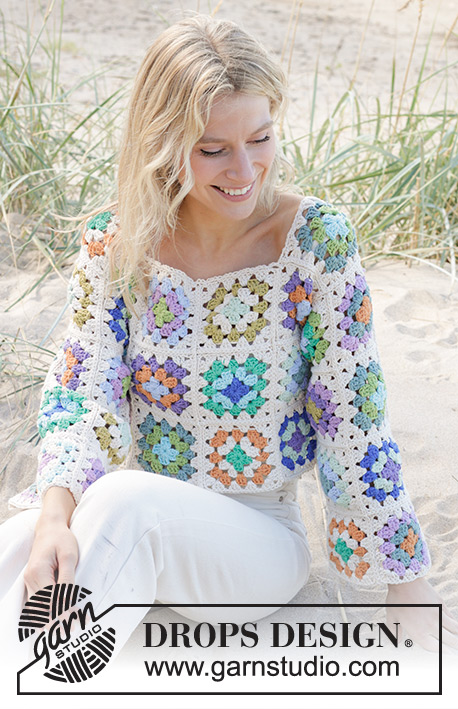
Crocheted sweater in DROPS Paris. The piece is worked in squares. Sizes S - XXXL.
DROPS 241-16 |
|||||||||||||||||||||||||
|
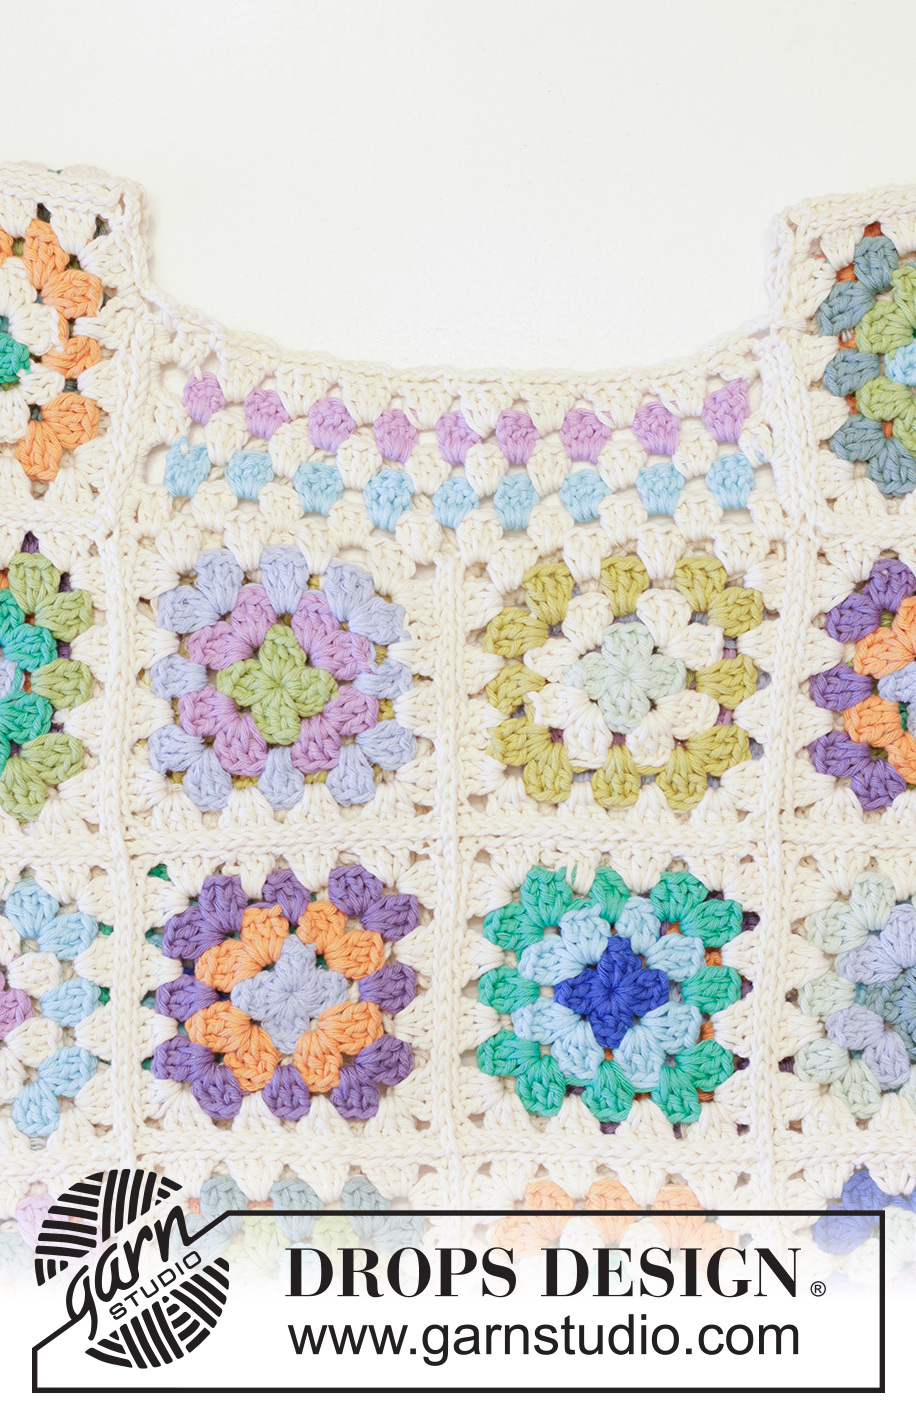
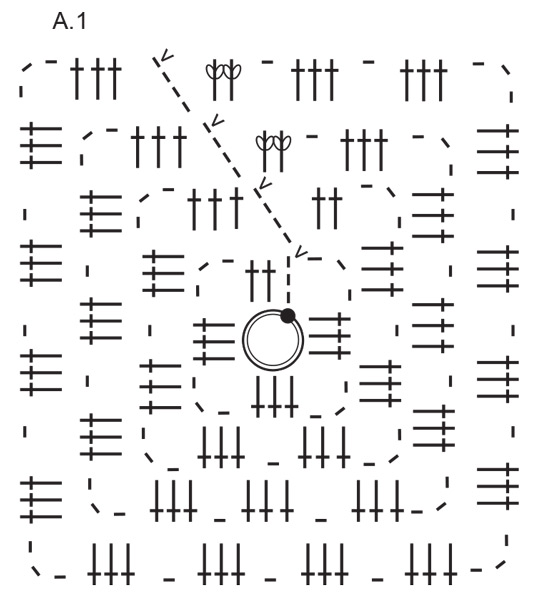
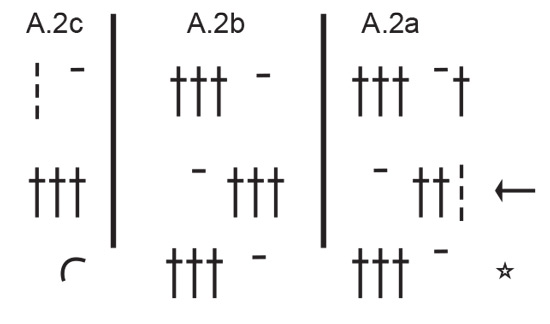
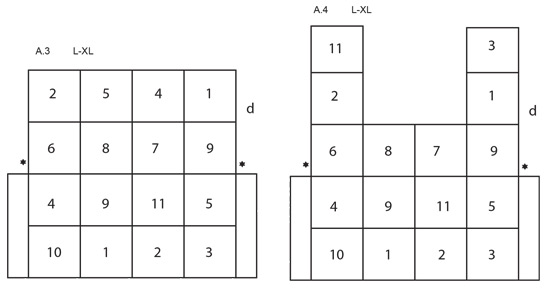
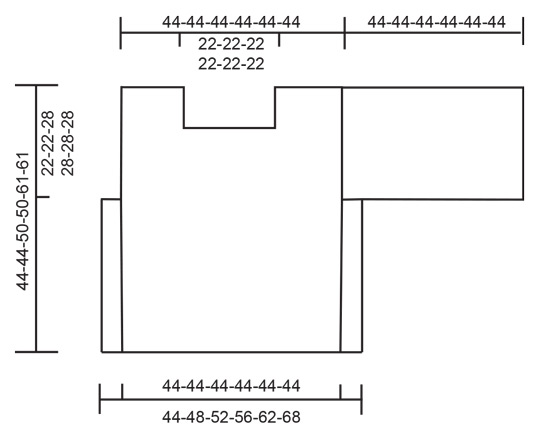
------------------------------------------------------- EXPLANATIONS FOR THE PATTERN: ------------------------------------------------------- COLORS: Work different combinations for the different squares: Square 1: CAST ON + ROUND 1: 02, light turquoise ROUND 2: 39, wasabi ROUND 3: 62, sea green ROUND 4: 17, off white Square 2: CAST ON + ROUND 1: 11, opal green ROUND 2: 17, off white ROUND 3: 71, tangerine ROUND 4: 17, off white Square 3: CAST ON + ROUND 1: 31, purple ROUND 2: 21, mint green ROUND 3: 09, royal blue ROUND 4: 17, off white Square 4: CAST ON + ROUND 1: 05, lilac ROUND 2: 17, off white ROUND 3: 02, light turquoise ROUND 4: 17, off white Square 5: CAST ON + ROUND 1: 62, sea green ROUND 2: 100, light wash ROUND 3: 21, mint green ROUND 4: 17, off white Square 6: CAST ON + ROUND 1: 100, light wash ROUND 2: 11, opal green ROUND 3: 39, wasabi ROUND 4: 17, off white Square 7: CAST ON + ROUND 1: 21, mint green ROUND 2: 17, off white ROUND 3: 61, lime ROUND 4: 17, off white Square 8: CAST ON + ROUND 1: 39, wasabi ROUND 2: 05, lilac ROUND 3: 100, light wash ROUND 4: 17, off white Square 9: CAST ON + ROUND 1: 100, light wash ROUND 2: 71, tangerine ROUND 3: 31, lilac ROUND 4: 17, off white Square 10: CAST ON + ROUND 1: 71, tangerine ROUND 2: 62, sea green ROUND 3: 05, lilac ROUND 4: 17, off white Square 11: CAST ON + ROUND 1: 09, royal blue ROUND 2: 02, light turquoise ROUND 3: 11, opal green ROUND 4: 17, off white Square 12: CAST ON + ROUND 1: 61, lime ROUND 2: 31, purple ROUND 3: 05, lilac ROUND 4: 17, off white CHANGING COLORS: For a neat transition when changing colors, work the last slip stitch on the round with the new color. PATTERN: See diagrams A.1 to A.5. Diagrams A.3 to A.5 show the positioning of the squares. ------------------------------------------------------- START THE PIECE HERE: ------------------------------------------------------- SWEATER - SHORT OVERVIEW OF THE PIECE: First work 60-60-72-72-80-80 squares in the different color combinations. Then the squares are crocheted together for the different pieces. In sizes S and M double-crochet groups are worked back and forth along the neck. I sizes M, L, XL, XXL and XXXL a side section is worked on each side. An edge is worked around the neck to finish. SQUARE: Use crochet hook size 5 MM = US H/8 and DROPS Paris. Read COLORS and CHANGING COLORS. Work squares according to diagram A.1 in the different color combinations. 1 square measures approx. 11 x 11 cm = 4⅜" x 4⅜". REMEMBER THE CROCHET GAUGE! Work 60-60-72-72-80-80 squares as follows: Square 1: 6-6-6-6-6-6 items Square 2: 6-6-6-6-6-6 items Square 3: 6-6-7-7-7-7 items Square 4: 4-4-7-7-9-9 items Square 5: 4-4-5-5-5-5 -items Square 6: 4-4-6-6-8-8 items Square 7: 6-6-6-6-6-6 items Square 8: 4-4-6-6-8-8 items Square 9: 6-6-6-6-6-6 items Square 10: 6-6-6-6-6-6 items Square 11:4-4-5-5-5-5 items Square 12: 4-4-6-6-8-8 items ASSEMBLY-1: Lay out the squares as shown in diagram A.3 for the front piece, A.4 for the back piece, (see diagram for your size). In sizes S and M the front and back pieces are the same, both worked according to A.3. Make sure all squares are right side up. The number in the diagram is the square-number in COLORS. Work the squares together first width-wise then length-wise. Use hook size 5 MM = US H/8 and color off white: Lay 2 squares edge-to-edge. Start in one corner and insert the hook from the right side through the back loop on first the one square then the other, pick up the strand and pull it through both loops on the hook *, work from *-* along 1 side, work 2 chain stitches and repeat from *-* along the next 2 squares. NOTE! Work 1 stitch in each corner and 1 stitch in each double crochet/chain stitch. Work all squares together width-wise, then length-wise. In sizes S and M, work double-crochet groups back and forth along the neck on back piece. This is not done in sizes L, XL, XXL and XXXL, skip the next section in these sizes. DOUBLE-CROCHET GROUPS ALONG NECK ON BACK PIECE: SIZES S & M: Work double-crochet groups back and forth along the neck, so the neck-line is not so deep. Work stripes, each row from the right side in color off white and each row from the wrong side in the color of your choice: Start in the corner of the square 7. Work A.2a, A.2b as far as the chain stitches in the corner of square 8, work A.2c in corner-space. NOTE! In the corner between 2 squares work 3 double crochets around the chain stitches from the first square, 1 chain stitch and 3 double crochets in the corner on the next square-space = 10 double-crochets group. Work back and forth according to A.2 for 5 rows. Work 1 row of single crochets along each short-side of the double-crochet groups as follows: 3 single crochets around each double crochet/3 chain stitches on the first 4 rows and 1 single crochet around the last double crochet/3 chain stitches = 13 single crochets on each side. Work this piece together with the squares on each shoulder, working 1 single crochet together with 1 double crochet/chain stitch from the square on the shoulder. There is 3-4 cm = 1⅛"-1½" left on each square up to the shoulder. Cut and fasten the strand. The back and front pieces are now finished in size S; the other sizes a side section is worked back and forth on each side of the back piece and on each side of each front piece as follows: LEFT SIDE, BACK PIECE: SIZES M, L, XL, XXL and XXXL: Work stripes, with each row from the right side in color off white and from the wrong side in the color of your choice: Start in the top corner of 2nd or 3rd square from the bottom edge - see star in illustration. Work along the side as follows: A.2a, A.2b as far as the bottom corner-space, work A.2c in the space, turn. NOTE! In the corners between 2 squares work 3 double crochets around the chain stitches from the first square, 1 chain stitch and 3 double crochets in the corner on the next square-space. Work 2-3-5-8-10 rows of A.2, the side section measures approx. 2-4-6-9-12 cm = ¾"-1½"-2⅜"-3½"-4¾". RIGHT SIDE, BACK PIECE: Work in the same way as the right side but start from the wrong side and crochet downwards. The rows from the wrong side are worked in in color off white and from the right side in the color of your choice. SIDES ON FRONT PIECE: Work in the same way as the back piece. SLEEVES: Lay the squares out as shown in diagram A.5; make sure all squares are right side up. The number in the diagram is the square-number in COLORS. Work the squares together first width-wise then length-wise. Fold the sleeve in the middle and work the sleeve seam (a to b in diagram A.5) leaving 0-2-3-4-9-12 cm = 0"-¾"-1⅛"-1½"-3½"-4¾" at the top. Work the other sleeve seam in the same way but in reverse (the squares at the top of one sleeve will be at the bottom of the other sleeve). ASSEMBLY: Lay the back and front pieces together, right side out. Work the sides together in the same way as the squares were worked together. Leave a split of 8-10 cm = 3⅛"-4" at the bottom of each side. Work the shoulder seams; in sizes L, XL, XXL and XXXL there are half squares at the top of each shoulder. Attach the sleeves, working first the 0-2-3-4-9-12 cm = 0"-¾"-1⅛"-1½"-3½"-4¾" which were not worked at the top of the side sections, then the sleeves to the armholes (c to d in diagrams A.3, A.4 andA.5) NECK. Start in the middle of one shoulder and work an edge around the neck, with color off white and hook size 5 MM = US H/8: Work 1 single crochet around the first chain-space, * 3 chain stitches, 1 single crochet around the next chain stitch *, work from *-* around the neck, finishing with 3 chain stitches and 1 slip stitch in the first single crochet on the round. Work a similar edge around the bottom of the sweater. Cut and fasten the strands. |
|||||||||||||||||||||||||
Diagram explanations |
|||||||||||||||||||||||||
|
|||||||||||||||||||||||||
 |
|||||||||||||||||||||||||
 |
|||||||||||||||||||||||||
 |
|||||||||||||||||||||||||
 |
|||||||||||||||||||||||||
 |
|||||||||||||||||||||||||
 |
|||||||||||||||||||||||||
Have you finished this pattern?Tag your pictures with #dropspattern #gardensquaressweater or submit them to the #dropsfan gallery. Do you need help with this pattern?You'll find 10 tutorial videos, a Comments/Questions area and more by visiting the pattern on garnstudio.com. © 1982-2026 DROPS Design A/S. We reserve all rights. This document, including all its sub-sections, has copyrights. Read more about what you can do with our patterns at the bottom of each pattern on our site. |
|||||||||||||||||||||||||


With over 40 years in knitting and crochet design, DROPS Design offers one of the most extensive collections of free patterns on the internet - translated to 17 languages. As of today we count 324 catalogs and 12290 patterns - 12280 of which are translated into English (US/in).
We work hard to bring you the best knitting and crochet have to offer, inspiration and advice as well as great quality yarns at incredible prices! Would you like to use our patterns for other than personal use? You can read what you are allowed to do in the Copyright text at the bottom of all our patterns. Happy crafting!
Post a comment to pattern DROPS 241-16
We would love to hear what you have to say about this pattern!
If you want to leave a question, please make sure you select the correct category in the form below, to speed up the answering process. Required fields are marked *.