
Popular categories
Looking for a yarn?


|
|||||||||||||||||||||||||
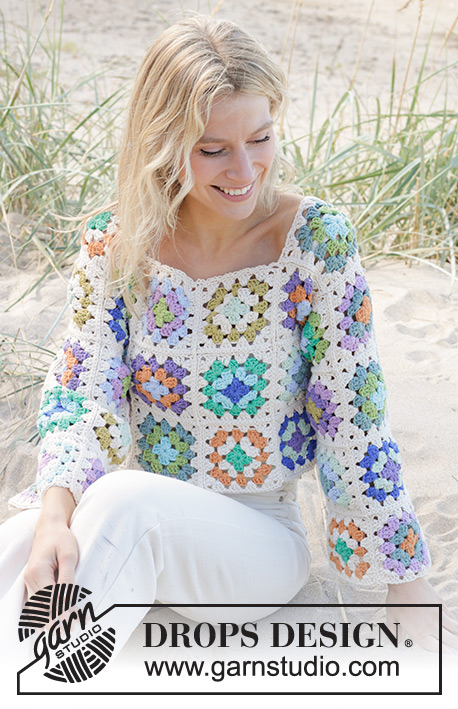
Garden Squares Cardigan |
|||||||||||||||||||||||||
 |
 |
||||||||||||||||||||||||
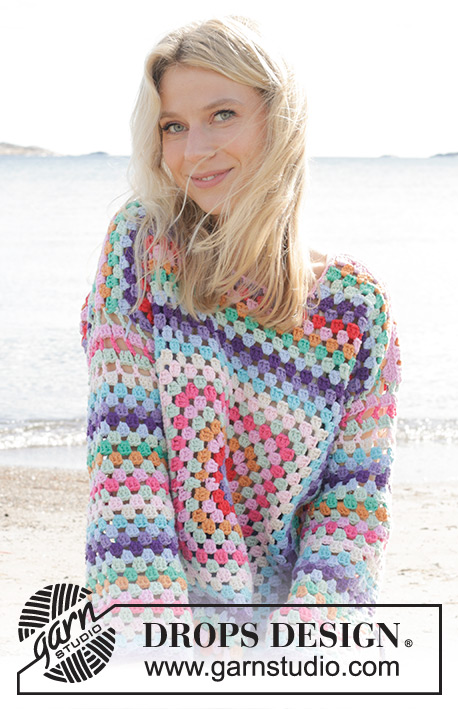
Crocheted jacket in DROPS Paris. The piece is worked in squares. Sizes S - XXXL.
DROPS 241-27 |
|||||||||||||||||||||||||
|
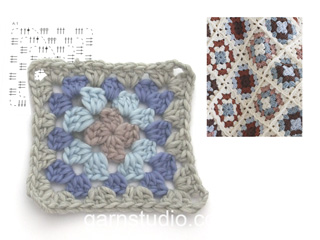
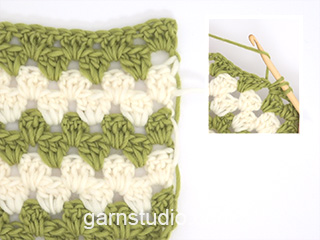
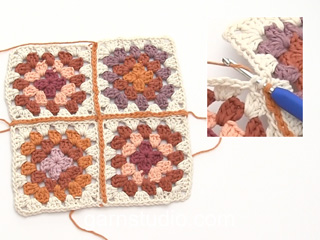
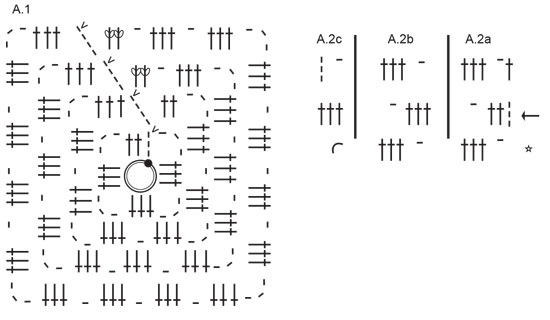
------------------------------------------------------- EXPLANATIONS FOR THE PATTERN: ------------------------------------------------------- COLORS: Work different combinations for the different squares: Square 1: CAST ON + ROUND 1: 02, light turquoise ROUND 2: 39, wasabi ROUND 3: 62, sea green ROUND 4: 17, off white Square 2: CAST ON + ROUND 1: 11, opal green ROUND 2: 17, off white ROUND 3: 71, tangerine ROUND 4: 17, off white Square 3: CAST ON + ROUND 1: 31, purple ROUND 2: 21, mint green ROUND 3: 09, royal blue ROUND 4: 17, off white Square 4: CAST ON + ROUND 1: 05, lilac ROUND 2: 17, off white ROUND 3: 02, light turquoise ROUND 4: 17, off white Square 5: CAST ON + ROUND 1: 62, sea green ROUND 2: 100, light wash ROUND 3: 21, mint green ROUND 4: 17, off white Square 6: CAST ON + ROUND 1: 100, light wash ROUND 2: 11, opal green ROUND 3: 39, wasabi ROUND 4: 17, off white Square 7: CAST ON + ROUND 1: 21, mint green ROUND 2: 17, off white ROUND 3: 61, lime ROUND 4: 17, off white Square 8: CAST ON + ROUND 1: 39, wasabi ROUND 2: 05, lilac ROUND 3: 100, light wash ROUND 4: 17, off white Square 9: CAST ON + ROUND 1: 100, light wash ROUND 2: 71, tangerine ROUND 3: 31, lilac ROUND 4: 17, off white Square 10: CAST ON + ROUND 1: 71, tangerine ROUND 2: 62, sea green ROUND 3: 05, lilac ROUND 4: 17, off white Square 11: CAST ON + ROUND 1: 09, royal blue ROUND 2: 02, light turquoise ROUND 3: 11, opal green ROUND 4: 17, off white Square 12: CAST ON + ROUND 1: 61, lime ROUND 2: 31, purple ROUND 3: 05, lilac ROUND 4: 17, off white CHANGING COLORS: For a neat transition when changing colors, work the last slip stitch on the round with the new color. PATTERN: See diagrams A.1 to A.6. Diagrams A.3 to A.6 show the positioning of the squares. ------------------------------------------------------- START THE PIECE HERE: ------------------------------------------------------- JACKET - SHORT OVERVIEW OF THE PIECE: First work 68-68-80-80-88-88 squares in the different color combinations. Then the squares are crocheted together for the different pieces. In sizes S and M double-crochet groups are worked back and forth along the neck. I sizes M, L, XL, XXL and XXXL a side section is worked on each side. An edge is worked around the jacket to finish. SQUARE: Use crochet hook size 5 MM = US H/8 and DROPS Paris. Read COLORS and CHANGING COLORS. Work squares according to diagram A.1 in the different color combinations. 1 square measures approx. 11 x 11 cm = 4 3/8" x 4 3/8". REMEMBER THE CROCHET GAUGE! Work 68-68-80-80-88-88 squares as follows: Square 1: 6-6-6-6-6-6 items Square 2: 6-6-6-6-6-6 items Square 3: 6-6-9-9-9-9 items Square 4: 6-6-7-7-9-9 items Square 5: 4-4-5-5-7-7 items Square 6: 6-6-8-8-8-8 items Square 7: 6-6-6-6-8-8 items Square 8: 6-6-8-8-8-8 items Square 9: 6-6-6-6-6-6 items Square 10: 6-6-6-6-8-8 items Square 11: 4-4-5-5-5-5 items Square 12: 6-6-8-8-8-8 items ASSEMBLY-1: Lay out the squares as shown in diagram A.3 for the back piece, A.4 for left front piece, A.5 for right front piece (see diagram for your size); make sure all squares are right side up. The number in the diagram is the square-number in COLORS. Work the squares together first width-wise then length-wise. Use hook size 5 MM = US H/8 and color off white: Lay 2 squares edge-to-edge. Start in one corner and insert the hook from the right side through the back loop on first the one square then the other, pick up the strand and pull it through both loops on the hook *, work from *-* along 1 side, work 2 chain stitches and repeat from *-* along the next 2 squares. NOTE! Work 1 stitch in each corner and 1 stitch in each double crochet/chain stitch. Work all squares together width-wise, then length-wise. In sizes S and M, work double-crochet groups back and forth along the neck on back piece. This is not done in sizes L, XL, XXL and XXXL, skip the next section in these sizes. DOUBLE-CROCHET GROUPS ALONG NECK ON BACK PIECE IN SIZES S & M: Work double-crochet groups back and forth along the neck, so the neck-line is not so deep on back piece. Work stripes, each row from the right side in color off white and each row from the wrong side in the color of your choice: Start in the corner of the first square 7. Work A.2a, A.2b as far as the chain stitches in the corner of square 8, work A.2c in corner-space. NOTE! In the corner between 2 squares work 3 double crochets around the chain stitches from the first square, 1 chain stitch and 3 double crochets in the corner on the next square-space = 10 double-crochets group. Work back and forth according to A.2 for 5 rows. Work 1 row of single crochets along each short-side of the double-crochet groups as follows: 3 single crochets around each double crochet/3 chain stitches on the first 4 rows and 1 single crochet around the last double crochet/3 chain stitches = 13 single crochets on each side. Work this piece together with the squares on each shoulder, work 1 single crochet together with 1 double crochet/chain stitch from the square on the shoulder. There is 3-4 cm = 1 1/8"-1 1/2" left on each square up to the shoulder. Cut and fasten the strand. The back and front pieces are now finished in size S; the other sizes a side section is worked back and forth on each side of the back piece and on one side of each front piece: RIGHT SIDE, BACK PIECE: SIZES M, L, XL, XXL and XXXL: Work stripes, with each row from the right side in color off white and from the wrong side in the color of your choice: Start in the top corner of 3rd or 4th square from the bottom edge - see star in illustration. Work along the side as follows: A.2a, A.2b as far as the bottom corner-space, work A.2c in the space, turn. NOTE! In the corners between 2 squares work 3 double crochets around the chain stitches from the first square, 1 chain stitch and 3 double crochets in the corner on the next square-space. Work 2-3-5-8-10 rows of A.2, the side section measures approx. 2-4-6-9-12 cm = 3/4"-1 1/2"-2 3/8"-3 1/2"-4 3/4". LEFT SIDE, BACK PIECE: Work in the same way as the right side but start from the wrong side so the decreases match on both sides. The rows from the wrong side are worked in in color off white and from the right side in the color of your choice. SIDE PIECES FRONT PIECES: Work in the same way on one side of each front piece (see diagrams A.4 and A.5). SLEEVES: Lay the squares out as shown in diagram A.6; make sure all squares are right side up. The number in the diagram is the square-number in COLORS. Work the squares together first width-wise then length-wise. Fold the sleeve in the middle and work the sleeve seam (a to b in diagram A.6) leaving 0-2-3-4-9-12 cm = 0”-3/4"-1 1/8"-1 1/2"-3 1/2"-4 3/4" at the top. Work the other sleeve seam in the same way but in reverse (the squares at the top of one sleeve will be at the bottom of the other sleeve). ASSEMBLY: Lay the back and front pieces together, right side out. Work the sides together in the same way as the squares were worked together. Leave a split of 8-10 cm = 3 1/8"-4” at the bottom of each side. Attach the sleeves, working first the 0-2-3-4-9-12 cm = 0”-3/4"-1 1/8"-1 1/2"-3 1/2"-4 3/4" which were not worked at the top of the side sections, then the sleeves to the armholes (c to d in diagrams A.3 and A.4/A.5) EDGE: Start at the bottom of the right front piece with color off white and hook size 5 MM = US H/8: Work 1 single crochet around the first chain-space, * 3 chain stitches, 1 single crochet around the next chain stitch *, work from *-* around the whole opening, finishing with 3 chain stitches and 1 slip stitch in the first single crochet on the round. Cut and fasten the strands. TIES: Work a row of chain stitches, 60 to 80 cm = 23 5/8" to 31 1/2", with hook size 5 MM = US H/8 and color off white. Cut and fasten the strand. Fold the cord double, thread the loop through the chain-space at the top of the neck on one front piece, thread the 2 ends of the cord through the loop. Repeat on the other front piece. |
|||||||||||||||||||||||||
Diagram explanations |
|||||||||||||||||||||||||
|
|||||||||||||||||||||||||
|
|||||||||||||||||||||||||

|
|||||||||||||||||||||||||

|
|||||||||||||||||||||||||

|
|||||||||||||||||||||||||
|
Have you made this or any other of our designs? Tag your pictures in social media with #dropsdesign so we can see them! Do you need help with this pattern?You'll find tutorial videos, a Comments/Questions area and more by visiting the pattern on garnstudio.com. © 1982-2024 DROPS Design A/S. We reserve all rights. This document, including all its sub-sections, has copyrights. Read more about what you can do with our patterns at the bottom of each pattern on our site. |
|||||||||||||||||||||||||


With over 40 years in knitting and crochet design, DROPS Design offers one of the most extensive collections of free patterns on the internet - translated to 17 languages. As of today we count 304 catalogs and 11422 patterns - 11417 of which are translated into English (US/in).
We work hard to bring you the best knitting and crochet have to offer, inspiration and advice as well as great quality yarns at incredible prices! Would you like to use our patterns for other than personal use? You can read what you are allowed to do in the Copyright text at the bottom of all our patterns. Happy crafting!
Comments / Questions (12)
Ved i hvor meget garn der skal bruges hvis man kun ønsker at bruge 1 farve udover den hvide bundfarve?
15.03.2024 - 18:47Hej Jeg er et spørgsmål mht hvordan firkanterne skal hækles sammen. Der står først på tværs og derefter på langs. Hvad betyder på tværs? Er det vandret eller lodret? Jeg vil jo mene at på langs betyder vandret/horisontalt, men kan ikke forstår at på tværs så skulle betyde lodret, altså fra bunden til toppen af arbejdet?
17.01.2024 - 16:52DROPS Design answered:
Hei Janne. Her vil jeg mene at på tvers betyr vannrett. Om du forstørrer bildet av jakken så kan du se at det først ble heklet vannrett, deretter loddrett. Man ser det på hjørnene der den loddrette sammen heklingen ligger over den vannrette sammen heklingen. mvh DROPS design
18.01.2024 - 09:25Bonjour, j'adore ce modèle mais je voudrais le réaliser en uni, et en laine ou mélange, pas en coton. Je suppose que le calcul du nombre de pelotes est différent ? Comment faire svp ? Merci d'avance
23.09.2023 - 13:50DROPS Design answered:
Bonjour Mme Druart, la quantité va dépendre du métrage - utilisez notre convertisseur pour voir les alternatives possibles et les quantités correspondantes - retrouvez ici quelques explications. Bon crochet!
25.09.2023 - 08:41Hvordan skal jeg få festet ermet pent? Ermet har 4 ruter og ermhullet har 4 ruter + de heklede radene i siden.
20.08.2023 - 21:20DROPS Design answered:
Hei Mona. Ermet hekles inn i ermhullet. Husk å se på diagrammet (c til d på diagram A.3 og A.4/A.5). Strekk litt i ermet om det ikke passer helt inn i ermhullet. mvh DROPS Design
21.08.2023 - 13:36Har skickat efter Drops Paris till en tröja. Fick hem garnet idag men ett nystan saknas, har bara fått 10 st Paris Natur, färgbad 1682-2,dock står det att 11 är levererade. Order-Id 301856 Mvh Kerstin Aronsson
04.08.2023 - 11:02I don’t understand the instructions for the side stripes. The instruction says to start in the top corner, but in the photo it starts in the middle of the square. The diagram A2a shows one single treble crochet, but I can’t see where that is in the photo. You also talk about decreases in the instruction and I can see in the photo that the number of clusters decreases along the rows, but do I keep decreasing for each row that I do? Thank you.
07.07.2023 - 13:40DROPS Design answered:
Dear Joanne, the photo is just an example of the side stripes, it's the stripes in the Top version of this pattern. You should follow the indications in the pattern and not the photograph. It's a sample but it doesn't contain the full instructions, so continue working with the charts, instead of following what is shown in the photograph. There are no decreases either in the jacket; it seems to be a typo from the top version. We will correct it as soon as possible. Happy knitting!
10.07.2023 - 16:04Ik vind het patroon A 6 niet voor de mouw
03.06.2023 - 23:01DROPS Design answered:
Dag Alfrida,
Deze staat onderaan de beschrijving tussen alle andere telpatronen, aan de rechterkant in de tweede rij waar de patronen met de hokjes met cijfers erin staan.
04.06.2023 - 10:45Jag vill virka "Garden Squares Cardigan" men vill byta garn till Drops Muskat. Hur ska jag räkna?
03.06.2023 - 11:07DROPS Design answered:
Hei Brita. "Garden Squares Cardigan" er heklet i DROPS Paris som tilhører garngruppe C, DROPS Muskat tilhører garngruppe B (Muskat er tynnere enn Paris), slik at oppskriften vil ikke stemme om man bruker et tynnere garn. Du kan evnt tilpasse selv, hekle til rutene måler 11 x 11 cm og stavgrupper i hals/sidene/kant. Da vi ikke har heklet denne i garngruppe B har vi heller ikke den nøyaktige garnmengden. mvh DROPS Design
05.06.2023 - 06:23Je suis vraiment folle de ce cardigan. J'aime beaucoup. Est ce qu'il ya moyen de nous faire une vidéo qui montre pas à pas comment faire les "GROUPES DE BRIDES LE LONG DE L'ENCOLURE DOS". Je vous en serais très reconnaissante. Merci d'avance Pascaline
31.05.2023 - 23:23DROPS Design answered:
Bonjour Pascaline, vous devez simplement crocheter les diagrammes A.2a (début de rang sur l'endroit, fin de rang sur l'envers), puis répétez A.2b et terminez par A.2c (fin de rang sur l'endroit, début de rang sur l'envers), autrement dit, c'est simplement comme le dernier rang du carré, sauf que vous n'avez pas de coin mais A.2a et A.2c de chaque côté - regardez la 3ème photo, elle montre cette partie, cela devrait pouvoir vous aider. Bon crochet!
01.06.2023 - 09:14Olkapäät valuu, ei pysy paikoillaan ? miten vois korjata tilanteen ?
29.05.2023 - 20:20DROPS Design answered:
Hei, on tärkeää, että jakun ympäri virkattava reunus ei virkata liian löyhästi. Halutessasi voit virkata vielä yhden kerroksen kiinteitä silmukoita pääntien ja olkapäiden reunoihin.
01.06.2023 - 16:33