
Popular categories
Looking for a yarn?


Comments / Questions (30)
![]() Gaël wrote:
Gaël wrote:
Bonjour, Je trouve 2 vidéos contradictoires concernant la double bride une "Comment crocheter des torsades avec des mailles en relief en suivant un diagramme" et oula DB est représentée par un cercle vide et l'autre vidéo illustrant la double bride. Dois-je réaliser ce modèle en double brides et donc en commençant par 2 jetés ou bien un seul Je vous remercie de votre retour et vous remercie pour ce partage de beaux modèles
21.10.2022 - 12:50DROPS Design answered:
Bonjour Gaël, dans la vidéo, on crochète des brides et des mailles serrées et non des double-brides et des mailles serrées (correction faite, merci pour votre retour) comme dans le diagramme, autrement dit, crochetez bien des double-brides comme indiqué dans le diagramme. Bon crochet!
21.10.2022 - 16:39
![]() Ariel wrote:
Ariel wrote:
Hej, vad menas med "Virka 1 fyrdubbelstolpe på samma sätt som förklarat ovan, men virka så att dessa fyrdubbelstolparna blir liggande bakom fyrdubbelstolparna med svart cirkel."? Hur gör man så att de hamnar liggande bakom fyrdubbelstolparna med svart cirkel?
17.09.2022 - 18:54DROPS Design answered:
Hei Ariel. Ta en titt på denne hjelpevideoen til diagrammet. Husk å les teksten til videoen: Hur man virkar flätor med relieffmaskor enligt diagram mvh DROPS Design
19.09.2022 - 12:58
![]() Katherine Whyte wrote:
Katherine Whyte wrote:
I’m confused by the instruction to add 6 chain stitches at the end of the next two rows. Doesn’t that mean that they will be at different rows thus making the arm holes uneven. Or are they mean to be worked only on one side?
30.03.2022 - 04:38DROPS Design answered:
Dear Katherine, yes, they will be on different rows, but that is only a slight difference, will not distort the final piece. Happy Knitting!
30.03.2022 - 06:21
![]() Gabriela wrote:
Gabriela wrote:
Bonjour, Je suis en train faire ce pull taille L. Je suis au niveau du DOS. Il y a des différences entre ce qui est indiqué dqns le patron et ce qui est écrit au début du texte. Dans le patron il y a 17 motifs sur un rang ( A1 A2 A3) et dans les instructions vous dites faire A1 dans les trois premières mailles ce qui veut dire que je ne peux pas terminer A3. Je dois suivre le patron ou bien les instructions ? Ou bien je n'ai rien compris ? Merci d'avance
30.10.2021 - 23:52DROPS Design answered:
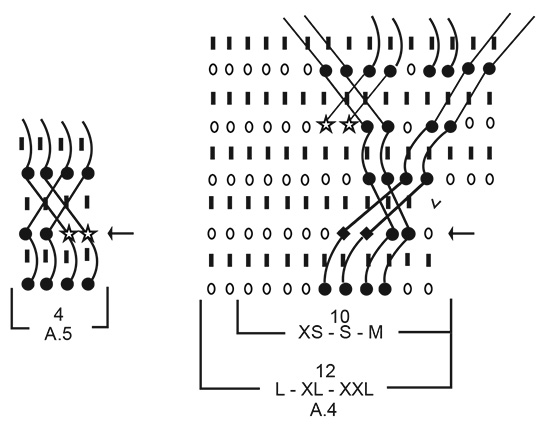
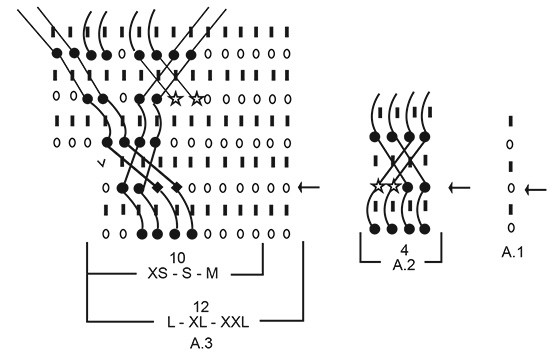
Bonjour Gabriela, en L (= 4ème taille = 19 mailles) crochetez ainsi: 1 fois A.1 (= 1 mailles serrée/double-bride), puis crochetez A.2 au-dessus des 4 mailles suivantes = 1 fois A.2 (= 4 m), puis A.3 au-dessus des 12 mailles suivantes = les 12 mailles du diagramme A.3, autrement dit vous avez bien: 1+4+12=17 mailles. (En M, vous aurez: 3 mailles en A.1, 4 mailles de A.2 et 10 de A.3 = 3+4+10=17 mailles). Bon crochet!
03.11.2021 - 07:17
![]() Chantal Duverbecq wrote:
Chantal Duverbecq wrote:
Combien fait -il de pelotes pour ce modèle, laine drops air mix 28 taille XL
16.08.2021 - 16:57DROPS Design answered:
Bonjour Chantal, pour la taille XL vous avez besoin de 11 pelotes de DROPS Air. Bon crochet!
17.08.2021 - 00:28
![]() Carina wrote:
Carina wrote:
Hallo, bij het haken van de rechterschouder van het achterpand staat er op een gegeven moment : haak zoals hiervoor over de (in mijn geval maat L) 26 steken. Welke steken of patroon zijn dat dan juist?
27.07.2021 - 12:55DROPS Design answered:
Dag Carina,
Je haakt over die 26 steken op dezelfde manier verder in patroon zoals de de toeren daarvoor deed.
20.08.2021 - 11:02
![]() Emma wrote:
Emma wrote:
Hola! Tengo un problema. No puedo entender el inicio de la manga. Porque 24 cadenas se me quedan a mitad del ancho de la sisa. A que parte corresponden?
21.06.2021 - 23:54DROPS Design answered:
Hola Emma, la manga se empieza desde arriba con la parte más estrecha de la copa de la manga. Según trabajas, vas a ir aumentando para tener el tamaño total de la sisa.
27.06.2021 - 19:12
![]() Claudia wrote:
Claudia wrote:
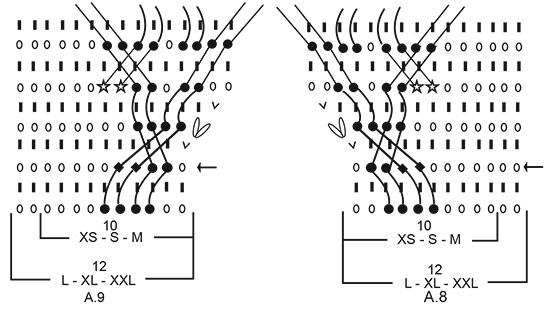
Hola! No se si me equivoco pero me parece que en la segunda hilera de p.a.d de A9 y A4 uno de los cruces debería ir por detrás para que quede simétrico con A8 y A3. Saludos!!
10.06.2021 - 01:50
![]() Thea Aan wrote:
Thea Aan wrote:
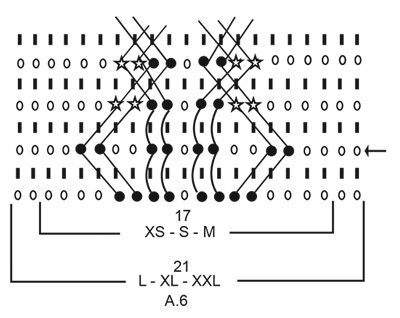
Vraag Wat is de betekenis van de 2 ruitjes in teltekening 3A ter hoogte van de pijl
04.06.2021 - 23:00DROPS Design answered:
Dag Thea,
Dit is '1 vaste in de steek', dus het tweede symbool in de lijst, alleen is het een beetje gekanteld in het telpatroon.
05.06.2021 - 09:22
![]() Maria wrote:
Maria wrote:
How many meters of yarn are they needed? Cuantos metros o yardas de lanas se ocupan?
04.05.2021 - 15:49DROPS Design answered:
Dear Maria, to make this piece you will need (depending on the size) 400-450-450-500-550-600 gramm of DROPS Air yarn, which is 150 m / 50 gramm, but takes into consideration the special air-blown quality of the yarn. Happy Crafting!
04.05.2021 - 16:55
|
|||||||||||||||||||||||||||||||
Enchanted Underwood#enchantedunderwoodsweater |
|||||||||||||||||||||||||||||||
 |
 |
||||||||||||||||||||||||||||||
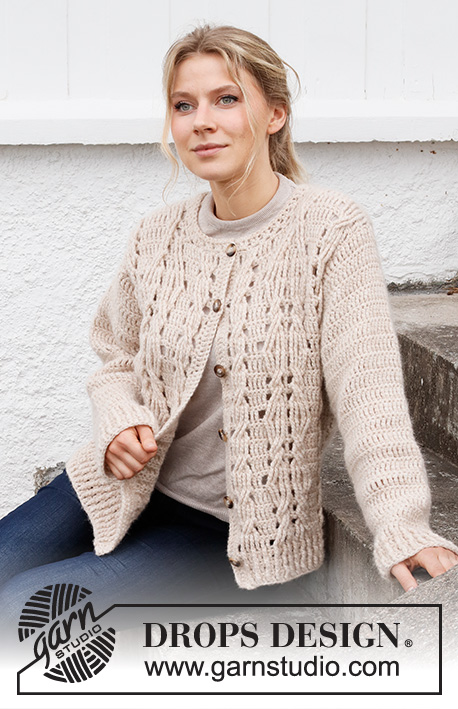
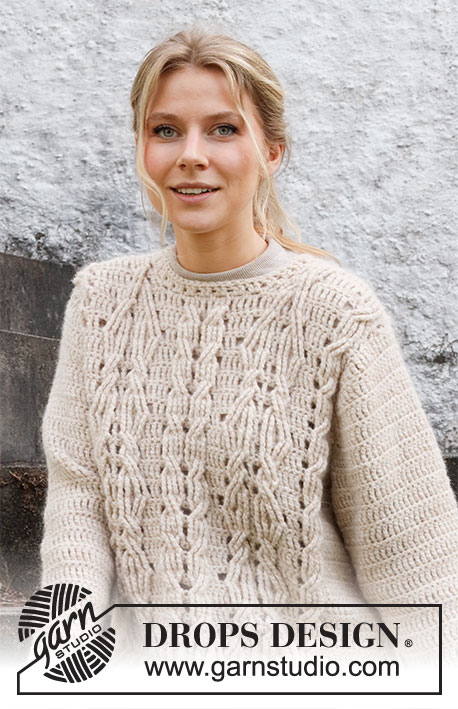
Crocheted sweater in DROPS Air. The piece is worked top down with cables and relief stitches. Sizes XS - XXL.
DROPS 218-32 |
|||||||||||||||||||||||||||||||
|
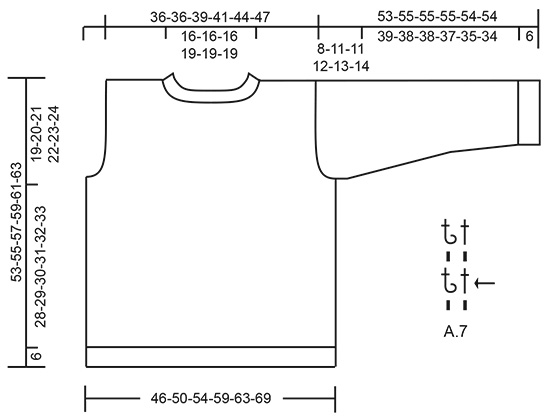
------------------------------------------------------- EXPLANATIONS FOR THE PATTERN: ------------------------------------------------------- CHAIN STITCH: If you work outermost on the hook the chain stitch will often be too tight; 1 chain stitch should be as long as 1 single crochet/treble crochet is wide. CROCHET INFORMATION: At the beginning of each row of treble crochets, work 4 chain stitches; these chain stitches do not replace the first treble crochet. At the beginning of each row/round of single crochets work 1 chain stitch; this chain stitch does not replace the first single crochet. PATTERN: See diagrams A.1 to A.9. Find your size in the diagrams (applies to A.3, A.4, A.6, A.8 and A.9). INCREASE TIP (for armholes): Increase 2 stitches by working 3 stitches in one stitch. DECREASE TIP (for sleeves): Decrease 1 stitch on each side of the piece by working together the first 2 stitches on the row and the last 2 stitches on the row as follows: Work 1 single crochet, but wait with the last yarn over and pull-through (= 2 loops on the hook), work 1 single crochet in the next stitch; on the last yarn over pull the strand through all 3 loops on the hook (= 1 stitch decreased). ------------------------------------------------------- START THE PIECE HERE: ------------------------------------------------------- SWEATER – SHORT OVERVIEW OF THE PIECE: The piece is worked top down and back and forth in sections, which are crocheted or sewn together to finish. BACK PIECE: Left shoulder: Work 15-15-17-17-19-21 chain stitches – read CHAIN STITCH, with hook size 5 mm = US H/8 and Air. Turn and work the first row from the right side as follows: 1 treble crochet in each chain stitch – read CROCHET INFORMATION = 15-15-17-17-19-21 treble crochets. Then work a row with 1 single crochet in each treble crochet. Now work pattern (start on the row with an arrow which corresponds to your size in the diagrams) from the right side as follows: Work A.1 over the first 1-1-3-1-3-5 stitches, A.2 over the next 4 stitches, A.3 over the next 10-10-10-12-12-12 stitches. When the row with the arrow is finished, cut the strand and lay the piece to one side. Right shoulder: Work 15-15-17-17-19-21 chain stitches, with hook size 5 mm = US H/8 and Air. Turn and work the first row from the right side as follows: 1 treble crochet in each chain stitch = 15-15-17-17-19-21 treble crochets. Then work a row with 1 single crochet in each treble crochet. Now work pattern (start on the row with an arrow which corresponds to your size in the diagrams) from the right side as follows: Work A.4 over the first 10-10-10-12-12-12 stitches, A.5 over the next 4 stitches, A.1 over the last 1-1-3-1-3-5 stitches. When the row with the arrow is finished, work the next row in the diagrams (= 1 stitch increased towards the neck), then work 20-20-20-24-24-24 loose chain stitches (= neck) and continue the same row over the left shoulder as follows: Work A.3 over the first 10-10-10-12-12-12 stitches (= 1 stitch increased towards the neck), A.2 over the next 4 stitches, A.1 over the last 1-1-3-1-3-5 stitches = 52-52-56-60-64-68 stitches. REMEMBER THE CROCHET GAUGE! Continue the next 2 rows in the pattern and, over the new stitches on the neck, work 1 treble crochet in each stitch from the right side and 1 single crochet in each stitch from the wrong side. Now work pattern as follows: Work as before over the first 22-22-24-26-28-30 stitches, A.2 over the next 4 stitches and A.5 over the next 4 stitches (make sure you work the same row in the diagrams on each side of the back piece), work as before over the last 22-22-24-26-28-30 stitches. When A.3 and A.4 have been finished in height, work pattern as follows: Work as before over the first 5-5-7-5-7-9 stitches, A.6 over the next 17-17-17-21-21-21 stitches, work A.2 and A.5 as before, A.6 over the next 17-17-17-21-21-21 stitches and work as before over the last 5-5-7-5-7-9 stitches. Continue this pattern back and forth. Repeat the diagrams from the row with the arrow. When the piece measures 17-16-17-18-19-19 cm = 6¾"-6¼"-6¾"-7"-7½"-7½", increase 2 stitches on each side of the piece for the armholes – read INCREASE TIP. Increase like this on each row 2-3-3-3-3-4 times on both sides = 60-64-68-72-76-84 stitches. At the end of the next 2 rows work 3-4-5-6-7-7 loose chain stitches for the armholes = 66-72-78-84-90-98 stitches. The new stitches are worked with A.1. Continue back and forth until the piece measures 47-49-51-53-55-57 cm = 18½"-19¼"-20"-21"-21⅝"-22½" measured from the shoulder – adjust so you finish after the row with the arrow in A.6 or after the next to last row in the diagram. Now work an edge as follows: Work 1 row with 1 single crochet in each stitch and increase 1 stitch on the row by working 2 single crochets in one stitch = 67-73-79-85-91-99 stitches. Work from the row with the arrow in A.7 until there is 1 stitch left, work the first stitch in A.7. Repeat the last 2 rows in the diagram until the edge measures 6 cm = 2⅜" – adjust so you finish after a row of double crochets/relief triple double crochets. Cut and fasten the strand. The back piece measures approx. 53-55-57-59-61-63 cm = 21"-21⅝"-22½"-23¼"-24"-24¾" from the shoulder down. FRONT PIECE: Right shoulder: Work 15-15-17-17-19-21 chain stitches – remember CHAIN STITCH, with hook size 5 mm = US H/8 and Air. Turn and work the first row from the right side as follows: 1 treble crochet in each chain stitch – remember CROCHET INFORMATION = 15-15-17-17-19-21 treble crochets. Then work a row with 1 single crochet in each treble crochet. Now work pattern (start on the row with the arrow which corresponds to your size in the diagrams) from the right side as follows: Work A.1 over the first 1-1-3-1-3-5 stitches, A.2 over the next 4 stitches, A.8 over the next 10-10-10-12-12-12 stitches. When row 3 from the arrow is finished, cut the strand and lay the piece to one side. Left shoulder: Work 15-15-17-17-19-21 chain stitches, with hook size 5 mm = US H/8 and Air. Turn and work the first row from the right side as follows: 1 treble crochet in each chain stitch = 15-15-17-17-19-21 treble crochets. Then work a row with 1 single crochet in each treble crochet. Now work pattern (start on the row with an arrow which corresponds to your size in the diagrams) from the right side as follows: Work A.9 over the first 10-10-10-12-12-12 stitches, A.5 over the next 4 stitches, A.1 over the last 1-1-3-1-3-5 stitches. Continue back and forth until row 4 has been worked, then work 16-16-16-20-20-20 loose chain stitches at the end of the row (= neck) and continue row 4 over the right shoulder as follows: Work A.8 over the first 12-12-12-14-14-14 stitches, A.2 over the next 4 stitches, A.1 over the last 1-1-3-1-3-5 stitches = 52-52-56-60-64-68 stitches. Continue the next 2 rows in the diagrams and over the new stitches on the neck work 1 treble crochet in each stitch from the right side and 1 single crochet in each stitch from the wrong side. Now work pattern as before over the first 22-22-24-26-28-30 stitches, A.2 over the next 4 stitches and A.5 over the next 4 stitches (make sure you work the same rows in A.2 and A.5 on each side of the front piece), work as before over the last 22-22-24-26-28-30 stitches. When A.8 and A.9 are finished in height, work as follows: As before over the first 5-5-7-5-7-9 stitches, A.6 over the next 17-17-17-21-21-21 stitches, A.2 and A.5 as before, A.6 over the next 17-17-17-21-21-21 stitches and as before over the last 5-5-7-5-7-9 stitches. Continue this pattern back and forth. The diagrams are repeated from the row with the arrow. When the piece measures 17-16-17-18-19-19 cm = 6¾"-6¼"-6¾"-7"-7½"-7½", increase 2 stitches on each side of the piece for the armholes – remember INCREASE TIP. Increase like this every row 2-3-3-3-3-4 times on each side = 60-64-68-72-76-84 stitches. At the end of the next 2 rows work 3-4-5-6-7-7 loose chain stitches for the armholes = 66-72-78-84-90-98 stitches. The new stitches are worked according to A.1. Continue back and forth until the piece measures 47-49-51-53-55-57 cm = 18½"-19¼"-20"-21"-21⅝"-22½" measured from the shoulder – adjust so you finish after the row with the arrow in A.6 or after the next to last row in the diagram. Now work an edge as follows: Work 1 row with 1 single crochet in each stitch and increase 1 stitch on the row by working 2 single crochets in one stitch = 67-73-79-85-91-99 stitches. Work from the row with the arrow in A.7 until there is 1 stitch left, work the first stitch in A.7. Repeat the last 2 rows in the diagram until the edge measures 6 cm = 2⅜" – adjust so you finish after a row of double crochets/relief triple double crochets. Cut and fasten the strand. The front piece measures approx. 53-55-57-59-61-63 cm = 21"-21⅝"-22½"-23¼"-24"-24¾" from the shoulder down. ASSEMBLY: Sew the shoulder seams in each and every stitch, making sure the seam is not tight. Crochet the side seams together through both layers, from the wrong side as follows: Fasten the strand with 1 single crochet in the side under the sleeve, * work 2 chain stitches, skip 1 cm = ⅜", 1 single crochet *, work from *-* down the whole seam and finish with 1 single crochet. SLEEVE: The sleeves are worked back and forth, top down. Work 24-24-24-25-25-27 chain stitches with hook size 5 mm = US H/8 and Air. Turn and work row 1 in A.1, AT THE SAME TIME increase for the sleeve cap on both sides as follows: Increase 2 stitches 3-1-2-1-0-0 times and 1 stitch 3-7-6-8-10-11 times = 42-42-44-45-45-49 stitches. At the end of the next 2 rows, work 3-4-5-6-7-7 new chain stitches = 48-50-54-57-59-63 stitches. The new stitches are worked in A.1. Insert 1 marker. THE PIECE IS NOW MEASURED FROM HERE. Continue back and forth with A.1. When the piece measures 2 cm = ¾" – adjust so the next row is a row of single crochets, decrease on each side of the piece – read DECREASE TIP. Decrease like this on every row of single crochets a total of 6-6-8-8-9-10 times = 36-38-38-41-41-43 stitches. Continue working until the sleeve measures 39-38-38-37-35-34 cm = 15¼"-15"-15"-14½"-13¾"-13⅜" – adjust so the next row is a row of single crochets. Now work an edge as follows: Work 1 row with 1 single crochet in each stitch and increase 1-1-1-0-0-0 stitch on the row = 37-39-39-41-41-43 stitches. Work from the row with the arrow in A.7 until there is 1 stitch left, work the first stitch in A.7. Repeat the last 2 rows in the diagram until the edge measures 6 cm = 2⅜" – adjust so you finish after a row with double crochets/relief triple double crochets. Now crochet the sleeve seams, through both layers from the wrong side, as follows: * Work 1 single crochets, 2 chain stitches, skip approx. 1 cm = ⅜" *, work from *-* as far as the chain stitches cast on for the armholes, finish with 1 single crochet. Work the other sleeve in the same way. Sew the sleeves to the body. NECK: ROUND 1: Start at the top of the shoulder and fasten the strand with 1 single crochet, * work 2 chain stitches, skip approx. 1½ cm = ½", 1 single crochet *, work from *-* around the whole neck and finish with 1 slip stitch in the first single crochet on the round = approx. 31- 35 chain-spaces. ROUND 2: Work 1 slip stitch around the chain-space, 3 chain stitches, 1 double crochet in the same chain-space, then work 2 double crochets around each of the remaining chain-spaces on the round and finish with 1 slip stitch in the 3rd chain stitch on the round. ROUND 3: 1 chain stitch, work 1 single crochet in each stitch and finish with 1 slip stitch in the first chain stitch on the round. Cut and fasten the strand. |
|||||||||||||||||||||||||||||||
Diagram explanations |
|||||||||||||||||||||||||||||||
|
|||||||||||||||||||||||||||||||
 |
|||||||||||||||||||||||||||||||
 |
|||||||||||||||||||||||||||||||
 |
|||||||||||||||||||||||||||||||
 |
|||||||||||||||||||||||||||||||
 |
|||||||||||||||||||||||||||||||
Have you finished this pattern?Tag your pictures with #dropspattern #enchantedunderwoodsweater or submit them to the #dropsfan gallery. Do you need help with this pattern?You'll find 15 tutorial videos, a Comments/Questions area and more by visiting the pattern on garnstudio.com. © 1982-2026 DROPS Design A/S. We reserve all rights. This document, including all its sub-sections, has copyrights. Read more about what you can do with our patterns at the bottom of each pattern on our site. |
|||||||||||||||||||||||||||||||


With over 40 years in knitting and crochet design, DROPS Design offers one of the most extensive collections of free patterns on the internet - translated to 17 languages. As of today we count 324 catalogs and 12290 patterns - 12280 of which are translated into English (US/in).
We work hard to bring you the best knitting and crochet have to offer, inspiration and advice as well as great quality yarns at incredible prices! Would you like to use our patterns for other than personal use? You can read what you are allowed to do in the Copyright text at the bottom of all our patterns. Happy crafting!
Post a comment to pattern DROPS 218-32
We would love to hear what you have to say about this pattern!
If you want to leave a question, please make sure you select the correct category in the form below, to speed up the answering process. Required fields are marked *.