
Popular categories
Looking for a yarn?


Comments / Questions (51)
![]() Tina wrote:
Tina wrote:
Jeg har brug for hjælp til at kunne forstå beskrivelsen af halskanten på jakken. Sæt en mærketråd midt bag på halskanten. Sæt de sidste 4 masker fra pinden på en tråd, og strik frem og tilbage over de første 4 masker til halskant, samtidig med at halskanten strikkes sammen med de resterende masker på ærmet og halsudskæringen på bagstykket således osv... Med venlig hilsen Tina
27.09.2022 - 09:30DROPS Design answered:
Hej Tina, du strikker de 4 masker fra halskanten i den ene side færdig om til mærket i nakken, samtidig som du strikker dem sammen med halsudskæringen (både maskerne over ærmerne og bag i nakken) følg forklaringen til HALSKANT :)
27.09.2022 - 10:51
![]() Martine Frijters wrote:
Martine Frijters wrote:
In het patroon staat eerst 12 cm de pas te breien vóór te beginnen met de V-hals. Klopt dit? Ik zie dit niet terug op de tekening
27.06.2021 - 16:35DROPS Design answered:
Dag Martine,
Ja, dit klopt, de V-hals begint zeg maar een stukje boven de oksel.
28.06.2021 - 12:11
![]() Lone Jensen wrote:
Lone Jensen wrote:
Tak for svar....men hvor, hvorfor og hvordan skal der også tages ind!?
05.05.2021 - 17:39DROPS Design answered:
Hej Lone, Du starter ved: START ARBEJDET HER: Når du følger opskriften, beskriver vi nøje skridt for skridt. Her kan du se: Hvordan følger man en opskrift og nederst i opskriften har vi instruktionsvideoer på hvordan man tager ind osv...
06.05.2021 - 11:10
![]() Lone Jensen wrote:
Lone Jensen wrote:
Hvordan skal Diagram A og diagram B forstås???
05.05.2021 - 12:27DROPS Design answered:
Hej Lone, Når du skal strikke A.1 fra retsiden, som der står i opskriften, så strikker du 3 ret og 1 vrang. Det vil sige at den 4. maske ind fra hver side mod midt foran altid skal være vrang (set fra retsiden). God fornøjelse!
05.05.2021 - 15:36
![]() Lone Jensen wrote:
Lone Jensen wrote:
Hvordan skal diagram A og B forstås?
05.05.2021 - 12:25
![]() Claudia wrote:
Claudia wrote:
Ich verstehe das Abnehmen beim Rumpfteil nicht. Muss ich einmalig 1 Maschen abnehmen? Oder nehme ich dann laufend in jeder Reihe 1 Maschen ab? Warum man das man überhaupt abnehmen beim Rumpfteil?
22.04.2021 - 20:29DROPS Design answered:
Liebe Claudia, bei der 1. Reihe A.1 und A.2 sollen Sie 1 Masche zwischen den beiden Diagrammen abnehmen. Diese Abnahme wird nicht wiederholt; dh Sie stricken dann glatt rechts mit A.1 und A.2 über die 192-208-228-244-268-296 Maschen. Viel Spaß beim stricken!
23.04.2021 - 07:59
![]() Roos wrote:
Roos wrote:
Hallo. Kunt u mij uitleggen hoe ik de halsrand brei. Ik kom er niet uit. Is het de bedoeling dat ik zo de bies langs de hals inbrei? ( bies, 1x2 steken samen, 3x 3 steken samen. De avrechte 4e steek van de bies verdwijnt hier?) Eerst vanaf het rechterpand tot midachter. En dan vanaf het linkerpand tot midachter? En waarom moet ik de laatste 4 steken op een hulpdraad zetten als de 2e helft pas later gebreid wordt?
21.01.2021 - 17:37DROPS Design answered:
Dag Roos,
Ja, je breit inderdaad de biessteken samen met se steken op de hals. Dus je breit eerst 3 steken en de 4e steek brei je samen met de steek van de hals. Zo ga je door tot je midden achter bent en dan kant je af. Het zelfde doe je vanaf het linker voorpand. Op het einde naai je de afkantranden samen.
24.01.2021 - 11:22
![]() Anna wrote:
Anna wrote:
Dzień dobry, czy ja dobrze rozumiem że plisy na guziki i dziurki są robione dżersejem ,3 oczka prawe a kolejne oczko jest robione lewe ( prawa plisa z dziurkami) ? Czy brzeg się nie zawija?
12.12.2020 - 18:29DROPS Design answered:
Witaj Anno! Plisy są wykonane dżersejem prawym (widok na prawej stronie robótki). Mogą się lekko zwijać. Pozdrawiamy!
17.12.2020 - 13:18
![]() Benedetta wrote:
Benedetta wrote:
Buongiorno, vorrei chiedervi se il bordo del collo è lavorato come I-cord? Grazie
22.09.2020 - 15:58DROPS Design answered:
Buongiorno Benedetta, è un bordo di rifinitura ma non è proprio i-cord. Buon lavoro!
25.09.2020 - 09:09
![]() Janka wrote:
Janka wrote:
Dziękuję, udało mi się poprawić dekolt, chociaż spowodowało to, że cały sweter jest troszkę krótszy.
21.02.2020 - 13:18
|
|||||||
December Moon Jacket#decembermoonjacket |
|||||||
 |
 |
||||||
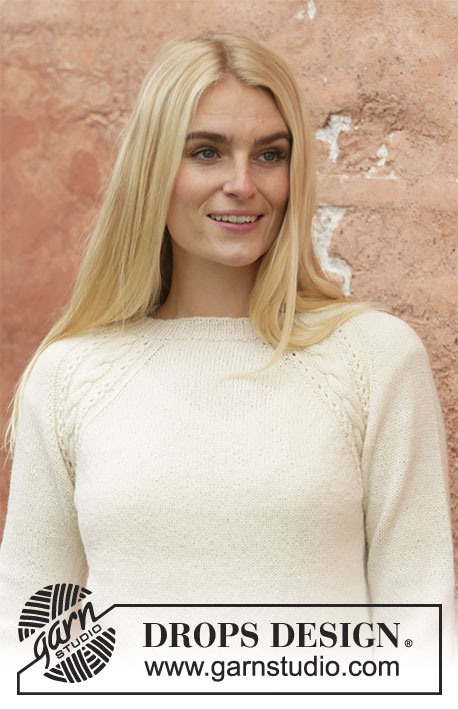
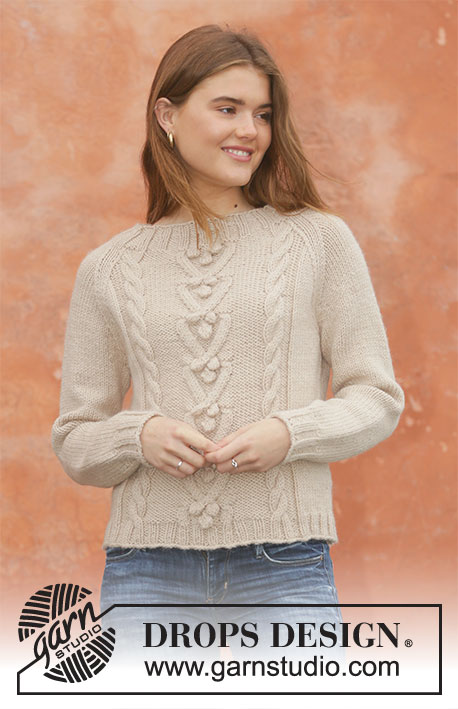
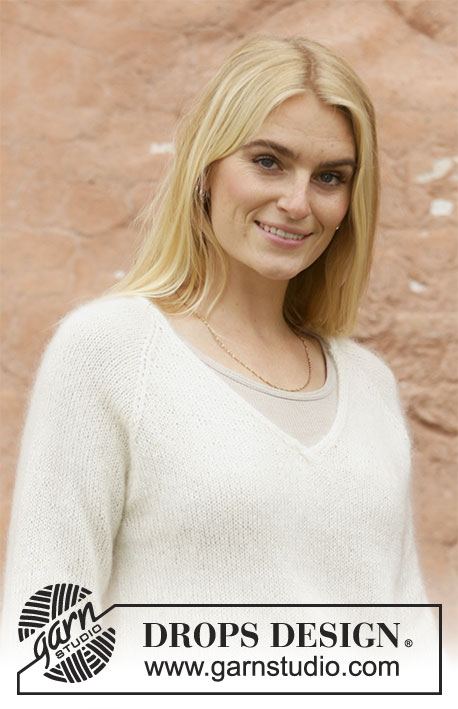
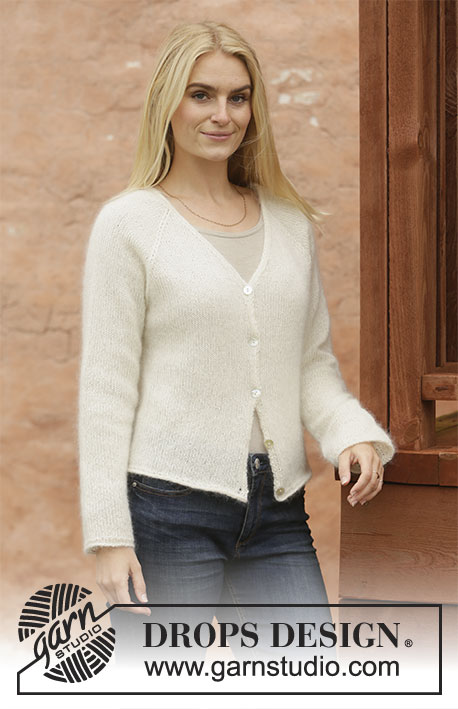
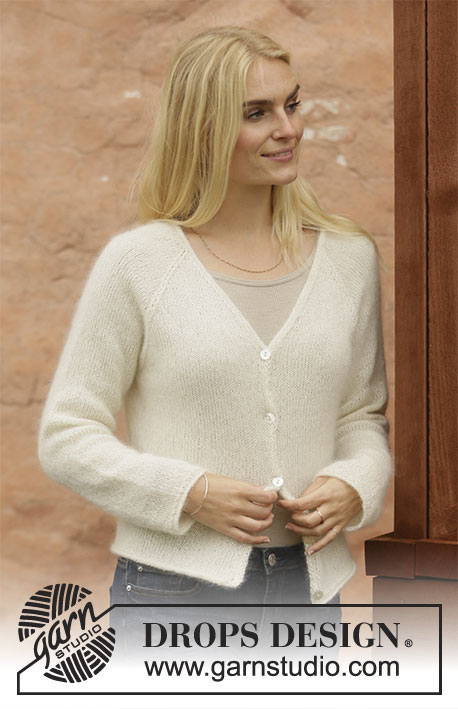
Knitted jacket with raglan and V-neck in DROPS Lace and DROPS Kid-Silk or DROPS Sky. Size: S - XXXL
DROPS 206-34 |
|||||||
|
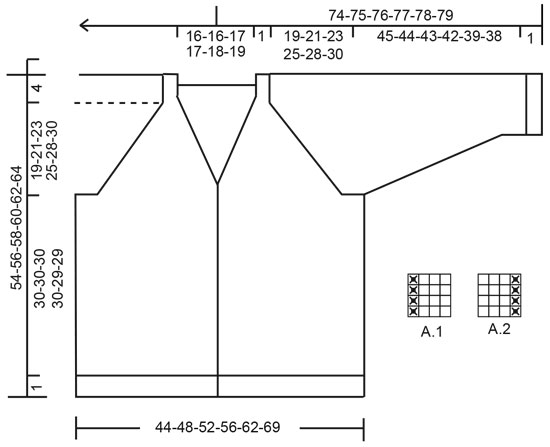
---------------------------------------------------------- EXPLANATION FOR THE PATTERN: ---------------------------------------------------------- PATTERN: See diagrams A.1 and A.2. Diagrams show all rows in pattern seen from the right side. INCREASE TIP (applies to sleeves): Work until 2 stitches remain before marker thread, 1 yarn over, knit 4 (marker thread is in the middle of these stitches), 1 yarn over. On next round knit yarn overs twisted to avoid holes. Then work the new stitches in stockinette stitch. RAGLAN: All decreases are done from the right side! Decrease 1 stitch on each side of marker thread as follows: Work until 2 stitches remain before marker thread, knit 2 together, marker thread is here, slip 1 stitch knitwise, knit 1, pass slipped stitch over stitch worked. Repeat at each of the remaining marker threads (= 8 stitches decreased). V-NECK: Decrease for V-neck on front pieces. All decreases are done from the right side! Decrease as follows after A.1: Slip 1 stitch knitwise, knit 1, pass slipped stitch over. Decrease as follows before A.2: Work until 2 stitches remain before A.2, knit 2 together. BUTTONHOLES: Decrease for buttonholes on right band. 1 BUTTONHOLE = knit third and fourth stitch from edge together and make 1 yarn over. On next row knit yarn over = hole. Decrease for buttonholes when piece measures: S: 3, 11, 20, 28 and 37 cm = 1⅛", 4⅜", 8", 11" and 14½" M: 2, 11, 20, 29 and 38 cm = ¾", 4⅜", 8", 11⅜" and 15" L: 3, 12, 21, 30 and 39 cm = 1⅛", 4¾", 8¼", 11¾" and 15¼" XL: 2, 11, 21, 30 and 40 cm = ¾", 4⅜", 8¼", 11¾" and 15¾" XXL: 3, 12, 22, 31 and 41 cm = 1⅛", 4¾", 8¾", 12¼" and 16⅛" XXXL: 2, 12, 22, 32 and 42 cm = ¾", 4¾", 8¾", 12½" and 16½" ---------------------------------------------------------- START THE PIECE HERE: ---------------------------------------------------------- JACKET - SHORT OVERVIEW OF THE PIECE: Work piece back and forth on circular needle. First work body. Then work sleeves in the round on double pointed needles/a short circular needle. Then slip sleeves on to same circular needle as body before working the yoke. Finish by working the neck edges. BODY: Cast on 193-209-229-245-269-297 stitches on circular needle size 4.5 mm = US 7 with 1 strand Lace + 1 strand Kid-Silk (= 2 strands) or 1 strand Sky. Purl 1 row from wrong side. Switch to circular needle size 4 mm = US 6 and work rolling edge as follows: ROW 1 (= right side): Knit all stitches. ROW 2 (= wrong side): Purl all stitches. ROW 3: Knit all stitches. ROW 4: Purl 3, * knit 1, purl 1 * until 4 stitches remain on needle, knit 1, purl 3. Now work as follows from right side: A.1 (= 4 stitches), stockinette stitch until 4 stitches remain at the same time as decreasing 1 stitch by knitting 2 together, A.2 over the last 4 stitches = 192-208-228-244-268-296 stitches. Continue back and forth like this. REMEMBER THE KNITTING GAUGE! Remember BUTTONHOLES on right band - read explanation above. When piece measures 31-31-31-31-30-30 cm = 12½"-12½"-12½"-12½"-11¾"-11¾", bind off stitches for armhole on next row from wrong side as follows: Work the first 46-50-54-58-63-68 stitches on row(= left front piece), bind off the next 8-8-10-10-12-16 stitches for armhole, work the next 84-92-100-108-118-128 stitches (= back piece), bind off the next 8-8-10-10-12-16 stitches for armhole, work the remaining 46-50-54-58-63-68 stitches (= right front piece). Put piece aside and work the sleeves. SLEEVE: Cast on 50-52-54-56-56-60 stitches on circular needle size 4.5 mm = US 7 with 1 strand Lace + 1 strand Kid-Silk (= 2 strands) or 1 strand Sky. Work rolling edge as follows: Knit 1 round. Switch to double pointed needles size 4 mm = US 6 and knit 3 rounds. Work next round as follows: * Knit 1, purl 1 *, repeat from *-* the entire round. Work in stockinette stitch in the round. When piece measures 10-10-10-8-9-9 cm = 4"-4"-4"-3⅛"-3½"-3½", increase 2 stitches under sleeve - read INCREASE TIP! Increase like this every 3½-2½-2-2-1½-1½ cm = 1¼"-1"-¾"-¾"-½"-½" 10-13-16-17-18-18 times in total = 70-78-86-90-92-96 stitches. When sleeve measures 46-45-44-43-40-39 cm = 18"-17¾"-17¼"-17"-15¾"-15¼", bind off the middle 8-8-10-10-12-16 stitches under sleeve (= 4-4-5-5-6-8 stitches on each side of marker thread) = 62-70-76-80-80-80 stitches. Put piece aside and knit another sleeve the same way. YOKE: Slip sleeves on to same circular needle as body where armholes were bind off = 300-332-360-384-404-424 stitches. Now insert 4 marker threads in the piece between front pieces, back piece and sleeves, but displace marker threads so that there are 1-1-1-2-4-6 stitches in each side of front/back piece on each side of sleeves. I.e. there are 82-90-98-104-110-116 stitches for back piece, 45-49-53-56-59-62 stitches on each front piece, and 64-72-78-84-88-92 stitches for each sleeve. Continue back and forth with stockinette stitch and A.1 and A.2 in each side as before. AT THE SAME TIME on first row from right side begin decrease for raglan, and when piece measures 7-8-9-10-12-13 cm = 2¾"-3⅛"-3½"-4"-4¾"-5⅛" from where sleeves were slipped onto same circular needle as body, work V-neck on front piece: RAGLAN: Decrease for RAGLAN - read explanation above. Decrease like this every 4th row 2-1-1-1-3-4 times and every other row 22-27-30-33-33-34 times (= 24-28-31-34-36-38 times in total). V-NECK: When yoke measures 7-8-9-10-12-13 cm = 2¾"-3⅛"-3½"-4"-4¾"-5⅛", decrease for V- neck on front piece, begin from right side as follows: Work A.1 as before over the first 4 stitches, decrease 1 stitch for V-NECK – read explanation above, work stockinette stitch (continue decrease for raglan as before) until 6 stitches remain on needle, decrease 1 stitch – remember V-NECK, work A.2 over the last 4 stitches. Continue back and forth like this, and decrease for V-neck every other row 15-14-15-13-14-14 times, and every 4th row 1-2-2-4-4-5 times (= 16-16-17-17-18-19 stitches in total decreased for V-neck in each side). When all decreases for V-neck and raglan are done, there are 76-76-78-78-80-82 stitches on needle. Work next row from right side as follows: Knit the first 3 stitches, purl the next 2 stitches together (= 1 stitch decreased), knit until 5 stitches remain on needle, purl the next 2 stitches together (= 1 stitch decreased), knit the last 3 stitches = 74-74-76-76-78-80 stitches. Work 1 row from wrong side with knit over knit and purl over purl. Jumper measures approx. 54-56-58-60-62-64 cm = 21¼"-22"-22¾"-23⅝"-24⅜"-25¼" from shoulder and down. NECK EDGE: Insert a marker thread mid back on neck edge. Slip the last 4 stitches on needle on a stitch holder, and work back and forth over the first 4 stitches for neck edge, at the same time work neck edge together with the remaining stitch on sleeve and neck line on back piece as follows: Work as follows from right side: ROW 1: Knit the first 3 stitches, knit the next 2 stitches together (= 1 stitch decreased). ROW 2: Turn and purl the 4 stitches. ROW 3: Knit the first 3 stitches, knit the next 3 stitches together (= 2 stitches decreased). ROW 4: Turn and purl the 4 stitches. ROWS 5-8: Work the same way as on 3rd and 4th row. Repeat rows 1-8 until you have worked until marker thread mid back in the neck. Bind off the 4 stitches on neck edge. Slip the 4 stitches from stitch holder on needle 4 and work from wrong side as follows: ROW 1: Purl the first 3 stitches, purl the next 2 stitches together (= 1 stitch decreased). ROW 2: Turn and knit the 4 stitches. ROW 3: Purl the first 3 stitches, purl the next 3 stitches together (= 2 stitches decreased). ROW 4: Turn and knit the 4 stitches. ROWS 5-8: Work the same way as on 3rd and 4th row. Repeat rows 1-8 until you have worked until marker thread mid back in the neck. Bind off the 4 stitches on neck edge. Sew bind-off edge together on the 2 neck edges mid back in the neck. Fasten off. |
|||||||
Diagram explanations |
|||||||
|
|||||||
 |
|||||||
Have you finished this pattern?Tag your pictures with #dropspattern #decembermoonjacket or submit them to the #dropsfan gallery. Do you need help with this pattern?You'll find 29 tutorial videos, a Comments/Questions area and more by visiting the pattern on garnstudio.com. © 1982-2026 DROPS Design A/S. We reserve all rights. This document, including all its sub-sections, has copyrights. Read more about what you can do with our patterns at the bottom of each pattern on our site. |
|||||||


With over 40 years in knitting and crochet design, DROPS Design offers one of the most extensive collections of free patterns on the internet - translated to 17 languages. As of today we count 324 catalogs and 12291 patterns - 12281 of which are translated into English (US/in).
We work hard to bring you the best knitting and crochet have to offer, inspiration and advice as well as great quality yarns at incredible prices! Would you like to use our patterns for other than personal use? You can read what you are allowed to do in the Copyright text at the bottom of all our patterns. Happy crafting!
Post a comment to pattern DROPS 206-34
We would love to hear what you have to say about this pattern!
If you want to leave a question, please make sure you select the correct category in the form below, to speed up the answering process. Required fields are marked *.