
Popular categories
Looking for a yarn?


Comments / Questions (24)
![]() Regine wrote:
Regine wrote:
Je comprend pas comment diminuer les mailles du devant je doit passer de 63ms a 57 mailles je les diminue tous sur le meme rang
18.01.2026 - 17:35DROPS Design answered:
Bonjour Régine, au dernier rang de A.1 vous allez 6 mailles à intervalles réguliers (utilisez la petite calculette en bas de page), mais diminuez seulement les mailles de A.1 pas celles de la bordure devant. Bon tricot!
19.01.2026 - 10:43
![]() Mamie Tricot wrote:
Mamie Tricot wrote:
Pourrais je avoir les explications du col en V.. Merci
08.03.2025 - 12:01DROPS Design answered:
Bonjour Mamie Tricot, il n'y a pas de diminutions pour l'encolure V dans ce modèle, on tricote tout droit les mailles côté encolure jusqu'à la fin - cf schéma. Bon tricot!
10.03.2025 - 08:10
![]() Mamie Tricot wrote:
Mamie Tricot wrote:
Les explications du col chale ne correspondent pas au col en V de la photo
07.03.2025 - 15:11DROPS Design answered:
Bonjour Mamie Tricot, le col se tricote bien ainsi, avec des rangs raccourcis comme indiqué , dans cette vidéo, nous montrons comment tricoter ce type de col châle, avec des rangs raccourcis en plus (il n'y en a pas dans la vidéo) pour que la bordure extérieure du col soit plus large que celle qui sera ensuite cousue le long de l'encolure dos. Bon tricot!
07.03.2025 - 15:50
![]() Judit wrote:
Judit wrote:
Ennél a modellnél nincs sálgallér és az ábra is mást ábrázol. Valami hiba van a leírásban.
22.10.2024 - 11:34
![]() Merete Wøhlk wrote:
Merete Wøhlk wrote:
Hej Jeg kan ikke se nogen indtagning til v udskæringen. Kommer den af sig selv på grund af mønsteret, eller har jeg bare ikke set ordenligt efter. Venlig hilsen Merete
30.10.2023 - 14:49DROPS Design answered:
Hej Merete, jakken har sjalskrave og den strikkes lige op, se måleskitsen nederst i opskriften, hvordan det skal se ud :)
31.10.2023 - 08:46
![]() Tok wrote:
Tok wrote:
I'm having trouble understanding the front band, from the pattern is knitted 6 stitch for the band. But from the model picture, the band seem to be picked up and knit afterward.
23.11.2022 - 10:01DROPS Design answered:
Dear Mrs Tok, the front band stitches are 6 stitches worked in garter stitch at the bottom + at the end of the row (on body) - the last picture migh help you seeing how they look at. Happy knitting!
23.11.2022 - 15:37
![]() Morgan Bediat wrote:
Morgan Bediat wrote:
Bonjour. Je viens de commencer le dos . Après les côtes 2/2 il faut faire 1 fois A1 et 2 fois A2 .mais si je comprend bien sur le schéma de A1 seul les rang endroit sont visibles ,donc 12 rangs sur le schéma ce qui ramène avec les rangs envers a 24 rangs. 10cm étant égal à 20 rangs d'après l'échantillon je ne comprend pas comment l'ouvrage peut mesurer 17cm après A2 . Pouvez vous m'aider svp .merci
10.09.2022 - 18:08DROPS Design answered:
Bonjour Mme Bediat, tous les rangs figurent dans les diagrammes, aussi bien ceux sur l'endroit que ceux sur l'envers, ainsi A.1 va se tricoter sur 12 rangs ainsi: 1 rang end sur l'end, 1 rang env sur l'env, 1 rang end sur l'end, 1 rang end sur l'env, 1 rang end sur l'end, 1 rang env sur l'env, 1 rang env sur l'end, 1 rang env sur l'env, 1 rang end sur l'end, 1 rang end sur l'env, 1 rang end sur l'end et 1 rang env sur l'end. Bon tricot!
12.09.2022 - 09:41
![]() Raabia wrote:
Raabia wrote:
Hi, I'm working on the back, the A4 part of the pattern and the lines look very joined together. Not like the picture at all. The horizontal line joins with the vertical line. I've checked the pattern and I'm not doing anything wrong
13.04.2022 - 01:06DROPS Design answered:
Dear Raabia, the resulting pattern may depend on your gauge. The rib also is sometimes tight when worked; you can block that part with steam, so that the stitches open up more and start forming a texture. Happy knitting!
14.04.2022 - 19:00
![]() Mona Johansen wrote:
Mona Johansen wrote:
Hei. 😊Er det feil i forklaringen til mønster A4 på ryggen i str M ,får ikke mønsteret til å gå opp på 1 runde på A4 når jeg gjør som forklart? 3 rett masker pluss 1 rille maske før mønsteret ,(str M) og avslutte med 4 rett masker pluss en rille....? Mvh Mona 😊
21.01.2022 - 11:56DROPS Design answered:
Hej Mona. Jo det ska gå opp; 1+3+(18*5)+4+1= 99 m. Mvh DROPS Design
21.01.2022 - 12:00
![]() Paula wrote:
Paula wrote:
Hola, en la espalda después de la siza se termina solo tejiendo el patrón de A5 o se turna con A4.
12.11.2021 - 22:45DROPS Design answered:
Hola Paula, depende de la talla. En las tallas M y XL trabajas solo A.4, en el resto A.4 y A.5.
14.11.2021 - 19:39
|
|||||||
Inner City Jacket#innercityjacket |
|||||||
 |
 |
||||||
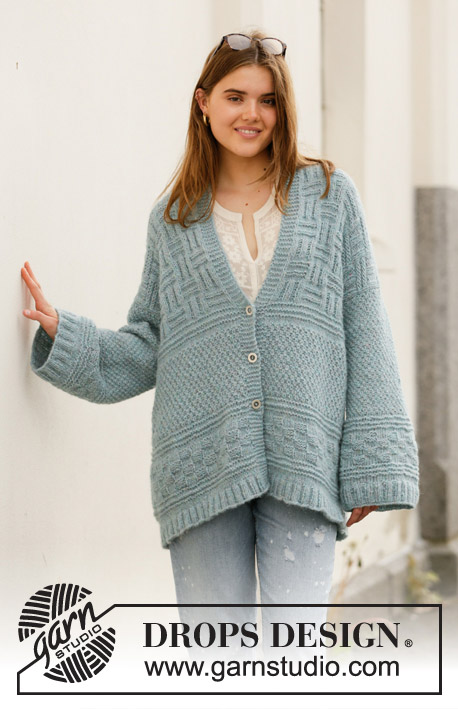
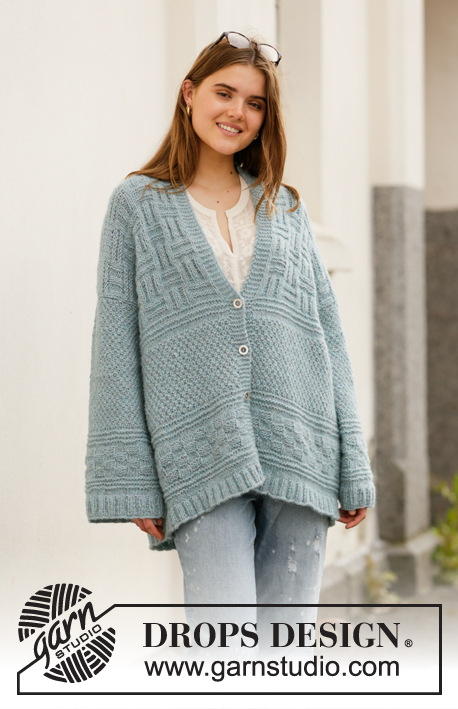
Knitted jacket in DROPS Air. The piece is worked with textured pattern and shawl-collar. Sizes S - XXXL.
DROPS 207-12 |
|||||||
|
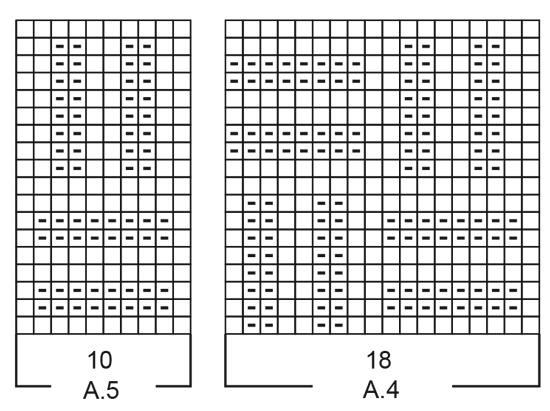
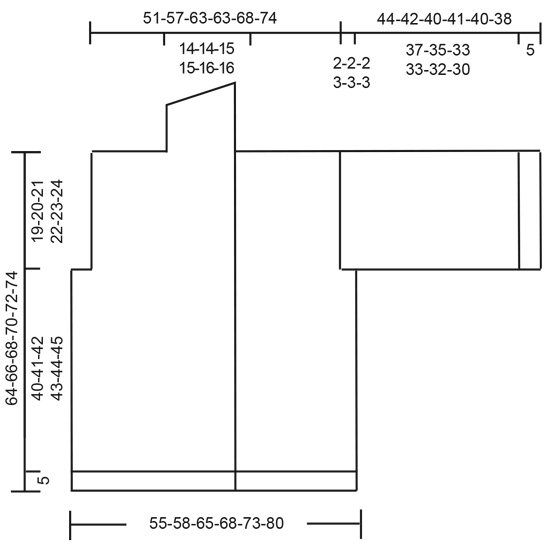
------------------------------------------------------- EXPLANATIONS FOR THE PATTERN: ------------------------------------------------------- RIDGE/GARTER STITCH (worked back and forth): Knit all rows. 1 ridge in height = Knit 2 rows. PATTERN: See diagrams A.1 to A.5. The diagrams show all rows in the pattern seen from the right side. DECREASE TIP (evenly spaced): To work out how to decrease evenly, count the total number of stitches on needle (e.g. 108 stitches), minus the 1 edge stitch on each side and divide by number of decreases to be made (e.g. 18) = 5.8. In this example decrease by knitting approx. each 5th and 6th stitch together. INCREASE TIP (evenly spaced): To work out how to increase evenly, count the total number of stitches on needle (e.g. 94 stitches), minus 1 edge stitch on each side and divide by the number of increases to be made (e.g. 5) = 18.4. In this example, increase by making 1 yarn over after alternately each 18th and 19th stitch. On the next row work the yarn overs twisted to avoid holes. BUTTONHOLES (bottom up): Work buttonholes on the right band. 1 BUTTONHOLE = Knit together the third and fourth stitch from the edge and then make 1 yarn over. On the next row knit the yarn over = hole. Work buttonholes as follows: Buttonhole 1: Worked on 7th row in A.1 the second time the diagram is worked in height. Buttonhole 2. Worked after you have completed 6-7-8-7-8-7 cm = 2⅜"-2¾"-3⅛"-2¾"-3⅛"-2¾" of pattern A.3. Buttonhole 3: Worked on the 7th row in A.1 the third time the diagram is worked in height. ------------------------------------------------------- START THE PIECE HERE: ------------------------------------------------------- JACKET – SHORT OVERVIEW OF THE PIECE: The piece is worked back and forth in sections which are sewn together to finish. The sleeves are worked in the round with short circular needle. BACK PIECE: Cast on 108-112-128-132-140-156 stitches with circular needle size 4.5 mm = US 7 and Air. Purl 1 row from the wrong side then work rib as follows: 1 edge stitch in GARTER STITCH – read description above, (knit 2/ purl 2) until there are 3 stitches left on row, knit 2 and 1 edge stitch in garter stitch. When the rib measures 5 cm = 2", knit 1 row from the right side where you decrease 18-18-22-22-22-26 stitches evenly spaced – read DECREASE TIP = 90-94-106-110-118-130 stitches. Change to circular needle size 5.5 mm = US 9 and purl 1 row back from the wrong side. Now work pattern as follows: A.1 with 1 edge stitch in garter stitch on each side. When A.1 has been worked in height work A.2 over A.1. Work A.2 in height a total of 2 times. REMEMBER THE KNITTING GAUGE! The piece measures approx. 17 cm = 6¾". Now work A.1 over A.2. When A.1 has been completed in height work A.3 over A.1. Continue until the piece measures 32-34-36-34-36-34 cm = 12½"-13⅜"-14¼"-13⅜"-14¼"-13⅜" – adjust so you finish after a row from the right side (i.e. rows 1,3,5 or 7 in the diagram). Cut the strand and continue from the right side (2 rows worked from the right side after each other): Work A.1 with 1 edge stitch in garter stitch on each side. On the second to last row in A.1 increase 0-5-2-0-1-0 stitches evenly spaced – read INCREASE TIP = 90-99-108-110-119-130 stitches. Now work pattern in the different sizes as follows: Sizes S, L, XL, XXXL: 1 edge stitch in garter stitch, knit 3-3-4-5, A.4 (= 18 stitches) a total of 4-5-5-6 times in width, A.5 (= 10 stitches), knit 3-3-4-5 and 1 edge stitch in garter stitch. Sizes M and XXL: 1 edge stitch in garter stitch, knit 3-4, A.4 (= 18 stitches) a total of 5-6 times in width, knit 4-5 and 1 edge stitch in garter stitch. All sizes: Continue back and forth until the piece measures 45-46-47-48-49-50 cm = 17¾"-18"-18½"-19"-19¼"-19¾". Now bind off 3-3-3-4-4-5 stitches at the beginning of the next 2 rows for the armholes = 84-93-102-102-111-120 stitches. Continue with pattern and 1 edge stitch in garter stitch on each side. When the piece measures 62-64-66-68-70-72 cm = 24⅜"-25¼"-26"-26¾"-27½"-28⅜", bind off the middle 20-21-22-22-23-24 stitches for neck and each shoulder is finished separately. Then bind off 1 stitch on the next row from the neck = 31-35-39-39-43-47 stitches. Continue working as many stitches in the pattern as there is room for until the armhole measures 18-19-20-21-22-23 cm = 7"-7½"-8"-8¼"-8¾"-9" (the piece measures a total of 63-65-67-69-71-73 cm = 24¾"-25½"-26⅜"-28"-28¾") – adjust so you finish after row 4, 8, 14 or 18 in A.4/A.5. Work 1 ridge over all stitches. Bind off. Work the other shoulder the same way. The piece measures approx. 64-66-68-70-72-74 cm = 25¼"-26"-26¾"-27½"-28⅜"-29⅛" from the shoulder down. RIGHT FRONT PIECE: Cast on 59-63-67-75-79-83 stitches with circular needle size 4.5 mm = US 7 and Air. Purl 1 row from the wrong side. Then work rib as follows from the right side: 6 band stitches in garter stitch, (knit 2/ purl 2) until there is 1 stitch left, 1 edge stitch in garter stitch. When the rib measures 5 cm = 2", knit 1 row from the right side where you decrease 8-8-8-12-12-12 stitches evenly spaced = 51-55-59-63-67-71 stitches. Change to circular needle size 5.5 mm = US 9 and purl 1 row back from the wrong side (edge and band stitches worked in garter stitch). Now work pattern as follows: 6 band stitches in garter stitch, A.1 until there is 1 stitch left and 1 edge stitch in garter stitch. When A.1 has been completed in height work A.2 over A.1. Work A.2 in height a total of 2 times. The piece measures 17 cm = 6¾". Now work A.1 over A.2 – remember BUTTONHOLES on right band – read description above. When A.1 has been completed in height work A.3 over A.1. Continue until the piece measures 32-34-36-34-36-34 cm = 12½"-13⅜"-14¼"-13⅜"-14¼"-13⅜" – adjust so you finish after a row from the right side (i.e. rows 1,3,5 or 7 in the diagram). Cut the strand and continue from the right side (2 rows worked from the right side after each other) as follows: 6 band stitches in garter stitch (i.e. purl 6 on this row), A.1 until there is 1 stitch left and 1 edge stitch in garter stitch (purled on this row). On the last row in A.1 adjust the number of stitches to 47-56-56-57-66-67 stitches (do not decrease/increase on the band). Now work pattern in the different sizes as follows: Sizes S, XXL, XXXL: 6 band stitches in garter stitch, A.4 (= 18 stitches) a total of 2-3-3 in width, knit 4-5-6, 1 edge stitch in garter stitch. Sizes M, L and XL: 6 band stitches in garter stitch, A.4 (= 18 stitches) a total of 2-2-2 times in width, A.5 (= 10 stitches), knit 3-3-4, 1 edge stitch in garter stitch. All sizes: Continue like this back and forth. When the piece measures 45-46-47-48-49-50 cm = 17¾"-18"-18½"-19"-19¼"-19¾", bind off 3-3-3-4-4-5 stitches at the beginning of the next row from the side for the armhole = 44-53-53-53-62-62 stitches. Continue with pattern as before. When the piece measures 62-64-66-68-70-72 cm = 24⅜"-25¼"-26"-26¾"-27½"-28⅜", work the next row from the right side as follows: Knit the first 13-14-14-14-15-15 stitches (= shawl-collar), knit the next 31-39-39-39-47-47 stitches and decrease at the same time 0-4-0-0-4-0 stitches evenly spaced = 31-35-39-39-43-47 stitches on shoulder. Turn and knit just the shoulder stitches (keep the collar stitches on the needle), turn and bind off. Cut the strand. The piece measures approx. 64-66-68-70-72-74 cm = 25¼"-26"-26¾"-27½"-28⅜"-29⅛" from the shoulder down. Now work the 13-14-14-14-15-15 collar stitches starting from the wrong side as follows: ROWS 1-5: Knit all stitches. ROW 6: Knit the first 6-7-7-7-7-7 stitches, turn, tighten strand. ROW 7: Knit back. ROW 8.: Knit all stitches. Repeat rows 1-8 until the collar measures 7-7-7½-7½-8-8 cm = 2¾"-2¾"-2⅞"-2⅞"-3⅛"-3⅛" down to the shoulder, at the shortest point. Bind off. LEFT FRONT PIECE: Cast on 59-63-67-75-79-83 stitches with circular needle size 4.5 mm = US 7 and Air. Purl 1 row from the wrong side. Then work rib as follows from the right side: 1 edge stitch in garter stitch, (knit 2/ purl 2) until there are 6 stitches left, 6 band stitches in garter stitch. When the rib measures 5 cm = 2", knit 1 row from the right side where you decrease 8-8-8-12-12-12 stitches evenly spaced = 51-55-59-63-67-71 stitches. Change to circular needle size 5.5 mm = US 9 and purl 1 row back from the wrong side (edge and band stitches worked in garter stitch). Now work pattern as follows: 1 edge stitch in garter stitch, A.1 until there are 6 stitches left and 6 band stitches in garter stitch. When A.1 has been completed in height work A.2 over A.1. Work A.2 in height a total of 2 times. The piece measures 17 cm = 6¾". Now work A.1 over A.2. When A.1 has been completed in height work A.3 over A.1. Continue until the piece measures 32-34-36-34-36-34 cm = 12½"-13⅜"-14¼"-13⅜"-14¼"-13 3/8 – adjust so you finish after a row from the right side (i.e. rows 1,3,5 or 7 in the diagram). Cut the strand and continue from the right side (2 rows worked from the right side after each other): 1 edge stitch in garter stitch (i.e. purl 1 on this row), A.1 until there are 6 stitches left and 6 band stitches in garter stitch (purled on this row). On the last row in A.1 adjust the number of stitches to 47-56-56-57-66-67 stitches (do not decrease/increase on the band). Now work pattern in the different sizes as follows: Sizes S, XXL, XXXL: 1 edge stitch in garter stitch, knit 4-5-6, A.4 (= 18 stitches) a total of 2-3-3 in width, 6 band stitches in garter stitch. Sizes M, L and XL: 1 edge stitch in garter stitch, knit 3-3-4, A.5 (= 10 stitches), A.4 (= 18 stitches) a total of 2-2-2 times in width, 6 band stitches in garter stitch. All sizes: Continue like this back and forth. When the piece measures 45-46-47-48-49-50 cm = 17¾"-18"-18½"-19"-19¼"-19¾", bind off 3-3-3-4-4-5 stitches at the beginning of the next row from the side for the armhole = 44-53-53-53-62-62 stitches. Continue with pattern as before. When the piece measures 62-64-66-68-70-72 cm = 24⅜"-25¼"-26"-26¾"-27½"-28⅜", work the next row from the right side as follows: Knit the first 31-39-39-39-47-47 stitches and decrease at the same time 0-4-0-0-4-0 stitches evenly spaced knit the last 13-14-14-14-15-15 stitches (= shawl-collar). Turn and knit all stitches. Turn and bind off the first 31-35-39-39-43-47 stitches for the shoulder. The piece measures approx. 64-66-68-70-72-74 cm = 25¼"-26"-26¾"-27½"-28⅜"-29⅛" from the shoulder down. Now work the 13-14-14-14-15-15 collar stitches starting from the right side as follows: ROWS 1-5: Knit all stitches. ROW 6: Knit the first 6-7-7-7-7-7 stitches, turn, tighten strand. ROW 7: Knit back. ROW 8.: Knit all stitches. Repeat rows 1-8 until the collar measures 7-7-7½-7½-8-8 cm = 2¾"-2¾"-2⅞"-2⅞"-3⅛"-3⅛" down to the shoulder, at the shortest point. Bind off. SLEEVE: The sleeve is worked in the round with short circular needle. Cast on 76-76-88-88-96-96 stitches with short circular needle size 4.5 mm = US 7 and Air. Knit 1 round then work rib (= knit 2/ purl 2) for 5 cm = 2". Knit 1 round where you decrease 12-12-16-16-16-16 stitches evenly spaced = 64-64-72-72-80-80 stitches. Change to circular needle size 5.5 mm = US 9 and work pattern as follows: Knit 1 round then work pattern A.1. When A.1 has been completed in height work A.2 a total of 2 times in height. The piece measures approx. 17 cm = 6¾". Now work A.1, AT THE SAME TIME on the first round decrease 4-0-4-2-6-4 stitches evenly spaced = 60-64-68-70-74-76 stitches. When A.1 has been completed, work A.3. Continue working until the piece measures 42-40-38-38-37-35 cm = 16½"-15¾"-15"-15"-14½"-13¾". Now continue with A.3 but working back and forth on the needle to give a small split under the sleeve (makes it easier to sew the sleeve to the armhole). When the sleeve measures 44-42-40-41-40-38 cm = 17¼"-16½"-15¾"-16⅛"-15¾"-15" (shorter measurements in larger sizes due to broader shoulders) bind off. Work the other sleeve in the same way. ASSEMBLY: Sew the shoulder seams with grafting stitches inside the bind-off edge. Sew the sleeves to the body inside the 1 edge stitch on the body and the bind-off edge on the sleeve. The last part of the sleeve which was worked back and forth is sewn to the body where the 3-3-3-4-4-5 stitches were bind off. Sew the side seams inside the edge stitch on each side. Sew the collar together mid back inside the bind-off edge and then sew the collar to the back of the neck. Sew buttons onto left band. |
|||||||
Diagram explanations |
|||||||
|
|||||||
 |
|||||||
 |
|||||||
 |
|||||||
Have you finished this pattern?Tag your pictures with #dropspattern #innercityjacket or submit them to the #dropsfan gallery. Do you need help with this pattern?You'll find 23 tutorial videos, a Comments/Questions area and more by visiting the pattern on garnstudio.com. © 1982-2026 DROPS Design A/S. We reserve all rights. This document, including all its sub-sections, has copyrights. Read more about what you can do with our patterns at the bottom of each pattern on our site. |
|||||||


With over 40 years in knitting and crochet design, DROPS Design offers one of the most extensive collections of free patterns on the internet - translated to 17 languages. As of today we count 324 catalogs and 12290 patterns - 12280 of which are translated into English (US/in).
We work hard to bring you the best knitting and crochet have to offer, inspiration and advice as well as great quality yarns at incredible prices! Would you like to use our patterns for other than personal use? You can read what you are allowed to do in the Copyright text at the bottom of all our patterns. Happy crafting!
Post a comment to pattern DROPS 207-12
We would love to hear what you have to say about this pattern!
If you want to leave a question, please make sure you select the correct category in the form below, to speed up the answering process. Required fields are marked *.