
Popular categories
Looking for a yarn?


Comments / Questions (25)
![]() EMILY wrote:
EMILY wrote:
Hi again, When we work 6th row of the first gusset we continue with the other colour , or we repeat short rows and gusset , so many times as it is needed until t 5-7 stc sremain in the needle . ifit is not difficult a video would be very helpful to us. thanks in advance
18.10.2019 - 10:47DROPS Design answered:
Dear Emily, Part-1 is worked with Delight, ie you work short rows and gusset with Delight; then you will change to Alpaca when working Part-2. Happy knitting!
18.10.2019 - 11:41
![]() EMILY wrote:
EMILY wrote:
PLEASE CAN YOU EXPLAIN ME HOW DO WE KNIT THE GUSSET ROWS. ALSO I;M CONFUSED IF YO IS BEFORE OR AFTER RED MARKER, AND BLUE MARKER.
18.10.2019 - 10:25DROPS Design answered:
Dear Emily, when you work the gusset on the first part, work as follows: Row 1 to 4 = short rows, Row 5: work and increase as before until 10 sts remain before red marker, Row 6: work return row. Repeat these 6 rows. You will work row 5 and 6 only when you work at least the 10 stitches before red marker. Happy knitting!
18.10.2019 - 11:39
![]() Cecilia wrote:
Cecilia wrote:
Bonjour, combien de mailles doit on avoir lorsqu'on a tricoter les 8 premier centimètres ? Merci pour vos conseils
14.09.2019 - 19:05DROPS Design answered:
Bonjour Cecilia, le nombre de mailles n'est pas indiqué car tout va dépendre de votre tension en hauteur. Au 1er rang sur l'endroit, on augmente 4 mailles, puis on va augmenter 3 mailles tous les rangs sur l'endroit jusqu'à ce que l'ouvrage mesure 8 cm, vous pouvez ainsi vérifier votre nombre de mailles si besoin en fonction de votre nombre de rangs. Bon tricot!
16.09.2019 - 09:19
![]() Sylvie wrote:
Sylvie wrote:
Bonjour, Je ne comprend pas comment je dois faire le rang raccourci et le gousset en même temps. Pouvez vous m'apporter de l'aide ou une petite vidéo éventuellement. Merci de votre aide
04.02.2019 - 13:34DROPS Design answered:
Bonjour Sylvie, tricotez les 4 rangs des rangs raccourcis (= ceux indiqués sous GOUSSET), puis au rang suivant, tricotez le gousset comme indiqué sur l'endroit, tournez, tricotez le rang retour. Continuez ainsi, avec les rangs raccourcis et les 2 rangs raccourcis du gousset en plus tous les 4 rangs des rangs raccourcis. Bon tricot!
04.02.2019 - 14:22
![]() DONATELLA PIETRAPERTOSA wrote:
DONATELLA PIETRAPERTOSA wrote:
Secondo le spiegazioni non sono molto chiare
30.12.2018 - 00:37
![]() DONATELLA PIETRAPERTOSA wrote:
DONATELLA PIETRAPERTOSA wrote:
Non capisco cosa si intende per tassello
30.12.2018 - 00:36DROPS Design answered:
Buonasera Donatella. Le indicazioni per il tassello, sono di fatto indicazioni per lavorare un ferro accorciato solo sulle maglie indicate (quindi non seguendo la regola di lavorare 4 m in meno) . Buon lavoro!
30.12.2018 - 23:09
![]() Nicola wrote:
Nicola wrote:
Hallo, ich stricke gerade das Tuch und verstehe leider nicht, wie ich den Keil stricken soll. Heißt das, dass ich die 1. Zunahme in der Reihe weglasse, sobald nur noch 10 Maschen vor dem roten Markierer sind? Dann würde ja der Umschlag fehlen und eine Unterbrechung in der Zunahmekette sein. Lieben Gruß und Dank für die Hilfe im Vorraus.
29.08.2018 - 09:42DROPS Design answered:
Liebe Nicola, bei den verkürzten Reihen wird es zugenommen, nur wenn Sie die Maschen mir dem Markierer stricken. Wenn Sie bis eine Markiererung nicht stricken, wird es zu dieser Markierung nicht zugenommen. Viel Spaß beim stricken!
04.09.2018 - 13:10
![]() Lis Mamsen wrote:
Lis Mamsen wrote:
Skal der i stykke 3, 4, 5 & 6 også strikkes kile sammen med forkortede pinde?
08.02.2018 - 19:29DROPS Design answered:
Hej, ja dem strikker du som förste stykke. Men Pga de forkortede p er det ikke altid muligt at strikke kile. Kilen strikkes kun når der strikkes forkortede p over de 10 m før rød mærketråd. God fornöjelse!
12.02.2018 - 15:47
![]() Maja Hansen wrote:
Maja Hansen wrote:
Jeg har problemer med at forstå om jeg skal strikke vendemasker hele pinden ud i stykke 3,før man strikker kile.så er det jo som at strikke en kile i kilen. og hvad mener man når der står at det ikke er muligt at strikke kile hvis man ikke strikker vendemasker over den røde mærketråd.,
18.10.2016 - 18:40DROPS Design answered:
Hej Maja. Vendemaskerne (forkortede pinde) er jo kilen? Du strikker ligesom stykke 1, men i stedet strikker du 8 m mindre i hver 2. p indtil du har 9-15 m tilbage.
19.10.2016 - 12:42
![]() Angelika wrote:
Angelika wrote:
Hallo liebes DROPS-Team, dieses Tuch interessiert mich sehr, nur leider kann ich mir die Form nicht vorstellen beim durchlesen der Anleitung. Gibt es ein Bild oder eine Zeichung hierzu? Grüße Angelika
28.07.2016 - 13:59DROPS Design answered:
Liebe Angelika, leider haben wir nur dieses eine Foto.
28.07.2016 - 14:56
|
|
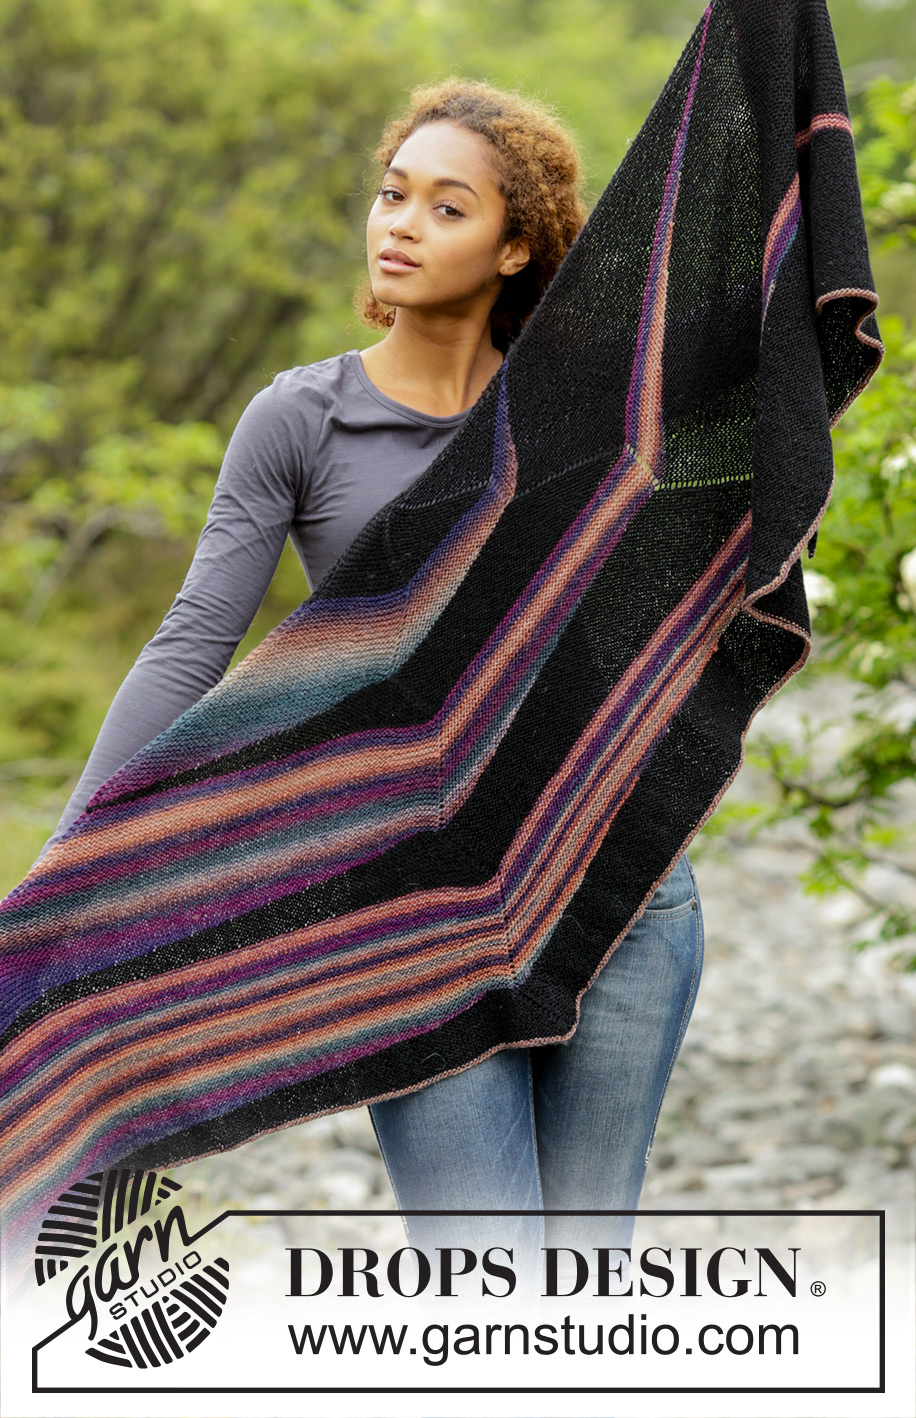
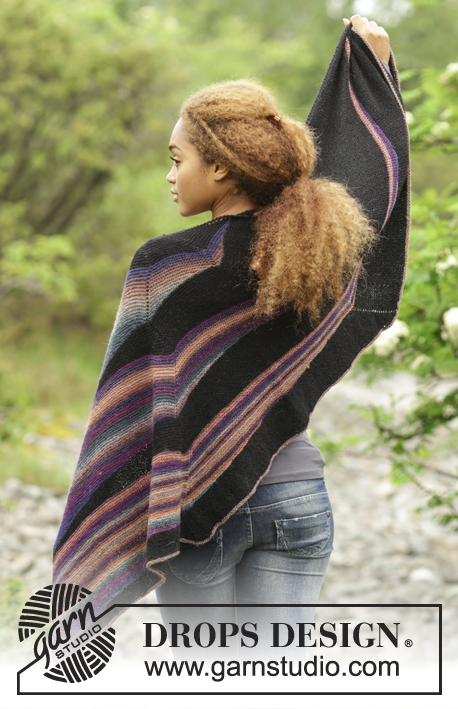
Colours in the Dark#coloursinthedarkscarf |
|
 |
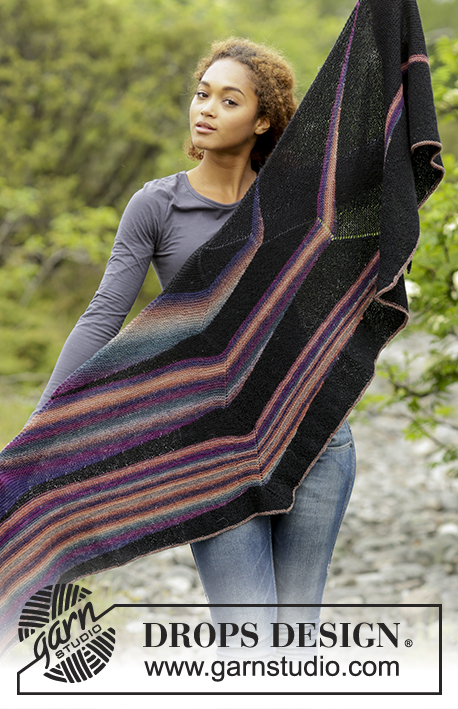 |
Knitted DROPS shawl with stripes and short rows in ”Delight” and ”Alpaca”.
DROPS 171-34 |
|
|
GARTER ST (back and forth): K all rows. 1 ridge = K2 rows. KNITTING TIP: Every time piece is turned in the middle of piece, slip first st as if to K, tighten yarn and return, this is done to avoid holes in the transitions. ---------------------------------------------------------- SHAWL: Worked top down in GARTER ST - see explanation above, back and forth on circular needle to make room for all the sts. Cast on 7 sts on circular needle size 4 mm / US 6 with Alpaca. ROW 1 (= RS): Work 2 sts in garter st, * 1 YO, 1 st in garter st *, repeat from *-* 4 times in total, finish with 1 st in garter st = 11 sts. ROW 2 (= WS): K all sts, do not work YOs twisted; they should make holes. ROW 3 (= RS): Work 1 st in garter st, K 2 tog, 1 YO (this is done so that the piece is the same in both sides), 2 sts in garter st, 1 YO, insert 1 red marker, 2 sts in garter st, 1 YO, insert 1 blue marker, 2 sts in garter st, 1 YO, finish with 2 sts in garter st = 14 sts (= 2 markers). ROW 4 (= WS): K all sts, do not work YOs twisted; they should make holes. ROW 5 (= RS): Work 1 st in garter st, K 2 tog, 1 YO, * work in garter st until marker, 1 YO (= 1 st inc, i.e. inc before marker) *, repeat from *-* 2 times in total, work in garter st until 2 sts remain, 1 YO (= 3 sts inc in total), finish with 2 sts in garter st. Repeat 4th and 5th row, i.e. inc 3 sts on every row from RS until piece measures 8 cm / 3 1/8'' measured along the middle, adjust so that next row is from RS. Then work as follows: ROW 1 (= RS): Work 1 st in garter st, K 2 tog, 1 YO, work 2 sts in each of the next 2 sts (= 2 sts inc), * work in garter st until marker, 1 YO *, repeat from *-* 2 times in total, work in garter st until 2 sts remain, 1 YO (= 5 sts inc in total), finish with 2 sts in garter st. ROW 2 (= WS): K all sts, do not work YOs twisted; they should make holes. REMEMBER THE KNITTING GAUGE PART 1: Switch to Delight. K 1 row over all sts from RS and inc as follows: K 2, 1 YO (= 1 st inc), K until red marker, 1 YO (= 1 st inc, i.e. inc after marker), K until blue marker 1 YO (= 1 st inc, i.e. inc after marker), K until 3 sts remain, 1 YO, K 2 tog, 1 st in garter st. K 1 row (= from WS). Continue inc like this AT THE SAME TIME work short rows and gusset as follows: NOTE: When working short rows, inc only at the markers worked over, i.e. you have to work over 1 st after marker to be able to inc with 1 YO. The inc after 2 edge sts continue as before on every row from RS. READ ALL OF THE FOLLOWING SECTION BEFORE CONTINUING! Work short rows while AT THE SAME TIME working gusset: SHORT ROWS: ROW 1 (= RS): K until 4 sts remain, turn piece (these sts are no longer worked). ROW 2 (= WS): K all sts - READ KNITTING TIP. ROW 3: K until 8 sts remain (includes the first 4 sts), turn piece (these sts are no longer worked). ROW 4: K back. Work over 4 sts less on every row from RS (= every other row) until 5 to 7 sts remain, there should be 4 or more sts left on last turn. Work last row from WS. GUSSET: Work 1 gusset in right side of piece (seen from RS) beg from RS as follows: ROW 1-4: Work short rows and inc as before. ROW 5 (= RS): Work and inc as before until 10 sts remain before red marker, turn piece. ROW 6 (= WS): K back. Because of the short rows it is not always possible to work gusset. Work gusset only when working short rows over the 10 sts before red marker. Repeat inc, the short rows and gusset. When the short rows have been worked, work next part as follows: PART 2: Switch to Alpaca. K 1 row over all sts from RS and inc as follows: K 1, K 2 tog, 1 YO, K until red marker, 1 YO (= 1 st inc, i.e. inc before marker), K until blue marker, 1 YO (= 1 st inc, i.e. inc before marker), K until 2 sts remain, 1 YO (= 1 st inc), K 2. Continue inc like this AT THE SAME TIME work short rows and gusset as follows: Inc will be diagonal according to part 1. NOTE: When working short rows, inc only at markers worked, i.e. work over 1 st after marker to inc with 1 YO. Inc before 2 edge sts at the end of every row from RS is continued as before on every row from RS. READ ALL OF THE FOLLOWING SECTION BEFORE CONTINUING! Work short rows while AT THE SAME TIME working gusset: SHORT ROWS: ROW 1 (= WS): K until 6 sts remain, turn piece (these sts are no longer worked). ROW 2 (= RS): K back and inc as before. ROW 3: K until 12 sts remain (includes the first 6 sts), turn piece (these sts are no longer worked). ROW 4: K back and inc as before. Work over 6 sts less on every row from WS (= every other row) until 7 to 11 sts remain, there should be 6 or more sts left on last turn. Work last row from RS. K 1 row from WS over all sts. GUSSET: Work 1 gusset in left side of piece (seen from RS) beg from WS as follows: ROW 1-4: Work short rows and inc as before. ROW 5 (= WS): Work and inc as before until 10 sts remain before blue marker, turn piece. ROW 6 (= RS): K back. Repeat inc, the short rows and gusset. When the short rows have been worked, work next part as follows: PART 3: Switch to Delight. Work as PART 1 but when working short rows work over 8 sts less on every other row until 9 to 15 sts remain, there should be 8 or more sts left on last turn. PART 4: Switch to Alpaca. Work as PART 2 but when working short rows work over 10 sts less on every other row until 11 to 19 sts remain, there should be 10 or more sts left on last turn. PART 5: Switch to Delight. Work as PART 1 but when working short rows work over 12 sts less on every other row until 13 to 23 sts remain, there should be 12 or more sts left on last turn. PART 6: Switch to Alpaca. Work as PART 2 but when working short rows work over 14 sts less on every other row until 15 to 27 sts remain, there should be 14 or more sts left on last turn. Piece now measures approx. 46 cm / 18'' (measured mid back). Work 1 ridge with Delight and inc as before on row from RS. Loosely bind off. |
|
Have you finished this pattern?Tag your pictures with #dropspattern #coloursinthedarkscarf or submit them to the #dropsfan gallery. Do you need help with this pattern?You'll find 14 tutorial videos, a Comments/Questions area and more by visiting the pattern on garnstudio.com. © 1982-2026 DROPS Design A/S. We reserve all rights. This document, including all its sub-sections, has copyrights. Read more about what you can do with our patterns at the bottom of each pattern on our site. |
|


With over 40 years in knitting and crochet design, DROPS Design offers one of the most extensive collections of free patterns on the internet - translated to 17 languages. As of today we count 324 catalogs and 12290 patterns - 12280 of which are translated into English (US/in).
We work hard to bring you the best knitting and crochet have to offer, inspiration and advice as well as great quality yarns at incredible prices! Would you like to use our patterns for other than personal use? You can read what you are allowed to do in the Copyright text at the bottom of all our patterns. Happy crafting!
Post a comment to pattern DROPS 171-34
We would love to hear what you have to say about this pattern!
If you want to leave a question, please make sure you select the correct category in the form below, to speed up the answering process. Required fields are marked *.