
Popular categories
Looking for a yarn?


Comments / Questions (70)
![]() France Gauthier wrote:
France Gauthier wrote:
Le modèle 171-2 semble comporter des erreurs au niveau des devants ( beaucoup trop larges par rapport au dos ), d`autres personnes vous l`ont mentionner aussi. Allons nous avoir les bonnes démarches sous peu?
01.08.2018 - 18:55DROPS Design answered:
Bonjour Mme Gauthier, les explications sont correctes, les deux devants se font ainsi avec de larges bordures devant au point de blé (14-16 m) qui vont se superposer. Pensez à bien vérifier - et à bien conserver votre tension, vous devez avoir 11 m x 15 rangs jersey = 10 x 10 cm, ajustez la taille de vos aiguilles si nécessaire. Bon tricot!
02.08.2018 - 08:59
![]() PRAT wrote:
PRAT wrote:
Bonjour je tricote actuellement ce modele 171-2 mais j'ai un probleme avec les 2 parties du devant : la largeur du dos est de 56 cm mais les 2 parties de devant se croisent beaucoup trop, elles sont trop grandes, les bordures au points de blé ne se superposent pas excactement. Pouvez-vous, s'il vous plait, simplement me donner largeur de chaque parties de devant, je calculerai le nombre de mailles nécessaires En vous remerciant vivement Bonne soirée Régine
27.05.2018 - 20:15DROPS Design answered:
Bonjour Mme Prat, pensez à bien conserver la bonne tension pour tricoter le jersey et le point de blé en même temps. Vous pouvez recalculer la largeur du devant sans la bordure devant grâce au nombre de mailles et à celui de l'échantillon. Pour toute assistance complémentaire, n'hésitez pas à demander de l'aide à votre magasin DROPS. Bon tricot!
28.05.2018 - 09:38
![]() Martine wrote:
Martine wrote:
Bonjour, est-il possible de faire ce modèle avec des aiguille normales car je n\'ai pas d’aiguilles circulaire. Merci
01.05.2018 - 10:43DROPS Design answered:
Bonjour Martine, chaque pièce se tricote ici séparément en allers et retours sur aiguille circulaire pour avoir suffisamment de place pour y loger toutes les mailles, vous pouvez donc utiliser des aiguilles droites, veillez à bien conserver la bonne tension. Vous trouverez ici quelques informations complémentaires. Bon tricot!
02.05.2018 - 09:47
![]() Janne wrote:
Janne wrote:
Er felling til ermetopp på erme riktig? Fellingen starter når ermet måler 47 cm og felles av ved 57 cm. Det vil si 10 cm fra start til slutt.
07.02.2018 - 20:04DROPS Design answered:
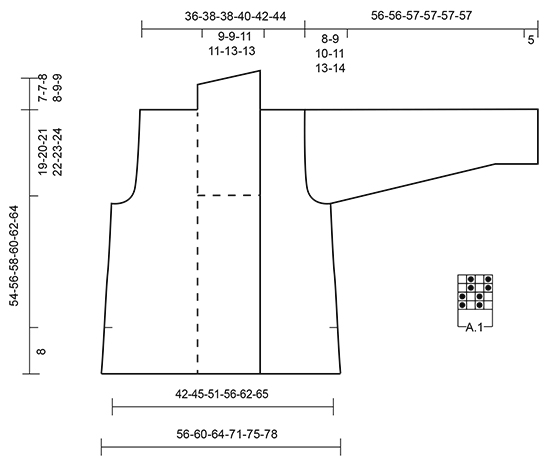
Hei Janne. Ja, det stemmer, se på målskissen. Avhengig av hvilken str du strikker skal målene være 8-9-10-11-13-14 cm. God Fornøyelse!
09.02.2018 - 09:37
![]() Charlotte wrote:
Charlotte wrote:
Jeg får kun 8cm ved 11 masker af strikkefasthed ved strikke prøven. Og jeg har prøvet forskellige andre pinde. Det hjælper ikke. Kan jeg strikke en eller to mindre størrelser i stedet for?
28.01.2018 - 15:01
![]() Maria wrote:
Maria wrote:
Posso usare ferri diritti?
16.11.2017 - 14:28DROPS Design answered:
Buongiorno Maria, il modello è un cardigan, quindi può usare i ferri dritti lavorando con le stesse spiegazioni. Buon lavoro!!
16.11.2017 - 14:39
![]() CHARRIER wrote:
CHARRIER wrote:
Je suis en train de réaliser le modèle de veste drops 171-2. Le dos est terminé.J'ai commencé le devant droit, et j'en suis aux emmanchures. J'ai superposé le devant sur le dos pour voir et je constate qu'une fois que le devant gauche sera fait, les bandes au point de blé ne se superposeront pas !!! Je pense qu'il y a un problème dans le modèle. Pourriez-vous me contacter car une réponse par écrit, ne sera pas suffisante Cordialement
05.10.2017 - 18:31DROPS Design answered:
Bonjour Mme Charrier, l'idéal sera de montrer votre ouvrage à votre magasin DROPS (en photo si besoin) et de lui expliquer en détail votre problème, ils auront alors une vue d'ensemble plus complète pour pouvoir vous aider. Bon tricot!
06.10.2017 - 09:03
![]() Willeke Meek wrote:
Willeke Meek wrote:
In maat L zet je voor het achterpand 70 steken op en voor beide voorpanden 49 steken. Dat betekent dat de voorkant 14 steken breder wordt dan het achterpand dus ruim 13 cm breder. Klopt dat wel?
06.06.2017 - 11:50DROPS Design answered:
Hoi Willeke, Ja, het klopt dat je in totaal meer steken hebt over het voorpand. Ik heb het even nagerekend en als je de steken aanhoud die zijn aangegeven moet je goed uitkomen met de sjaalkraag en schouder. Veel breiplezier!
06.06.2017 - 12:50
![]() Jenny wrote:
Jenny wrote:
I wanted to convert this pattern to inches for sizing of bust and full length. The website will not convert this pattern as it does on some others.
17.05.2017 - 23:04DROPS Design answered:
Hi Jenny, if you choose English (US/in) in the menu under the picture you will get the pattern with cm/in measures. To convert the cm in the graphic you can use this tool.
18.05.2017 - 08:38
![]() Sophie wrote:
Sophie wrote:
Bonjour, je viens de commencer le patron. Aprés avoir rabattu les 10m centrales du dos, faut-il continuer de tricoter les 32m restantes normalement, c'est à dire que les m vont se reserrer à hauteur du col ou il y a -t- il une autre technique?
13.05.2017 - 21:29DROPS Design answered:
Bonjour Sophie, après avoir rabattu les 10 m centrales pour l'encolure dos, continuez chaque épaule séparément, d'abord sur les 16 m du 1er côté de l'épaule jusqu'à ce que l'ouvrage mesure 54 cm, rabattez ces mailles. Reprenez les mailles de l'autre épaule et tricotez-les pendant le même nombre de rangs. Les 2 épaules mesureront la même hauteur. Bon tricot!
15.05.2017 - 09:19
|
|||||||
Winter Hues#winterhuescardigan |
|||||||
|
|
|||||||
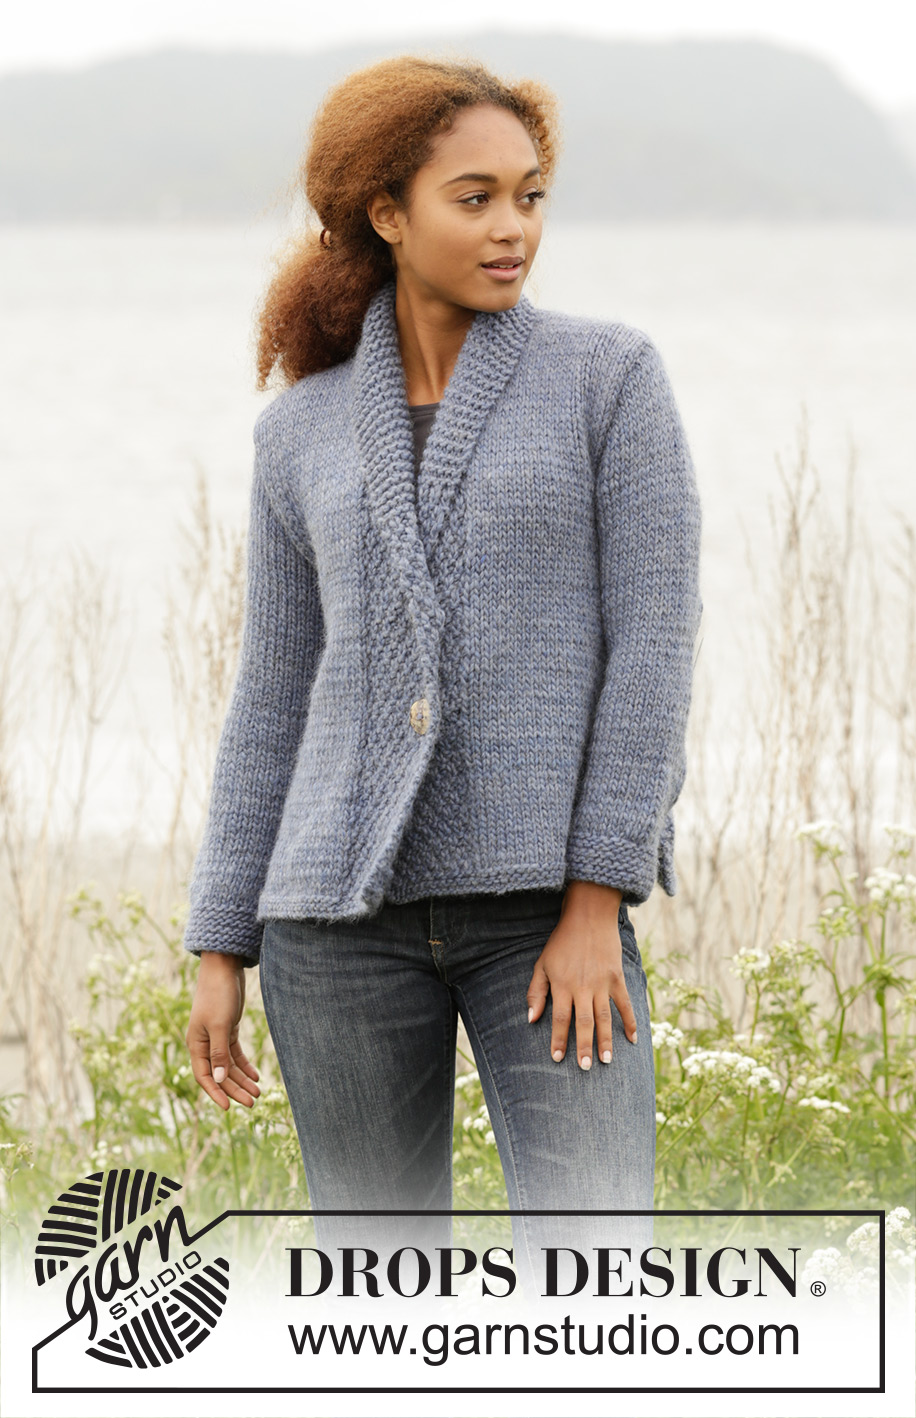
Knitted DROPS jacket with double seed st in band and shawl collar in ”Snow” or DROPS Wish. Size: S - XXXL.
DROPS 171-2 |
|||||||
|
GARTER ST (back and forth): K all rows. 1 ridge = K2 rows. PATTERN: See diagram A.1. Diagram shows all rows in pattern, seen from RS. DECREASE TIP: Dec inside 1 edge st in garter st. All dec are done from RS! Dec as follows before 1 edge st: K 2 tog. Dec as follows after 1 edge sts: Slip 1 st as if to K, K 1, psso. INCREASE TIP Increase 1 stitch with a yarn over inside 1 edge stitch on each side. Work the yarn overs twisted on next row to avoid holes. BUTTONHOLES: Dec for buttonholes on right band. 1 buttonhole = K tog fourth and fifth st from edge and make 1 YO. Dec for buttonholes when piece measures: SIZE S: 17 and 26 cm / 6¾" and 10¼" SIZE M: 18 and 27 cm / 7" and 10½". SIZE L: 19 and 28 cm / 7½" and 11". SIZE XL: 20 and 29 cm / 8" and 11½". SIZE XXL: 21 and 30 cm / 8¼" and 11¾". SIZE XXXL: 22 and 31 cm / 8¾" and 12¼". ---------------------------------------------------------- BACK PIECE: Worked back and forth on circular needle. Cast on 62-66-70-78-82-86 sts on circular needle size 7 mm / US 10.75 with Snow or Wish. Work 2 ridges in GARTER ST - see explanation above. Switch to circular needle size 8 mm / US 11. Work in stockinette st with 3 sts in garter st in each side. When piece measures 8 cm / 3⅛", cast on 1 new st at the end of the next 2 rows = 64-68-72-80-84-88 sts. Work in stockinette st with 1 edge st in garter st in each side. REMEMBER THE KNITTING GAUGE When piece measures 11 cm / 4½", dec 1 st in each side of piece - READ DECREASE TIP! Dec like this every 3-3-4-3-4-4 cm / 1"-1"-1½"-1"-1½"-1½" 8-8-7-8-7-7 times in total = 48-52-58-64-70-74 sts. When piece measures 35-36-37-38-39-40 cm / 13¾"-14¼"-14½"-15"-15¼"-15¾", bind off for armhole in each side of piece on every other row: 3 sts 0-1-1-1-1-1 time, 2 sts 1-0-1-2-3-3 times and 1 st 1-1-2-2-2-3 times = 42-44-44-46-48-50 sts. When piece measures 52-54-56-58-60-62 cm / 20½"-21¼"-22"-22¾"-23⅝"-24⅜", bind off the middle 10-10-12-12-14-14 sts for neck = 16-17-16-17-17-18 sts remain on each shoulder. Bind off when piece measures 54-56-58-60-62-64 cm / 21¼"-22"-22¾"-23⅝"-24⅜"-25¼". RIGHT FRONT PIECE: Cast on 45-47-49-55-57-59 sts (includes 14-14-14-16-16-16 band sts) on circular needle size 7 with Snow or Wish. Work 2 ridges. Switch to circular needle size 8 mm / US 11. Work as follows from RS: 14-14-14-16-16-16 band sts in A.1, stockinette st until 3 sts remain, finish with 3 sts in garter st. Continue like this until piece measures 8 cm / 3⅛". Cast on 1 new st at the end of next row from RS = 46-48-50-56-58-60 sts. Work as follows from WS: 1 edge st in garter st, stockinette st until 14-14-14-16-16-16 sts remain, A.1 over band sts as before. Continue like this. When piece measures 11 cm / 4½", dec in the side (i.e. at the end of row from RS) as on back piece = 38-40-43-48-51-53 sts. REMEMBER BUTTONHOLES! When piece measures 35-36-37-38-39-40 cm / 13¾"-14¼"-14½"-15"-15¼"-15¾", bind off for armhole in the side as on back piece = 35-36-36-39-40-41 sts. When bind off for armhole is done work band sts (= 14-14-14-16-16-16 sts towards mid front) in garter st until finished measurements. When piece measures 54-56-58-60-62-64 cm / 21¼"-22"-22¾"-23⅝"-24⅜"-25¼", bind off the first 16-17-16-17-17-18 sts for shoulder on next row from WS = 19-19-20-22-23-23 sts remain for shawl collar. Continue in garter st over these sts - AT THE SAME TIME work short rows, beg from the neck (RS) as follows: * Work 1 ridge over all sts (= 2 rows K). On next row from RS K 14-14-14-16-16-16, turn and K back *, repeat from *-* until piece measures 7-7-8-8-9-9 cm / 2¾"-2¾"-3⅛"-3⅛"-3½"-3½" from bind off for shoulder (short side). Loosely bind off all sts. LEFT FRONT PIECE: Work as right front piece but reversed. Do not dec for buttonholes on left band. SLEEVE: Worked back and forth on circular needle. Cast on 34-34-36-36-38-38 sts (includes 1 edge st in each side) on circular needle size 7 mm / US 10.75 with Snow or Wish. Work 6 ridges. Switch to circular needle size 8 mm / US 11. Work in stockinette st with 1 edge st in garter st in each side. When piece measures 12-13-13-12-10-11 cm / 4¾"-5"-5"-4¾"-4"-4½", inc 1 st in each side of piece - READ INCREASE TIP! Inc like this every 8-6-6-5-5-4 cm / 3"-2¼"-2¼"-2"-2"-1½" 5-6-6-7-7-8 times in total = 44-46-48-50-52-54 sts. When piece measures 48-47-47-46-44-43 cm / 19"-18½"-18½"-18"-17¼"-17", bind off for sleeve cap in each side on every other row: 3 sts 1 time, 2 sts 1 time, 1 st 2-3-4-4-6-7 times, then bind off 2 sts in each side until piece measures 54-54-55-55-55-55 cm / 21¼"-21¼"-21½"-21½"-21½"-21½" , then bind off 3 sts 1 time in each side before binding off the remaining sts. Piece measures approx. 56-56-57-57-57-57 cm / 22"-22"-22½"-22½"-22½"-22½". Make another sleeve the same way. ASSEMBLY: Sew the shoulder seams tog. Sew in the sleeves inside 1 edge st. Sew side and sleeve seams in one inside 1 edge st down to where edge st were cast on (i.e. approx. 8 cm / 3" vent). Sew collar tog mid back - NOTE: Seam should be at the back so that it is not visible when collar is folded down. Sew collar along neckline in the back of neck. Sew buttons on left band. |
|||||||
Diagram explanations |
|||||||
|
|||||||
 |
|||||||
Have you finished this pattern?Tag your pictures with #dropspattern #winterhuescardigan or submit them to the #dropsfan gallery. Do you need help with this pattern?You'll find 22 tutorial videos, a Comments/Questions area and more by visiting the pattern on garnstudio.com. © 1982-2026 DROPS Design A/S. We reserve all rights. This document, including all its sub-sections, has copyrights. Read more about what you can do with our patterns at the bottom of each pattern on our site. |
|||||||


With over 40 years in knitting and crochet design, DROPS Design offers one of the most extensive collections of free patterns on the internet - translated to 17 languages. As of today we count 324 catalogs and 12245 patterns - 12235 of which are translated into English (US/in).
We work hard to bring you the best knitting and crochet have to offer, inspiration and advice as well as great quality yarns at incredible prices! Would you like to use our patterns for other than personal use? You can read what you are allowed to do in the Copyright text at the bottom of all our patterns. Happy crafting!
Post a comment to pattern DROPS 171-2
We would love to hear what you have to say about this pattern!
If you want to leave a question, please make sure you select the correct category in the form below, to speed up the answering process. Required fields are marked *.