
Popular categories
Looking for a yarn?


Comments / Questions (43)
![]() Malene wrote:
Malene wrote:
Takk for svar :-) Men skulle gjerne fått det forklart litt mer.. 2 m mer på forkortet p. Hvor på p skal jeg øke maskene? Er det samme hvor bare jeg øker med 2?
21.11.2016 - 21:28DROPS Design answered:
Hej Malene. Du skal ikke öge, du skal strikke 2 m mere. Dvs, har du strikket 7 m förste gang för du vender, strikker du 9 naeste gang, saa 11 osv.
22.11.2016 - 15:40
![]() Malene wrote:
Malene wrote:
Hei, etter pinne 12.. Det står gjenta 5.-12.P fram og tilbake. Skal jeg da strikke fra 5-12 og så fra 12 til 5 igjen? Og skal jeg legge til 2 masker hver gang jeg strikker forkortet pinne?
19.11.2016 - 22:45DROPS Design answered:
Hej Malene. Du strikker pinde 5 til 12 igen og ja du skal laegge 2 m til for hver forkortede p til du har strikket over totalt 26 m i hver side.
21.11.2016 - 14:40
![]() Mirjam wrote:
Mirjam wrote:
Lovely scarf, I 'm knitting it in aqua grey mix, light petroleum and petroleum mix
01.11.2016 - 10:05
![]() Christiane wrote:
Christiane wrote:
Hei, jeg lurte på pinne 9 på sjalet ja.
26.10.2016 - 11:49
![]() Tora wrote:
Tora wrote:
Hei, på pinne 6. Et kast og en vridd maske vrang for å unngå hull. Er det et vanlig kast på pinnen òg så en vridd maske? El hente opp en maske mellom pinnene og gjøre den vridd vrang?
25.10.2016 - 10:54
![]() Christiane wrote:
Christiane wrote:
Hei Er det mulig å få en ekstra forklaring på 9.P? Ev henvisning til video.
22.10.2016 - 22:45DROPS Design answered:
Hej Christiane. Er det 9. p til sjalet eller diagrammet du spörger til?
25.10.2016 - 12:43
![]() Marjo wrote:
Marjo wrote:
Bonjour, je ne comprends pas bien où se font les augmentations : 12m au rang 5 ET 12 m au rang 7, ou 6 à chaque fois? Et faut il répartir les augmentations dans le rang ou bien les ajouter en début ou en fin de rang? Merci
16.10.2016 - 17:48DROPS Design answered:
Bonjour Marjo, on augmente 6 m à chaque fois que l'on tricote le rang 5 et 6 m à chaque fois que l'on tricote le rang 7, ainsi, en répétant les rangs 5 à 12, on augmente 12 m. Bon tricot!
17.10.2016 - 10:15
![]() Hana wrote:
Hana wrote:
Není mi jasný návod na Pikotkové zakončení. Po nahození 3 nových ok na levé jehlici, pletu "první oko hladce" to poslední nahozené nebo původně první, čili nyní čtvrté? Díky za odpověď, Hanka
13.10.2016 - 11:42DROPS Design answered:
Dobrý den, Hanko, jde o 1. oko po směru pletení, tj. od špičky jehlice (tedy poslední z nahozených 3 ok). Hodně zdaru! Hana
18.10.2016 - 06:55
![]() Malene wrote:
Malene wrote:
Takk for svar, men er fortsatt litt usikker.. Er 1 rille 2 pinner med rettstrikk på alle maskene? (P betyr vel omgang?) Eller er det slik: På 4.P står det jo 1 kant-m RILLE, betyr det på første masken bare? Så blir det vrangstrikk fram til siste maske som skal strikkes rett? Så blir det en rett maske på hver side av maskene jeg strikker vrange? Er en kant-m RILLE rett og slett bare én maske som strikkes rett? :-)
12.10.2016 - 21:23DROPS Design answered:
Hej. 1 kant-m i RILLE er bare 1 maske
13.10.2016 - 12:16
![]() Malene Christiane Lydersen wrote:
Malene Christiane Lydersen wrote:
Beklager for trippelmelding :-)
12.10.2016 - 11:40
|
||||||||||||||||||||||
Shades of Eire#shadesofeirescarf |
||||||||||||||||||||||
|
|
||||||||||||||||||||||
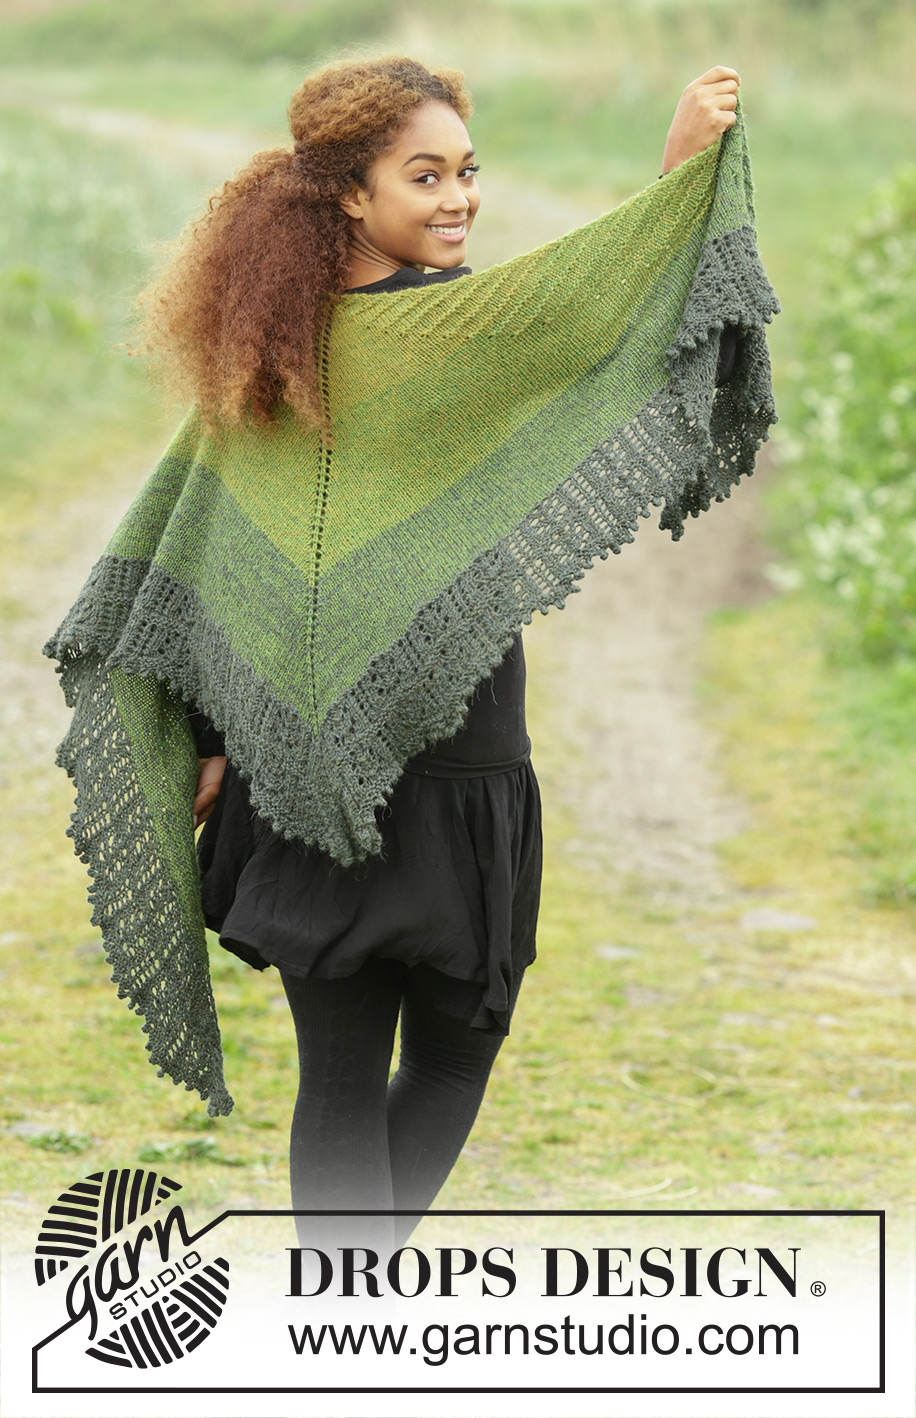
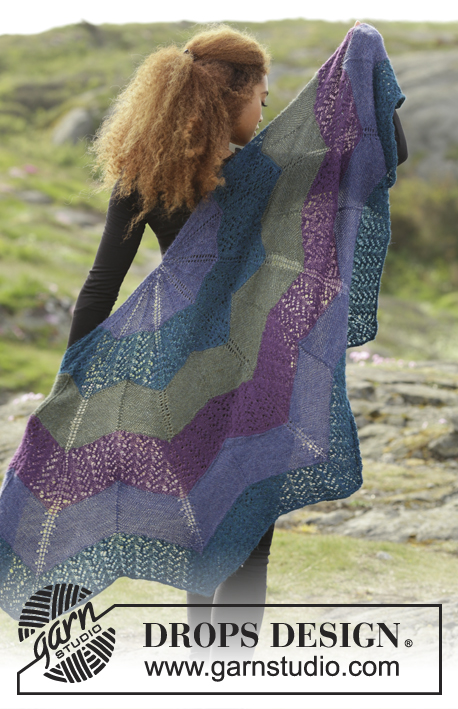
Knitted DROPS shawl with short rows, lace pattern and stripes, worked top down in 2 strands "Alpaca".
DROPS 171-8 |
||||||||||||||||||||||
|
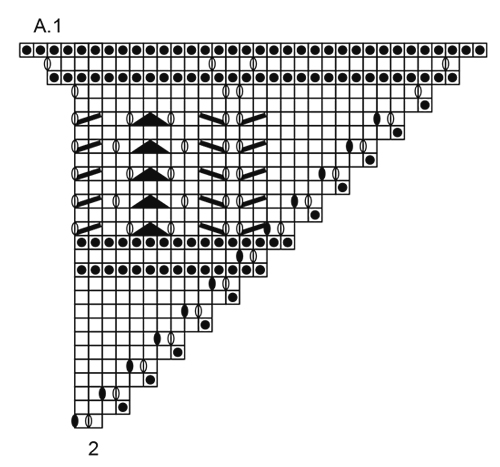
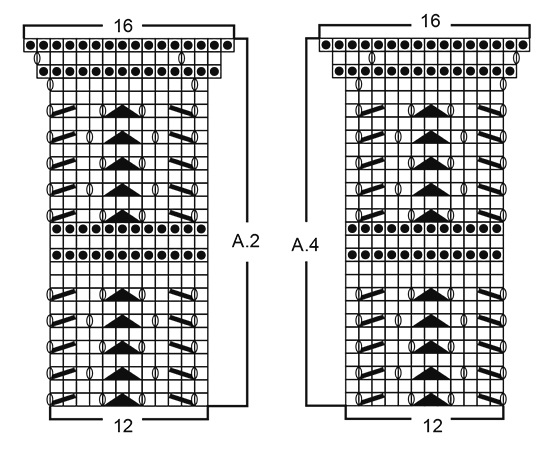
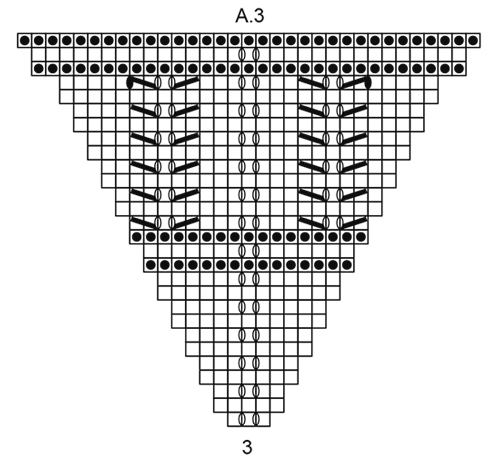
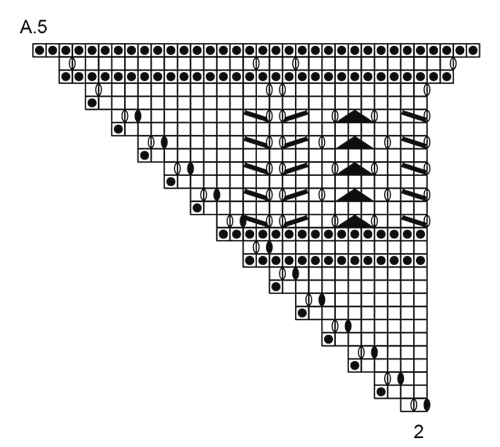
STRIPES: Work stripes as follows: Cast on with 2 strands olive and work 1st-12th row, then repeat 5th-12th ROW 7 more times = 105 sts. Switch to 1 strand olive and 1 strand dark olive, repeat 5th-12th ROW 9 times in total = 213 sts. Switch to 1 strand dark olive and 1 strand green/turquoise, repeat 5th-12th ROW 8 times in total = 309 sts. Then work pattern A.1-A.5 with 2 strands green/turquoise. GARTER ST (back and forth on circular needle): K all rows. PATTERN: See diagrams A.1-A.5. The diagrams show all rows in pattern seen from RS. ---------------------------------------------------------- SHAWL: Cast on 3 sts on circular needle size 5 mm / US 8 with 2 strands olive. Work STRIPES - see explanation above and work as follows: ROW 1 (= RS): K all sts. ROW 2 (= WS): K 1, 1 YO, P 1, 1 YO, K 1 = 5 sts. ROW 3 (= RS): K 1, 1 YO, K 1, 1 YO, K 1, 1 YO, K 1, 1 YO, K 1 = 9 sts. Insert 1 marker in the middle st (= mid st). ROW 4 (= WS): 1 edge sts in GARTER ST - see explanation above, work P until 1 st remains and finish with 1 edge st in garter st. Continue to work and inc as follows with 1 edge st in garter st in each side: ROW 5 (= RS): 1 edge st in garter st, 1 YO, K 1, 1 YO, K until mid st, 1 YO, K 1 (mid st), 1 YO, K until 2 sts remain on row, 1 YO, K 1, 1 YO and 1 edge st in garter st. ROW 6 (= WS): 1 edge st in garter st, P 2, P next YO twisted to avoid hole, P until 4 sts remain on row, P first YO twisted, P 2 and finish with 1 edge st in garter st. ROW 7 (= RS): 1 edge st in garter st, 1 YO, K 1, 1 YO, K until mid st, 1 YO, K 1 (= mid st), 1 YO, K until 2 sts remain on row, 1 YO, K 1, 1 YO and 1 edge st in garter st. ROW 8 (= short row from WS): 1 edge st in garter st, K 2, K 1 twisted (to avoid hole), K 4, turn piece. NOTE: K this row from WS to make a ridge seen from RS. ROW 9 (= RS): Slip 1st st as if to K, tighten yarn and K 7. ROW 10 (= WS): 1 edge st in garter st, P until 4 sts remain on row, P first YO twisted (to avoid hole), P 2 and finish with 1 edge st in garter st. ROW 11 (= short row from RS): 1 edge st in garter st, K 7, turn piece. ROW 12 (= WS): Slip 1st st as if to K, tighten yarn and K 7. NOTE: K this row from WS to make a ridge seen from RS. REMEMBER THE KNITTING GAUGE Repeat 5th-12th ROW back and forth BUT on every repetition work 2 sts more on short rows until short rows have been worked over 26 sts in total in each side. Then work short rows over only over 26 sts until finished measurements (work the other sts in stockinette st as before). After every repetition 12 new sts inc (inc 5th and 7th ROW). After last stripe and repetition of 5th-12th ROW there are 309 sts on needle. Switch to 2 strands green/turquoise. K 1 row from RS while inc 10 sts as follows: Inc as before in each side and at mid st (= 6 sts) and inc in addition 4 sts evenly (i.e. 2 sts on each side of middle st, inc these sts with YOs that are worked twisted on next row) = 319 sts on needle. K 1 row from WS (work edge sts in garter st as before). Then work according to diagram as follows: A.1 over 2 sts, repeat A.2 until 1 st before mid st, work A.3 over the next 3 sts (mid st is in the middle of A.3), repeat A.4 until 2 sts remain and work A.5 over these sts. Then work diagram 1 time in total vertically. Do not cut the yarn but bind off with picot - see explanation below. BIND-OFF EDGE WITH PICOT: Loosely bind off with K from RS as follows: K 1, ((** insert right needle in between the first 2 sts on left needle (i.e. between sts on needle, not through sts), make 1 YO on right needle, pull YO forwards between sts and slip YO on left needle **, repeat from **-** 2 more times (= 3 new sts on left needle). * K first st on left needle, pass first st on right needle over last st worked *)), repeat from *-* 6 times in total and repeat from ((-)) along the entire shawl until 1 st remains, cut the yarn and pull it through last st. |
||||||||||||||||||||||
Diagram explanations |
||||||||||||||||||||||
|
||||||||||||||||||||||
 |
||||||||||||||||||||||
 |
||||||||||||||||||||||
 |
||||||||||||||||||||||
 |
||||||||||||||||||||||
Have you finished this pattern?Tag your pictures with #dropspattern #shadesofeirescarf or submit them to the #dropsfan gallery. Do you need help with this pattern?You'll find 13 tutorial videos, a Comments/Questions area and more by visiting the pattern on garnstudio.com. © 1982-2026 DROPS Design A/S. We reserve all rights. This document, including all its sub-sections, has copyrights. Read more about what you can do with our patterns at the bottom of each pattern on our site. |
||||||||||||||||||||||


With over 40 years in knitting and crochet design, DROPS Design offers one of the most extensive collections of free patterns on the internet - translated to 17 languages. As of today we count 324 catalogs and 12290 patterns - 12280 of which are translated into English (US/in).
We work hard to bring you the best knitting and crochet have to offer, inspiration and advice as well as great quality yarns at incredible prices! Would you like to use our patterns for other than personal use? You can read what you are allowed to do in the Copyright text at the bottom of all our patterns. Happy crafting!
Post a comment to pattern DROPS 171-8
We would love to hear what you have to say about this pattern!
If you want to leave a question, please make sure you select the correct category in the form below, to speed up the answering process. Required fields are marked *.