
Popular categories
Looking for a yarn?


Comments / Questions (7)
![]() Mette Sæther wrote:
Mette Sæther wrote:
Hei. Jeg får ikke opp diagrammet på denne oppskriften, har prøvd fra flere PCer og på tlf men den vil ikke dukke opp. Jeg har også prøvd å skrive den ut og der bilde for A1 skal være så står det bare diagram forr drops entra 0-1231
08.10.2021 - 15:11
![]() Loes wrote:
Loes wrote:
Ik ben bij het minderen voor de hiel aangekomen, maar volgens mij klopt dit niet. Ik houd twee steken over. Je hebt 17 steken op de zool. Als ik ga tellen kom ik op 15 steken i.p.v. 17 uit: 2 st samen, 3 steken, 2 steken samen, 1 st, 2 steken samen, 3 st, 2 steken samen = 15 steken naar 13, lijkt mij de tweede mindertoer. Volgens mij moeten er 4 st tussen de minderingen. Heb ik gelijk? Vriendelijk groet, Loes
09.07.2019 - 16:27
![]() Frida wrote:
Frida wrote:
Hej. Jag undrar ifall man ska göra något annorlunda med luftmaskorna i början på raden då man kommit till att virka öppningen för foten? Alltså när det virkas fram och tillbaka istället för runt. Jag tycker det ser lite konstigt ut med luftmaskorna + första reliefstolpen. Tack för ett annars fint mönster.
19.11.2018 - 10:42DROPS Design answered:
Hei Frida. Du begynner omgangen med 3 luftmasker for å komme deg opp til rikitg høyde for å hekle reliefstaven. Om du ikke hekler luftmaskene vil du starte fra samme høyde som forrige omgang og reliefstaven vil bli bøyd. God fornøyelse.
03.12.2018 - 10:10Frederikke Hansen wrote:
Hi, I've gotten to the part where I have to work the pattern from the wrong side (ws). Before I start the row, should I slip stitch into the 3rd chain on the beginning of the row? And is there a guide on how to work the ws of a pattern, especially the relief tr? I read the note here but I don't understand it and I can't find a video. Thank you!
13.11.2018 - 07:49DROPS Design answered:
Dear Mrs Hansen, you join the yarn in the middle of A.1 (= in the 4th st from A.1) and crochet 3 ch, 1 relief treble in the same st where you join the yarn, 1 relief tr in each of the next 2 sts from A.1, decrease and continue as before, decrease and finish with 1 relief tr in each of the last 3 sts (= the first 3 sts from A.1). this video shows how to crochet the relief trebles from both RS and WS. Happy crocheting!
13.11.2018 - 09:09
![]() Pomme Yvonnou wrote:
Pomme Yvonnou wrote:
Bonjour, Une fois qu'on commence les cotés des chaussons, après avoir fini les A1, faut-il toujours faire les brides en reliefs des cotés ? Faut-il les faire tout au long du chausson ? Je pense qu'elles délimitent la semelle ? Merci
26.06.2018 - 16:49DROPS Design answered:
Bonjour Mme Yvonnou, tout à fait, quand on continue en allers et retours, on crochète 3 ml, 1 bride en relief autour des 3 premières brides,, continuez en brides jusqu'à ce qu'il reste 3 brides, 1 bride en relief autour des 3 dernières brides (en diminuant aux 2 premiers rangs comme indiqué) jusqu'à 20-22-25 cm. Ces 3 brides en relief de chaque côté de chaque rang forment une petite bordure autour de l'ouverture du pied. Bon crochet!
27.06.2018 - 08:12
![]() Pomme Yvonnou wrote:
Pomme Yvonnou wrote:
Bonjour, J\'en suis à \"Continuer maintenant en allers et retours, en commençant au milieu de A.1a (c\'\'est-à-dire 3 m de A.1a = milieu du dessus du pied)...Continuer comme avant jusqu\'à ce que l\'ouvrage mesure 20-22-25 cm. \" Je voudrais savoir si on continue à faire la bride en relief qui est sur les cotés (je pense qu\\\'elle délimite la semelle) ? Doit-on faire tout le chausson avec ces brides latérales ? Merci pour votre réponse.Pomme.
26.06.2018 - 16:43
![]() Eva Lundberg wrote:
Eva Lundberg wrote:
Mycket tvetydlig beskrivning om st omkring maskan bakifrån och framifrån (reliefmaskor) i beskrivningen i mönstret, som jag faktiskt kan virka, men då ni beskriver mönsterbeskrivningen framkommer det inte alls på vilka varv man sticket in nålen framför eller bakom maskan. Här läser man mönstret att det inte gör någon skillanad .
14.02.2016 - 01:29
|
|||||||||||||
Amber Road |
|||||||||||||
|
|
|||||||||||||
Crochet DROPS slippers with cables and relief sts in "Alaska".
DROPS Extra 0-1231 |
|||||||||||||
|
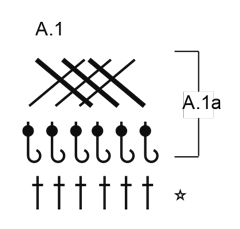
CROCHET INFO: Beg every round with dc with 3 ch and finish with 1 sl st in 3rd ch. Each row with dc starts with 3 ch(does not replace first dc). RELIEF DC: When working 1 relief dc, 1 relief dtr or 1 relief dtr it is to work around 1 st from previous round (do not work in loops but around the dc from the front). RELIEF DC (WS): Work 1 dc around 1 dc on previous row (i.e. do not work in loops but around dc) as follows: 1 YO on hook (the way as working 1 normal dc), insert hook on RS between 2 dc, up around dc, get the yarn, work the rest of dc as normal. 6 DTR CABLE: Skip 5 relief dc, 1 relief dtr around next relief dc, 1 relief dtr around 5th and 4th st skipped, 1 relief dtr in first st skipped, 1 relief dtr in 2nd and 3rd st skipped. DECREASE TIP: Dec 1 dc by working 2 dc tog as follows: Work 1 dc but wait with last pull through (= 2 loops on hook), then work next dc but on last pull through, pull yarn through all 3 loops on hook. PATTERN: See diagram A.1. ---------------------------------------------------------- SLIPPERS: Work in the round from toe towards heel. Round beg mid under foot. Work 4 ch on hook size 4.5 mm/US 7 with Alaska and form 1 ring with 1 sl st in first ch. Work 12 dc in ring – read CROCHET INFO. ROUND 1: Work 1 dc in first dc, 2 dc in next dc, 1 RELIEF dc – see explanation above - around next dc, 2 dc in next dc, 1 dc in each of the next 3 dc, 2 dc in next dc, 1 relief dc around next dc, 2 dc in next dc, 1 dc in each of the last 2 dc = 16 dc. ROUND 2: Work 1 dc in each of the first 2 dc, 2 dc in next dc, 1 relief dc around next relief dc, 2 dc in next dc, 1 dc in each of the next 4 dc, * 2 dc in next dc *, repeat from *-* 1 more time, 1 relief dc around next relief dc, 2 dc in next dc, 1 dc in each of the last 3 dc = 21 dc. REMEMBER THE CROCHET GAUGE! Then work as follows: ROUND 3: Work 1 dc in each of the first 3 dc, 2 dc in next dc, 1 relief dc around next relief dc, 2 dc in next dc, 1 dc in next dc, A.1 over the next 6 dc, 1 dc in next dc, 2 dc in next dc, 1 relief dc around next relief dc, 2 dc in next dc, 1 dc in each of the last 4 dc = 25 dc. Continue working 2 dc in same dc on each side of the 2 relief dc in each side of piece (= 4 dc inc per round) and A.1 over the middle 6 dc on top of slipper. Repeat inc 2-2-3 more times = 33-33-37 dc. Then work next round as follows: 1 dc in each of the first 7-7-8 dc, 1 relief dc as before, 1 dc in each of the next 5-5-6 dc, A.1 as before (repeat A.1a), 1 dc in each of the next 5-5-6 dc, 1 relief dc as before, 1 dc in each of the last 8-8-9 dc. Continue like this until piece measures 12-13-14 cm / 4¾"-5"-5½"", adjust so that last round is first round in A.1a. Fasten off. Now work piece back and forth, beg in the middle of A.1a (i.e. 3 sts in in A.1a = mid on top of foot). Work as follows (first row from RS): Work ch 3, work 1 relief dc around each of the first 3 dc (= over A.1a), work the next 2 dc tog – READ DECREASE TIP, work as before until 5 dc remain, work the next 2 dc tog, 1 relief dc around each of the last 3 dc = 31-31-35 dc. Repeat dec from WS - READ RELIEF dc (WS) = 29-29-33 dc. Work pattern as before until piece measures 20-22-25 cm / 8"-8¾"-9¾". Work next row as follows: Work 1 relief dc around each of the first 3 relief dc, 1 dc in each of the 3-3-4 dc, 1 relief dc around the relief dc as before, work 2 dc tog, 1 dc in each of the next 3 dc, 2 dc tog, 1 dc, 2 dc tog, 1 dc in each of the next 3 dc, 2 dc tog, 1 relief dc, 1 dc in each of the next 3-3-4 dc, 1 relief dc around each of the last 3 relief dc = 25-25-29 dc. Repeat this dec on next row = 21-21-25 dc. Then work back and forth only over the first 7-7-8 dc as before for 2 cm / ¾". Fasten off. Work back and forth over the last 7-7-8 dc in opposite side of piece as before for 2 cm / ¾". Sew them tog mid back, sew them to under side of slipper. Work another slipper the same way. |
|||||||||||||
Diagram explanations |
|||||||||||||
|
|||||||||||||
 |
|||||||||||||
Have you finished this pattern?Tag your pictures with #dropspattern or submit them to the #dropsfan gallery. Do you need help with this pattern?You'll find 9 tutorial videos, a Comments/Questions area and more by visiting the pattern on garnstudio.com. © 1982-2026 DROPS Design A/S. We reserve all rights. This document, including all its sub-sections, has copyrights. Read more about what you can do with our patterns at the bottom of each pattern on our site. |
|||||||||||||


With over 40 years in knitting and crochet design, DROPS Design offers one of the most extensive collections of free patterns on the internet - translated to 17 languages. As of today we count 324 catalogs and 12290 patterns - 12280 of which are translated into English (US/in).
We work hard to bring you the best knitting and crochet have to offer, inspiration and advice as well as great quality yarns at incredible prices! Would you like to use our patterns for other than personal use? You can read what you are allowed to do in the Copyright text at the bottom of all our patterns. Happy crafting!
Post a comment to pattern DROPS Extra 0-1231
We would love to hear what you have to say about this pattern!
If you want to leave a question, please make sure you select the correct category in the form below, to speed up the answering process. Required fields are marked *.