
Popular categories
Looking for a yarn?


Comments / Questions (13)
![]() Monica wrote:
Monica wrote:
Porqué en la fase del montaje de las dos partes del agarrador se trabajan 20 cadenetas, cuando existen instrucciones específicas para trabajar una argolla en color marrón, cuando se hacen la "argolla y el pedúnculo"?
06.08.2025 - 17:45DROPS Design answered:
Hola Mónica, esta cadena de 20 pts sirve para pasar a través de ella la argolla y asegurarla más a la labor. Pero puedes omitir este paso, trabajando 1 p.b en cada pt en la última vuelta y después asegurar la argolla directamente a la pieza.
10.08.2025 - 13:54
![]() Lilian wrote:
Lilian wrote:
Looks lovely ,torn in between 🥝 and 🍐
14.08.2024 - 19:28
![]() Lilo wrote:
Lilo wrote:
Please add diagram pattern to the written pattern
25.08.2022 - 09:25
![]() Katia wrote:
Katia wrote:
Buongiorno, il quantitativo di filato indicato per il lavoro specifica essere per 2 presine; volevo però capire se si intende la realizzazione di 2 presine complete, ossia con le due parti unite e per un totale di 4 pezzi. Grazie
23.11.2020 - 12:13DROPS Design answered:
Buonasera Katia, il quantitativo è per 2 presine intere. Buon lavoro!
25.11.2020 - 22:43
![]() Jane Belger wrote:
Jane Belger wrote:
Someone is selling this pattern on Etsy. Imagine my surprise when I downloaded and saw "Drops Design"....the shop is Vintage Pattern Faves
04.05.2020 - 22:49
![]() Kim Nelson wrote:
Kim Nelson wrote:
What are the dimensions of the apple and the pear pot holders?
03.12.2019 - 16:47DROPS Design answered:
Dear Mrs Nelson, if you get the right tension in height (and approx. 10 ,5 rows with dc and 21 rows sc = 10 cm in height), apple should be approx. 20 x 20 cm and pear should be approx. 23 cm height and 19 cm wide (at the widest part). Happy crocheting!
04.12.2019 - 10:01
![]() Pauline wrote:
Pauline wrote:
Bij het ‘samenhaken’ 20 l voor een lus......en ‘ophang-lusje met steel’: dus de pannenlappen hebben twee ophang-lusjes?!? (Een groene en bruine?)
25.08.2019 - 13:22DROPS Design answered:
Dag Pauline,
Nee, het zijn geen 2 ophanglusjes. Het is de bedoeling dat je het bruine ophanglusje door de groene lus rijgt en dan vast maakt.
31.08.2019 - 14:05
![]() Monique SERVAIS wrote:
Monique SERVAIS wrote:
J\'aime beaucoup ces accessoires nettement plus modernes !
25.07.2018 - 15:36
![]() Ida wrote:
Ida wrote:
Hva skal man bruke den luftmaske ringen man lager I pistasj når man hekler sammen sidene ?
28.07.2016 - 23:28DROPS Design answered:
Hei Ida. Ikke noget, det er den du starter omg med, saa du kan komme igang.
29.07.2016 - 11:36
![]() Helene Lindemann wrote:
Helene Lindemann wrote:
100g Pistacie var lige knebent til at nå begge pærer. Ellers meget fine grydelapper.
29.03.2016 - 16:00
|
|
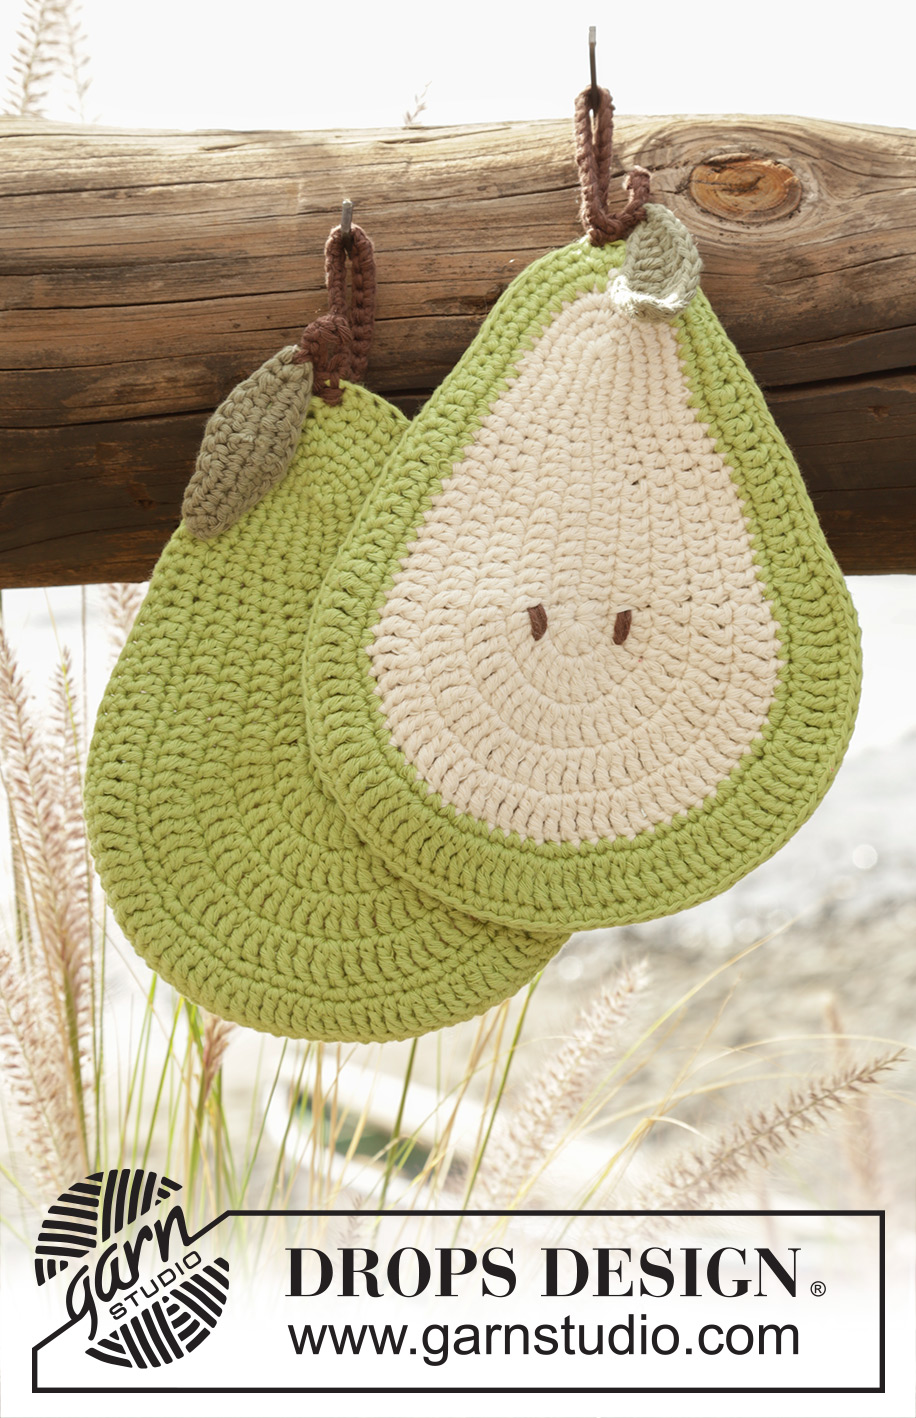
Quite a Pear!#quiteapearpotholders |
|
|
|
|
Crochet DROPS pear pot holders in "Paris".
DROPS 170-20 |
|
|
CROCHET TIP: Round beg with ch 1, this comes in addition and does not replace first sc, finish with 1 sl st in ch. ---------------------------------------------------------- POT HOLDER: Work 4 ch on hook size 3.5 mm/E/4 with off white and form a ring with 1 sl st in first ch. Continue to work from ch-ring, work 19 ch, turn and work 1 sc in second ch from hook, work 1 sc in each of the next ch 5, work 1 hdc in each of the next ch 4, work 1 dc in each of the next 8 ch, work 8 dc around ch-ring, then work on the under side of ch-row: Work 1 dc in bottom edge of every dc, 1 hdc in bottom edge of every hdc and 1 sc in bottom edge of every sc, finish with 1 sl st in first sc = 6 sc, 4 hdc, 8 dc on each side of ch-row, 8 dc around ring. ROUND 1: Work 1 sc in first sc, 2 sc in next sc, 1 sc in each of the next 4 sc, 1 hdc in every hdc, 1 dc in each of the next 8 dc, 2 tr in every dc around circle, 1 dc in every dc, 1 hdc in every hdc, 1 sc in each of the next 4 sc, 2 sc in next sc, 1 sc in last sc, finish with 1 sl st = 7 sc, 4 hdc, 8 dc on each side of ch-row, 16 tr around ring. REMEMBER THE CROCHET GAUGE! ROUND 2: Work 1 sc in first sc, 2 sc in next sc, 1 sc in each of the next 5 sc, 1 hdc in every hdc, 1 dc in each of the next 8 dc, * 1 tr in first tr, 2 tr in next tr *, repeat from *-* 8 times in total, 1 dc in every dc, 1 hdc in every hdc, 1 sc in each of the next 5 sc, 2 sc in next sc, 1 sc in last sc, finish with 1 sl st = 8 sc, 4 hdc, 8 dc on each side of ch-row, 24 tr around ring. ROUND 3: Work 1 sc in first sc, 2 sc in next sc, 1 sc in each of the next 6 sc, 1 hdc in every hdc, 1 dc in each of the next 8 dc, * 1 tr in each of the first 2 tr, 2 tr in next tr *, repeat from *-* 8 times in total, 1 dc in every dc, 1 hdc in every hdc, 1 sc in each of the next 6 sc, 2 sc in next sc, 1 sc in last sc, finish with 1 sl st = 9 sc, 4 hdc, 8 dc on each side of ch-row, 32 tr around ring. ROUND 4: Work 1 sc in first sc, 2 sc in next sc, 1 sc in each of the next 7 sc, 1 hdc in every hdc, 1 dc in each of the next 8 dc, * 1 tr in each of the first 3 tr, 2 tr in next tr *, repeat from *-* 8 times, 1 dc in every dc, 1 hdc in every hdc, 1 sc in each of the next 7 sc, 2 sc in next sc, 1 sc in last sc, finish with 1 sl st = 10 sc, 4 hdc, 8 dc on each side of ch-row, 40 tr around ring. ROUND 5: Switch to pistachio. Work 1 sc in first sc, 2 sc in next sc, 1 sc in each of the next 8 sc, 1 sc in each of the 4 hdc, 1 sc in each of the 8 dc, *1 sc in each of the first 4 tr, 2 sc in next tr *, repeat from *-* 8 times, 1 sc in each of the 8 dc, 1 sc in each of the 4 hdc, 1 sc in each of the next 8 sc, 2 sc in next sc, 1 sc in last sc, finish with 1 sl st = 23 sc on each side of ch-row, 48 sc around ring. ROUND 6: Work 1 sc in first sc, 2 sc in next sc, 1 sc in each of the next 9 sc, 1 hdc in each of the next 4 sc, 1 dc in each of the next 8 sc, *1 tr in each of the first 5 sc, 2 tr in next sc *, repeat from *-* 8 times, 1 dc in each of the next 8 sc, 1 hdc in each of the next 4 sc, 1 sc in each of the next 9 sc, 2 sc in next sc, 1 sc in last sc, finish with 1 sl st = 12 sc, 4 hdc, 8 dc on each side of ch-row, 56 tr around ring. Work another pot holder, now work pot holder in pistachio. CROCHET TOG: Place 2 pot holders on top of each other WS against WS, and crochet them tog as follows: 1 sl st at the top of pear, 20 ch, 1 sc in next sc, in sc in every st, finish with 20 sc around ch-space and 1 sl st in first sc. LEAF: Work 14 ch with moss green, turn and work 1 sc in second ch from hook, 1 sc in next st, 1 hdc in each of the next ch 2, 1 dc in each of the next ch 2, 1 tr in next ch, 1 dc in each of the next ch 2, 1 hdc in each of the next ch 2, 1 sc in next ch, 2 sc in next sc, then work on the under side of ch as follows: 1 sc in next ch, 1 hdc in each of the next ch 2, 1 dc in each of the next ch 2, 1 tr in next ch, 1 dc in each of the next ch 2, 1 hdc in each of the next ch 2, 1 sc in each of the last ch 2, fasten off. STRAP AND STEM: Work 27 ch with brown, 1 sc in 2nd ch from hook, 1 sc in each of the next ch 2, work 1 leaf to stem with 1 sc through 1 st on leaf and 1 ch on stem, work 1 sc in each of the remaining ch, place the stem into a ring fasten with 1 sl st through all layers (both pot holder and stem). Fasten off. Embroider two seeds with brown - see photo. |
|
Have you finished this pattern?Tag your pictures with #dropspattern #quiteapearpotholders or submit them to the #dropsfan gallery. Do you need help with this pattern?You'll find 9 tutorial videos, a Comments/Questions area and more by visiting the pattern on garnstudio.com. © 1982-2026 DROPS Design A/S. We reserve all rights. This document, including all its sub-sections, has copyrights. Read more about what you can do with our patterns at the bottom of each pattern on our site. |


With over 40 years in knitting and crochet design, DROPS Design offers one of the most extensive collections of free patterns on the internet - translated to 17 languages. As of today we count 324 catalogs and 12290 patterns - 12280 of which are translated into English (US/in).
We work hard to bring you the best knitting and crochet have to offer, inspiration and advice as well as great quality yarns at incredible prices! Would you like to use our patterns for other than personal use? You can read what you are allowed to do in the Copyright text at the bottom of all our patterns. Happy crafting!
Post a comment to pattern DROPS 170-20
We would love to hear what you have to say about this pattern!
If you want to leave a question, please make sure you select the correct category in the form below, to speed up the answering process. Required fields are marked *.