
Popular categories
Looking for a yarn?


Comments / Questions (38)
![]() Judy wrote:
Judy wrote:
Some of the most beautiful patterns I've ever seen are on your site. However, most of them have only diagrams and partial diagrams at that. I don't work from diagrams, only written patterns. I certainly can't be the person who works this way. Won't you please add written instructions to your patterns so we can join in making your beautiful garments. PLEASE!!!!!
04.04.2019 - 18:59DROPS Design answered:
Dear Judy, thank you very much, to help you crocheting from diagrams, you will find some explanations here. Happy crocheting!
05.04.2019 - 09:18
![]() Wendy Stephens wrote:
Wendy Stephens wrote:
I am having difficulty understanding this pattern for some reason? I\\\'m not really used to following diagrams, only patterns in written form, so when it gives instructions it refers us to see the diagram. Is there a written pattern available (no diagram) or possibly a tutorial, or even close up\\\'s of the finished jacket to go by? I am also confused as to how you select your size? \\r\\nAny help would be greatly appreciated! Thank you!
29.06.2018 - 17:14DROPS Design answered:
Dear Wendy, we are sorry, but we do not have a written out pattern for the diagramsm but you will find teh explanations for eaxg symbol just above the charts. There are also a some videos to help you along, you can find the links just below the pictures. However, if you still having problems, you can always ask for help in the store you bought your DROPS yarn from, Happy Crafting!
01.07.2018 - 03:35Parul Sehgal wrote:
What does going back and forth mean? How to do that?
25.01.2018 - 07:20DROPS Design answered:
Dear Mrs Sehgal, this means to work in rows and not in round anymore. Happy crocheting!
25.01.2018 - 08:45
![]() Andrea Perren wrote:
Andrea Perren wrote:
Herzlichen Dank für die rasche Antwort. Dachte ich mir schon, dass ich falsch liege. Könnten Sie aber die Häkelschrift A4 bei der deutschen Anleitung überprüfen? Vorallem die Runde mit Lochmuster direkt oberhalb der 12x Stäbchenrunde.
30.05.2017 - 10:14DROPS Design answered:
Liebe Frau Perren, Sie sollen auch immer die 12 Stb bei der 2. 3. und 4. Reihe haben, jeweils mit 2 Lm zwischen 2 Stb. Viel Spaß beim häkeln!
30.05.2017 - 11:43
![]() Andrea Perren wrote:
Andrea Perren wrote:
Ich bin am Ärmel. Ich habe die Länge erreicht und starte jetzt mit Muster A4. Erste Runde ist klar. Ich habe A4 12 x in der Runde gehäkelt. 2. Runde immer ein Stäbchen zwischen das Stäbchenmuster, dh ich habe um die Hälfte reduziert und nicht die gleiche Maschenzahl wie vorher. Ist das richtig? Wenn ich das ganze Muster A4 2x mache, reduziert es sich nochmals. Stimmt das?
28.05.2017 - 11:29DROPS Design answered:
Liebe Frau Perren, beim A.4 soll die Maschenanzahl nicht reduziert werden, aber immer 12 x in der Runde häkeln. Es kann helfen, Fadenmarkierer zwischen jedem Rapport einsetzen. Viel Spaß beim häkeln!
29.05.2017 - 09:54
![]() Andrea Perren wrote:
Andrea Perren wrote:
Ich bin am Ärmel. Ich habe die Länge erreicht und starte jetzt mit Muster A4. Erste Runde ist klar. Ich habe A4 12 x in der Runde gehäkelt. 2. Runde immer ein Stäbchen zwischen das Stäbchenmuster, dh ich habe um die Hälfte reduziert und nicht die gleiche Maschenzahl wie vorher. Ist das richtig? Wenn ich das ganze Muster A4 2x mache, reduziert es sich nochmals. Stimmt das?
28.05.2017 - 11:27
![]() Andrea Perren wrote:
Andrea Perren wrote:
Wieviel Wolle braucht es für die Ärmel alleine? Ich brauche mehr Wolle als erwartet, darum habe ich nicht mehr genug für die Ärmel.
17.04.2017 - 22:51DROPS Design answered:
Liebe Frau Perren, wir haben nur Garnmenge für die ganze Jacke, Ihr DROPS Laden kann Ihnen aber sicher damit helfen. Viel Spaß beim häkeln!
18.04.2017 - 11:35
![]() Andrea Perren wrote:
Andrea Perren wrote:
Bei den Seitenteilen heisst es "im Muster und mit den verkürzten Reihen auf diese Weise weiterhäkeln". Das bedeutet jede Reihe nehme ich ab bzw verkürze ich. Ist das richtig?
20.03.2017 - 21:38DROPS Design answered:
Liebe Frau Perren, Sie werden beidseitig abnehmen (verkürzten Reihen) und gleichzeitig im Muster wie zuvor (mit den Zunahmen wie zuvort) häkeln. Viel Spaß beim häkeln!
21.03.2017 - 09:05
![]() Murielle Pham wrote:
Murielle Pham wrote:
Bonjour, je n'arrive pas à comprendre comment commencer les rangs avec les arceaux pour la manche... Le début du rang se décalé... Pouvez vous m'aider ? Merkiiiii
15.09.2016 - 16:11DROPS Design answered:
Bonjour Mme Pham, placez votre marqueur dans la dernière bride (= celle qui va permettre de former le dernier arceau soit le 32-34-36ème arceau) et placez toujours le marqueur après le dernier arceau, vous devez toujours avoir le bon nombre à chaque tour (utilisez plusieurs marqueurs si besoin, un à chaque tour). Bon crochet!
16.09.2016 - 16:55
![]() BRENDA PYTLIK wrote:
BRENDA PYTLIK wrote:
I'm not very good at reading diagrams, is there a complete written pattern for this jacket? Would love to have it if there is. thank you so much
25.07.2016 - 01:04DROPS Design answered:
Dear Mrs Pytlick, there is only diagram to this pattern, 1 symbol is for 1 st/group of st as explained under diagram text - read every round from the right towards the left starting on the bottom corner on the right side of diagrams. For any further personnal assistance you are welcome to contact your DROPS store. Happy crocheting!
25.07.2016 - 10:14
|
||||||||||||||||||||||
Oasis#oasisjacket |
||||||||||||||||||||||
 |
 |
|||||||||||||||||||||
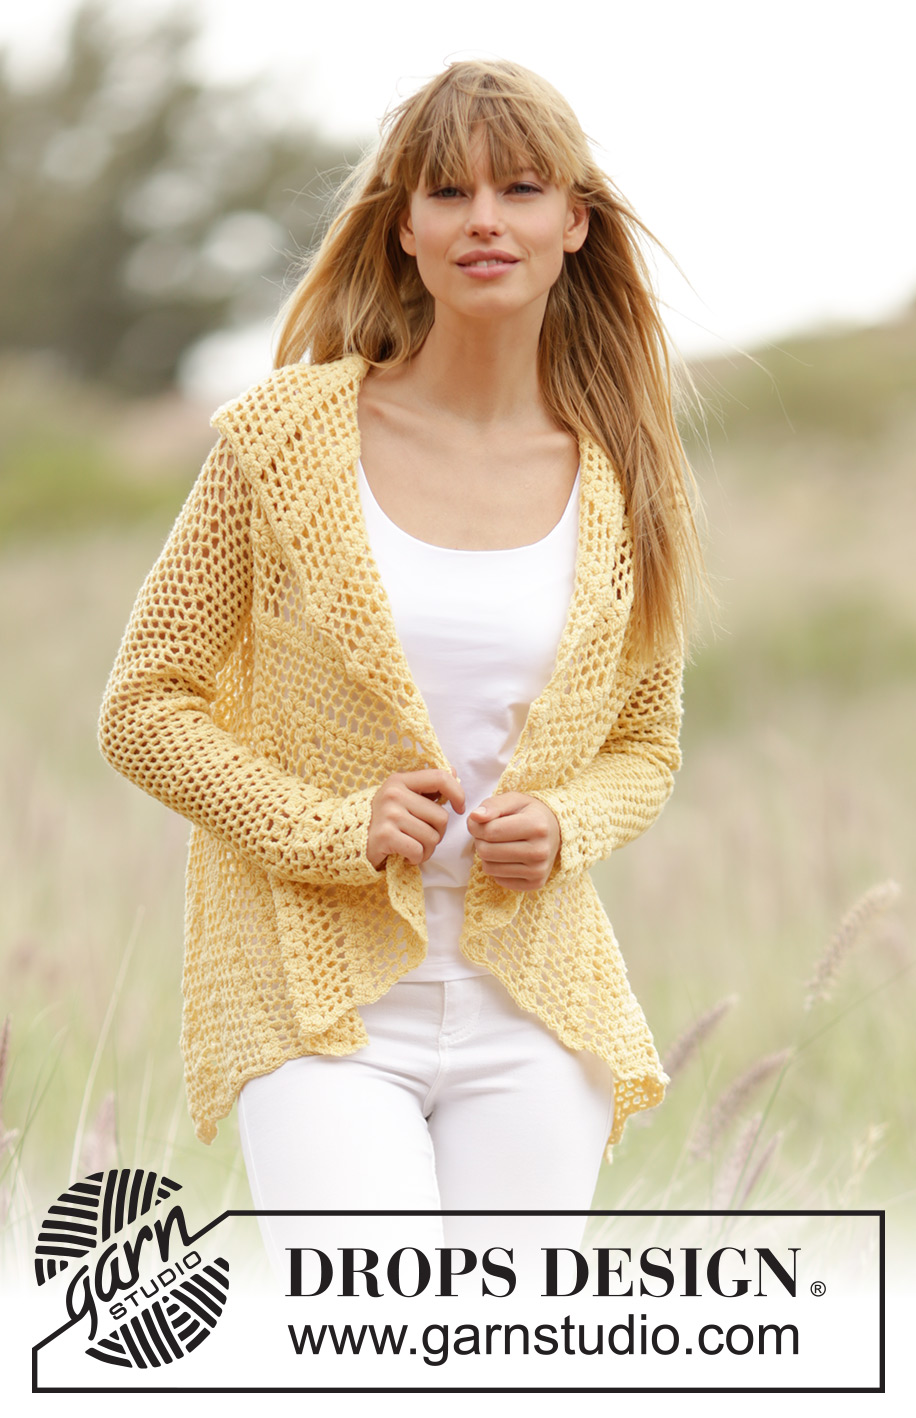
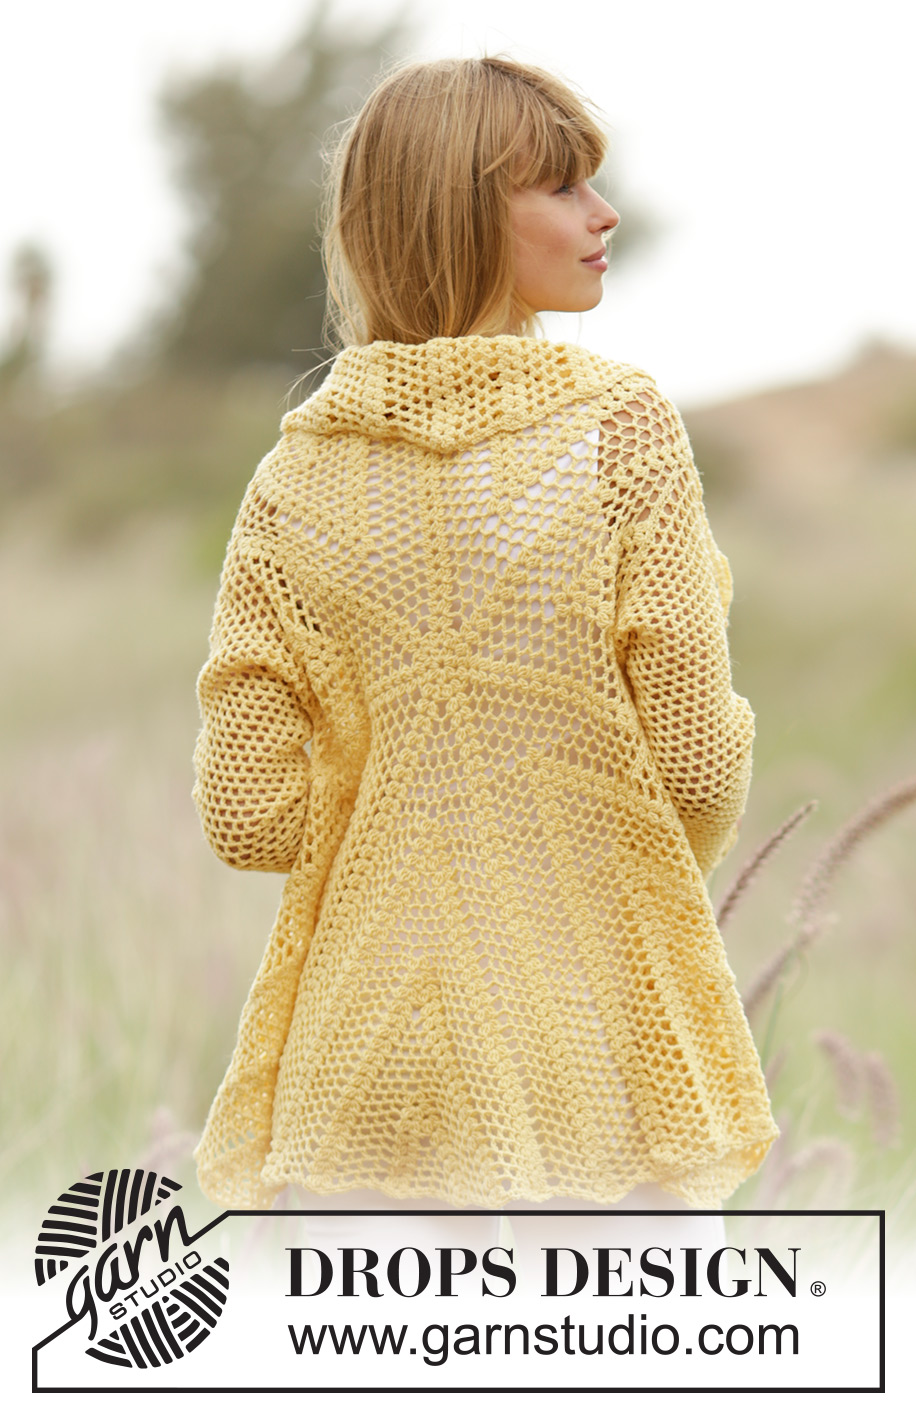
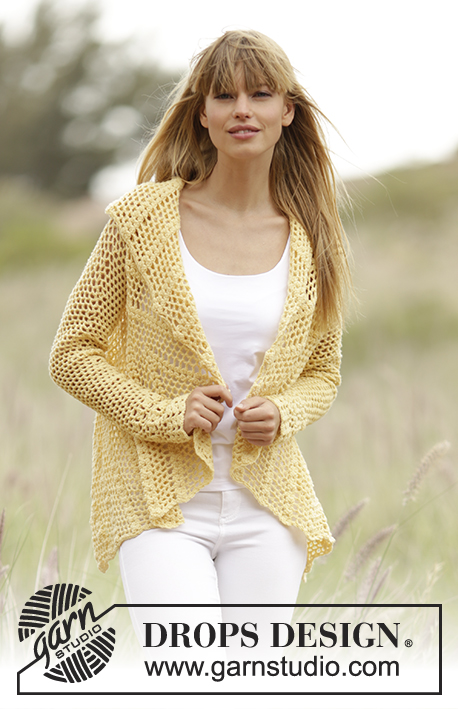
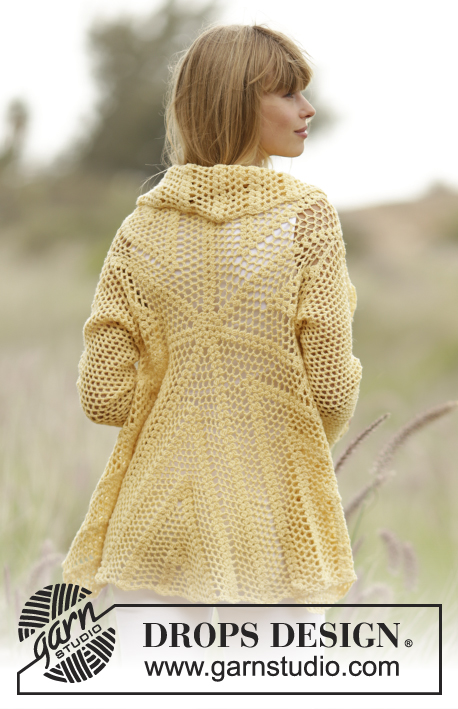
Crochet DROPS jacket worked in a circle with lace and fan pattern in "BabyMerino". Size: S - XXXL.
DROPS 169-35 |
||||||||||||||||||||||
|
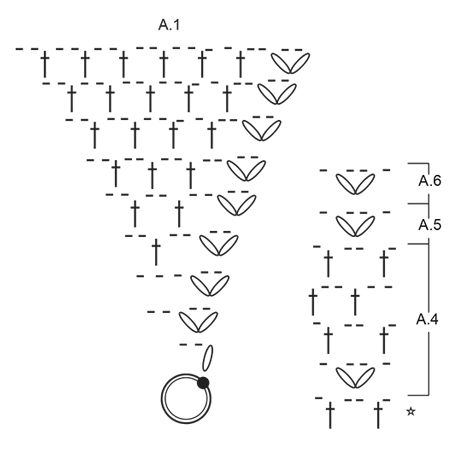
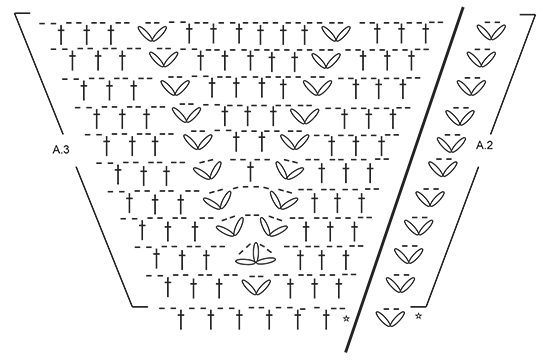
PATTERN: See diagrams A.1 to A.6. CROCHET INFO: Beg every round with 3 ch and finish with 1 sl st in 3rd ch. CROCHET TIP (applies to sleeves): After last dc on the round, continue to next round with 1 dc in next ch-space (= first ch-space on next round). NOTE: Insert 1 marker at the beg of round between last ch and first dc on the next round, move the marker upwards. NOTE: BE CAREFUL NOT TO DISPLACE THE MARKER. DECREASE TIP: Work 1 dc around next ch-space but wait with last pull through, work next dc around next ch-space (do not work 2 ch between dc), on last pull through, pull yarn through all 3 loops on hook. ---------------------------------------------------------- CIRCLE: Worked in the round from the middle of circle and outwards. Work 8 ch on hook size 3.5 mm/E/4 with Baby Merino and form a ring with 1 sl st in first ch. Then repeat A.1 7 times in total on round - READ CROCHET INFO. When A.1 has been worked 1 time vertically, work as follows: * Work A.2 over fan in A.1, work A.3 over the remaining dc/ch in A.1 *, repeat from *-* 7 times in total. REMEMBER THE CROCHET GAUGE! When A.2 and A.3 have been worked 1 time vertically, there are 378 dc/ch on round (= 4 dc/ch in every repetition of A.2 and 50 dc/ch in every repetition of A.3). NOTE: Every fan consist of 3 dc worked tog (= 1 dc), 2 ch and 3 dc worked tog (= 1 dc). Then repeat A.2 and A.3 vertically, continue with pattern over the remaining dc/ch as before (i.e. Work fan over fan and 1 dc around every ch-space and 2 ch between every dc as before). Insert 1 marker before every A.2 (= 7 markers in piece). First marker marks beg of round. Move the markers upwards when working. Work until piece measures 18-19-20 cm / 7"-7½"-8" the middle (= 36-38-40 cm / 14¼"-15"-15¾" in diameter). Then work as follows: Work pattern as before until 2nd marker (= 1 repetition of pattern), skip 16-17-18 ch-spaces (includes ch-space in A.2 and between fans in A.3 i.e. all ch-spaces), work 48-51-54 ch for armhole, work pattern as before until 16-17-18 ch-spaces remain before 7th marker (includes ch-space in A.2 and fans between A.3 i.e all ch-spaces), skip these ch-spaces, work 48-51-54 ch for armhole, work as before the rest of round. Then work pattern as before, work around ch-row over each armhole. When piece measures approx. 39-42-45 cm / 15¼"-16½"-17¾" from middle (= 78-84-90 cm / 30¾"-33"-35½" in diameter), work back and forth over front pieces. Fasten off. LEFT FRONT PIECE: Work back and forth. Insert 1 marker in piece, NOW MEASURE PIECE FROM HERE. Start at 2nd marker. Work from RS: 1 sc in ch-space before A.2, ch 4, continue to work pattern as before (i.e. A.2 and A.3) until 4th marker, finish with 1 dc around next ch-space, turn piece. Now work short rows as follows: Work ch 3, skip 1 ch-space, 1 sc around next ch-space, 3 ch (these 2 ch-spaces will not be worked in again), 1 dc around next ch-space, work pattern as before until 2 ch-spaces remain (i.e. ch-spaces between dc, these ch-spaces will no longer be worked in), turn work. Continue pattern and short rows like this. I.e. continue to inc in A.3. Work until piece measures 16-17-18 cm / 6¼"-6¾-7" from marker. Fasten off. RIGHT FRONT PIECE: Work as left front piece but now work between 5th and 7th marker. EDGE: Work 1 edge around the entire jacket as follows: Start from 1st marker. Work * 1 sc around first/next ch-space, ch 3, 1 sc around next ch-space *, repeat from *-* around the entire circle. Fasten off. SLEEVE: Sleeve is worked in the round, top down. Work 96-102-108 ch on hook size 3.5 mm/E/4 with Baby Merino. ROUND 1: Work ch 3, * ch 2, skip ch 2, 1 dc in next ch *, repeat from *-* in ch on row, work 2 ch and 1 dc around the first 3 ch = 32-34-36 ch-spaces - READ CROCHET TIP - explanation above. Continue to work 2 ch and 1 dc around every ch-space. When piece measures 4 cm / 1½", dec 1 ch-space before marker - READ DECREASE TIP! NOTE: BE CAREFUL NOT TO DISPLACE THE MARKER. Repeat dec alternately on each side of marker every 2½-3-3 cm / ⅞"-1⅛"-1⅛" 13-11-11 more times = 18-22-24 ch-spaces. When piece measures 42 cm / 16½" for all sizes, finish round with 1 sl st in last ch mid under sleeve. Continue in the round as follows: Work A.4 9-11-12 times on round. Repeat A.4 2 times in total vertically. Then work A.5 over A.4. When A.5 has been worked 1 time vertically, work A.6 over A.5 2 times in total vertically. Fasten off. The piece now measures approx. 53 cm / 21" in all sizes. Work another sleeve the same way. ASSEMBLY: Work sleeves tog with circle as follows: 1 sl st, * ch 2, 1 sl st around next ch-space *, repeat from *-*. |
||||||||||||||||||||||
Diagram explanations |
||||||||||||||||||||||
|
||||||||||||||||||||||
 |
||||||||||||||||||||||
 |
||||||||||||||||||||||
 |
||||||||||||||||||||||
Have you finished this pattern?Tag your pictures with #dropspattern #oasisjacket or submit them to the #dropsfan gallery. Do you need help with this pattern?You'll find 6 tutorial videos, a Comments/Questions area and more by visiting the pattern on garnstudio.com. © 1982-2026 DROPS Design A/S. We reserve all rights. This document, including all its sub-sections, has copyrights. Read more about what you can do with our patterns at the bottom of each pattern on our site. |
||||||||||||||||||||||


With over 40 years in knitting and crochet design, DROPS Design offers one of the most extensive collections of free patterns on the internet - translated to 17 languages. As of today we count 324 catalogs and 12290 patterns - 12280 of which are translated into English (US/in).
We work hard to bring you the best knitting and crochet have to offer, inspiration and advice as well as great quality yarns at incredible prices! Would you like to use our patterns for other than personal use? You can read what you are allowed to do in the Copyright text at the bottom of all our patterns. Happy crafting!
Post a comment to pattern DROPS 169-35
We would love to hear what you have to say about this pattern!
If you want to leave a question, please make sure you select the correct category in the form below, to speed up the answering process. Required fields are marked *.