
Popular categories
Looking for a yarn?


Comments / Questions (38)
![]() Alison wrote:
Alison wrote:
I absolutely love DROPS patterns, and I want to make so many, but not having fully written patterns is a major negative for me, as I find diagrams extremely difficult to work from. Please, please, please update your patterns to include standard written instructions!! I was even going to try some of your yarns to match the patterns, but I won’t do this until I’m sure I’m able to choose a pattern I’ll be able to finish without major unnecessary challenges! Videos would be great too!!
21.03.2026 - 01:58
![]() Tanja wrote:
Tanja wrote:
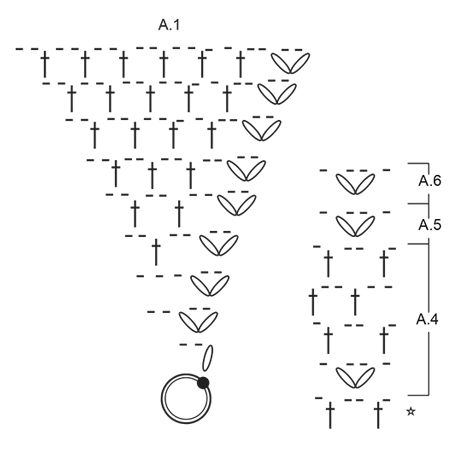
Jeg vil gerne spørge til hvordan man laver viften på omgangenes start, når den første stangmaske erstattes med 3 luftmasker ? Så vil der jo ikke være 4 løkker at skulle afslutte med, men kun 3 løkker.
24.08.2024 - 19:07DROPS Design answered:
Hei Tanja. Da hekler du slik: 3 luftmasker (= erstatter 1. stav), 1 stav om luftmaske-ringen /buen, men vent med siste gjennomtrekning (= 2 masker på nålen), hekle 1 stav til om samme luftmaske-ringen/buen på samme måte, dra deretter tråden gjennom alle 3 masker på nålen. mvh DROPS Design
26.08.2024 - 13:45
![]() Takako wrote:
Takako wrote:
Hello, I have question about making armholes. Pattern says “Then work pattern as before, work around ch-row over each armhole.” How EXACTLY work around ch-row over each armhole? If you can add diagram or written pattern to help understanding, that would be great.
27.08.2023 - 06:13
![]() Coral Vorster wrote:
Coral Vorster wrote:
I find it extremely difficult to follow DROPS patterns. Can you not please have a WRITTEN pattern for this beautiful yellow garment
08.07.2022 - 22:34
![]() Amandine wrote:
Amandine wrote:
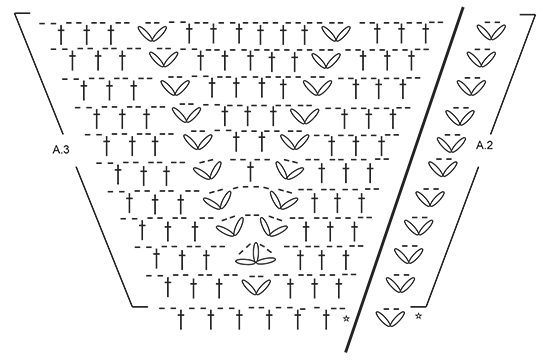
Bonjour! J’ai fini de crocheter une fois A2 et A3 une fois en hauteur et mon cercle mesure déjà 17 cm depuis le centre. Je ne comprends pas la suite de l’explication: faut-il poursuivre encore une fois de la même façon ? Soit A2 et A3 comme la première fois, ou différemment ? D’autant plus que mon cercle mesure déjà la bonne dimension après une fois. Merci!
26.06.2022 - 16:28DROPS Design answered:
Bonjour Amandine, avec la hauteur correspondant à l'échantillon, vous devez avoir les 19 rangs de A.1+A.2/A.3 = environ 16 cm. Vous continuez en suivant les motifs précédents de A.2/A.3, autrement dit, vous commencez par A.2 et répétez A.3 comme avant, vous aurez juste plus de brides/mailles en l'air entre les éventails de A.3 à chaque tour, mais toujours le même nombre entre chaque branche du V des éventails de A.3. Bon crochet!
27.06.2022 - 08:49
![]() Caitriona wrote:
Caitriona wrote:
Hi Drops, thank you so much for your quick reply! My problem is actually with the second & third line of A3, particularly with the treble fan. Many thanks for your assistance, we have been looking through your very useful you tube channel but can't find a demo for this pattern. Thanks again!
12.05.2021 - 12:03DROPS Design answered:
Dear Caitriona, on 2nd row work: 2 fans over fans (= A.2), (2 ch, 1 tr) in the next 3 chain-spaces, 2 ch, 1 fan, 2 chains, 1 fan, 2 chains, 1 fan, 2 ch in the next 2-ch-space (in the middle between both previous fans), and finish with (1 tr, 2 ch) in the next 3 chain spaces = A.3. Repeat A.2 and A.3 all the round and continue diagram like this, there will be always 3 tr with 2 chains in between on each side of A.3 and work fans, chain-spaces and trebles as shown in the diagram. Happy crocheting!
12.05.2021 - 14:06
![]() Caitriona wrote:
Caitriona wrote:
I'm struggling to follow the diagram transition from A1 to A3. Although there are 7 trebles in the first line of A3, there are only 6 trebles in the second line of A3 plus 3 fans. When I'm working the second line I get 4 trebles with 3 fans. Can you explain where I'm going wrong please?! Thank you!!
11.05.2021 - 13:46DROPS Design answered:
Dear Caitriona, the bottom row (with a star) in A.2 and A.3 shows the last row in A.1, ie 7 ch-spaces on last row in A.1 worked as shown in the first rowof A.3, ie 2 ch, 1 tr in each of the first 3 ch-space, 2 ch, 1 fan in next ch-space, 2 ch, 1 tr in next of the 3 ch-spaces, 2 ch (= A.3) and 1 fan in the next fan (= next A.2). Hope it can help. Happy crocheting!
12.05.2021 - 06:54
![]() Odette Fox wrote:
Odette Fox wrote:
Danke. Da ich nicht wende, weiß ich jetzt nicht, wo der erste Fächer hinkommt, da die 3 Luftmaschen direkt über dem letzten Fächer sind und nicht über dem Luftmaschenraum. Ich habe jetzt die Anfrage auf Facebook gestellt, vielleicht kann mir jemand anhand meines Fotos zeigen, wie es funktioniert. Danke für die Hilfe hier.
16.12.2019 - 13:13
![]() Odette Fox wrote:
Odette Fox wrote:
Meine Frage wurde leider nicht beantwortet. Arbeit wenden oder nicht wenden? Ich weiß, dass ich in Runden ( Anfang 3 Steigluftmaschen und Ende mit 1 Kettmasche) arbeite und nicht in fortlaufenden Spiralrunden.
16.12.2019 - 11:53DROPS Design answered:
Liebe Frau Fox, ja genau, so wird die Arbeit gehäkelt = in der Runde, dh immer von der Hinreihen = nicht wenden am Ende jeder Runde (nur wenn Sie dann in Hin und Rückreihen später häkeln). Viel Spaß beim häkeln!
16.12.2019 - 12:25
![]() Odette Fox wrote:
Odette Fox wrote:
Guten Morgen Ich scheitere in der deutschen Anleitung bereits nach der ersten Runde. A1 zeigt, dass die Fächer um die Luftmaschen gearbeitet werden sollen. Muss ich die Arbeit nach jeder Runde wenden? Es ist leider nirgendwo angegeben. Es soll meine erste Jacke von Drops werden, allerdings verstehe ich die Anleitung bisher gar nicht (bin kein Anfänger). Danke für die Hilfe.
16.12.2019 - 07:58DROPS Design answered:
Liebe Frau Fox, A.1 wird in der Runde gehäkelt - so lesen Sie A.1 in jeder Runde von rechts nach links - jede Rd beginnen Sie mit 3 Lm - siehe HÄKELINFO. Hier lesen Sie mehr über Diagramme. Viel Spaß beim häkeln!
16.12.2019 - 09:13
|
||||||||||||||||||||||
Oasis#oasisjacket |
||||||||||||||||||||||
 |
 |
|||||||||||||||||||||
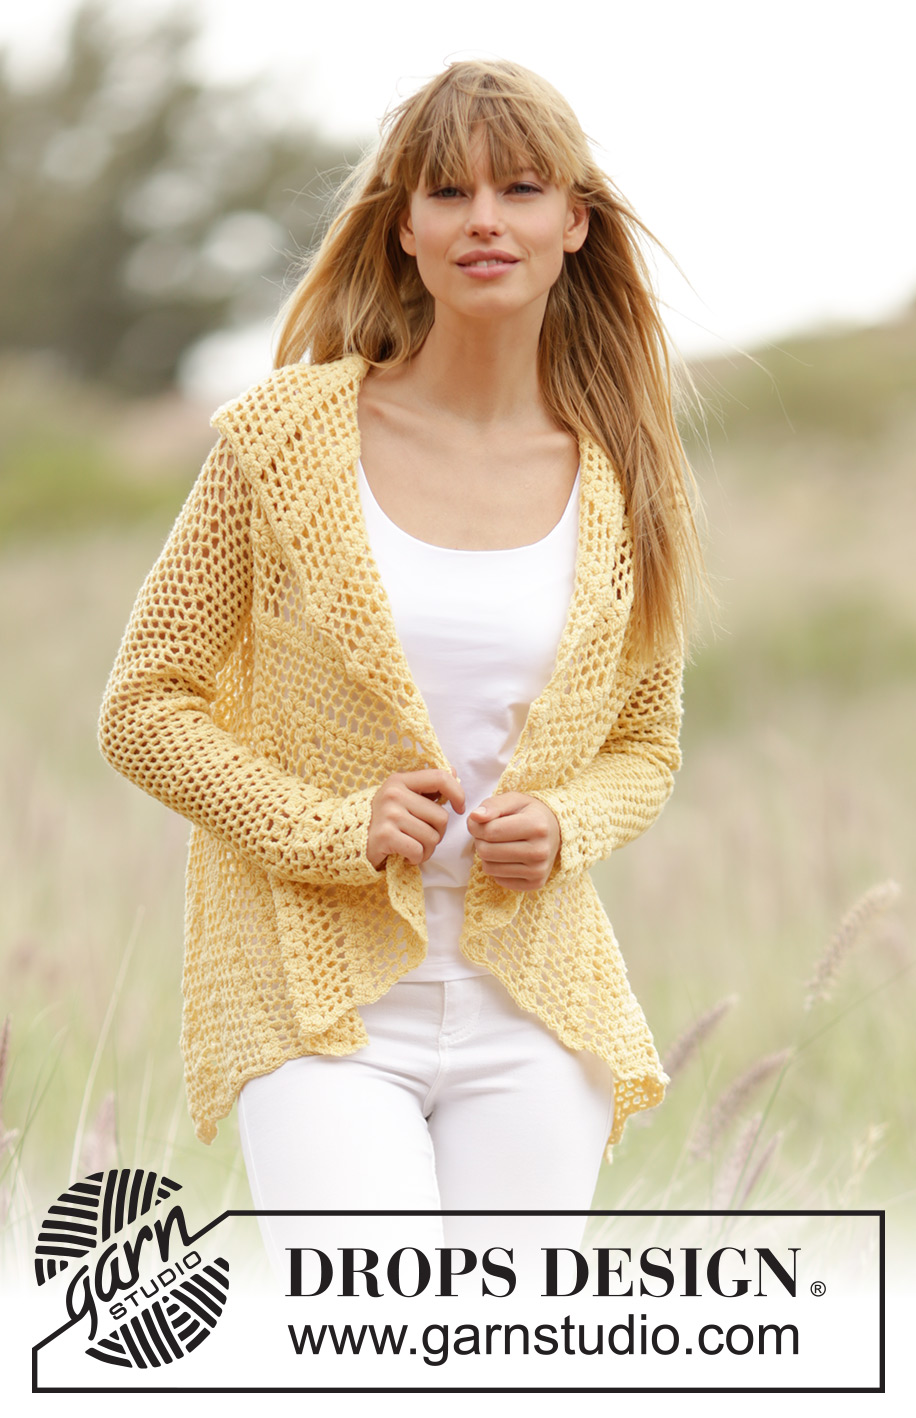
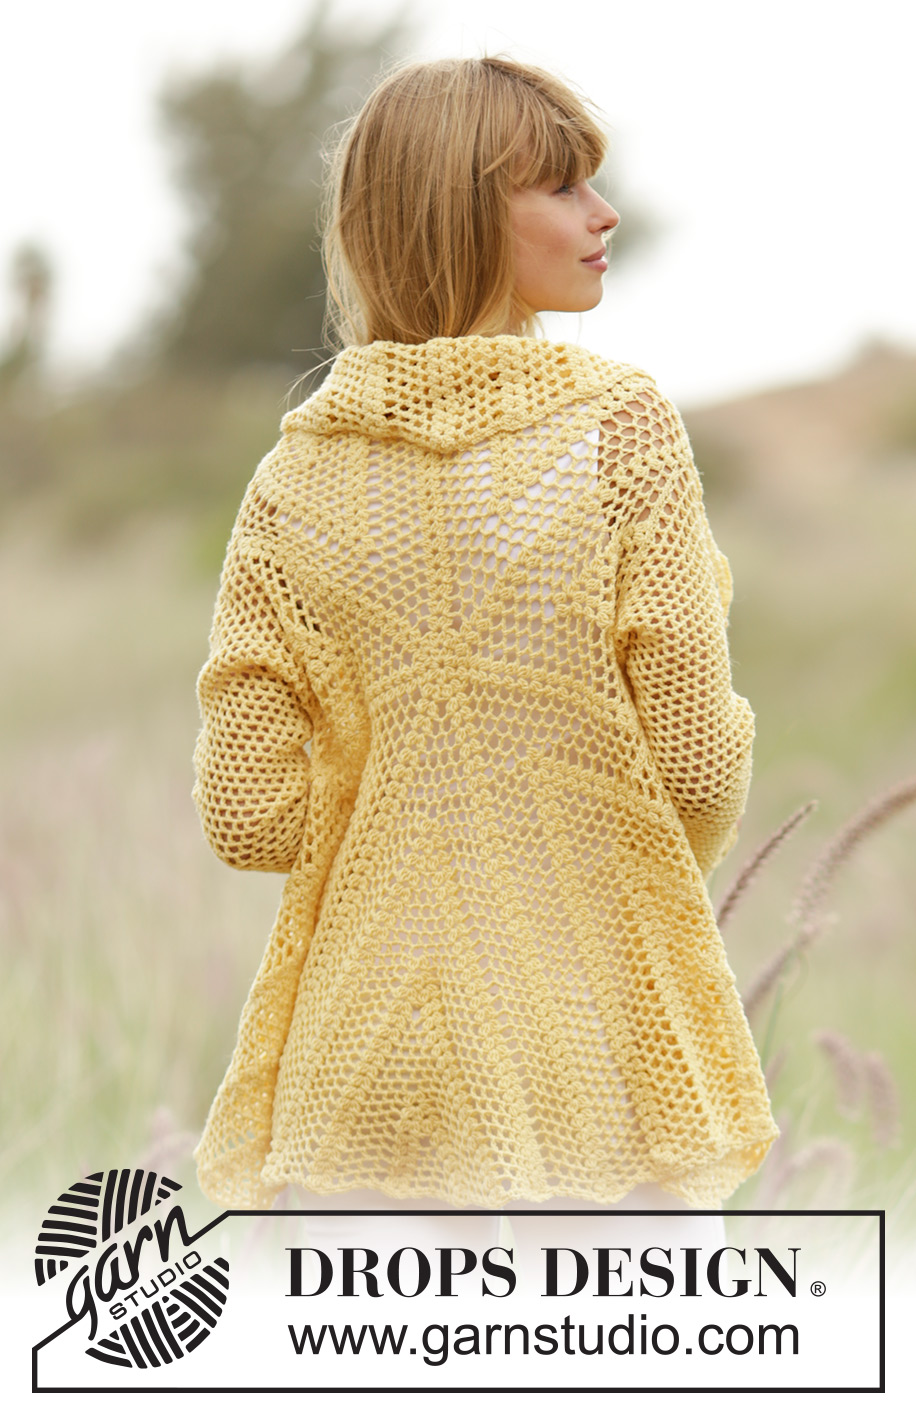
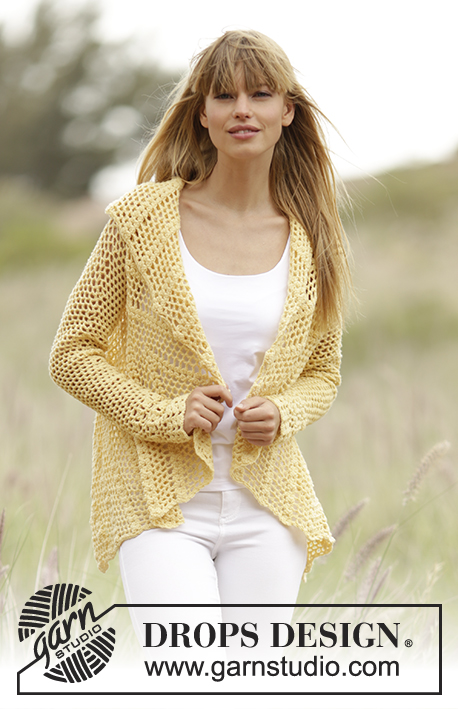
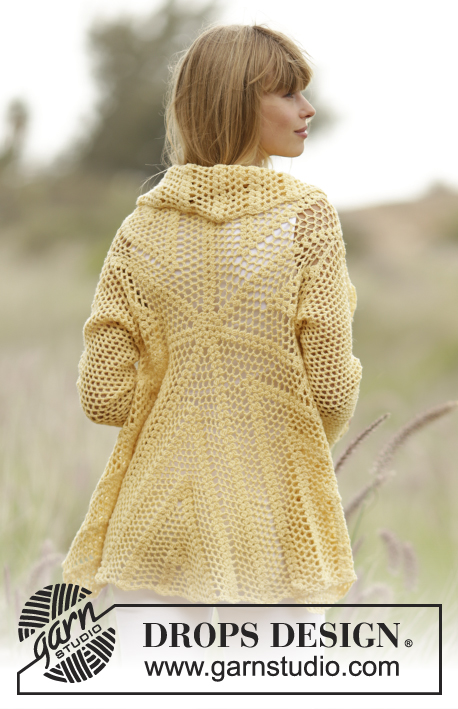
Crochet DROPS jacket worked in a circle with lace and fan pattern in "BabyMerino". Size: S - XXXL.
DROPS 169-35 |
||||||||||||||||||||||
|
PATTERN: See diagrams A.1 to A.6. CROCHET INFO: Beg every round with 3 ch and finish with 1 sl st in 3rd ch. CROCHET TIP (applies to sleeves): After last dc on the round, continue to next round with 1 dc in next ch-space (= first ch-space on next round). NOTE: Insert 1 marker at the beg of round between last ch and first dc on the next round, move the marker upwards. NOTE: BE CAREFUL NOT TO DISPLACE THE MARKER. DECREASE TIP: Work 1 dc around next ch-space but wait with last pull through, work next dc around next ch-space (do not work 2 ch between dc), on last pull through, pull yarn through all 3 loops on hook. ---------------------------------------------------------- CIRCLE: Worked in the round from the middle of circle and outwards. Work 8 ch on hook size 3.5 mm/E/4 with Baby Merino and form a ring with 1 sl st in first ch. Then repeat A.1 7 times in total on round - READ CROCHET INFO. When A.1 has been worked 1 time vertically, work as follows: * Work A.2 over fan in A.1, work A.3 over the remaining dc/ch in A.1 *, repeat from *-* 7 times in total. REMEMBER THE CROCHET GAUGE! When A.2 and A.3 have been worked 1 time vertically, there are 378 dc/ch on round (= 4 dc/ch in every repetition of A.2 and 50 dc/ch in every repetition of A.3). NOTE: Every fan consist of 3 dc worked tog (= 1 dc), 2 ch and 3 dc worked tog (= 1 dc). Then repeat A.2 and A.3 vertically, continue with pattern over the remaining dc/ch as before (i.e. Work fan over fan and 1 dc around every ch-space and 2 ch between every dc as before). Insert 1 marker before every A.2 (= 7 markers in piece). First marker marks beg of round. Move the markers upwards when working. Work until piece measures 18-19-20 cm / 7"-7½"-8" the middle (= 36-38-40 cm / 14¼"-15"-15¾" in diameter). Then work as follows: Work pattern as before until 2nd marker (= 1 repetition of pattern), skip 16-17-18 ch-spaces (includes ch-space in A.2 and between fans in A.3 i.e. all ch-spaces), work 48-51-54 ch for armhole, work pattern as before until 16-17-18 ch-spaces remain before 7th marker (includes ch-space in A.2 and fans between A.3 i.e all ch-spaces), skip these ch-spaces, work 48-51-54 ch for armhole, work as before the rest of round. Then work pattern as before, work around ch-row over each armhole. When piece measures approx. 39-42-45 cm / 15¼"-16½"-17¾" from middle (= 78-84-90 cm / 30¾"-33"-35½" in diameter), work back and forth over front pieces. Fasten off. LEFT FRONT PIECE: Work back and forth. Insert 1 marker in piece, NOW MEASURE PIECE FROM HERE. Start at 2nd marker. Work from RS: 1 sc in ch-space before A.2, ch 4, continue to work pattern as before (i.e. A.2 and A.3) until 4th marker, finish with 1 dc around next ch-space, turn piece. Now work short rows as follows: Work ch 3, skip 1 ch-space, 1 sc around next ch-space, 3 ch (these 2 ch-spaces will not be worked in again), 1 dc around next ch-space, work pattern as before until 2 ch-spaces remain (i.e. ch-spaces between dc, these ch-spaces will no longer be worked in), turn work. Continue pattern and short rows like this. I.e. continue to inc in A.3. Work until piece measures 16-17-18 cm / 6¼"-6¾-7" from marker. Fasten off. RIGHT FRONT PIECE: Work as left front piece but now work between 5th and 7th marker. EDGE: Work 1 edge around the entire jacket as follows: Start from 1st marker. Work * 1 sc around first/next ch-space, ch 3, 1 sc around next ch-space *, repeat from *-* around the entire circle. Fasten off. SLEEVE: Sleeve is worked in the round, top down. Work 96-102-108 ch on hook size 3.5 mm/E/4 with Baby Merino. ROUND 1: Work ch 3, * ch 2, skip ch 2, 1 dc in next ch *, repeat from *-* in ch on row, work 2 ch and 1 dc around the first 3 ch = 32-34-36 ch-spaces - READ CROCHET TIP - explanation above. Continue to work 2 ch and 1 dc around every ch-space. When piece measures 4 cm / 1½", dec 1 ch-space before marker - READ DECREASE TIP! NOTE: BE CAREFUL NOT TO DISPLACE THE MARKER. Repeat dec alternately on each side of marker every 2½-3-3 cm / ⅞"-1⅛"-1⅛" 13-11-11 more times = 18-22-24 ch-spaces. When piece measures 42 cm / 16½" for all sizes, finish round with 1 sl st in last ch mid under sleeve. Continue in the round as follows: Work A.4 9-11-12 times on round. Repeat A.4 2 times in total vertically. Then work A.5 over A.4. When A.5 has been worked 1 time vertically, work A.6 over A.5 2 times in total vertically. Fasten off. The piece now measures approx. 53 cm / 21" in all sizes. Work another sleeve the same way. ASSEMBLY: Work sleeves tog with circle as follows: 1 sl st, * ch 2, 1 sl st around next ch-space *, repeat from *-*. |
||||||||||||||||||||||
Diagram explanations |
||||||||||||||||||||||
|
||||||||||||||||||||||
 |
||||||||||||||||||||||
 |
||||||||||||||||||||||
 |
||||||||||||||||||||||
Have you finished this pattern?Tag your pictures with #dropspattern #oasisjacket or submit them to the #dropsfan gallery. Do you need help with this pattern?You'll find 6 tutorial videos, a Comments/Questions area and more by visiting the pattern on garnstudio.com. © 1982-2026 DROPS Design A/S. We reserve all rights. This document, including all its sub-sections, has copyrights. Read more about what you can do with our patterns at the bottom of each pattern on our site. |
||||||||||||||||||||||


With over 40 years in knitting and crochet design, DROPS Design offers one of the most extensive collections of free patterns on the internet - translated to 17 languages. As of today we count 324 catalogs and 12290 patterns - 12280 of which are translated into English (US/in).
We work hard to bring you the best knitting and crochet have to offer, inspiration and advice as well as great quality yarns at incredible prices! Would you like to use our patterns for other than personal use? You can read what you are allowed to do in the Copyright text at the bottom of all our patterns. Happy crafting!
Post a comment to pattern DROPS 169-35
We would love to hear what you have to say about this pattern!
If you want to leave a question, please make sure you select the correct category in the form below, to speed up the answering process. Required fields are marked *.