
Popular categories
Looking for a yarn?


Comments / Questions (151)
![]() Montse wrote:
Montse wrote:
¡¡POR FAVOR PODRIAN ACLARAR ESTA EXPLICACION UN POCO MAS DETALLADA NO ENTIENDO LO DE LA CADENA Y POR DONDE SEGUIR SOS AYUDA!!! Ahora trabajar p.de cad hasta el centro del sig lado como sigue: 1 p.de cad en cada p.de cad/p.a. saltado. Ahora trabajar el patrón como antes hasta el centro entre la 3ª y la 4ª esquina. Ahora trabajar p.de cad hasta el inicio de la vta como sigue: 1 p.de cad en cada p.de cad/p.a. saltado. GRACIAS. ME ENCANTARIA PODER ACABARLA ES MUY BONITA LA CHAQUETA.
22.04.2015 - 12:59DROPS Design answered:
Hola Montse. Para formar la sisa de la chaqueta hay que trabajar una cadeneta y saltar tantos pts de la vta anterior como pts de cadeneta estamos trabajando. "....Ahora trabajar p.de cad hasta el centro del sig lado (es decir, en el medio de la primera y la segunda esquina) como sigue: 1 p.de cad POR cada p.de cad/p.a. saltado. Ahora trabajar el patrón como antes hasta el centro entre la 3ª y la 4ª esquina. Después trabajar p.de cad hasta el inicio de la vta como sigue: 1 p.de cad POR cada p.de cad/p.a. saltado...."
25.04.2015 - 12:23
![]() Marie wrote:
Marie wrote:
Where do I find the sizes that correlate to S through XXXL?
19.04.2015 - 22:27DROPS Design answered:
Dear Marie, you will find at the bottom of the pattern a measurement chart with all measurements in cm for each size, taken flat from side to side. Compare these to a similar garment you have and like the shape to find out the matching size. Happy crocheting!
20.04.2015 - 10:32
![]() Nathalie Lambert wrote:
Nathalie Lambert wrote:
N'y a t il pas une erreur dans le nombre de pelotes de ce modèle ? j ai eu besoin de 3 pelotes supplémentaires pour la première taille (en faisant les devants plus court) et je n ai pas eu assez pour faire le tour de finition pour le modèle complet il m aurait fallu sans doute 14-15 pelotes alors que le modèle en préconise 8
19.04.2015 - 11:38DROPS Design answered:
Bonjour Mme Lambert, la quantité était effectivement erronée et a été modifiée. Merci. Bon crochet!
22.04.2015 - 11:41
![]() Marlies Batz wrote:
Marlies Batz wrote:
Ich habe erfolgreich die Luftmaschenreihe für den Armausschnitt gehäkelt und muss mit der 6. Reihe fortsetzen. Werden die nächsten Maschen in die Luftmaschen oder um die Luftmaschenreihe gehäkelt?
18.04.2015 - 11:20DROPS Design answered:
Antwort siehe unten! :-)
03.05.2015 - 11:21
![]() Marlies Batz wrote:
Marlies Batz wrote:
Ich habe erfolgreich die Luftmaschenreihe für den Armausschnitt gehäkelt und muss mit der 6. Reihe fortsetzen. Werden die nächsten Maschen in die Luftmaschen oder um die Luftmaschenreihe gehäkelt?
17.04.2015 - 22:04DROPS Design answered:
Das ist im Prinzip egal, da die M-Zahl der Lm-Kette ja der M-Zahl entspricht, die für das Muster nötig ist, somit können Sie das Muster auch in die Lm häkeln. Es ist aber vielleicht einfacher, es um die Lm zu häkeln, weil man dann nicht ganz exakt die Lm mitzählen muss... Sie müssen dann nur darauf achten, dass Sie die richtige Anzahl an Lm-Bogen der 6. Rd arbeiten.
03.05.2015 - 11:21
![]() Doreen wrote:
Doreen wrote:
Bevor ich die Armausschnitte häkel, soll ich mit Reihe 9 enden. Nach den Luftmaschenketten soll im Muster weiter gehäkelt werden. Das wäre dann Reihe 6. Nachdem die Runde fertig ist soll weiter wie zuvor im Muster (auch über die Luftmaschenketten) gehäkelt werden. Das wäre dann eine Reihe 7 mit 2 Stb +2 Lm + 2 Stb. Leider fehlen auf den Luftmaschenketten die Grundlage dafür. Soll das ignoriert werden? Oder hab ich in der Anleitung etwas falsch verstanden? LG Doreen
13.04.2015 - 20:17DROPS Design answered:
Sie müssen nicht zwingend mit einer 9. Rd enden, das kann auch eine andere Rd sein. Vielleicht ist es am einfachsten, mit einer 8. Rd zu enden, in der 9. Rd die Armausschnitte zu arbeiten und dann mit der 6. Rd weiterzuarbeiten, also auch über die Lm - dabei behandeln Sie die Lm wie die M der 9. Rd, also das Stb der 9. Rd ist dann bei den Armausschnitten 1 Lm.
15.04.2015 - 10:41
![]() Andrée wrote:
Andrée wrote:
Merci pour votre réponse, cependant je suis rendu à faire le devant et je ne comprends pas, combien de mailles dois-je monter en chainette et comment on assemble le tout ?
12.04.2015 - 23:06DROPS Design answered:
Bonjour André, quand votre carré mesure 36-46 cm de côté (cf taille), crochetez jusqu'au 1er coin, puis 3 B,3ml,3B dans le 1er coin, comptez le nombre de mailles jusqu'au milieu du côté (entre le 1er et le 2ème coin) et crochetez ce nbe en ml, puis continuez le motif à partir du milieu du côté (entre le 1er et le 2ème coin) jusqu'au milieu du côté entre le 3ème et le 4ème coin et crochetez des ml jusqu'au 4ème coin (on doit avoir le même nombre de ml et le même nombre de mailles sautées pour les 2 emmanchures), puis continuez comme avant. Au tour suivant, continuez le motif tout autour en crochetant dans les chaînettes des emmanchures. Bon crochet!
13.04.2015 - 13:52
![]() Nastic Inge wrote:
Nastic Inge wrote:
Die Armausschnitte wie mach ich das? Versteh die Anleitung nicht😑
12.04.2015 - 14:11DROPS Design answered:
Sie überspringen Maschen, statt sie zu häkeln, und häkeln statt dieser Maschen Luftmaschen. Sie häkeln also die erste Ecke ganz normal, dann überspringen Sie die Maschen bis zur Mitte der folgenden Seite und häkeln stattdessen Luft-M. Dann häkeln Sie bis zur gegenüberliegenden Seite normal weiter, bis Sie die Mitte dieser Seite erreicht haben, dann überspringen Sie die M bis zur Ecke und häkeln stattdessen Luft-M. Die beiden Stellen, an denen Sie die Luft-M gehäkelt haben, liegen sich genau gegenüber.
13.04.2015 - 08:54
![]() Nines wrote:
Nines wrote:
Por favor, no entiendo cómo se hace la sisa, me lo podrían explicar un poco más extenso o con un dibujo, también querría saber que significa empezar en LR, Gracias
11.04.2015 - 00:06DROPS Design answered:
Hola Nines, LR significa lado revés de la labor y LD sería el lado derecho. Para la sisa se trabaja una cadeneta encima del espacio para la sisa y se salta tantos pts como tiene la cadeneta. En la sig fila se trabaja encima de la cadeneta quedando así un agujero que es donde posteriormente se encaja la manga.
12.04.2015 - 09:41
![]() Andrée Hudon wrote:
Andrée Hudon wrote:
J'aimerais comprendre lors des emmanchures vous dites crocheter des ML jusqu'au milieu est-ce que cela veux dire qu,il y aura comme un grand bout qui sera comme une chainette car cela fait comme un trou??
10.04.2015 - 16:27DROPS Design answered:
Bonjour Mme Hudon, effectivement la chaînette forme un trou (= emmanchure) entre le coin et le milieu du côté (1ère emmanchure) et entre le milieu du côté et le coin (=2ème emmanchure). Les manches sont ensuite crochetées de haut en bas, à partir des mailles sautées et de la chaînette. Bon crochet!
11.04.2015 - 09:27
|
||||||||||||||||||||||
Spring Bliss#springblisscardigan |
||||||||||||||||||||||
 |
 |
|||||||||||||||||||||
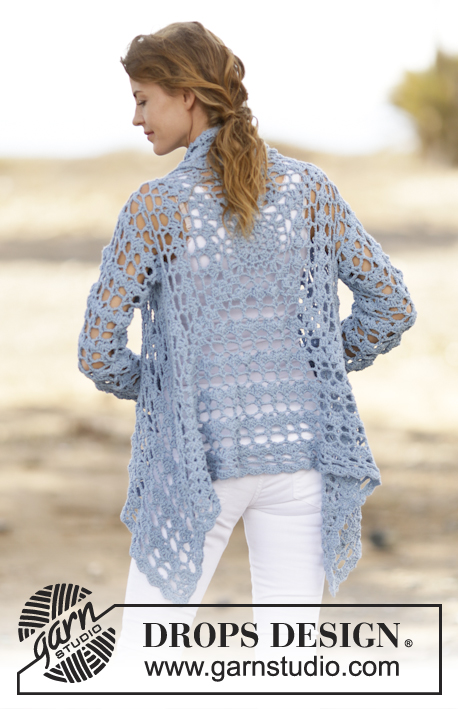
Crochet DROPS jacket with lace pattern in ”Paris”. Size: S - XXXL.
DROPS 162-5 |
||||||||||||||||||||||
|
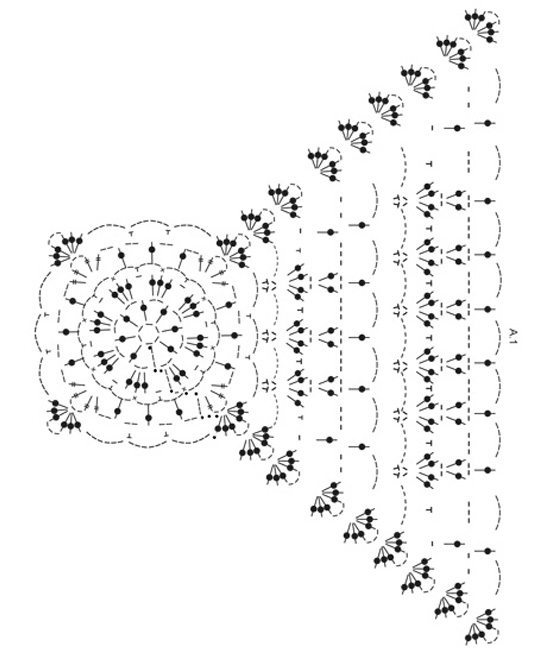
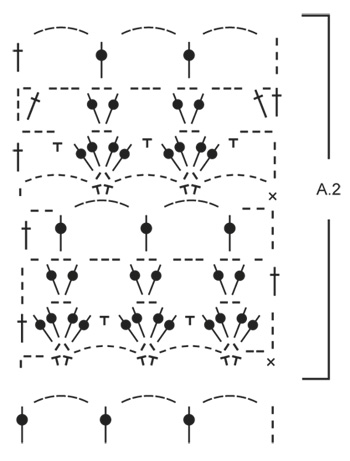
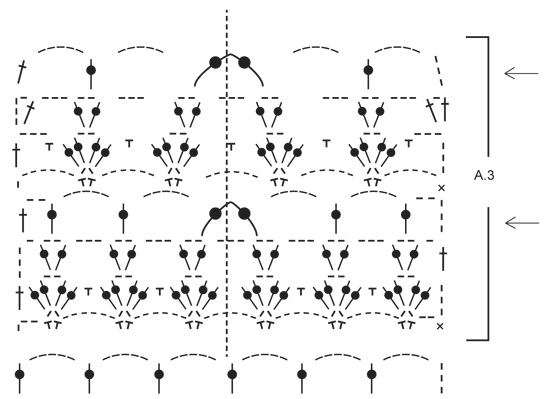
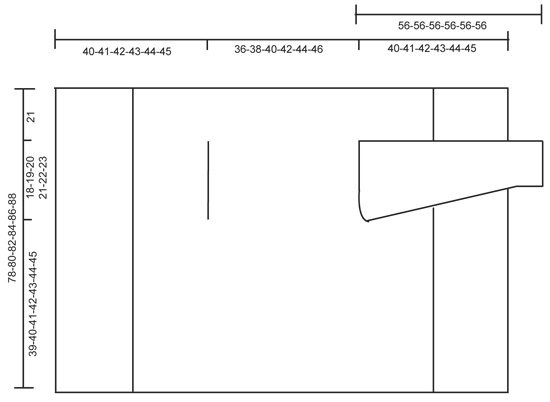
PATTERN: See diagrams A.1 and A.2. DECREASE TIP: Dec 1 dc by working 2 dc tog as follows: Work 1 dc in first ch-space but wait with last pull through, skip ch 3, work 1 dc in next ch-space but on last pull through, pull yarn through all 3 loops on hook. ---------------------------------------------------------- BODY: Worked in the round from mid back on the back. Work 6 ch with Paris on hook size 5 mm / H/8 and form a ring with 1 sl st in first ch. Work according to diagram A.1, i.e. work as follows: ROUND 1: 5 ch (= 1 dc + 2 ch), * 1 dc in ring, 2 ch *, repeat from *-* a total of 7 times, finish with 1 sl st in 3rd ch from beg of round = 8 dc with 2 ch between each. ROUND 2: 1 sl st in first ch-space, 3 ch (= 1 dc), 2 dc in same ch-space, * ch 1, 3 dc in next ch-space *, repeat from *-* 7 times in total, and finish with 1 ch and 1 sl st in 3rd ch from beg of round = 8 dc-groups with 1 ch between each. ROUND 3: ch 1, 1 sc in the middle dc in dc-group, * ch 3, 1 sc in ch before next dc-group, ch 3, 1 sc in the middle dc in next dc-group *, repeat from *-* 7 times in total, ch 3, 1 sc in last ch, 3 ch and 1 sl st in first sc at beg of round = 16 ch-spaces. ROUND 4: Now work the circle into a square, i.e. work as follows: 1 sl st in first ch-space, 4 ch (= 1 tr), 1 tr + 3 ch + 2 tr in same ch-space (= corner), * (2 ch, 1 dc in next ch-space) repeat from (-) 3 times in total, ch 2, 2 tr + 3 ch + 2 tr in next ch-space (= corner) *, repeat from *-* 3 times in total, repeat from (-) 3 times in total and finish with 2 ch and 1 sl st in 4th ch from beg of round. ROUND 5: Work sl sts until ch-space in the corner, 3 ch (= 1 dc), 2 dc + 3 ch + 3 dc in same ch-space (= corner), * ch 5, skip 1 ch-space, 1 sc in next ch-space, ch 5, 1 sc in next ch-space, ch 5, skip 1 ch-space, in next ch-space (= corner) work 3 dc + 3 ch + 3 dc *, repeat from *-* 3 times in total, ch 5, skip 1 ch-space, 1 sc in next ch-space, ch 5, 1 sc in next ch-space, ch 5, skip last ch-space and finish with 1 sl st in 3rd ch at beg of round. ROUND 6: Work sl sts until ch-space in the corner, 3 ch (= 1 dc), 2 dc + 3 ch + 3 dc in same ch-space (= corner), * (6 ch, 1 sc + 2 ch + sc in next ch-space), repeat from (-) until corner, ch 6, work 3 dc + 3 ch + 3 dc in ch-space in the corner *, repeat from *-* 3 times in total, repeat from (-) until the corner and finish with 6 ch and 1 sl st in 3rd ch at beg of round. ROUND 7: Work sl sts until ch-space in the corner, 3 ch (= 1 dc), 2 dc + 3 ch + 3 dc in same ch-space (= corner), * ch 1, (1 sc in 6-ch-space, 2 dc + 2 ch + 2 dc in 2-ch-space), repeat from (-) until one 6-ch-space remains before the corner, 1 sc in 6-ch-space, ch 1, 3 dc + 3 ch + 3 dc in ch-space in the corner *, repeat from *-* 3 times in total, ch 1, repeat from (-) until one 6-ch-space remains before the corner and finish with 1 ch and 1 sl st in 3rd ch at beg of round. ROUND 8: Work sl sts until ch-space in the corner, 3 ch (= 1 dc), 2 dc + 3 ch + 3 dc in same ch-space (= corner), * ch 2, 1 dc in first ch, (3 ch, 1 dc + 2 ch + 1 dc in ch-space in dc-group), repeat from (-) until corner, ch 3, 1 dc in ch before corner, ch 2, 3 dc + 3 ch + 3 dc in ch-space in the corner *, repeat from *-* 3 times in total, ch 2, 1 dc in first ch, repeat from (-) until corner, ch 3, 1 dc in last ch, 2 ch and 1 sl st in 3rd ch at beg of round. ROUND 9: Work sl sts until ch-space in the corner, 3 ch (= 1 dc), 2 dc + 3 ch + 3 dc in same ch-space (= corner), * ch 5, 1 dc in first ch-space, (5 ch, 1 dc in ch-space in dc-group), repeat from (-) until 1 ch-space remains before dc-group in the corner, ch 5, 1 dc in last ch-space before the corner, 5 ch and 3 dc + 3 ch + 3 dc in ch-space in the corner *, repeat from *-* 3 times in total, ch 5, 1 dc in first ch-space, repeat from (-) until 1 ch-space remains before the corner, ch 5, 1 dc in last ch-space, 5 ch and 1 sl st in 3rd ch at beg of round. REMEMBER THE CROCHET GAUGE! Repeat 6th to 9th round (4 rounds) outwards as shown in diagram. Continue like this until square measures approx. 36-38-40-42-44-46 cm x 36-38-40-42-44-46 cm / 14¼"-15"-15¾"-16½"-17¼"-18" x 14¼"-15"-15¾"-16½"-17¼"-18". Now work armholes as follows: Work as before until first corner, work 3 dc + 3 ch + 3 dc in ch-space in the corner. Now work ch until the middle of next side (i.e. in the middle between 1st and 2nd corner) as follows: Work 1 ch for every ch/dc skipped. Then work pattern as before until the middle between 3rd and 4th corner. Now work ch until beg of round as follows: Work 1 ch for every ch/dc skipped. On next round work pattern and inc as before over all sts, also in ch for armholes. Continue like this until square measures approx. 78-80-82-84-86-88 cm x 78-80-82-84-86-88 cm/ 30¾"-31½"-32¼"-33"-33⅞"-34⅝" x 30¾"-31½"-32¼"-33"-33⅞"-34⅝" (i.e. approx. 21 cm / 8¼" in all sizes from armhole) - adjust to finish after 9th round (round with ch-spaces and dc's). Cut the yarn. FRONT PIECE: Beg from WS and work back and forth between first and second corner. NOTE: Work front piece without inc. Work according to diagram A.2 from first corner, i.e. work as follows: ROW 1: 3 ch (= 1 sc + 2 ch), 1 sc + 2 ch + 1 sc in first ch-space, * ch 6, 1 sc + 2 ch + 1 sc in next ch-space*, repeat from *-* the entire row and finish with 2 ch and 1 sc in first ch-space in the corner, turn piece. ROW 2 (= RS): 3 ch (= 1 dc), * 2 dc + 2 ch + 2 dc in ch-space between 2 sc, 1 sc in 6-ch-space *, repeat from *-* the entire row and finish with 1 dc in 1st ch from beg of previous row, turn piece. ROW 3: 4 ch (= 1 dc + 1 ch), * 1 dc + 2 ch + 1 dc in ch-space in the middle of dc-group, 3 ch *, repeat from *-* until 1 dc-group remains before the corner, 1 dc + 2 ch + 1 dc in ch-space in last dc-group, finish with 1 ch and 1 dc in 3rd ch from beg of previous row, turn piece. ROW 4 (= RS): 5 ch (= 1 dc + 2 ch), * 1 dc in ch-space in dc-group, 5 ch *, repeat from *-* until 1 dc-group remains, 1 dc in ch-space in last dc-group, 2 ch and 1 dc in 3rd ch from beg of previous row, turn piece. ROW 5: 7 ch (= 1 sc + 6 ch), * 1 sc + 2 ch + 1 sc in 5-ch-space, 6 ch *, repeat from *-* the entire row and finish with 1 sc in 3rd ch from beg of previous row, turn piece. ROW 6 (= RS): 6 ch (= 1 dc + 3 ch), * 1 sc in 6-ch-space, 2 dc + 2 ch + 2 dc in 2-ch-space *, repeat from *-* the entire row and finish with 1 sc in last 6-ch-space, 3 ch and 1 dc in first ch from beg of previous row, turn piece. ROW 7: 4 ch (= 1 dc + 1 ch), 1 dc in same st, * ch 3, 1 dc + 2 ch + 1 dc in ch-space in the middle of next dc-group *, repeat from *-* the entire row and finish with 3 ch and 1 dc + 1 ch + 1 dc in 3rd ch from beg of previous row, turn piece. ROW 8 (= RS): 8 ch (= 1 dc + 5 ch), * 1 dc in ch-space in the middle of dc-group, 5 ch *, repeat from *-* the entire row and finish with 5 ch and 1 dc in 3rd ch from beg of previous row, turn piece. Repeat rows 1 to 8 outwards. Continue like this until approx. 19-20-21-22-23-24 cm / 7½"-8"-8¼"-8¾"-9"-9½" have been worked back and forth, fasten off (adjust after 1st or 5th row in pattern). Repeat on the other side, now work back and forth from third to fourth corner. EDGE: Finally work a round around the entire piece with 2nd or 6th row in pattern but in ch-space in each corner work 6 dc. Fasten off. SLEEVE: Work back and forward and sew togheter at the end. Sleeve is worked straight out of armhole of the body, top down. Beg mid under armhole, from RS. 1 sc in first st, then work ch-space as on 4th or 8th row in A.2. Work so that there are 12-13-14-15-15-16 ch-spaces around armhole. Then continue with pattern according to diagram A.2. Work pattern like this until sleeve measures 26 cm / 10¼". Now work according to A.3. On every row with arrow work 2 dc tog into 1 dc mid front of sleeve (i.e. dec 1 ch-space on every round with arrow) - READ DECREASE TIP. The dotted line shows mid front of sleeve. Otherwise continue the pattern as before. Dec on every 4th row a total of 4 times. Then work according to diagram A.2 until sleeve measures 56 cm / 22" in all sizes. Fasten off. Repeat in the other side. |
||||||||||||||||||||||
Diagram explanations |
||||||||||||||||||||||
|
||||||||||||||||||||||
 |
||||||||||||||||||||||
 |
||||||||||||||||||||||
 |
||||||||||||||||||||||
 |
||||||||||||||||||||||
Have you finished this pattern?Tag your pictures with #dropspattern #springblisscardigan or submit them to the #dropsfan gallery. Do you need help with this pattern?You'll find 12 tutorial videos, a Comments/Questions area and more by visiting the pattern on garnstudio.com. © 1982-2026 DROPS Design A/S. We reserve all rights. This document, including all its sub-sections, has copyrights. Read more about what you can do with our patterns at the bottom of each pattern on our site. |
||||||||||||||||||||||


With over 40 years in knitting and crochet design, DROPS Design offers one of the most extensive collections of free patterns on the internet - translated to 17 languages. As of today we count 324 catalogs and 12290 patterns - 12280 of which are translated into English (US/in).
We work hard to bring you the best knitting and crochet have to offer, inspiration and advice as well as great quality yarns at incredible prices! Would you like to use our patterns for other than personal use? You can read what you are allowed to do in the Copyright text at the bottom of all our patterns. Happy crafting!
Post a comment to pattern DROPS 162-5
We would love to hear what you have to say about this pattern!
If you want to leave a question, please make sure you select the correct category in the form below, to speed up the answering process. Required fields are marked *.