
Popular categories
Looking for a yarn?


Comments / Questions (151)
![]() Sylvia Miller wrote:
Sylvia Miller wrote:
I cannot seem to understand exactly how the sleeve should be worked on this pattern. I see there was an update. To work it back and forth. How does it come together in the end? Question two. Where in the arm hole do I start crocheting the sleeve? Is it in the shoulder area or underarm space. Thank you! For your assistance
21.05.2015 - 16:08DROPS Design answered:
Dear Mrs Miller, if you printed the pattern after the correction has been made, the pattern includes correction. Start working sleeve at the bottom of sleeve (underarm) and work around the armhole starting from RS, back and forth (= in rows) to the bottom edge of sleeve. Happy crocheting!
21.05.2015 - 16:27
![]() Sandra Minke wrote:
Sandra Minke wrote:
Volgens mij klopt de vanafprijs niet. Ik kom in ieder geval op minimaal het dubbele uit.
17.05.2015 - 15:37DROPS Design answered:
Hoi Sandra. De prijs is aangepast
18.05.2015 - 13:35
![]() Irene wrote:
Irene wrote:
Después de la vuelta 9 hay que repetir de la 6 a la 9 hasta que mida, en mi caso 38x38 cm. En mi caso, la pieza alcanza esta medida en la vuelta tercera vuelta 6. ¿Puedo parar ahí para seguir con el siguiente paso (las sisas) o hay que hacer las vueltas completas, es decir, de la 6 a la 9? No se si me explico bien. Gracias.
16.05.2015 - 19:00DROPS Design answered:
Hola Irene, no, no hace falta repetir 6,7,8 y 9 cuando llegues a la medida. Paras en la que coincida con los cm que necesitas.
20.05.2015 - 16:58
![]() M. Carmen Martinez wrote:
M. Carmen Martinez wrote:
De las mejores explicaciones q he visto, gracias, muchas gracias
15.05.2015 - 12:05
![]() Ulla Rønde Steckel wrote:
Ulla Rønde Steckel wrote:
Hej har med held hæklet efter diagram MEN er ikke så god til andet end at følge opskriften slavisk...Er en lille prop så i denne opskrift passer længden 78 ok til mig men skal vist helt op i xxxl for at nå rundt :) kan jeg bare fortsætte med siderne hvor ærmerne er og ikke bund og top når jeg er nået så langt ( lige om lidt ) eller hvordan gør jeg ??? :) tusind tak på forhånd .....hm men er altså bare 160 høj ...
12.05.2015 - 13:17DROPS Design answered:
Hej Ulla. Ja, jeg ville ogsaa haekle bredere - og pröv den paa undervejs, saa du kan stoppe naar den er som du vil have den. God fornöjelse.
12.05.2015 - 16:52
![]() Silvia wrote:
Silvia wrote:
Perdonar, se que lo han preguntado otra vez, pero lo de la sisa no entiendo como se ha de hacer de la manera que esta explicado. Me gustaria que me lo explicaran de otra manera. Muchas gracias
11.05.2015 - 18:12DROPS Design answered:
Hola Silvia, marcamos el centro de los 2 laterales del cuadrado con 1 marcapuntos. Se comienza a trabajar desde la esquina izquierda del lado inferior del cuadrado se trabaja el lado inferior hasta la esquina derecha, trabajamos la esquina como siempre. A partir de esa esquina hacemos una cadeneta con tantos p.de cadeneta como p.a. hay hasta el centro del lateral, unimos la cadeneta con el pt central (donde insertamos el marcapuntos) y el resto del lateral + el lado superior del cuadrado+la 1ª mitad del otro lateral se trabaja segun el patrón, Ahora se hace la cadeneta en la otra mitad a partir del MP.
15.05.2015 - 08:43
![]() Lourdes wrote:
Lourdes wrote:
En lasisa que es lo que tenemos que hacer u aro donde se cose la manga y solo una sola vez o ahí que hacerlo mas veces hasta completar los centímetros que hay que hacer estoy liada en esa zona y no soy capaz de seguir gracias
09.05.2015 - 13:43DROPS Design answered:
Hola Lourdes, para la sisa se hace una cadeneta (una para cada manga) con tantos pts como pts saltados hay.
11.05.2015 - 11:44Marilyn Germishuys wrote:
This looks like a very nice pattern and i am going to try and make it
09.05.2015 - 13:15
![]() Inca Van Beek wrote:
Inca Van Beek wrote:
Verdorie , gisteren de katoen binnen gekregen en nu zie ik dat de hoeveelheden zijn aangepast naar bijna het dubbelen!!! heel slordig...want krijg je een ander verfbad. ik vraag mij af hoe het kan dat de hoeveelheid niet klopt als jullie deze al een keer hebben gemaakt. Niet blij :-(
23.04.2015 - 11:14DROPS Design answered:
Hoi Inca. We zijn maar mensen en fouten kunnen gebeuren bij het schrijven van de patronen - maar het patroon is nu aangepast. Excuses voor het ongemak.
23.04.2015 - 12:03
![]() Mieke Janssen wrote:
Mieke Janssen wrote:
Eerder deze week patroon al uitgeprint, maar als ik nu kijk zijn de hoeveelheden garen veel hoger. Op mijn versie staat 400-500 enz. en nu op de site 800-850 enz. Welke is nu het juiste? Scheelt nogal met bestellen.
22.04.2015 - 21:38DROPS Design answered:
Hoi Mieke. Het aantal was verkeerd. Daarom de correctie. 800-850-950-1050-1150-1250 g is correct.
23.04.2015 - 12:04
|
||||||||||||||||||||||
Spring Bliss#springblisscardigan |
||||||||||||||||||||||
 |
 |
|||||||||||||||||||||
Crochet DROPS jacket with lace pattern in ”Paris”. Size: S - XXXL.
DROPS 162-5 |
||||||||||||||||||||||
|
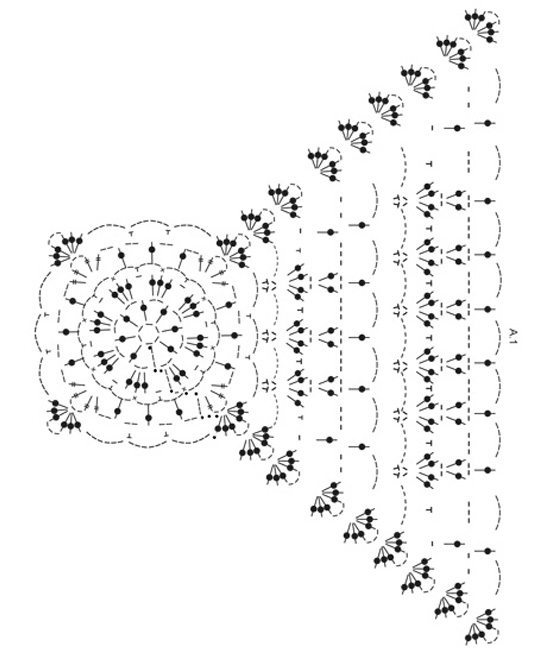
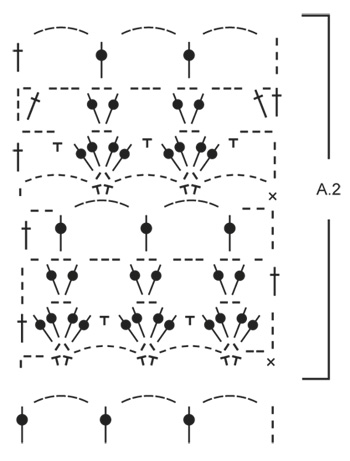
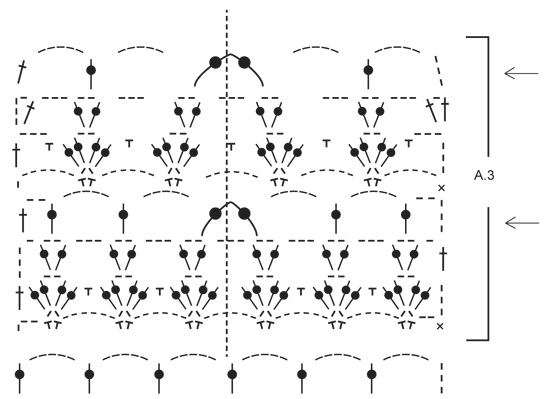
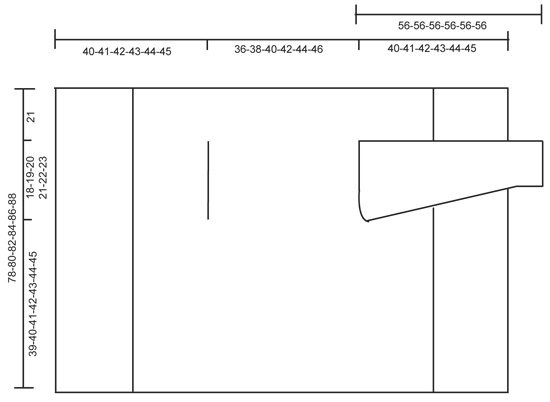
PATTERN: See diagrams A.1 and A.2. DECREASE TIP: Dec 1 dc by working 2 dc tog as follows: Work 1 dc in first ch-space but wait with last pull through, skip ch 3, work 1 dc in next ch-space but on last pull through, pull yarn through all 3 loops on hook. ---------------------------------------------------------- BODY: Worked in the round from mid back on the back. Work 6 ch with Paris on hook size 5 mm / H/8 and form a ring with 1 sl st in first ch. Work according to diagram A.1, i.e. work as follows: ROUND 1: 5 ch (= 1 dc + 2 ch), * 1 dc in ring, 2 ch *, repeat from *-* a total of 7 times, finish with 1 sl st in 3rd ch from beg of round = 8 dc with 2 ch between each. ROUND 2: 1 sl st in first ch-space, 3 ch (= 1 dc), 2 dc in same ch-space, * ch 1, 3 dc in next ch-space *, repeat from *-* 7 times in total, and finish with 1 ch and 1 sl st in 3rd ch from beg of round = 8 dc-groups with 1 ch between each. ROUND 3: ch 1, 1 sc in the middle dc in dc-group, * ch 3, 1 sc in ch before next dc-group, ch 3, 1 sc in the middle dc in next dc-group *, repeat from *-* 7 times in total, ch 3, 1 sc in last ch, 3 ch and 1 sl st in first sc at beg of round = 16 ch-spaces. ROUND 4: Now work the circle into a square, i.e. work as follows: 1 sl st in first ch-space, 4 ch (= 1 tr), 1 tr + 3 ch + 2 tr in same ch-space (= corner), * (2 ch, 1 dc in next ch-space) repeat from (-) 3 times in total, ch 2, 2 tr + 3 ch + 2 tr in next ch-space (= corner) *, repeat from *-* 3 times in total, repeat from (-) 3 times in total and finish with 2 ch and 1 sl st in 4th ch from beg of round. ROUND 5: Work sl sts until ch-space in the corner, 3 ch (= 1 dc), 2 dc + 3 ch + 3 dc in same ch-space (= corner), * ch 5, skip 1 ch-space, 1 sc in next ch-space, ch 5, 1 sc in next ch-space, ch 5, skip 1 ch-space, in next ch-space (= corner) work 3 dc + 3 ch + 3 dc *, repeat from *-* 3 times in total, ch 5, skip 1 ch-space, 1 sc in next ch-space, ch 5, 1 sc in next ch-space, ch 5, skip last ch-space and finish with 1 sl st in 3rd ch at beg of round. ROUND 6: Work sl sts until ch-space in the corner, 3 ch (= 1 dc), 2 dc + 3 ch + 3 dc in same ch-space (= corner), * (6 ch, 1 sc + 2 ch + sc in next ch-space), repeat from (-) until corner, ch 6, work 3 dc + 3 ch + 3 dc in ch-space in the corner *, repeat from *-* 3 times in total, repeat from (-) until the corner and finish with 6 ch and 1 sl st in 3rd ch at beg of round. ROUND 7: Work sl sts until ch-space in the corner, 3 ch (= 1 dc), 2 dc + 3 ch + 3 dc in same ch-space (= corner), * ch 1, (1 sc in 6-ch-space, 2 dc + 2 ch + 2 dc in 2-ch-space), repeat from (-) until one 6-ch-space remains before the corner, 1 sc in 6-ch-space, ch 1, 3 dc + 3 ch + 3 dc in ch-space in the corner *, repeat from *-* 3 times in total, ch 1, repeat from (-) until one 6-ch-space remains before the corner and finish with 1 ch and 1 sl st in 3rd ch at beg of round. ROUND 8: Work sl sts until ch-space in the corner, 3 ch (= 1 dc), 2 dc + 3 ch + 3 dc in same ch-space (= corner), * ch 2, 1 dc in first ch, (3 ch, 1 dc + 2 ch + 1 dc in ch-space in dc-group), repeat from (-) until corner, ch 3, 1 dc in ch before corner, ch 2, 3 dc + 3 ch + 3 dc in ch-space in the corner *, repeat from *-* 3 times in total, ch 2, 1 dc in first ch, repeat from (-) until corner, ch 3, 1 dc in last ch, 2 ch and 1 sl st in 3rd ch at beg of round. ROUND 9: Work sl sts until ch-space in the corner, 3 ch (= 1 dc), 2 dc + 3 ch + 3 dc in same ch-space (= corner), * ch 5, 1 dc in first ch-space, (5 ch, 1 dc in ch-space in dc-group), repeat from (-) until 1 ch-space remains before dc-group in the corner, ch 5, 1 dc in last ch-space before the corner, 5 ch and 3 dc + 3 ch + 3 dc in ch-space in the corner *, repeat from *-* 3 times in total, ch 5, 1 dc in first ch-space, repeat from (-) until 1 ch-space remains before the corner, ch 5, 1 dc in last ch-space, 5 ch and 1 sl st in 3rd ch at beg of round. REMEMBER THE CROCHET GAUGE! Repeat 6th to 9th round (4 rounds) outwards as shown in diagram. Continue like this until square measures approx. 36-38-40-42-44-46 cm x 36-38-40-42-44-46 cm / 14¼"-15"-15¾"-16½"-17¼"-18" x 14¼"-15"-15¾"-16½"-17¼"-18". Now work armholes as follows: Work as before until first corner, work 3 dc + 3 ch + 3 dc in ch-space in the corner. Now work ch until the middle of next side (i.e. in the middle between 1st and 2nd corner) as follows: Work 1 ch for every ch/dc skipped. Then work pattern as before until the middle between 3rd and 4th corner. Now work ch until beg of round as follows: Work 1 ch for every ch/dc skipped. On next round work pattern and inc as before over all sts, also in ch for armholes. Continue like this until square measures approx. 78-80-82-84-86-88 cm x 78-80-82-84-86-88 cm/ 30¾"-31½"-32¼"-33"-33⅞"-34⅝" x 30¾"-31½"-32¼"-33"-33⅞"-34⅝" (i.e. approx. 21 cm / 8¼" in all sizes from armhole) - adjust to finish after 9th round (round with ch-spaces and dc's). Cut the yarn. FRONT PIECE: Beg from WS and work back and forth between first and second corner. NOTE: Work front piece without inc. Work according to diagram A.2 from first corner, i.e. work as follows: ROW 1: 3 ch (= 1 sc + 2 ch), 1 sc + 2 ch + 1 sc in first ch-space, * ch 6, 1 sc + 2 ch + 1 sc in next ch-space*, repeat from *-* the entire row and finish with 2 ch and 1 sc in first ch-space in the corner, turn piece. ROW 2 (= RS): 3 ch (= 1 dc), * 2 dc + 2 ch + 2 dc in ch-space between 2 sc, 1 sc in 6-ch-space *, repeat from *-* the entire row and finish with 1 dc in 1st ch from beg of previous row, turn piece. ROW 3: 4 ch (= 1 dc + 1 ch), * 1 dc + 2 ch + 1 dc in ch-space in the middle of dc-group, 3 ch *, repeat from *-* until 1 dc-group remains before the corner, 1 dc + 2 ch + 1 dc in ch-space in last dc-group, finish with 1 ch and 1 dc in 3rd ch from beg of previous row, turn piece. ROW 4 (= RS): 5 ch (= 1 dc + 2 ch), * 1 dc in ch-space in dc-group, 5 ch *, repeat from *-* until 1 dc-group remains, 1 dc in ch-space in last dc-group, 2 ch and 1 dc in 3rd ch from beg of previous row, turn piece. ROW 5: 7 ch (= 1 sc + 6 ch), * 1 sc + 2 ch + 1 sc in 5-ch-space, 6 ch *, repeat from *-* the entire row and finish with 1 sc in 3rd ch from beg of previous row, turn piece. ROW 6 (= RS): 6 ch (= 1 dc + 3 ch), * 1 sc in 6-ch-space, 2 dc + 2 ch + 2 dc in 2-ch-space *, repeat from *-* the entire row and finish with 1 sc in last 6-ch-space, 3 ch and 1 dc in first ch from beg of previous row, turn piece. ROW 7: 4 ch (= 1 dc + 1 ch), 1 dc in same st, * ch 3, 1 dc + 2 ch + 1 dc in ch-space in the middle of next dc-group *, repeat from *-* the entire row and finish with 3 ch and 1 dc + 1 ch + 1 dc in 3rd ch from beg of previous row, turn piece. ROW 8 (= RS): 8 ch (= 1 dc + 5 ch), * 1 dc in ch-space in the middle of dc-group, 5 ch *, repeat from *-* the entire row and finish with 5 ch and 1 dc in 3rd ch from beg of previous row, turn piece. Repeat rows 1 to 8 outwards. Continue like this until approx. 19-20-21-22-23-24 cm / 7½"-8"-8¼"-8¾"-9"-9½" have been worked back and forth, fasten off (adjust after 1st or 5th row in pattern). Repeat on the other side, now work back and forth from third to fourth corner. EDGE: Finally work a round around the entire piece with 2nd or 6th row in pattern but in ch-space in each corner work 6 dc. Fasten off. SLEEVE: Work back and forward and sew togheter at the end. Sleeve is worked straight out of armhole of the body, top down. Beg mid under armhole, from RS. 1 sc in first st, then work ch-space as on 4th or 8th row in A.2. Work so that there are 12-13-14-15-15-16 ch-spaces around armhole. Then continue with pattern according to diagram A.2. Work pattern like this until sleeve measures 26 cm / 10¼". Now work according to A.3. On every row with arrow work 2 dc tog into 1 dc mid front of sleeve (i.e. dec 1 ch-space on every round with arrow) - READ DECREASE TIP. The dotted line shows mid front of sleeve. Otherwise continue the pattern as before. Dec on every 4th row a total of 4 times. Then work according to diagram A.2 until sleeve measures 56 cm / 22" in all sizes. Fasten off. Repeat in the other side. |
||||||||||||||||||||||
Diagram explanations |
||||||||||||||||||||||
|
||||||||||||||||||||||
 |
||||||||||||||||||||||
 |
||||||||||||||||||||||
 |
||||||||||||||||||||||
 |
||||||||||||||||||||||
Have you finished this pattern?Tag your pictures with #dropspattern #springblisscardigan or submit them to the #dropsfan gallery. Do you need help with this pattern?You'll find 12 tutorial videos, a Comments/Questions area and more by visiting the pattern on garnstudio.com. © 1982-2026 DROPS Design A/S. We reserve all rights. This document, including all its sub-sections, has copyrights. Read more about what you can do with our patterns at the bottom of each pattern on our site. |
||||||||||||||||||||||


With over 40 years in knitting and crochet design, DROPS Design offers one of the most extensive collections of free patterns on the internet - translated to 17 languages. As of today we count 324 catalogs and 12290 patterns - 12280 of which are translated into English (US/in).
We work hard to bring you the best knitting and crochet have to offer, inspiration and advice as well as great quality yarns at incredible prices! Would you like to use our patterns for other than personal use? You can read what you are allowed to do in the Copyright text at the bottom of all our patterns. Happy crafting!
Post a comment to pattern DROPS 162-5
We would love to hear what you have to say about this pattern!
If you want to leave a question, please make sure you select the correct category in the form below, to speed up the answering process. Required fields are marked *.