
Popular categories
Looking for a yarn?


Comments / Questions (151)
![]() Lupo Maria wrote:
Lupo Maria wrote:
Non riesco a capire come fare gli scalfì è possibile avere un diagramma?
06.05.2019 - 21:28DROPS Design answered:
Buongiorno Maria. Purtroppo uun diagramma non è disponibile. Una volta lavorato fino al primo angolo compreso, non deve lavorare la prima metà del lato tra il 1° e il 2° angolo, ma avvia 1 catenella per ogni maglia (catenella o m.alta) che non lavora. Riprende a lavorare a metà del lato (tra il 1° e il 2° angolo) e procede come prima fino alla metà del lato tra il 3° e il 4° angolo. Qui avvia di nuovo lo stesso numero di catenelle e chiude il giro. Buon lavoro!
07.05.2019 - 09:03
![]() Marta wrote:
Marta wrote:
Podrian explicar como se forma el hombro? Se cose? No me queda claro. Gracias
04.03.2019 - 19:29DROPS Design answered:
Hola Marta . El hombro se forma a la vez que trabajas el cuerpo y los delanteros.
17.10.2019 - 19:00
![]() Lieve wrote:
Lieve wrote:
Ik heb het lijf volledig af maar ik begrijp ff niet hoe het zit met de armsgaten. Daar zit ik wat vast.
26.06.2018 - 11:18DROPS Design answered:
Dag Lieve, Je haakt tot het midden van de volgende zijkant en dan haak je lossen (een aantal lossen dat overeenkomt met de steken van de vorige toer) om vervolgens op de hoek het patroon weer op te pakken. Op deze manier heb je een armsgat gecreëerd, waar later de mouw aan gehaakt kan worden.
26.06.2018 - 14:52
![]() Kewl Potato wrote:
Kewl Potato wrote:
Heyy, I've just chained for the arms on both sides of the squares and I'm not sure what to do next
21.06.2018 - 12:42DROPS Design answered:
Dear Mrs Potato, after the round with chains and skipping sts for armholes, work next round in diagram, but now crochet in both chains as there weren't any chain before (= you should crochet the same row as over all other sts on round so that you have the same number of sts after and before the armholes). Happy crocheting!
21.06.2018 - 15:27
![]() Noor wrote:
Noor wrote:
Jätte svårt att förstå hur man ska gå tillväga :(
09.06.2018 - 21:51
![]() Ingrid wrote:
Ingrid wrote:
Wat een leuk en mooi patroon! Ik vond het ook erg makkelijk te volgen (wat eerlijk gezegd niet altijd zo is bij patronen van deze site 😉). Ik had alleen helaas niet genoeg aan de aangegeven hoeveelheid garen 😕.
05.06.2018 - 11:35
![]() Kathleen Foley wrote:
Kathleen Foley wrote:
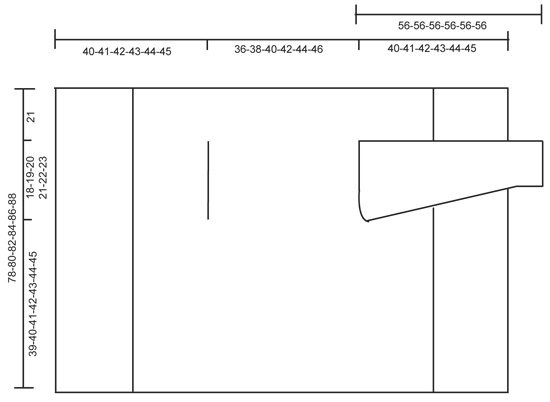
I need help visualizing where the initial 9 round square is situated within the last diagram on the completed sweater. For example, my square is 36x36. I can see the 36 on the top of the diagram and the lines representing the armholes. Where is the 36 on the left measure? I see 21, 18, 39.
28.03.2018 - 17:29DROPS Design answered:
Dear Mrs Foley, when square measures 36 x 36 you will shape armhole from one of the corner to the middle of the side between corners (= 18 cm), you continue then this side for the last 18 cm, work the bottom side, then on the last side, crochet for 18 cm as before and skip the last 18 cm for 2nd armhole. Happy crocheting!
30.03.2018 - 11:49
![]() Wendi wrote:
Wendi wrote:
Can you please explain to me the 3.5 DC groups for the gauge? I'm not sure how I am supposed to stitch or what, to determine the correct gauge based on the yard I'm using
11.09.2017 - 00:00DROPS Design answered:
Dear Wendi, work the first 9 rounds in pattern, then measure width so that there are 3,5 dc-groups approx. for 10 cm in width and 9 rounds in height = 10 cm. Happy crocheting!
11.09.2017 - 09:06
![]() SH Van Essen wrote:
SH Van Essen wrote:
Ben bij de armsgaten aangekomen wat wordt er bedoeld met de lossen hier net zoveel lossen haken als je telt bij de vorige gehaakte toer en dan bevestigen bij de hoek ?
27.08.2017 - 16:47DROPS Design answered:
Hallo SH Van Essen, Voor elke steek (stokje of losse) haak je 1 losse tot het midden van de zijkant. Dus het aantal steken dat je overslaat, moet overeen komen met het aantal lossen dat je haakt.
06.11.2017 - 17:00
![]() Linda wrote:
Linda wrote:
Dobry den, v ceskem navodu je spatne uvedene mnozstvi prize. V holandskem komentari jsem zde nasla opravu. 800-850-950-1050-1150-1250 g Jsem v polovine vesty a 10 klubicek (500g) opravdu nestaci. I found an error in the Czech pattern - wrong amount of yarn needed for all sizes.
13.08.2017 - 22:52DROPS Design answered:
Milá Lindo, díky za upozornění - opraveno.
20.09.2017 - 00:25
|
||||||||||||||||||||||
Spring Bliss#springblisscardigan |
||||||||||||||||||||||
 |
 |
|||||||||||||||||||||
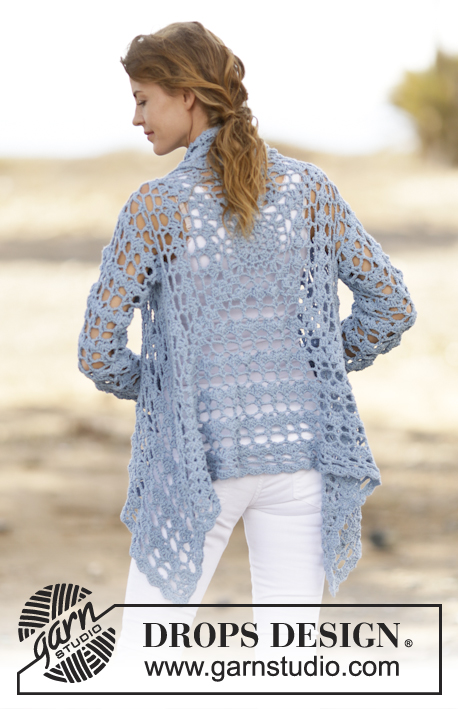
Crochet DROPS jacket with lace pattern in ”Paris”. Size: S - XXXL.
DROPS 162-5 |
||||||||||||||||||||||
|
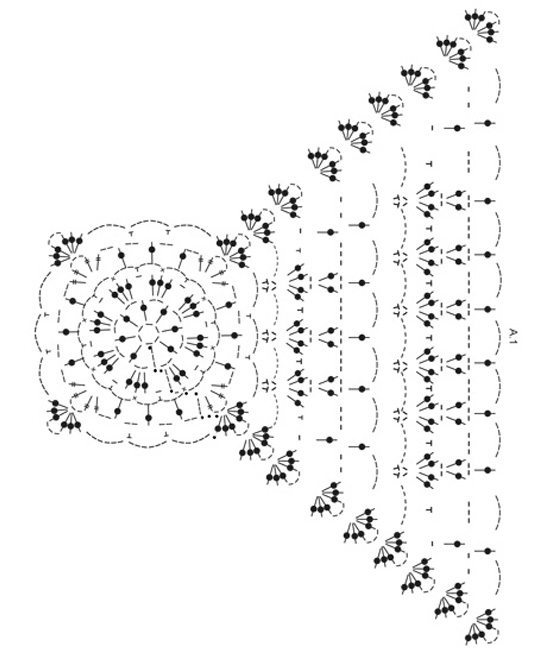
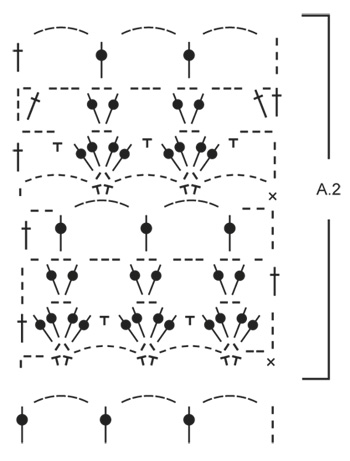
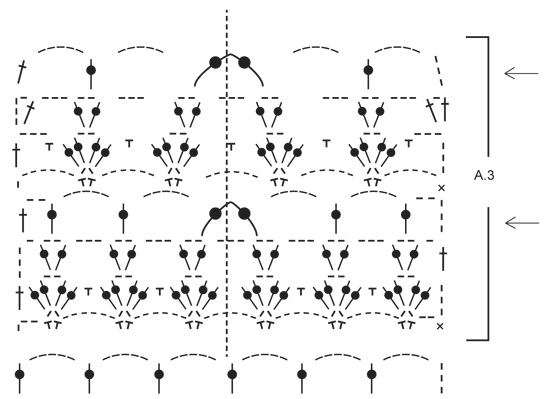
PATTERN: See diagrams A.1 and A.2. DECREASE TIP: Dec 1 dc by working 2 dc tog as follows: Work 1 dc in first ch-space but wait with last pull through, skip ch 3, work 1 dc in next ch-space but on last pull through, pull yarn through all 3 loops on hook. ---------------------------------------------------------- BODY: Worked in the round from mid back on the back. Work 6 ch with Paris on hook size 5 mm / H/8 and form a ring with 1 sl st in first ch. Work according to diagram A.1, i.e. work as follows: ROUND 1: 5 ch (= 1 dc + 2 ch), * 1 dc in ring, 2 ch *, repeat from *-* a total of 7 times, finish with 1 sl st in 3rd ch from beg of round = 8 dc with 2 ch between each. ROUND 2: 1 sl st in first ch-space, 3 ch (= 1 dc), 2 dc in same ch-space, * ch 1, 3 dc in next ch-space *, repeat from *-* 7 times in total, and finish with 1 ch and 1 sl st in 3rd ch from beg of round = 8 dc-groups with 1 ch between each. ROUND 3: ch 1, 1 sc in the middle dc in dc-group, * ch 3, 1 sc in ch before next dc-group, ch 3, 1 sc in the middle dc in next dc-group *, repeat from *-* 7 times in total, ch 3, 1 sc in last ch, 3 ch and 1 sl st in first sc at beg of round = 16 ch-spaces. ROUND 4: Now work the circle into a square, i.e. work as follows: 1 sl st in first ch-space, 4 ch (= 1 tr), 1 tr + 3 ch + 2 tr in same ch-space (= corner), * (2 ch, 1 dc in next ch-space) repeat from (-) 3 times in total, ch 2, 2 tr + 3 ch + 2 tr in next ch-space (= corner) *, repeat from *-* 3 times in total, repeat from (-) 3 times in total and finish with 2 ch and 1 sl st in 4th ch from beg of round. ROUND 5: Work sl sts until ch-space in the corner, 3 ch (= 1 dc), 2 dc + 3 ch + 3 dc in same ch-space (= corner), * ch 5, skip 1 ch-space, 1 sc in next ch-space, ch 5, 1 sc in next ch-space, ch 5, skip 1 ch-space, in next ch-space (= corner) work 3 dc + 3 ch + 3 dc *, repeat from *-* 3 times in total, ch 5, skip 1 ch-space, 1 sc in next ch-space, ch 5, 1 sc in next ch-space, ch 5, skip last ch-space and finish with 1 sl st in 3rd ch at beg of round. ROUND 6: Work sl sts until ch-space in the corner, 3 ch (= 1 dc), 2 dc + 3 ch + 3 dc in same ch-space (= corner), * (6 ch, 1 sc + 2 ch + sc in next ch-space), repeat from (-) until corner, ch 6, work 3 dc + 3 ch + 3 dc in ch-space in the corner *, repeat from *-* 3 times in total, repeat from (-) until the corner and finish with 6 ch and 1 sl st in 3rd ch at beg of round. ROUND 7: Work sl sts until ch-space in the corner, 3 ch (= 1 dc), 2 dc + 3 ch + 3 dc in same ch-space (= corner), * ch 1, (1 sc in 6-ch-space, 2 dc + 2 ch + 2 dc in 2-ch-space), repeat from (-) until one 6-ch-space remains before the corner, 1 sc in 6-ch-space, ch 1, 3 dc + 3 ch + 3 dc in ch-space in the corner *, repeat from *-* 3 times in total, ch 1, repeat from (-) until one 6-ch-space remains before the corner and finish with 1 ch and 1 sl st in 3rd ch at beg of round. ROUND 8: Work sl sts until ch-space in the corner, 3 ch (= 1 dc), 2 dc + 3 ch + 3 dc in same ch-space (= corner), * ch 2, 1 dc in first ch, (3 ch, 1 dc + 2 ch + 1 dc in ch-space in dc-group), repeat from (-) until corner, ch 3, 1 dc in ch before corner, ch 2, 3 dc + 3 ch + 3 dc in ch-space in the corner *, repeat from *-* 3 times in total, ch 2, 1 dc in first ch, repeat from (-) until corner, ch 3, 1 dc in last ch, 2 ch and 1 sl st in 3rd ch at beg of round. ROUND 9: Work sl sts until ch-space in the corner, 3 ch (= 1 dc), 2 dc + 3 ch + 3 dc in same ch-space (= corner), * ch 5, 1 dc in first ch-space, (5 ch, 1 dc in ch-space in dc-group), repeat from (-) until 1 ch-space remains before dc-group in the corner, ch 5, 1 dc in last ch-space before the corner, 5 ch and 3 dc + 3 ch + 3 dc in ch-space in the corner *, repeat from *-* 3 times in total, ch 5, 1 dc in first ch-space, repeat from (-) until 1 ch-space remains before the corner, ch 5, 1 dc in last ch-space, 5 ch and 1 sl st in 3rd ch at beg of round. REMEMBER THE CROCHET GAUGE! Repeat 6th to 9th round (4 rounds) outwards as shown in diagram. Continue like this until square measures approx. 36-38-40-42-44-46 cm x 36-38-40-42-44-46 cm / 14¼"-15"-15¾"-16½"-17¼"-18" x 14¼"-15"-15¾"-16½"-17¼"-18". Now work armholes as follows: Work as before until first corner, work 3 dc + 3 ch + 3 dc in ch-space in the corner. Now work ch until the middle of next side (i.e. in the middle between 1st and 2nd corner) as follows: Work 1 ch for every ch/dc skipped. Then work pattern as before until the middle between 3rd and 4th corner. Now work ch until beg of round as follows: Work 1 ch for every ch/dc skipped. On next round work pattern and inc as before over all sts, also in ch for armholes. Continue like this until square measures approx. 78-80-82-84-86-88 cm x 78-80-82-84-86-88 cm/ 30¾"-31½"-32¼"-33"-33⅞"-34⅝" x 30¾"-31½"-32¼"-33"-33⅞"-34⅝" (i.e. approx. 21 cm / 8¼" in all sizes from armhole) - adjust to finish after 9th round (round with ch-spaces and dc's). Cut the yarn. FRONT PIECE: Beg from WS and work back and forth between first and second corner. NOTE: Work front piece without inc. Work according to diagram A.2 from first corner, i.e. work as follows: ROW 1: 3 ch (= 1 sc + 2 ch), 1 sc + 2 ch + 1 sc in first ch-space, * ch 6, 1 sc + 2 ch + 1 sc in next ch-space*, repeat from *-* the entire row and finish with 2 ch and 1 sc in first ch-space in the corner, turn piece. ROW 2 (= RS): 3 ch (= 1 dc), * 2 dc + 2 ch + 2 dc in ch-space between 2 sc, 1 sc in 6-ch-space *, repeat from *-* the entire row and finish with 1 dc in 1st ch from beg of previous row, turn piece. ROW 3: 4 ch (= 1 dc + 1 ch), * 1 dc + 2 ch + 1 dc in ch-space in the middle of dc-group, 3 ch *, repeat from *-* until 1 dc-group remains before the corner, 1 dc + 2 ch + 1 dc in ch-space in last dc-group, finish with 1 ch and 1 dc in 3rd ch from beg of previous row, turn piece. ROW 4 (= RS): 5 ch (= 1 dc + 2 ch), * 1 dc in ch-space in dc-group, 5 ch *, repeat from *-* until 1 dc-group remains, 1 dc in ch-space in last dc-group, 2 ch and 1 dc in 3rd ch from beg of previous row, turn piece. ROW 5: 7 ch (= 1 sc + 6 ch), * 1 sc + 2 ch + 1 sc in 5-ch-space, 6 ch *, repeat from *-* the entire row and finish with 1 sc in 3rd ch from beg of previous row, turn piece. ROW 6 (= RS): 6 ch (= 1 dc + 3 ch), * 1 sc in 6-ch-space, 2 dc + 2 ch + 2 dc in 2-ch-space *, repeat from *-* the entire row and finish with 1 sc in last 6-ch-space, 3 ch and 1 dc in first ch from beg of previous row, turn piece. ROW 7: 4 ch (= 1 dc + 1 ch), 1 dc in same st, * ch 3, 1 dc + 2 ch + 1 dc in ch-space in the middle of next dc-group *, repeat from *-* the entire row and finish with 3 ch and 1 dc + 1 ch + 1 dc in 3rd ch from beg of previous row, turn piece. ROW 8 (= RS): 8 ch (= 1 dc + 5 ch), * 1 dc in ch-space in the middle of dc-group, 5 ch *, repeat from *-* the entire row and finish with 5 ch and 1 dc in 3rd ch from beg of previous row, turn piece. Repeat rows 1 to 8 outwards. Continue like this until approx. 19-20-21-22-23-24 cm / 7½"-8"-8¼"-8¾"-9"-9½" have been worked back and forth, fasten off (adjust after 1st or 5th row in pattern). Repeat on the other side, now work back and forth from third to fourth corner. EDGE: Finally work a round around the entire piece with 2nd or 6th row in pattern but in ch-space in each corner work 6 dc. Fasten off. SLEEVE: Work back and forward and sew togheter at the end. Sleeve is worked straight out of armhole of the body, top down. Beg mid under armhole, from RS. 1 sc in first st, then work ch-space as on 4th or 8th row in A.2. Work so that there are 12-13-14-15-15-16 ch-spaces around armhole. Then continue with pattern according to diagram A.2. Work pattern like this until sleeve measures 26 cm / 10¼". Now work according to A.3. On every row with arrow work 2 dc tog into 1 dc mid front of sleeve (i.e. dec 1 ch-space on every round with arrow) - READ DECREASE TIP. The dotted line shows mid front of sleeve. Otherwise continue the pattern as before. Dec on every 4th row a total of 4 times. Then work according to diagram A.2 until sleeve measures 56 cm / 22" in all sizes. Fasten off. Repeat in the other side. |
||||||||||||||||||||||
Diagram explanations |
||||||||||||||||||||||
|
||||||||||||||||||||||
 |
||||||||||||||||||||||
 |
||||||||||||||||||||||
 |
||||||||||||||||||||||
 |
||||||||||||||||||||||
Have you finished this pattern?Tag your pictures with #dropspattern #springblisscardigan or submit them to the #dropsfan gallery. Do you need help with this pattern?You'll find 12 tutorial videos, a Comments/Questions area and more by visiting the pattern on garnstudio.com. © 1982-2026 DROPS Design A/S. We reserve all rights. This document, including all its sub-sections, has copyrights. Read more about what you can do with our patterns at the bottom of each pattern on our site. |
||||||||||||||||||||||


With over 40 years in knitting and crochet design, DROPS Design offers one of the most extensive collections of free patterns on the internet - translated to 17 languages. As of today we count 324 catalogs and 12290 patterns - 12280 of which are translated into English (US/in).
We work hard to bring you the best knitting and crochet have to offer, inspiration and advice as well as great quality yarns at incredible prices! Would you like to use our patterns for other than personal use? You can read what you are allowed to do in the Copyright text at the bottom of all our patterns. Happy crafting!
Post a comment to pattern DROPS 162-5
We would love to hear what you have to say about this pattern!
If you want to leave a question, please make sure you select the correct category in the form below, to speed up the answering process. Required fields are marked *.