
Popular categories
Looking for a yarn?


Comments / Questions (151)
![]() Stina Sanborn wrote:
Stina Sanborn wrote:
Hur är garnåtgången beräknad? Jag har ärmar och framstycken kvar att virka och har 2 nystan kvar av 13 inköpta (masktätheten stämmer). Det skulle gå åt 12 till st XL. Känner mig lurad, eftersom garner är slut i affären och de inte skall ta in mer.
10.04.2015 - 15:59DROPS Design answered:
Hej Stina. Der var desvaerre en fejl i antallet af nögler, men vi har rettet mönstret til nu. DROPS Paris kan faas i mange andre butikker ogsaa - pröv eventuelt en Superstore. Se alle svenske butikker her
22.04.2015 - 15:51Sylvia wrote:
Thank you for your response to my question I do have another question. If I am skipping stitches between corner 1 and corner 2 to the middle then I would have to get a slip stitch break the thread and then start with the third and fourth corner between the middle to corner for my second armhole and do you have a video available on this thank you
07.04.2015 - 15:32DROPS Design answered:
Dear Sylvia, when you are shaping armholes, you just crochet in the round with pattern and ch over the skipped sts: crochet in the first corner, then ch to middle between 1st and 2nd corner for 1st armhole, continue in pattern until middle between 3rd and 4th corner, ch for 2nd armhole to 4th corner and continue to the end of round as before. Happy crocheting!
07.04.2015 - 17:32Sylvia wrote:
Can you help me understand how to crochet the armholes? This section is confusing.
06.04.2015 - 15:29DROPS Design answered:
Dear Sylvia, to shape armhole, you will skip some sts (from 1st corner to middle between 1st and 2nd corner = 1st armhole and from middle between 3rd and 4th corner to 4th corner = 2nd armhole). Count number of sts you have to skip and crochet ch to replace the skipped sts. Happy crocheting!
07.04.2015 - 09:49
![]() DOMINIQUE DEMAY wrote:
DOMINIQUE DEMAY wrote:
Merci de m'avoir répondu, j'ai compris pour définir l'emmanchure mais comment continuer pour le reste du dos car là je ne comprends pas ? d'avance merci
26.03.2015 - 10:11DROPS Design answered:
Bonjour Mme Demay, on continue ensuite comme avant jusqu'à ce que le carré mesure la bonne dimension pour votre taille, puis on termine chaque devant séparément (bande de chaque côté dans le schéma). Bon crochet!
30.03.2015 - 16:24
![]() DOMINIQUE DEMAY wrote:
DOMINIQUE DEMAY wrote:
Je suis un peu ennuyée car je ne comprends pas du tout comment vous faites au niveau de l'emmanchure donc je suis bloquée pour continuer. Pouvez-vous montrer sur vidéo comment faire et aussi surtout au niveau du point : crocheter 1 ml pour chaque ml/B sautée et pour la chaînette. D'avance merci.
25.03.2015 - 17:29DROPS Design answered:
Bonjour Mme Demay, comptez le nombre de mailles du rang précédent que vous devez sauter pour créer l'emmanchure (= à partir du coin jusqu'au milieu du côté, entre le 1er et le 2ème coin) et remplacez ce nombre de mailles sautées par 1 ml pour l'emmanchure, et continuez comme avant à partir du milieu du côté (entre le 2e et le 3e coin) jusqu'à l'autre emmanchure et répétez de la même façon que pour la 1ère. Bon crochet!
26.03.2015 - 08:51Jacqueline Vankampen wrote:
I am not fully understanding the tension. If i make a sample swatch, should I get 9 rounds in pattern in a 10 X 10 cm
24.03.2015 - 17:51DROPS Design answered:
Dear Mrs Vankampen, you can crochet the first 9 rounds in the pattern and check that you get the correct tension, ie approx. 3.5 tr-groups in width x 9 rounds vertically = 10 x 10 cm. Happy crocheting!
25.03.2015 - 08:56
![]() Susie wrote:
Susie wrote:
In this pattern - on row 4 it wants a repeat from "-" and I don't understand where the "-" is in that pattern row
23.03.2015 - 02:52DROPS Design answered:
Dear Susie, in round 4 in body, you repeat the pattern between the *, ie : * (2 ch, 1 dc in next ch-space) repeat from (-) 3 times in total, ch 2, 2 tr + 3 ch + 2 tr in next ch-space (= corner) *. In row 4 for front piece, you repeat this part: * 1 dc in ch-space in dc-group, 5 ch *. Happy crocheting!
23.03.2015 - 10:44
![]() Sylvia wrote:
Sylvia wrote:
Het is niet duidelijk uitgelegd hoeveel losse je moet haken bij de toeren armsgaten kunt u het misschien anders beschrijven?
20.03.2015 - 22:00DROPS Design answered:
Hoi Sylvia. Ik kan niet het patroon anders beschrijven, wel helpen om deze uitleg te begrijpen. Je haakt zoals hiervoor tot de eerste hoek van je vierkant. Haak dan 3 stk en 3 l en 3 stk in de l-lus in de hoek. Daarna haak je tot het midden van de zijkant (midden tussen deze eerste en volgende hoek) als volgt: 1 l voor elke overgeslagen l/stk = je haakt 1 l voor elke l of stk dat je overslaat tot het midden van de zijkant. Haak vanaf het midden van de zijkant door als hiervoor tot het midden tussen 3e en 4e hoek = 2e armsgat. Herhaal met dezelfde aantal l als het eerste armsgat.
24.03.2015 - 15:16
![]() A Kooi wrote:
A Kooi wrote:
Graag uitleg over het gedeelte van de armsgaten. Kom er niet uit wat betreft hoeveel lossen ik moet haken.
15.03.2015 - 21:31DROPS Design answered:
Hoi A Kooi. Je haakt l tot het midden van de volgende zijkant (dus in het midden tussen de 1e en 2e hoek). Je haakt 1 l voor elke overgeslagen l/stk tot het midden van de volgende zijkant.
18.03.2015 - 15:47
![]() Susanne wrote:
Susanne wrote:
This pattern has no linear measurements, meaning bust measurements. Just S, M, L, XL, and so on. I have no idea which size to pick. Thank you.
10.03.2015 - 18:38DROPS Design answered:
Dear Suzanne, you will find all measurements in the measurement chart at the bottom of the pattern, ie width back piece, front pieces (remember the front pieces are wider), height of armhole, length of sleeves and total height for each size, in cm. Compare these measurement to a similar garment you have and like the shape to find out the matching size. Happy crocheting!
11.03.2015 - 08:47
|
||||||||||||||||||||||
Spring Bliss#springblisscardigan |
||||||||||||||||||||||
 |
 |
|||||||||||||||||||||
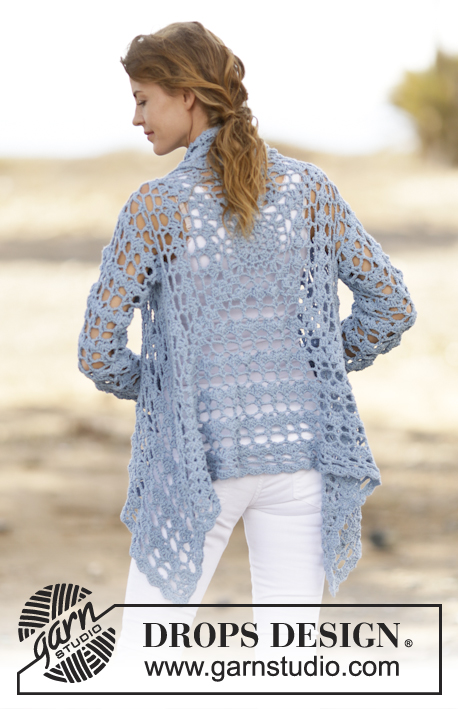
Crochet DROPS jacket with lace pattern in ”Paris”. Size: S - XXXL.
DROPS 162-5 |
||||||||||||||||||||||
|
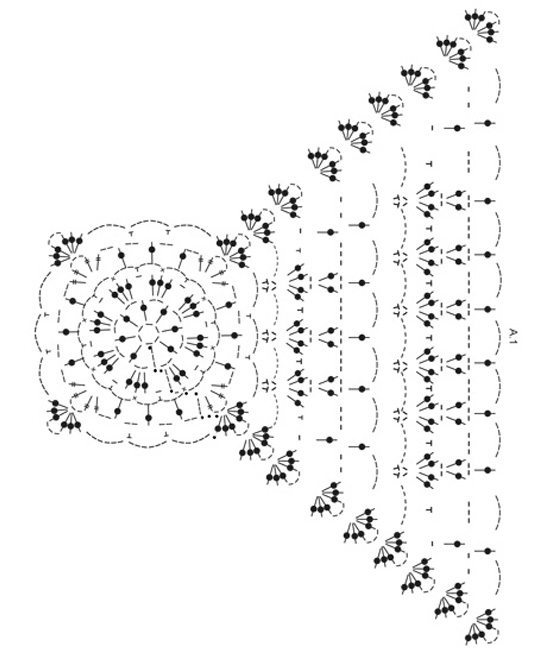
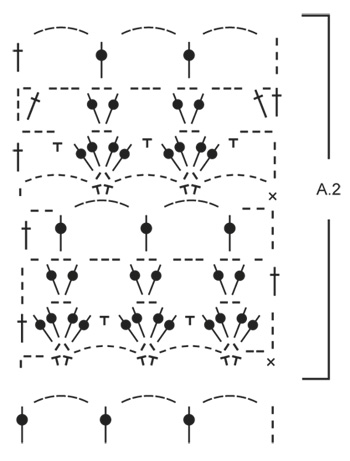
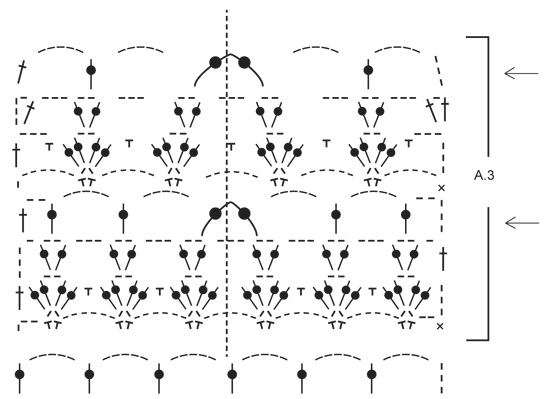
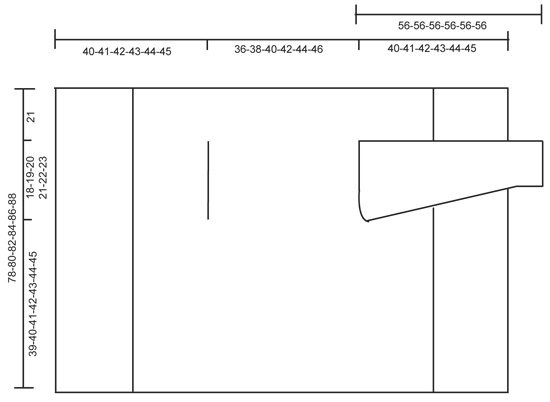
PATTERN: See diagrams A.1 and A.2. DECREASE TIP: Dec 1 dc by working 2 dc tog as follows: Work 1 dc in first ch-space but wait with last pull through, skip ch 3, work 1 dc in next ch-space but on last pull through, pull yarn through all 3 loops on hook. ---------------------------------------------------------- BODY: Worked in the round from mid back on the back. Work 6 ch with Paris on hook size 5 mm / H/8 and form a ring with 1 sl st in first ch. Work according to diagram A.1, i.e. work as follows: ROUND 1: 5 ch (= 1 dc + 2 ch), * 1 dc in ring, 2 ch *, repeat from *-* a total of 7 times, finish with 1 sl st in 3rd ch from beg of round = 8 dc with 2 ch between each. ROUND 2: 1 sl st in first ch-space, 3 ch (= 1 dc), 2 dc in same ch-space, * ch 1, 3 dc in next ch-space *, repeat from *-* 7 times in total, and finish with 1 ch and 1 sl st in 3rd ch from beg of round = 8 dc-groups with 1 ch between each. ROUND 3: ch 1, 1 sc in the middle dc in dc-group, * ch 3, 1 sc in ch before next dc-group, ch 3, 1 sc in the middle dc in next dc-group *, repeat from *-* 7 times in total, ch 3, 1 sc in last ch, 3 ch and 1 sl st in first sc at beg of round = 16 ch-spaces. ROUND 4: Now work the circle into a square, i.e. work as follows: 1 sl st in first ch-space, 4 ch (= 1 tr), 1 tr + 3 ch + 2 tr in same ch-space (= corner), * (2 ch, 1 dc in next ch-space) repeat from (-) 3 times in total, ch 2, 2 tr + 3 ch + 2 tr in next ch-space (= corner) *, repeat from *-* 3 times in total, repeat from (-) 3 times in total and finish with 2 ch and 1 sl st in 4th ch from beg of round. ROUND 5: Work sl sts until ch-space in the corner, 3 ch (= 1 dc), 2 dc + 3 ch + 3 dc in same ch-space (= corner), * ch 5, skip 1 ch-space, 1 sc in next ch-space, ch 5, 1 sc in next ch-space, ch 5, skip 1 ch-space, in next ch-space (= corner) work 3 dc + 3 ch + 3 dc *, repeat from *-* 3 times in total, ch 5, skip 1 ch-space, 1 sc in next ch-space, ch 5, 1 sc in next ch-space, ch 5, skip last ch-space and finish with 1 sl st in 3rd ch at beg of round. ROUND 6: Work sl sts until ch-space in the corner, 3 ch (= 1 dc), 2 dc + 3 ch + 3 dc in same ch-space (= corner), * (6 ch, 1 sc + 2 ch + sc in next ch-space), repeat from (-) until corner, ch 6, work 3 dc + 3 ch + 3 dc in ch-space in the corner *, repeat from *-* 3 times in total, repeat from (-) until the corner and finish with 6 ch and 1 sl st in 3rd ch at beg of round. ROUND 7: Work sl sts until ch-space in the corner, 3 ch (= 1 dc), 2 dc + 3 ch + 3 dc in same ch-space (= corner), * ch 1, (1 sc in 6-ch-space, 2 dc + 2 ch + 2 dc in 2-ch-space), repeat from (-) until one 6-ch-space remains before the corner, 1 sc in 6-ch-space, ch 1, 3 dc + 3 ch + 3 dc in ch-space in the corner *, repeat from *-* 3 times in total, ch 1, repeat from (-) until one 6-ch-space remains before the corner and finish with 1 ch and 1 sl st in 3rd ch at beg of round. ROUND 8: Work sl sts until ch-space in the corner, 3 ch (= 1 dc), 2 dc + 3 ch + 3 dc in same ch-space (= corner), * ch 2, 1 dc in first ch, (3 ch, 1 dc + 2 ch + 1 dc in ch-space in dc-group), repeat from (-) until corner, ch 3, 1 dc in ch before corner, ch 2, 3 dc + 3 ch + 3 dc in ch-space in the corner *, repeat from *-* 3 times in total, ch 2, 1 dc in first ch, repeat from (-) until corner, ch 3, 1 dc in last ch, 2 ch and 1 sl st in 3rd ch at beg of round. ROUND 9: Work sl sts until ch-space in the corner, 3 ch (= 1 dc), 2 dc + 3 ch + 3 dc in same ch-space (= corner), * ch 5, 1 dc in first ch-space, (5 ch, 1 dc in ch-space in dc-group), repeat from (-) until 1 ch-space remains before dc-group in the corner, ch 5, 1 dc in last ch-space before the corner, 5 ch and 3 dc + 3 ch + 3 dc in ch-space in the corner *, repeat from *-* 3 times in total, ch 5, 1 dc in first ch-space, repeat from (-) until 1 ch-space remains before the corner, ch 5, 1 dc in last ch-space, 5 ch and 1 sl st in 3rd ch at beg of round. REMEMBER THE CROCHET GAUGE! Repeat 6th to 9th round (4 rounds) outwards as shown in diagram. Continue like this until square measures approx. 36-38-40-42-44-46 cm x 36-38-40-42-44-46 cm / 14¼"-15"-15¾"-16½"-17¼"-18" x 14¼"-15"-15¾"-16½"-17¼"-18". Now work armholes as follows: Work as before until first corner, work 3 dc + 3 ch + 3 dc in ch-space in the corner. Now work ch until the middle of next side (i.e. in the middle between 1st and 2nd corner) as follows: Work 1 ch for every ch/dc skipped. Then work pattern as before until the middle between 3rd and 4th corner. Now work ch until beg of round as follows: Work 1 ch for every ch/dc skipped. On next round work pattern and inc as before over all sts, also in ch for armholes. Continue like this until square measures approx. 78-80-82-84-86-88 cm x 78-80-82-84-86-88 cm/ 30¾"-31½"-32¼"-33"-33⅞"-34⅝" x 30¾"-31½"-32¼"-33"-33⅞"-34⅝" (i.e. approx. 21 cm / 8¼" in all sizes from armhole) - adjust to finish after 9th round (round with ch-spaces and dc's). Cut the yarn. FRONT PIECE: Beg from WS and work back and forth between first and second corner. NOTE: Work front piece without inc. Work according to diagram A.2 from first corner, i.e. work as follows: ROW 1: 3 ch (= 1 sc + 2 ch), 1 sc + 2 ch + 1 sc in first ch-space, * ch 6, 1 sc + 2 ch + 1 sc in next ch-space*, repeat from *-* the entire row and finish with 2 ch and 1 sc in first ch-space in the corner, turn piece. ROW 2 (= RS): 3 ch (= 1 dc), * 2 dc + 2 ch + 2 dc in ch-space between 2 sc, 1 sc in 6-ch-space *, repeat from *-* the entire row and finish with 1 dc in 1st ch from beg of previous row, turn piece. ROW 3: 4 ch (= 1 dc + 1 ch), * 1 dc + 2 ch + 1 dc in ch-space in the middle of dc-group, 3 ch *, repeat from *-* until 1 dc-group remains before the corner, 1 dc + 2 ch + 1 dc in ch-space in last dc-group, finish with 1 ch and 1 dc in 3rd ch from beg of previous row, turn piece. ROW 4 (= RS): 5 ch (= 1 dc + 2 ch), * 1 dc in ch-space in dc-group, 5 ch *, repeat from *-* until 1 dc-group remains, 1 dc in ch-space in last dc-group, 2 ch and 1 dc in 3rd ch from beg of previous row, turn piece. ROW 5: 7 ch (= 1 sc + 6 ch), * 1 sc + 2 ch + 1 sc in 5-ch-space, 6 ch *, repeat from *-* the entire row and finish with 1 sc in 3rd ch from beg of previous row, turn piece. ROW 6 (= RS): 6 ch (= 1 dc + 3 ch), * 1 sc in 6-ch-space, 2 dc + 2 ch + 2 dc in 2-ch-space *, repeat from *-* the entire row and finish with 1 sc in last 6-ch-space, 3 ch and 1 dc in first ch from beg of previous row, turn piece. ROW 7: 4 ch (= 1 dc + 1 ch), 1 dc in same st, * ch 3, 1 dc + 2 ch + 1 dc in ch-space in the middle of next dc-group *, repeat from *-* the entire row and finish with 3 ch and 1 dc + 1 ch + 1 dc in 3rd ch from beg of previous row, turn piece. ROW 8 (= RS): 8 ch (= 1 dc + 5 ch), * 1 dc in ch-space in the middle of dc-group, 5 ch *, repeat from *-* the entire row and finish with 5 ch and 1 dc in 3rd ch from beg of previous row, turn piece. Repeat rows 1 to 8 outwards. Continue like this until approx. 19-20-21-22-23-24 cm / 7½"-8"-8¼"-8¾"-9"-9½" have been worked back and forth, fasten off (adjust after 1st or 5th row in pattern). Repeat on the other side, now work back and forth from third to fourth corner. EDGE: Finally work a round around the entire piece with 2nd or 6th row in pattern but in ch-space in each corner work 6 dc. Fasten off. SLEEVE: Work back and forward and sew togheter at the end. Sleeve is worked straight out of armhole of the body, top down. Beg mid under armhole, from RS. 1 sc in first st, then work ch-space as on 4th or 8th row in A.2. Work so that there are 12-13-14-15-15-16 ch-spaces around armhole. Then continue with pattern according to diagram A.2. Work pattern like this until sleeve measures 26 cm / 10¼". Now work according to A.3. On every row with arrow work 2 dc tog into 1 dc mid front of sleeve (i.e. dec 1 ch-space on every round with arrow) - READ DECREASE TIP. The dotted line shows mid front of sleeve. Otherwise continue the pattern as before. Dec on every 4th row a total of 4 times. Then work according to diagram A.2 until sleeve measures 56 cm / 22" in all sizes. Fasten off. Repeat in the other side. |
||||||||||||||||||||||
Diagram explanations |
||||||||||||||||||||||
|
||||||||||||||||||||||
 |
||||||||||||||||||||||
 |
||||||||||||||||||||||
 |
||||||||||||||||||||||
 |
||||||||||||||||||||||
Have you finished this pattern?Tag your pictures with #dropspattern #springblisscardigan or submit them to the #dropsfan gallery. Do you need help with this pattern?You'll find 12 tutorial videos, a Comments/Questions area and more by visiting the pattern on garnstudio.com. © 1982-2026 DROPS Design A/S. We reserve all rights. This document, including all its sub-sections, has copyrights. Read more about what you can do with our patterns at the bottom of each pattern on our site. |
||||||||||||||||||||||


With over 40 years in knitting and crochet design, DROPS Design offers one of the most extensive collections of free patterns on the internet - translated to 17 languages. As of today we count 324 catalogs and 12290 patterns - 12280 of which are translated into English (US/in).
We work hard to bring you the best knitting and crochet have to offer, inspiration and advice as well as great quality yarns at incredible prices! Would you like to use our patterns for other than personal use? You can read what you are allowed to do in the Copyright text at the bottom of all our patterns. Happy crafting!
Post a comment to pattern DROPS 162-5
We would love to hear what you have to say about this pattern!
If you want to leave a question, please make sure you select the correct category in the form below, to speed up the answering process. Required fields are marked *.