
Popular categories
Looking for a yarn?


Comments / Questions (49)
![]() Jeanette Siemerink wrote:
Jeanette Siemerink wrote:
Ik heb de eerste 7 toeren gehaakt van het vestje. Het oogt alsof het na de eerste toer met stokjes steeds smaller wordt. Het geheel trekt helemaal krom. Het lijkt net of ik stokjes of losse vergeten ben, maar volgens mij heb ik het patroon gevolgd. Wat doe ik verkeerd??
19.05.2022 - 20:51DROPS Design answered:
Dag Jeanette,
Het werk zou niet scheef mogen trekken. Kan het zijn dat je de lossen aan het begin van de toer te strak haakt? Dit gebeurt vaak als je op het uiteinde van de haaknaald haakt, dus waar de haaknaald wat dunner is. De lossen worden daardoor kleiner en dan kan het werk scheef trekken.
23.05.2022 - 17:04
![]() Lavenac Nathalie wrote:
Lavenac Nathalie wrote:
Bonjour et merci pour votre réponse rapide. Donc, c'est bien ce que j'avais compris, je ne commence pas A8 avant d'arriver près des épaules ? Merci et bonne journée.
04.06.2020 - 09:24DROPS Design answered:
Bonjour Mme Lavenac, vous crochetez (sur l'endroit pour le devant droit) le 8ème rang de A.8 quand vous crochetez le dernier rang de A.2 à A.5 (vous terminez sur l'endroit par A.8 (devant droit) pour l'encolure) puis vous continuez A.8 et répétez A.x de A.2-A.5. (sur l'envers du devant droit, vous commencez par A.8) Bon crochet!
04.06.2020 - 09:46
![]() Lavenac Nathalie wrote:
Lavenac Nathalie wrote:
Bonjour. Je ne comprends pas à quoi correspond et sert le diagramme A8 au rang 7 et comment poursuivre le modèle ensuite. Merci pour votre réponse .
03.06.2020 - 18:09DROPS Design answered:
Bonjour Mme Lavenac, n'hésitez pas à nous dire si vous avez maintenant réussi à continuer. Bon crochet!
04.06.2020 - 08:32
![]() Lavenac Nathalie wrote:
Lavenac Nathalie wrote:
Bonjour. Je viens de commencer et j’ai réalisé les rangs 1 à 6 puis le rang 7 mais je ne comprends pas m comment se fait le diagramme A8 : seul ou faut-il continuer le reste du rang avec A2 à A5 ? A quoi sert ce A8? Merci pour votre reponse.
03.06.2020 - 18:07DROPS Design answered:
Bonjour Mme Lavenac, le diagramme A.8 correspond aux augmentations pour l'encolure, vous continuez les autres diagrammes comme avant (A.2 à A.5) et crochetez A.8 sur les dernières mailles (au lieu/au-dessus de A.6). Cette vidéo fait pour le top vous aidera peut-être à visualiser comment les épaules se présentent. Bon crochet!
04.06.2020 - 08:29
![]() Helle wrote:
Helle wrote:
Jeg kan ikke få maskeantallet til at stemme i begyndelsen. Jeg hækler str. L/xl og har efter 1. række 73 stm. En stm gruppe med 5 m og 17 stm grupper med 4m. På diagrammet vises stm grupper á 5 m og ikke 4,som i teksten. Hvorfor det? Når jeg hækler A2, A3 A4x3, A5 og A6 bliver det kun over 11 stm grupper og jeg har derfor 7 grupper tilbage. Hvis jeg derimod hækler A3, A4 og A5 3 gange og A2 og A6 en gang, så passer det. Tager jeg fejl?
04.06.2019 - 19:02DROPS Design answered:
Hei Helle. Du hekler fler luftmasker enn du trenger på starten av omgangen for at oppleggskanten ikke skal stramme. Rad 1, der du hekler staver og hopper over ca hver 5 luftmaske, hekles slik for å regulere maskeantallet til det du trenger videre. Dette har altså ingenting med videre hekling og gjøre. Hekle diagrammene som anvist: 1 luftmaske (A.2), 5 luftmasker (altså totalt 6 luftmasker), 1 fastmaske i den 7 staven, 5 luftmasker, hopp over 5 staver, 1 fastmaske i neste stav osv. OBS: det er kun A.4 som gjentas 2-3-4-5 ganger - den andre diagrammene hekles 1 gang hver. God fornøyelse
05.06.2019 - 08:16
![]() Van Den Eeckhoudt Inge wrote:
Van Den Eeckhoudt Inge wrote:
Rechtervoorpand van shy violet cardigan : 1ste toer 91 st gehaakt. toer 1 - 6 zit ik vast. toer 1 : Hoe moet ik beginnen tellen? 5 lossen en 5 st overslaan , dan een v ? Waar begint en eindigt A.4? Kan u mij helpen? Dank u ! Inge.
28.02.2018 - 12:12DROPS Design answered:
Hallo Inge, Je begint met A.2 (= 1 losse, 1 losse overslaan), dan A.3 5 lossen, 5 lossen overslaan, 1 vaste in de volgende losse, etc. A.4 is een herhalend patroon (in de eerste toer worden 3 boogjes herhaald) en deze begint en eindigt in het midden van het boogje.
30.04.2018 - 11:15Charlene Boardman wrote:
I am beginning this cardigan. Row 1: What does A.2 say to do? Ch 1 and skip st? Also why does A.4 end in 3rd chain of 5ch loop? If I move immediately to 2nd repeat beginning at A.2, what happens to the loop? I just do not understand the chart and have crocheted many things from charts. What am I doing or seeing wrong? I am so frustrated! Drops is not sold in my country, so have nobody to ask.
12.09.2016 - 15:21DROPS Design answered:
Dear Mrs Boardman, on row 1 in A.2 work 1 ch (= 1st dc (UK-English)/sc (US-English) - A.3 ends with 2 ch, A.4 beg with 3 ch (= 5-ch-space) and ends with 2 ch then A.5 beg with 3 ch (= 5-ch-space). You can get DROPS yarn and further assistance from your DROPS store all around the world, see here. Happy crocheting!
12.09.2016 - 16:18
![]() Paola wrote:
Paola wrote:
Buongiorno. Sono arrivata per entrambi i lati davanti alle 22 catenelle ma poi non riesco a capire come proseguire. Devo fare la prima riga dei diagrammi indicati (quella con la freccia tutta a sequenze di 5 catenelle) o la prima del diagramma A.x? Grazie.
21.07.2016 - 08:37DROPS Design answered:
Buongiorno Paola. Deve iniziare i diagrammi dalla riga con la freccia; è la riga tra la sequenza di cat e il diagramma A.x, quella che per i diagrammi A.3, A.4 e A.5 è formata da archi di cat e 1 m.b. Buon lavoro!
21.07.2016 - 09:06
![]() Helga wrote:
Helga wrote:
Hallo Ich habs nun mit der gleichen Anzahl Luftmaschen wie Stäbchen in der 1. Reihe versucht, ein paar Reihen gehäkelt. Und dann anschliessend am Anschlag für den Rücken angehäkelt....ich habe viel zu viele Stäbchen, es wellt und wird mit allem ziehen nicht glatt. Was mache ich falsch? Ich kanns nicht verstehen. Gibts eine Alternative? liebe Grüsse
26.06.2016 - 10:14DROPS Design answered:
Liebe Helga, wenn Sie der längere Luftmaschenanschlag stört, häkeln Sie nur so viele Lm (aber möglichst locker, damit es nicht spannt) wie nachher Stäbchen angegeben sind. Sonst passiert es, dass Sie zu viele Stb haben und es zu weit ist bzw. wellt. Aber wenn ich Sie richtig verstanden habe, haben Sie dies bereits getan. Ich kann von hier aus nicht ganz nachvollziehen, wieso Ihre Häkelarbeit dann wellig wird.
05.07.2016 - 15:53
![]() Helga wrote:
Helga wrote:
Danke für die Antwort. Wie schon erwähnt wird mein Anschlag respektive durch die 1. Reihe total wellig.....es ist nicht möglich, die Häkelarbeit nur schon gerade auszulegen. Sieht aus wie Rüschen.........so kann man doch nicht zusammensetzen oder anhäkeln.
24.06.2016 - 21:57DROPS Design answered:
Liebe Helga, siehe Antwort weiter oben.
05.07.2016 - 15:53
|
|||||||||||||||||||||||||
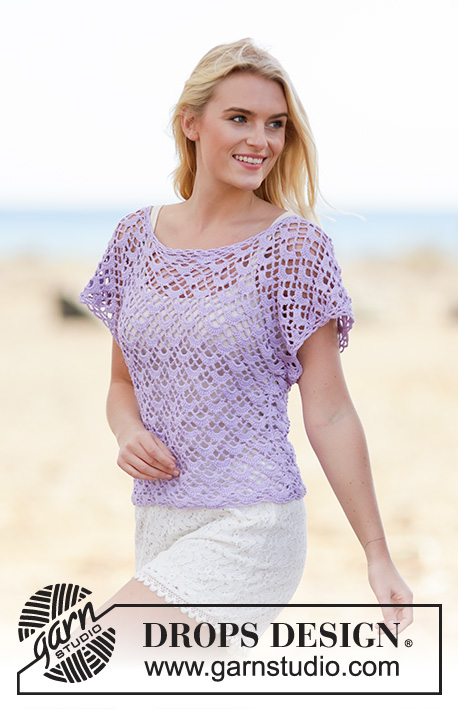
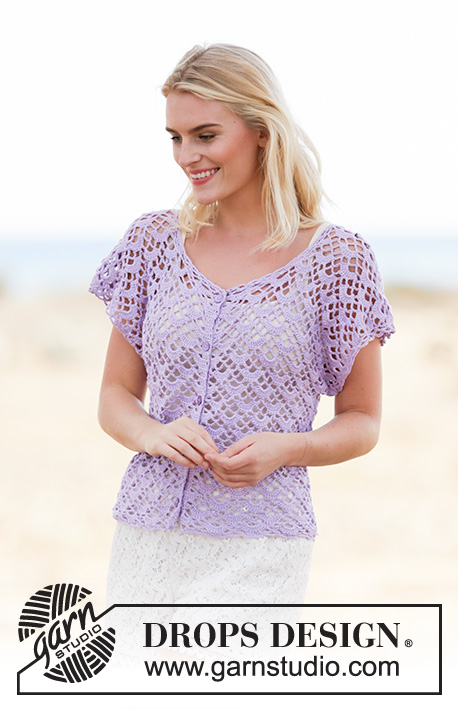
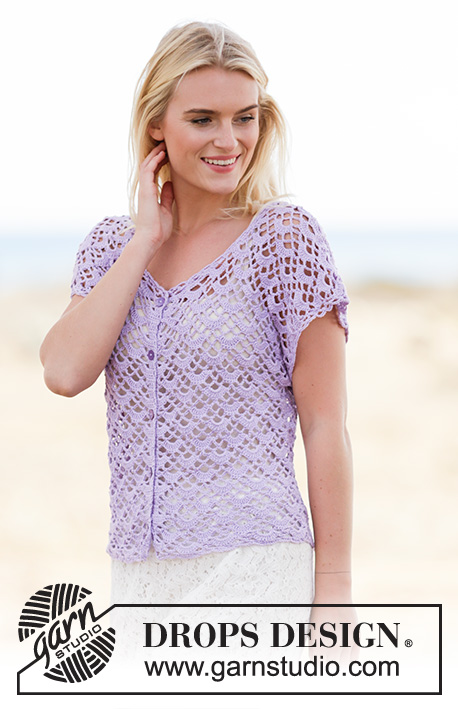
Shy Violet Cardigan#shyvioletcardigan |
|||||||||||||||||||||||||
 |
 |
||||||||||||||||||||||||
Crochet DROPS jacket with fan pattern, worked top down in ”Safran”. Size S-XXXL.
DROPS 162-14 |
|||||||||||||||||||||||||
|
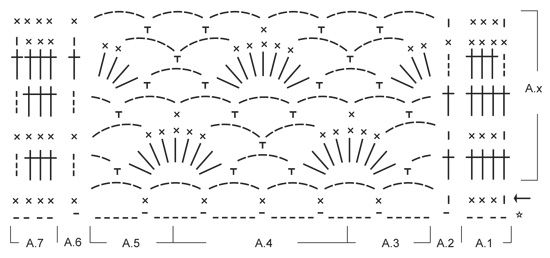
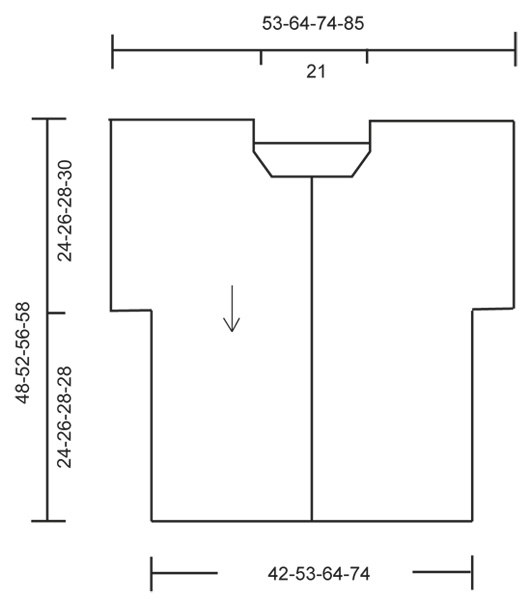
PATTERN: See diagrams A.1 to A.9. The diagrams show all rows in pattern seen from RS. BUTTONHOLES: Measure from neck edge at the front and sew buttons on left band: SIZE S/M: 1, 9, 17, 25 and 33 cm / 3/8", 3½", 6¾", 9¾", 13". SIZE L: 1, 10, 19, 28 and 37 cm / 3/8", 4", 7½", 11", 14½" SIZE XL/XXL: 1, 8, 16, 24, 32 and 40 cm / 3/8", 3⅛", 6¼", 9½", 12½", 15¾". SIZE XXXL: 1, 9, 17, 25, 33 and 41 cm / 3/8", 3½", 6¾", 9¾", 13", 16⅛" ---------------------------------------------------------- JACKET: The piece is worked top down. RIGHT FRONT PIECE: Work 69-92-114-137 ch (includes 3 ch to turn with) on hook size 3.5 mm/E/4 with Safran. ROW 1 (= WS): Work 1 dc in 4th ch from hook (= 2 dc), 1 dc in each of the next 5-3-5-3 ch, * skip ch 1, work 1 dc in each of the next 4 ch *, repeat from *-* the entire row = 55-73-91-109 dc. NOW MEASURE PIECE FROM HERE! Now work according to diagram, i.e. work as follows: ROW 1-6: (1st row = RS): Work A.2, A.3, A.4 2-3-4-5 times in total, A.5, A.6. REMEMBER THE CROCHET GAUGE! ROW 7 (= RS): Work last row in A.2-A.5 as before but finish with A.8 over A.6. Continue until A.8 has been worked 1 time vertically, in A.2-A.5 repeat rows in A.x. Do not cut the yarn. Take a new strand and work 1 sl st in 3rd ch at beg of last row and 22 ch for neck. Cut the yarn and continue with first strand. Work over all sts, beg from RS as follows: A.2, A.3, A.4 4-5-6-7 times in total, A.5, finish with A.7 (= band). Continue like this. When piece measures approx. 24-26-28-30 cm / 9½"-10¼"-11"-11¾" – adjust after 7th row, sleeves are done. Then work as follows, beg from WS: Work A.7 (= band), A.5, A.4 3-4-5-6 times in total, A.3, finish with A.2 (do not work the last 3 ch-spaces). Continue like this until piece measures approx. 48-52-56-58 cm / 19"-20½"-22"-22¾", adjust after 5th row in diagram. Fasten off. LEFT FRONT PIECE: Work as right front piece to and with 6th row. ROW 7 (= RS): Work last row in A.3-A.6 as before but start with A.9 over A.2. Continue until A.9 has been worked 1 time vertically, in A.3-A.6 repeat rows in A.x. Work 22 ch at the end of row for neck. Now work over all sts, beg from RS as follows: A.1 (= band), A.3, A.4 4-5-6-7 times in total, A.5, finish with A.6. Continue like this. When piece measures approx. 24-26-28-30 cm / 9½"-10¼"-11"-11¾" – adjust after right front piece, sleeves are done. Cut the yarn. Then work as follows, beg from WS: Skip 3 ch-space, beg by working in next sc as follows: A.6, A.5, A.4 3-4-5-6 times in total, A.3, finish with A.1 (= band). Continue like this until piece measures approx. 48-52-56-58 cm / 19"-20½"-22"-22¾", adjust after right front piece. Fasten off. BACK PIECE: Work left shoulder in ch-row from cast on edge (work in same ch as dc's, i.e. in the 55-73-91-109 dc) from left front piece as follows: ROW 1-6: (1st row = RS): Work A.2, A.3, A.4 2-3-4-5 times in total, A.5, A.6. Cut the yarn. Work right shoulder as left shoulder but in right front piece - NOTE! Instead of cutting the yarn work 71 ch for neck at the end of row, fasten with 1 sl st in first ch at beg of last row on left shoulder. Cut the yarn. Now work over all sts, beg from RS as follows: NOTE: (Work first row as first row in diagram A1-A.6, then A.x) Work A.2, A.3, A.4 9-10-11-12 times in total, A.5, finish with A.6. Continue like this. When piece measures approx. 24-26-28-30 cm / 9½"-10¼"-11"-11¾" – adjust after front piece, sleeves are done. Cut the yarn. Then work as follows, beg from WS: Skip 3 ch-space, beg by working in next sc as follows: A.6, A.5, A.4 7-8-9-10 times in total, A.3, finish with A.2 (do not work the last 3 ch-spaces). Continue like this until piece measures approx. 48-52-56-58 cm / 19"-20½"-22"-22¾", adjust after front piece. Fasten off. ASSEMBLY: Sew side and underarm seams in one. Sew buttons on to the left band - see explanation above. Button through a hole in right front piece. EDGES: Work an edge along the neck, beg from band on right front piece as follows: Work * 1 sc, 5 ch *, repeat from *-* along the neck with approx. 2 cm / ¾" between every sc until band on left front piece. Turn piece with 5 ch and work as follows: 1 sc in first ch-space, * ch 5, 1 sc in next ch-space*, repeat from *-* the entire row and finish with 5 ch and 1 sc in first ch from previous row. Fasten off. Work an edge at the bottom along front and back piece the same way, beg from band on left front piece. Work an edge around the sleeve the same way, beg from mid under sleeve. |
|||||||||||||||||||||||||
Diagram explanations |
|||||||||||||||||||||||||
|
|||||||||||||||||||||||||
 |
|||||||||||||||||||||||||
 |
|||||||||||||||||||||||||
 |
|||||||||||||||||||||||||
Have you finished this pattern?Tag your pictures with #dropspattern #shyvioletcardigan or submit them to the #dropsfan gallery. Do you need help with this pattern?You'll find 6 tutorial videos, a Comments/Questions area and more by visiting the pattern on garnstudio.com. © 1982-2026 DROPS Design A/S. We reserve all rights. This document, including all its sub-sections, has copyrights. Read more about what you can do with our patterns at the bottom of each pattern on our site. |
|||||||||||||||||||||||||


With over 40 years in knitting and crochet design, DROPS Design offers one of the most extensive collections of free patterns on the internet - translated to 17 languages. As of today we count 324 catalogs and 12284 patterns - 12274 of which are translated into English (US/in).
We work hard to bring you the best knitting and crochet have to offer, inspiration and advice as well as great quality yarns at incredible prices! Would you like to use our patterns for other than personal use? You can read what you are allowed to do in the Copyright text at the bottom of all our patterns. Happy crafting!
Post a comment to pattern DROPS 162-14
We would love to hear what you have to say about this pattern!
If you want to leave a question, please make sure you select the correct category in the form below, to speed up the answering process. Required fields are marked *.