
Popular categories
Looking for a yarn?


Comments / Questions (18)
![]() Pauline wrote:
Pauline wrote:
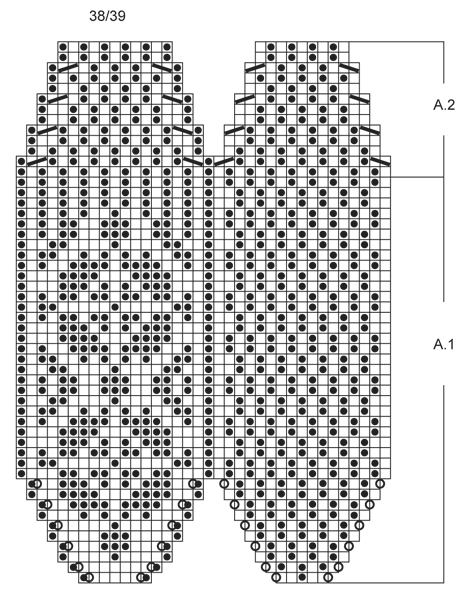
When working from the chart I understand it’s in the round. The confusion I have is the chart to the right has 5 st to start and the one on the left has 7 st. There’s a gap between those stitches, do I ignore the gap and knit across to complete the left side or do I work them separately joining up as you progress up the chart. If I don’t leave a gap it seems like I’ve made a very tiny point.
15.11.2024 - 03:56DROPS Design answered:
Dear Pauline, you start with 12 stitches, which are the 7+5 stitches in the charts. There should be no gaps between the stitches; the gaps in the charts are to better visualize the increases of the pattern towards the middle, until both sides of the chart are fully connected. But in the actual piece all of it will be connected, so the gaps are ignored. Happy knitting!
17.11.2024 - 19:50
![]() Pauline wrote:
Pauline wrote:
When working from the chart I understand it’s in the round. The confusion I have is the chart to the right has 5 st to start and the one on the left has 7 st. There’s a gap between those stitches, do I ignore the gap and knit across to complete the left side or do I work them separately joining up as you progress up the chart. If I don’t leave a gap it seems like I’ve made a very tiny point.
15.11.2024 - 03:52DROPS Design answered:
Dear Pauline, you start with 12 stitches, which are the 7+5 stitches in the charts. There should be no gaps between the stitches; the gaps in the charts are to better visualize the increases of the pattern towards the middle, until both sides of the chart are fully connected. But in the actual piece all of it will be connected, so the gaps are ignored. Happy knitting!
17.11.2024 - 19:50
![]() Alexa wrote:
Alexa wrote:
Eine technische Frage zum Ausdruck: mit Handy und Tablet klappt es nicht. Oder gibt's einen Trick? LG und Dank an dieser Stelle für die tollen Anleitungen und Wolle! Alexa
25.08.2021 - 16:16DROPS Design answered:
Liebe Alexa, es sollte genauso möglich sein: klicken sie auf "Drucken", dann "Anleitung", eine neue Seite soll sich öffnen, oben rechts auf "Die Anleitung ausdrucken" klicken, um die Einstellungen für den Drucker zu öffnen, dann wird die Anleitung gedruckt. Viel Spaß beim stricken!
26.08.2021 - 08:29
![]() Karo wrote:
Karo wrote:
Hallo! Ich verstehe den Beginn von A1 nicht. Ich starte mit 12 Maschen mittelblau auf dem Nadelspiel und beginne dann mit A1. Das sind in Runde 1 aber nur 5 Maschen? Danke
21.01.2021 - 19:03DROPS Design answered:
Liebe Karo, A.1 hat 12 Maschen und wird am Anfang und am Ende in 2 Teile gezeichnet: die 5 ersten sind für die Sohlen, die 7 nächsten sind für das obere Fuß, dh bei der 1. Reihe stricken Sie: 1 Umschlag, 5 Maschen wie im Diagram für Ihre Größe gezeigt, 1 Umschlag, dann stricken Sie das 2. Teil: 1 Masche blau, 1 Umschlag, 5 Maschen, 1 Umschlag, 1 Masche blau = jezt haben Sie 4 M zugenommen = 16 M auf der Nadel. Viel Spaß beim stricken!
22.01.2021 - 07:53
![]() Teresa wrote:
Teresa wrote:
Hello, Should I expect to get the stockinette pattern gauge of 18 sts x 23 rows when working two strands in color? Teresa
05.10.2020 - 18:04DROPS Design answered:
Dear Teresa, you should get the same tension with nordic pattern as with stocking stitch. Happy knitting!
06.10.2020 - 10:10
![]() Jenny Cyr wrote:
Jenny Cyr wrote:
Bonjour, Je voudrais avoir plus d'explications pour le modèle 161-20, je ne comprend pas ce passage "Rabattre souplement avec 2 fils. Monter maintenant 17-19-21 m avec les aiguilles 4.5 et 2 fils bleu moyen. Continuer avec seul 1 fil et tricoter 2 côtes mousse, puis reprendre les mailles en attente". Comment 2 fils et 1 fil? Est ce possible de faire un petit vidéo avec plus d'explications. Merci beau modèle. Jenny
24.06.2020 - 15:45DROPS Design answered:
Bonjour Mme Cyr, cette vidéo montre comment monter les mailles et comment les rabattre avec 2 fils. Bon tricot!
24.06.2020 - 17:06
![]() Alexandra Shirley Hansen wrote:
Alexandra Shirley Hansen wrote:
Kan denne opskrift laves i størrelse 44/45... ? Hvordan gør jeg? Alexandra
11.02.2019 - 20:59DROPS Design answered:
Hej Alexandra, når du først er igang, så tror jeg let du kan strikke det strykke rundt om foden så langt du vil, inden du går igang med hælen. God fornøjelse!
12.02.2019 - 09:42
![]() Dayen wrote:
Dayen wrote:
Is het mogelijk om het patroon uit te breiden naar maat 46 (EUR)?
30.03.2016 - 00:29DROPS Design answered:
Hoi Dayen. Ik kan je helaas niet helpen met individuele aanpassingen, maar het zou mogelijk moeten zijn met hulp van de stekenverhouding (aantal st per 10 cm) en als je weet hoe groot de slof dan moet worden. Succes!
01.04.2016 - 16:33
![]() Lilith wrote:
Lilith wrote:
Die Slipper finde ich wunderschön, leider kann ich noch keine Muster stricken. Deshalb meine Bitte: könnten Sie mir eine Kurzanleitung geben, wie ich daraus unifarbene Slipper stricken kann? Vielen Dank!
14.03.2015 - 12:36DROPS Design answered:
Sie können ganz einfach die Farbwechsel weglassen und stricken die Diagranmme nur einfarbig glatt re mit den Zunahmen und Abnahmen. Sie müssen nur beachten, dass durch das Norwegermuster die Hausschuhe etwas dicker sind, da man ja den Faden, den man gerade nicht braucht, beim Stricken auf der Rückseite mitführt. Ihre Schuhe werden dann also etwas "dünnschichtiger". Für einen Einstieg ins Musterstricken schauen Sie sich doch einfach mal unser Hilfsvideo "Fair Isle" oben im Kopf neben dem Foto an - es ist nicht so schwierig, wie es Ihnen vielleicht erscheint, man muss nur ein wenig aufpassen und mitzählen. Sie können das Muster auch an einem Probestück testen.
14.03.2015 - 18:28
![]() Anna Göransson wrote:
Anna Göransson wrote:
Mystofflor. dessa tofflor är bra att ha på inne och bra passform.
30.01.2015 - 17:00
|
||||||||||||||||
Alfie#alfieslippers |
||||||||||||||||
 |
 |
|||||||||||||||
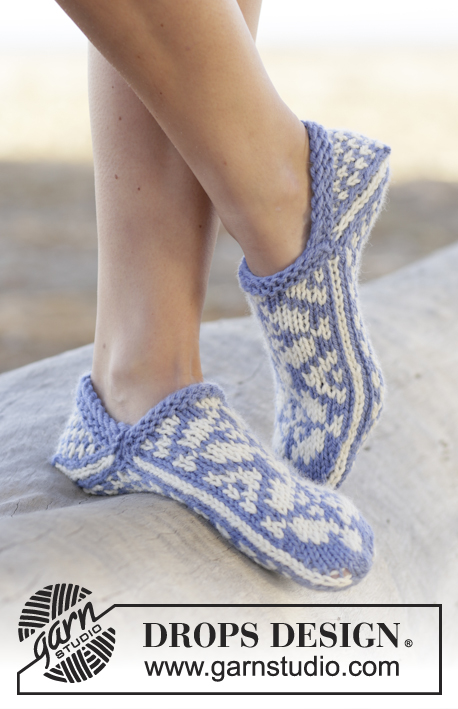
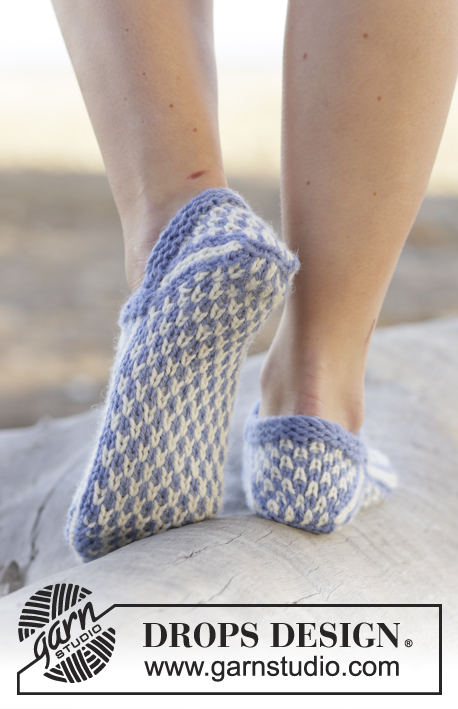
Knitted DROPS slippers with Norwegian pattern in "Nepal".
DROPS 161-20 |
||||||||||||||||
|
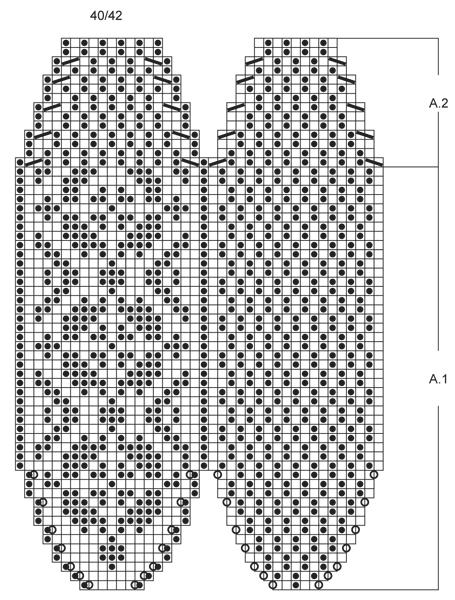
GARTER ST (back and forth): K all rows. 1 ridge = K2 rows. MAGIC CIRCLE: To avoid hole in the middle beg with this technique: Hold yarn end in the left hand and make a loop around left index finger (from left to right). Hold the loop with left thumb and index finger. Insert needle through loop, get yarn from ball, pull yarn back through loop, 1 YO (place yarn from the back and towards you) and pull YO through sts on needle, * insert needle through loop, 1 YO, pull YO through loop, 1 YO and pull YO through outermost st on right needle (i.e. the last st made) *, repeat from *-* until there are 12-12-12 sts on needle. Distribute sts on double pointed needles size 4.5 mm / US 7. Then work as explained in pattern – AT THE SAME TIME pull yarn end so that loop is tighten tog and the hole disappears. PATTERN: See diagrams A.1 and A.2. The diagrams show all rows in pattern seen from RS. Work entire pattern in stockinette st. Choose diagram for correct size. ---------------------------------------------------------- SLIPPER: Work in the round in stockinette st from the toe and back towards heel. Start with medium blue and MAGIC CIRCLE - see explanation above - on double pointed needles 4.5 mm. On first round work PATTERN according to diagram A.1 - see explanation above. REMEMBER THE KNITTING GAUGE When A.1 has been worked, slip the first 15-17-19 sts on round (= under foot) on a stitch holder, then work 2 ridges in GARTER ST back and forth - see explanation above, over the last 17-19-21 sts on round (= on top of foot) with medium blue. Loosely bind off with 2 strands. Now cast on 17-19-21 sts on needle size 4.5 mm / US 7 with 2 strands medium blue. Continue with 1 strand and work 2 ridges, slip sts from stitch holder back on needle = 32-36-40 sts. Continue in the round with pattern and dec according to diagram A.2. When entire diagram has been worked vertically and 16-20-20 sts remain on round, bind off the remaining sts. Knit another slipper the same way. ASSEMBLY: Sew tog heel in one and one st inside bind-off edge. Sew edges in garter st neatly tog on each side of foot as follows: Place edge on edge in garter st from top of foot over edge in garter st from back of foot and sew tog through both layers. Fasten off. |
||||||||||||||||
Diagram explanations |
||||||||||||||||
|
||||||||||||||||
 |
||||||||||||||||
 |
||||||||||||||||
 |
||||||||||||||||
Have you finished this pattern?Tag your pictures with #dropspattern #alfieslippers or submit them to the #dropsfan gallery. Do you need help with this pattern?You'll find 13 tutorial videos, a Comments/Questions area and more by visiting the pattern on garnstudio.com. © 1982-2026 DROPS Design A/S. We reserve all rights. This document, including all its sub-sections, has copyrights. Read more about what you can do with our patterns at the bottom of each pattern on our site. |
||||||||||||||||


With over 40 years in knitting and crochet design, DROPS Design offers one of the most extensive collections of free patterns on the internet - translated to 17 languages. As of today we count 324 catalogs and 12291 patterns - 12281 of which are translated into English (US/in).
We work hard to bring you the best knitting and crochet have to offer, inspiration and advice as well as great quality yarns at incredible prices! Would you like to use our patterns for other than personal use? You can read what you are allowed to do in the Copyright text at the bottom of all our patterns. Happy crafting!
Post a comment to pattern DROPS 161-20
We would love to hear what you have to say about this pattern!
If you want to leave a question, please make sure you select the correct category in the form below, to speed up the answering process. Required fields are marked *.