
Popular categories
Looking for a yarn?


Comments / Questions (51)
![]() Maryse Davreux wrote:
Maryse Davreux wrote:
Bonjour, Pourquoi faut-il avoir 2 fils pour monter les mailles et par la suite n’en prendre qu’un seul?
07.05.2019 - 05:20DROPS Design answered:
Bonjour Mme Davreux, on utilise 2 fils pour le rang de montage pour qu'il soit plus souple, mais on continue ensuite avec 1 seul fil. Bon tricot!
07.05.2019 - 09:26
![]() Evq wrote:
Evq wrote:
Varför rundstickor till detta mönster? Fram- och bakstycke stickas ju för sig....förstår inte detta riktigt.
10.01.2019 - 20:16DROPS Design answered:
Hej, du kan sticka modellen på antingen rundsticka eller parstickor.
15.01.2019 - 14:00
![]() Nghiem wrote:
Nghiem wrote:
Modèle très confortable
17.08.2018 - 10:03
![]() Marialouise wrote:
Marialouise wrote:
Waarom worden hierbij rondbreinaalden gebruikt? Kan het ook met "gewone" breinaalden?
27.06.2018 - 22:09DROPS Design answered:
Dag Marialouise, Ja, deze kan je inderdaad prima met rechte naalden breien.
01.07.2018 - 21:01
![]() Yvonne Thomsen wrote:
Yvonne Thomsen wrote:
Hej, jeg forstår ikke rigtigt, at man skal slå op med 2 tråde? Kan det passe at man så skal sidde med to tråde til hver side, når man slår op??
05.06.2018 - 23:11DROPS Design answered:
Hej Yvonne, nej du lægger bare tråden dobbelt og slår op som du plejer, når du så strikker første pind, strikker du kun med én tråd. Du slår op med 2 tråd for at kanten ikke skal blive for stram. God fornøjelse!
06.06.2018 - 15:17
![]() Agata wrote:
Agata wrote:
Hi! Just wanted to ask before I start - for this pattern I need needle nr 9 that is 5,5mm or needle 9mm that is size 12 in Drops set?
27.03.2018 - 22:38DROPS Design answered:
Dear Agata, this pattern is worked with needle size 9 mm or US size 13. Happy knitting!
28.03.2018 - 15:31
![]() Agata wrote:
Agata wrote:
I'm beginner at knitting so excuse me if it's silly question - what's happening with second thread that we are starting with?
27.03.2018 - 22:37DROPS Design answered:
Dear Agata, just cut one of the threads and continue with only one thread. You will then just have to weave the cut yarn. Happy knitting!
28.03.2018 - 15:30
![]() Agata wrote:
Agata wrote:
Hi! Just wanted to ask before I start - for this pattern I need needle nr 9 that is 5,5mm or needle 9mm that is size 12 in Drops set?
27.03.2018 - 22:36
![]() Elin wrote:
Elin wrote:
Skal forstykke strikkes helt likt som bakstykke? Med tanke på fellinger.
13.02.2018 - 14:57DROPS Design answered:
Hei Elin, Ja, forstykke og bakstykke er strikket likt from til du skal felle til hals. God fornøyelse!
14.02.2018 - 06:23
![]() Coni wrote:
Coni wrote:
Hello! I am confused! Cast on with two strands but continue knitting with one? What's the purpose of this technique? What do I do with the strand left behind? Do you have a video that shows the transition from two to one strand? Please help!! Thank you! Coni.
06.01.2018 - 13:45DROPS Design answered:
Hi Coni, you use two strands to cast on with so that the cast-on edge is stretchy. When you have cast on you cut the one strand and fasten it well and continue with just the other one. Happy knitting!
07.01.2018 - 06:07
|
||||
Perly May#perlymaysweater |
||||
 |
 |
|||
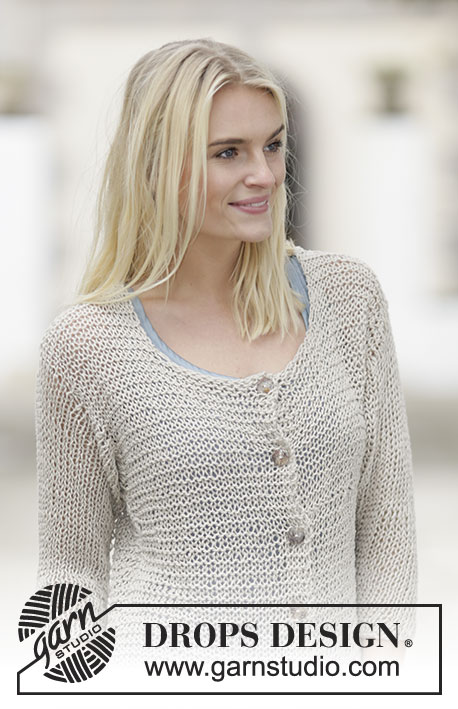
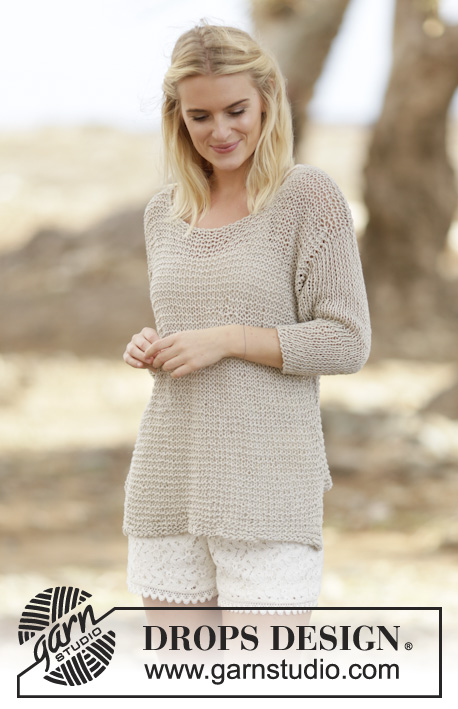
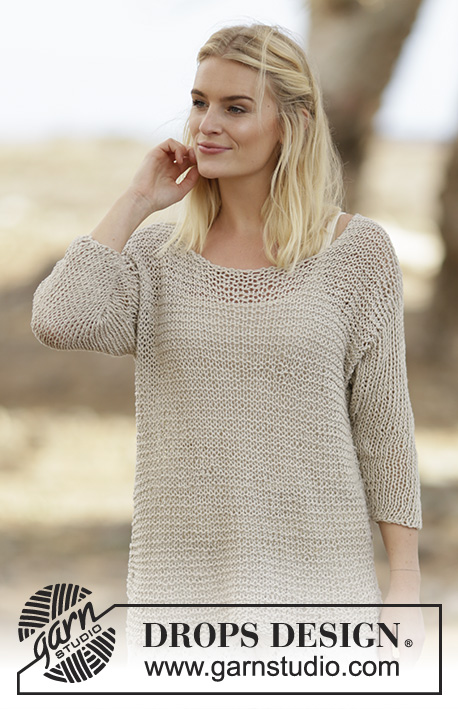
Knitted DROPS jumper in garter st, stockinette st and vent in "Bomull-Lin" or "Paris". Size: S - XXXL.
DROPS 160-5 |
||||
|
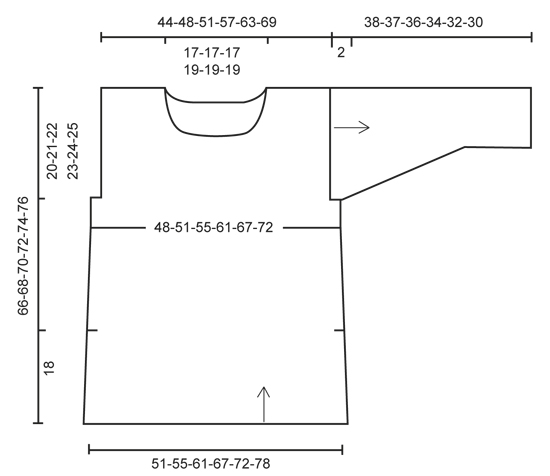
GARTER ST (back and forth): K all rows. 1 ridge = K2 rows. DECREASE TIP: Dec 1 st at beg of row as follows: 1 edge st, slip next st as if to K, K 1, psso. Dec 1 st at end of row as follows: Work until 3 sts remain on needle, K the next 2 sts tog, 1 edge st. MEASURING TIP: Because of the ridges and the weight of the yarn all measurements must be done by holding the piece up otherwise the garment will be too long when worn. ---------------------------------------------------------- BACK PIECE: Worked back and forth on circular needle. LOOSELY cast on 54-58-64-70-76-82 sts on circular needle size 9 mm / US 13 with 2 strands Bomull-Lin or Paris. Then work ridges in GARTER ST - see explanation above, work only with 1 strand. REMEMBER THE KNITTING GAUGE When piece measures 18 cm / 7" - READ MEASURING TIP, insert 1 marker in each side of piece (vent beg here). When piece measures 26 cm / 10¼", dec 1 st in each side of piece - READ DECREASE TIP! Repeat dec in each side every 9 cm / 3½" 1-1-2-2-2-2 more times = 50-54-58-64-70-76 sts. When piece measures 46-47-48-49-50-51 cm / 18"-18½"-19"-19¼"-19¾"-20", bind off for armholes in each side of piece as follows: bind off 2 sts at the beg of the next 2 rows = 46-50-54-60-66-72 sts. When piece measures 62-64-66-68-70-72 cm / 24⅜"-25¼"-26"-26¾"-27½"-28⅜" - REMEMBER MEASURING TIP, bind off the middle 16-16-16-18-18-18 sts for neck and finish each shoulder separately (= 15-17-19-21-24-27 sts remain on each shoulder). Dec 1 st on next row from RS towards the neck = 14-16-18-20-23-26 sts. LOOSELY bind off when piece measures 66-68-70-72-74-76 cm / 26"-26¾"-27½"-28⅜"-29⅛"-30". FRONT PIECE: Cast on and work as back piece. When piece measures 56-58-59-61-62-64 cm / 22"-22¾"-23¼"-24"-24½"-25¼", bind off the middle 14-14-14-16-16-16 sts for neck and finish each shoulder separately (= 16-18-20-22-25-28 sts on each shoulder). Then dec at beg of every row from neck as follows: Dec 1 st 2 times = 14-16-18-20-23-26 sts. LOOSELY bind off when piece measures 66-68-70-72-74-76 cm / 26"-26¾"-27½"-28⅜'-29⅛"-30". ASSEMBLY: Sew the shoulder seams. SLEEVE: Sleeve is worked top down. Pick up 44-46-48-50-52-54 sts (includes 1 edge st in each side) on circular needle size 9 mm / US 13 with Bomull-Lin or Paris - NOTE: Pick up in edge sts inside the 2 sts bind off for armholes in each side. Work stockinette st back and forth on circular needle. When piece measures 2 cm / ¾", insert 1 marker in each side - used for assembly of sleeve. When piece measures 5-4-5-4-5-3 cm / 2"-1½"-2"-1½"-2"-1", dec 1 st in each side of piece inside 1 edge st. Repeat dec every 3 cm / 1" 8-8-7-7-6-6 more times = 26-28-32-34-38-40 sts. LOOSELY bind off sleeve piece measures 38-37-36-34-32-30 cm / 15"-14½"-14¼"-13½"-12½"-11¾" (shorter measurements in the larger sizes because of wider shoulders). ASSEMBLY: Sew the sleeve seams inside 1 edge st - NOTE: The 2 cm / ¾" worked back and forth before marker at the top of sleeve should fit the bind off for armhole. Sew side seam from armhole down to marker for vent, sew in outer loops of edge sts. |
||||
Diagram explanations |
||||
|
||||
 |
||||
Have you finished this pattern?Tag your pictures with #dropspattern #perlymaysweater or submit them to the #dropsfan gallery. Do you need help with this pattern?You'll find 16 tutorial videos, a Comments/Questions area and more by visiting the pattern on garnstudio.com. © 1982-2026 DROPS Design A/S. We reserve all rights. This document, including all its sub-sections, has copyrights. Read more about what you can do with our patterns at the bottom of each pattern on our site. |
||||


With over 40 years in knitting and crochet design, DROPS Design offers one of the most extensive collections of free patterns on the internet - translated to 17 languages. As of today we count 324 catalogs and 12290 patterns - 12280 of which are translated into English (US/in).
We work hard to bring you the best knitting and crochet have to offer, inspiration and advice as well as great quality yarns at incredible prices! Would you like to use our patterns for other than personal use? You can read what you are allowed to do in the Copyright text at the bottom of all our patterns. Happy crafting!
Post a comment to pattern DROPS 160-5
We would love to hear what you have to say about this pattern!
If you want to leave a question, please make sure you select the correct category in the form below, to speed up the answering process. Required fields are marked *.