
Popular categories
Looking for a yarn?


Comments / Questions (105)
![]() Vicki Parrish wrote:
Vicki Parrish wrote:
I am confused by the instructions for the short rows. On the first piece I cast on the required number of stitches but after I do the first set of short rows it says to knit in stockinette over all the stitches. However not all the stitches that were cast on are used in the short rows so there are some left over. How can I knit over ALL the stitches unless it only means the stitches in the short rows? Then what happens to the extra stitches?
05.03.2020 - 02:41DROPS Design answered:
Dear Mrs Parrish, when you work the short rows, you always work the first 3 sts from RS in garter stitch and the next 32-102 sts (depending on the row - the remaining sts on left needle are unworked) in stocking stitch (= K from RS, P from WS), and finish the repeat of the short rows with 8 rows garter stitch on all stitches (=4 ridges on all stitches). You have now worked 8 rows on the top of piece (towards shoulder) and 18 rows on the bottom of piece (bottom edge). Happy knitting!
05.03.2020 - 10:25
![]() Judith wrote:
Judith wrote:
I’m confused as to “work 3 stitches in garter (which I assume means knit) work in stockinette over the next 32 (does this mean purl), turn and work return row (do I knit the return?)
03.02.2019 - 14:00DROPS Design answered:
Dear Judith, on RS rows you will knit the sts in garter stitch and the sts in stocking stitch, but from WS you will then purl the sts in stocking st andn K the stitch in garter st. On row 1, work; K3, K32 (= stocking st), then turn and work row back = P32, K3. Happy knitting!
04.02.2019 - 12:31Minni wrote:
Hi, my problem is the needle sizing. To knit 24 sts for 10 cm I need to use needles size 5 (and that way I'll knit 25sts which is the closest fit). This means fairly loose knitting. Will this affect badly the completed work? Usually I need to swapt for needles one size larger, but I don't understand why I now need two sizes larger. I'm hesitant to start.
17.05.2017 - 17:13DROPS Design answered:
Dear Minni, 24 sts for 10 cm is a quite usual tension for Fabel. You can work your swatch with different needle size, wash and block them then find out the best needle size. Happy knitting!
18.05.2017 - 08:34
![]() Mieke Lubbers wrote:
Mieke Lubbers wrote:
Drops 145-23 Begin ik het linker voorpand middenvoor te breien of vanaf de zijnaad?
20.09.2016 - 12:04DROPS Design answered:
Deze vraag is twee keer gesteld. U kunt het antwoord hieronder vinden.
20.09.2016 - 13:10
![]() M.Lubbers-Ciggaar wrote:
M.Lubbers-Ciggaar wrote:
Drops 145-23 Begin ik het linker voorpand vanaf middenvoor of vanaf de zijnaad?
20.09.2016 - 12:02DROPS Design answered:
U begint aan de zijkant, net als bij het rechtervoorpand. Verder volgt u alle aanwijzingen voor het rechtervoorpand en zoals aangegeven staat, begint u de verkorte toeren aan de verkeerde kant.
20.09.2016 - 13:09
![]() Ria Schoonhoven-van Der Steen wrote:
Ria Schoonhoven-van Der Steen wrote:
Ik heb patroon 145-33 gemaakt. Nu blijkt dat - door het gewicht van het materiaal - het vest langer is (20 cm) dan het oorspronkelijke patroon. Het vest is dwars gebreid. Is er dan ook een manier om het korter te maken?? Ik hoor graag van U. Hartelijke groet, Ria
06.04.2015 - 13:54DROPS Design answered:
Maak altijd eerst een proeflapje en was dit ook voor het breien van een heel vest. Een lapje kan er eerst behoorlijk vast uitzien, maar na het wassen een stuk losser worden. Pas dan de naaldgrootte aan.
06.04.2015 - 15:23
![]() Miekelien wrote:
Miekelien wrote:
Wanneer met je Ocean Blue gebruiken en wanneer beige?
03.02.2015 - 06:24DROPS Design answered:
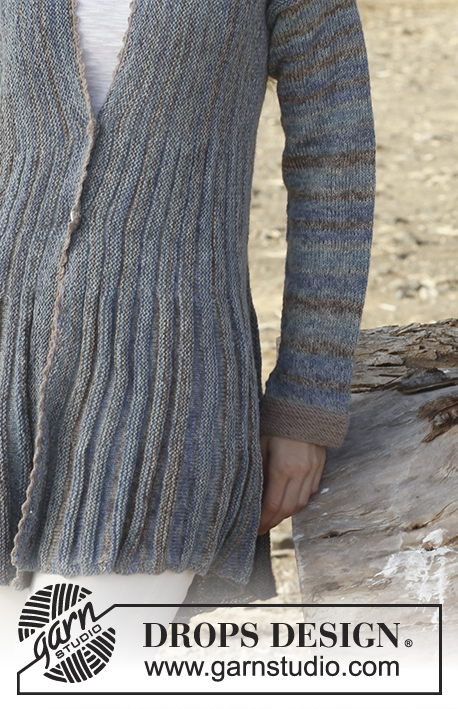
Hoi Miekelien. Je gebruikt alleen de beige voor het begin van de mouwen en de gehaakte rand. De rest wordt alleen met de Ocean Blue gebreid. In deze kleur zit ook stukken beige. Veel breiplezier.
03.02.2015 - 11:58
![]() Mareike wrote:
Mareike wrote:
Hallo liebes Drops-Team! Ich habe noch keine Antwort auf meine Frage vom 03.01.15 bekommen ! Ich muß bald neue Wolle bestellen , weil "burgunder" nicht reicht. Ich möchte dann die andere Farbe mitbestellen. Es eilt! Danke!
15.01.2015 - 10:42DROPS Design answered:
Liebe Mareike, die Farbwahl ist letztendlich immer Geschmackssache. Sie könnten Baby Merino Nr. 27 oder Alpaca Nr. 3720 ausprobieren.
15.01.2015 - 15:54
![]() Mareike wrote:
Mareike wrote:
Hallo, ich stricke mir die Jacke gerade in der Farbe "burgunder" und habe mir für den Häkelrand die Farbe "cerise" bestellt. Das ist viel zu grell, welche Farbe kann ich nehmen? Muß nicht "Fabel" sein. Am besten wäre der helle Ton, der in "burgunder" vorkommt! Auf dem Bildschirm sind die Farben verfälscht.
03.01.2015 - 11:54
![]() Sabine VR wrote:
Sabine VR wrote:
Hallo, ich habe mir diese Jacke in der Farbe "forest" (Garn: Fabel) gestrickt. Sie ist sehr angenehm, beschwingt, individuell und ungewöhnlich. Auf diese Jacke bin ich schon mehrfach angesprochen worden.
29.09.2014 - 14:04
|
|
Stormcloud#stormcloudjacket |
|
 |
 |
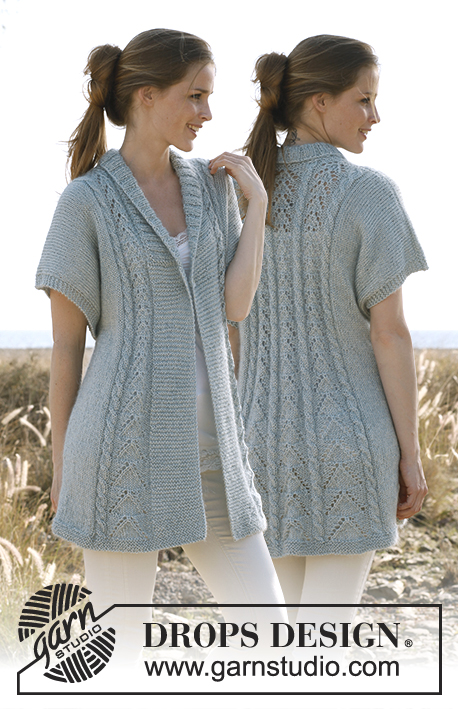
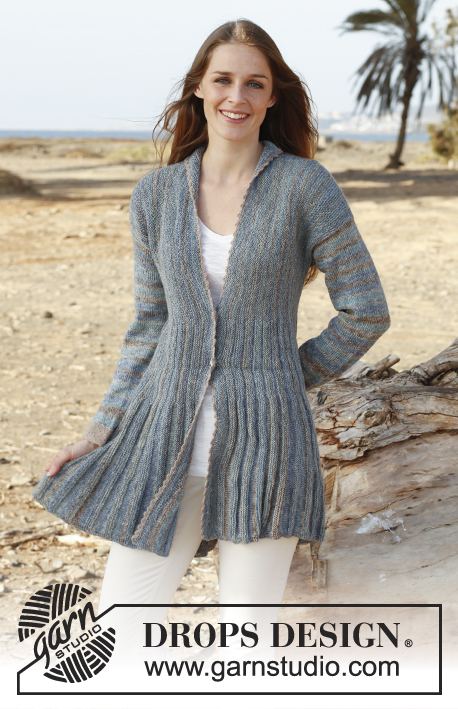
Knitted DROPS jacket with short rows and shawl collar in "Fabel". Size: S - XXXL.
DROPS 145-23 |
|
|
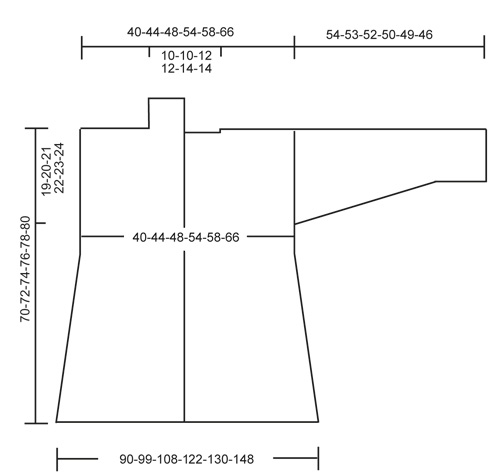
GARTER ST (back and forth on needle): K all rows. 1 ridge = 2 rows K. GARTER ST (in the round on circular needle): * K 1 round and P 1 round *, repeat from *-*. 1 ridge = 2 rounds. -------------------------------------------------------- BACK PIECE: Worked back and forth from side to side on circular needle to make room for all the sts. Cast on 168-172-178-182-188-192 sts on circular needle size 3 mm / US 2.5 with ocean view. Insert 1 marker in the piece when 46-48-50-52-54-56 sts remain on row (seen from RS). This marker shows where the sleeve is sewn in the garment. Work 6 ridges in GARTER ST – see explanation above! Then work short rows as follows, beg from RS (always work the first 3 sts in garter st): * Work 3 sts in garter st, work in stockinette st over the next 32 sts, turn and work return row. 3 sts in garter st, work in stockinette st over the next 67 sts, turn and work return row. 3 sts in garter st, work in stockinette st over the next 102 sts, turn and work return row. 3 sts in garter st, work in stockinette st over the next 67 sts, turn and work return row. 3 sts in garter st, work in stockinette st over the next 32 sts, turn and work return row, 8 rows in garter st back and forth over all sts *, repeat from *-*, 1 repetition = 8 rows at the top, 18 rows at the bottom. REMEMBER THE GAUGE! Continue in garter st with short rows in stockinette st until piece measures 15-17-18-21-22-26 cm / 6"-6¾"-7"-8¼"-8¾"-10¼", measured at the shortest. On next row from WS bind off the first 5 sts for neck = 163-167-173-177-183-187 sts. Continue in garter st with short rows in stockinette st. When piece measures 25-27-30-33-36-40 cm / 9¾"-10⅝"-11¾"-13"-14¼"-15¾" (10-10-12-12-14-14 cm / 4"-4"-4¾"-4¾"-5½"-5½" from where neck was bound off), cast on 5 new sts at the end of next row from RS = 168-172-178-182-188-192 sts. Continue as before. When piece measures 40-44-48-54-58-66 cm / 15¾"-17¼"-19"-21¼"-22¾"-26" (the same no of ridges has been worked before and after bound off for neck - make sure to finish after one whole repetition + 2 ridges over all sts), insert a marker in piece when 46-48-50-52-54-56 sts remain on row (seen from RS). This marker shows where the sleeve is sewn in the garment. Bind off sts on next row. RIGHT FRONT PIECE: Worked from side to side on circular needle to make room for all the sts. Beg in the side and work towards mid front. Cast on 168-172-178-182-188-192 sts on circular needle size 3 mm / US 2.5 with ocean view. Insert 1 marker in the piece when 46-48-50-52-54-56 sts remain on row (seen from RS). This marker shows where the sleeve is sewn in the garment. Work 6 ridges in GARTER ST – see explanation above! Then work short rows as follows, beg from RS (always work the first 3 sts in garter st): * Work 3 sts in garter st, work in stockinette st over the next 32 sts, turn and work return row. 3 sts in garter st, work in stockinette st over the next 67 sts, turn and work return row. 3 sts in garter st, work in stockinette st over the next 102 sts, turn and work return row. 3 sts in garter st, work in stockinette st over the next 67 sts, turn and work return row. 3 sts in garter st, work in stockinette st over the next 32 sts, turn and work return row, 8 rows in garter st back and forth over all sts *, repeat from *-*, 1 repetition = 8 rows at the top, 18 rows at the bottom. Continue in garter st with short rows in stockinette st until piece measures 15-17-18-21-22-26 cm / 6"-6¾"-7"-8¼"-8¾"-10¼", measured at the shortest. At the end of next row from RS, cast on 20-20-22-22-24-24 new sts for collar = 188-192-200-204-212-216 sts. Continue in garter st with short rows in stockinette st. When piece measures 20-22-24-27-29-33 cm / 8"-8¾"-9½"-10⅝"-11⅜"-13" (5-5-6-6-7-7 cm / 2"-2"-2⅜"-2⅜"-2¾"-2¾" from where new sts were cast on – stop just before the 8 rows K in a repetition), work in garter st over all sts for 1 cm / ⅜". Now dec for buttonholes as follows - from RS: Work 82-84-88-92-96-100 sts, K 2 tog, 1 YO, work 16 sts, K 2 tog, 1 YO. Work the rest of row. Continue to work in garter st for 3 cm / 1⅛" in total. Bind off. LEFT FRONT PIECE: Work as right front piece but reversed. Beg the short rows from WS. Do not dec for buttonholes. SLEEVE: Worked in the round on double pointed needles. Cast on 56-58-60-62-64-66 sts on double pointed needles size 3 mm / US 2.5 with beige. Work in GARTER ST for 4 cm / 1½" - see explanation above. Change to ocean view. Then work in stockinette st. Insert 1 marker at the beg of round. When piece measures 8 cm / 3⅛", inc 1 st on each side of marker, repeat inc every 2½-2-2-2-1½-1½ cm / ⅞"-¾"-¾"-¾"-½"-½" 17-18-19-20-21-22 more times (18-19-20-21-22-23 inc in total) = 92-96-100-104-108-112 sts. When piece measures 54-53-52-50-49-46 cm / 21¼"-21"-20½"-19¾"-19¼"-18" (shorter measurements in the larger sizes because of wider shoulders), bind off. ASSEMBLY: Sew the shoulder seams. Sew side seams from the marker and down. Sew in sleeves. Sew the collar tog mid back and sew it to the neckline. Sew the buttons on to left front piece. CROCHET EDGE: Work an edge around the opening at the front on jacket, beg at the bottom of right front piece, work around the collar and down along left front piece. Work with beige on hook size 3 mm / C as follows: 1 sc, * ch 3, 1 dc in 1st ch, skip approx. 1 cm / ½", 1 sc *, repeat from *-*. Fasten off. |
|
 |
|
Have you finished this pattern?Tag your pictures with #dropspattern #stormcloudjacket or submit them to the #dropsfan gallery. Do you need help with this pattern?You'll find 15 tutorial videos, a Comments/Questions area and more by visiting the pattern on garnstudio.com. © 1982-2026 DROPS Design A/S. We reserve all rights. This document, including all its sub-sections, has copyrights. Read more about what you can do with our patterns at the bottom of each pattern on our site. |
|


With over 40 years in knitting and crochet design, DROPS Design offers one of the most extensive collections of free patterns on the internet - translated to 17 languages. As of today we count 325 catalogs and 12298 patterns - 12288 of which are translated into English (US/in).
We work hard to bring you the best knitting and crochet have to offer, inspiration and advice as well as great quality yarns at incredible prices! Would you like to use our patterns for other than personal use? You can read what you are allowed to do in the Copyright text at the bottom of all our patterns. Happy crafting!
Post a comment to pattern DROPS 145-23
We would love to hear what you have to say about this pattern!
If you want to leave a question, please make sure you select the correct category in the form below, to speed up the answering process. Required fields are marked *.