
Popular categories
Looking for a yarn?


Comments / Questions (22)
![]() Hanna Strandberg wrote:
Hanna Strandberg wrote:
Hej! Jag får inte ihop diagrammet tillsammans med ökningarna. Allting blir bara ojämnt. vad gör jag för fel egentligen?
09.11.2015 - 18:50DROPS Design answered:
Hej Hanna, På fram&bakst är du färdig med ökningen när du börjar med diagrammet. På ärmen ser du till at diagrammet stämmer ovanpå ärmen. Lycka till!
20.11.2015 - 13:45
![]() Marie Faure wrote:
Marie Faure wrote:
Merci pour votre réponse. Pour être sûre de bien comprendre : A1 doit-il faire tout le tour de la manche ? Dans ce cas, dois-je donc arrêter le diagramme à la fin du tour et reprendre le début du tour avec le motif de manière à récupérer le début du motif au milieu du dessus de la manche (avec une transition pas nette sous la manche au début/fin du tour) ? Ou bien ne dois-je faire A1 que sur une partie de la manche ? Dans ce cas, combien de fois en largeur dois-je répéter A1 (taille S) ? Merci !
11.02.2015 - 21:03DROPS Design answered:
Bonjour Mme Faure, vous devez centrer A.1 sur le dessus de la manche de sorte que la 1ère m du diagramme soit celle avec le marqueur au-dessus de la manche (milieu extérieur de la manche), comptez 18 m pour chaque motif avant ce marqueur, s'il reste 5 m avant le début du tour (par exemple), tricotez A.1 en commençant par les 5 dernières m du diagramme. Tricotez les augmentations de la manche en suivant le motif. Bon tricot!
12.02.2015 - 09:33
![]() Marie Faure wrote:
Marie Faure wrote:
Bonjour, J'ai une petite question concernant ce modèle : pour les manches, je ne vois pas comment tricoter A1, alors qu'il n'y a pas un nombre de mailles égal à 18 (= largeur de A1) ou multiple de 18 (plusieurs A1) et que, surtout, il y a des augmentations durant la réalisation même du motif... Il ne peut donc pas être complet. A moins que ce motif ne fasse pas tout le tour de la manche ? Merci pour votre réponse et pour vos magnifiques modèles, ainsi que pour la qualité de vos fils !
11.02.2015 - 17:09DROPS Design answered:
Bonjour Mme Faure, le diagramme ne sera pas complet au niveau du début/de la fin du tour. La 1ère m de A.1 doit être celle avec le marqueur au milieu du dessus de la manche, comptez à partir du marqueur jusqu'au début du tour pour placer le motif. Bon tricot!
11.02.2015 - 18:11
![]() Linda wrote:
Linda wrote:
Er denne genseren veldig liten i størrelsen? Synes den blir veldig smal selv om jeg holder strikkefastheten.
11.02.2015 - 11:03DROPS Design answered:
Hej Linda. Hvis din strikkefasthed passer, saa skulle maalene vaere som vist i maalskitsen nederst paa mönstret. Her ser du alle maal per störrelse i cm.
11.02.2015 - 15:48
![]() Ellen wrote:
Ellen wrote:
Beste Drops Design, Hartelijk dank voor uw antwoord. Nu nog een laatste vraag en dan is de trui bijna af. Volgende zin begrijp ik niet helemaal; Kant dan 2 st af aan elke kant tot het werk 57 cm meet, kant dan 1 keer 3 st af aan elke kant. Kant alle st af, het werk meet ongeveer 58 cm voor alle maten. Blijf ik dan iedere keer 2 steken afkanten ? Of is het eenmalig 2 steken afkanten en dan 1x3 steken afkanten. Alvast hartelijk dank !
25.11.2014 - 16:10DROPS Design answered:
Hoi Ellen. Je blijft 2 st afkanten aan elke zijkant tot 57 cm en dan kant je 1 keer 3 st af aan beide zijkanten.
27.11.2014 - 13:53
![]() Ellen wrote:
Ellen wrote:
Ik ben met de mouw bezig, met het telpatroon. Nu zit ik al op 47 cm om te gaan minderen, maar ben nog niet klaar met het telpatroon. Ik moet nog 6 rijen breien en dan is het telpatroon klaar. Vraag; zal ik eerst het telpatroon afmaken en dan minderen ? Of nu al beginnen met minderen. Ik heb wel lange armen.
21.11.2014 - 09:38DROPS Design answered:
Hoi Ellen. Als het past met de lengte van je mouwen, zou ik wachten met minderen tot het telpatroon klaar is. Als niet, dan moet je nu gaan minderen.
21.11.2014 - 13:51
![]() Ellen wrote:
Ellen wrote:
Ik ben al uit mijn vraag, het is anders niet deelbaar.
27.09.2014 - 16:05DROPS Design answered:
Hoi Ellen. Mooi zo. Veel breiplezier verder.
29.09.2014 - 12:33
![]() Ellen wrote:
Ellen wrote:
Bij het voorpand staat; de middelste 8-9-8-9-10-11 steken afkanten. Moet dat niet zijn; 8-8-9-9 ?
26.09.2014 - 22:15
![]() Ingela Sandström wrote:
Ingela Sandström wrote:
Jag får inte ärmarna att stämma, tycker dom är på tok för smala och de passar inte i ärmhålet. Hjälp önskas
28.10.2012 - 14:22DROPS Design answered:
Om du håller stickfastheten så stämmer ärmarna i ärmhålet. Men maska av löst!
15.11.2012 - 15:30
![]() Jrène Stähli wrote:
Jrène Stähli wrote:
Die Wolle habe ich schon - warte noch aufs Strickmuster und freue mich schon jetzt auf Winterspaziergänge!
19.06.2012 - 11:31
|
|||||||
Celtic#celticsweater |
|||||||
 |
 |
||||||
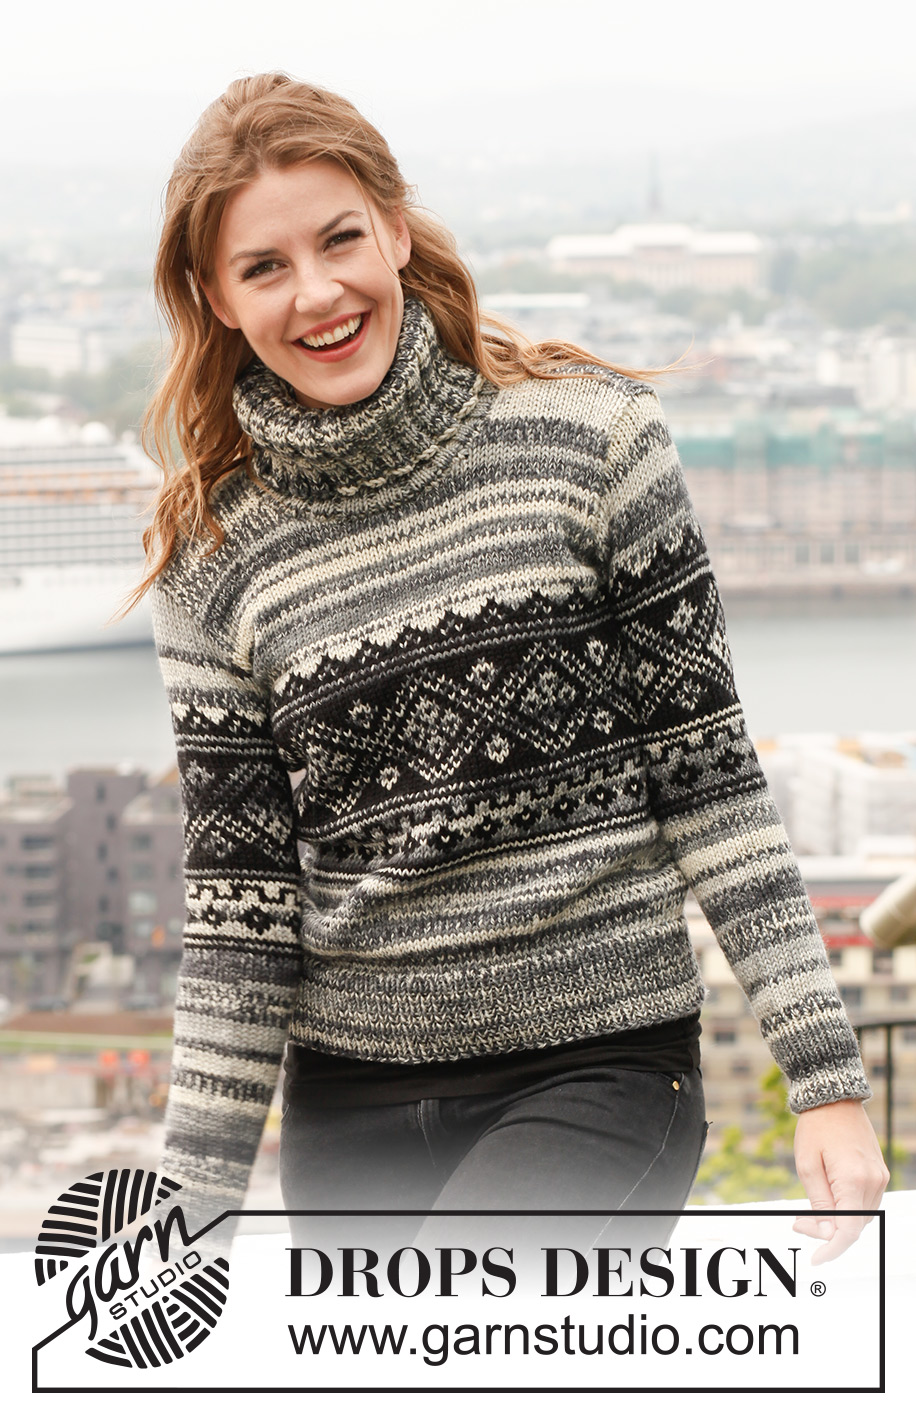
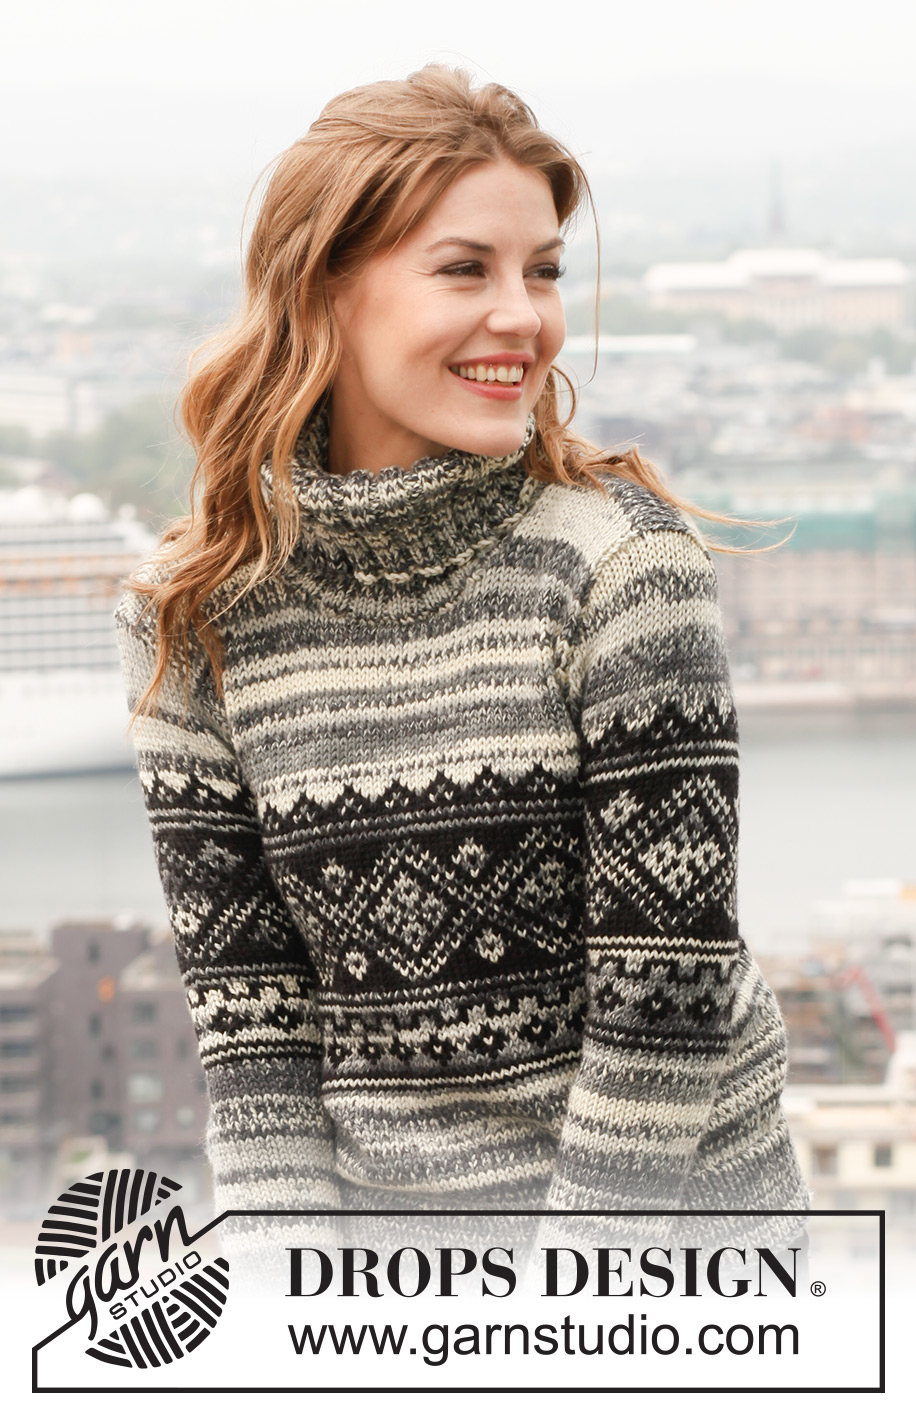
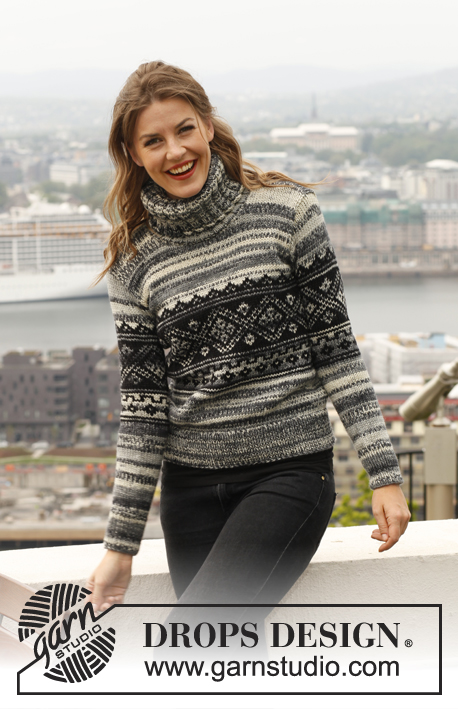
Knitted DROPS jumper with pattern in 1 thread in ”Big Fabel” or 2 threads Fabel. Size: S - XXXL.
DROPS 140-26 |
|||||||
|
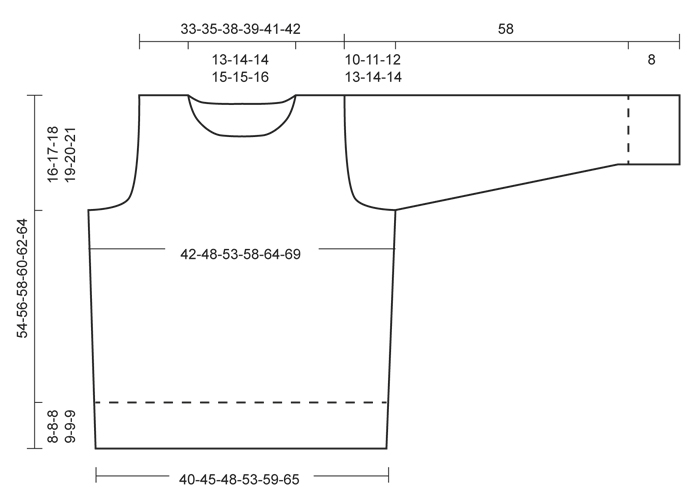
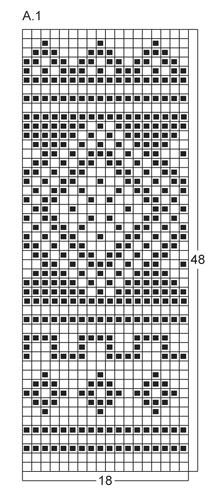
PATTERN: See diagram A.1, diagram shows 1 pattern repetition seen from RS. GARTER ST (back and forth on needle): K all rows. NOTE: Work all edge sts in garter st when working the piece back and forth. INCREASE TIP: Inc 1 st by getting the thread between 2 sts from previous row - work this st twisted, i.e. work in back loop of st instead of front to avoid holes. ---------------------------------------------------------- BODY: Worked in the round. Cast on 164-182-196-216-240-264 sts with 1 thread in Big Fabel in black/off white or 2 threads Fabel in salt & pepper on circular needle size 4 mm / US 6. Work rib as follows: * K 1, P 1 *, repeat from *-*. Continue until rib measures 8-8-8-9-9-9 cm / 3"-3"-3"-4"-4"-4". On next round switch to circular needle size 5 mm / US 8 and K while AT THE SAME TIME dec 28-30-32-36-40-44 sts evenly = 136-152-164-180-200-220 sts. Then continue in stockinette st. REMEMBER THE GAUGE! When piece measures 11-11-12-13-14-14 cm / 4⅜"-4⅜"-4¾"-5⅛"-5½"-5½" on next round inc 4-5-8-9-8-7 sts evenly - READ INCREASE TIP. Repeat inc one more time when piece measures 14-14-16-17-19-19 cm / 5½"-5½"-6¼"-6¾"-7½"-7½" = 144-162-180-198-216-234 sts. Continue until piece measures 16-17-18-19-20-21 cm / 6¼"-6¾"-7"-7½"-8"-8¼". Then work diagram A.1 (= 8-9-10-11-12-13 repetitions in width) one time vertically and then work in stockinette st with black/off white until finished measurements. When piece measures 38-39-40-41-42-43 cm / 15-15¼"-15¾"-16⅛"-16½"-17" (A.1 should now be done), insert 1 marker at beg of round and 1 marker after 72-81-90-99-108-117 sts and now divide the piece at the markers and finish each part separately. BACK PIECE: = 72-81-90-99-108-117 sts. Then continue back and forth in stockinette st with black/off white - AT THE SAME TIME bind off for armholes at the beg of every row in each side as follows: bind off 3 sts 1-1-1-2-3-3 times, 2 sts 1-2-2-3-3-4 times and 1 st 3-4-6-4-4-6 times = 56-59-64-67-70-71 sts. Continue until piece measures 52-54-56-58-60-62 cm / 20½"-21¼"-22"-22¾"-23⅝"-24⅜". Now bind off the middle 20-21-22-23-24-25 sts for neck and finish each shoulder separately. Bind off 1 st on next row from neck = 17-18-20-21-22-22 sts remain on shoulder. Loosely bind off all sts when piece measures 54-56-58-60-62-64 cm / 21¼"-22"-22¾"-23⅝"-24⅜"-25¼". FRONT PIECE: = 72-81-90-99-108-117 sts. Then continue back and forth with black/off white - AT THE SAME TIME bind off for armhole the same way as on back piece. Continue until piece measures 47-48-49-51-52-53 cm / 18½"-19"-19¼"-20"-20½"-21". Now bind off the middle 8-9-8-9-10-11 sts for neck and finish each shoulder separately. Then bind off on every row from neck as follows: 3 sts 1 time, 2 sts 1 time, 1 st 2-2-3-3-3-3 times = 17-18-20-21-22-22 sts remain on shoulder. Loosely bind off all sts when piece measures 54-56-58-60-62-64 cm / 21¼"-22"-22¾"-23⅝"-24⅜"-25¼". SLEEVE: Worked in the round on double pointed needles. Cast on 42-44-46-50-52-54 sts on double pointed needles size 4 mm / US 6 with black/off white. Work rib as follows: * K 1, P 1 *, repeat from *-*. Continue until rib measures 8 cm / 3". On next round switch to double pointed needles size 5 mm / US 8 and K while AT THE SAME TIME dec 7-7-7-9-9-9 sts evenly = 35-37-39-41-43-45 sts. Then continue in stockinette st. When piece measures 9 cm / 3½", insert 1 marker at beg of round (= mid under sleeve) and move the marker upwards when working. On next round inc 1 st on each side of marker. Repeat inc every 7-5½-4½-4-3½-3 cm / 2¾"-2¼"-1¾"-1½"-1¼"-1⅛" 5-6-7-8-9-10 more times (= 6-7-8-9-10-11 times in total) = 47-51-55-59-63-67 sts. AT THE SAME TIME when piece measures 26-25-24-23-22-22 cm / 10¼"-9¾"-9½"-9"-8¾"-8¾", insert 1 marker in the middle st on round (= mid on top of sleeve) and work A.1 one time vertically - NOTE: 1st st in A.1 should be the st with marker mid on top of sleeve. When A.1 has been worked, work with black/off white until finished measurements. When piece measures 48-47-46-45-44-44 cm / 19"-18½"-18"-17¾"-17¼"-17¼" (shorter measurements in the larger sizes because of longer sleeve cap and broader shoulder width, A.1 should be done), bind off 3 sts on each side of marker (= 6 sts bind off mid under sleeve). Then work piece back and forth on needle - AT THE SAME TIME bind off for sleeve cap at the beg of every row in each side as follows: 3 sts 0-0-0-1-1-1 time, 2 sts 1-2-2-2-3-3 times and 1 st 2-2-3-3-4-4 times. Then bind off 2 sts in each side until piece measures 57 cm / 22½", then bind off 3 sts 1 time in each side. Bind off all sts, piece measures approx. 58 cm / 22¾" in all sizes. ASSEMBLY: Sew shoulder seams and sew in sleeves inside 1 edge st. COLLAR: Pick up from RS approx. 100 to 120 sts inside 1 edge st along neck edge on circular needle size 4 mm / US 6 (beg mid back). K next round - while AT THE SAME TIME adjusting no of sts to 95-100-105-110-115-120. Continue to work rib as follows: * K 3, P 2 *, repeat from *-*. Continue with rib K 3/P 2 until collar measures approx. 11 cm / 4½". Now inc 1 P st in every P-section = 114-120-126-132-138-144 sts. Then work rib K 3/P 3 until collar measures 24 cm / 9½", then loosely bind off all sts with K over K and P over P. |
|||||||
Diagram explanations |
|||||||
|
|||||||
 |
|||||||
 |
|||||||
Have you finished this pattern?Tag your pictures with #dropspattern #celticsweater or submit them to the #dropsfan gallery. Do you need help with this pattern?You'll find 11 tutorial videos, a Comments/Questions area and more by visiting the pattern on garnstudio.com. © 1982-2026 DROPS Design A/S. We reserve all rights. This document, including all its sub-sections, has copyrights. Read more about what you can do with our patterns at the bottom of each pattern on our site. |
|||||||


With over 40 years in knitting and crochet design, DROPS Design offers one of the most extensive collections of free patterns on the internet - translated to 17 languages. As of today we count 324 catalogs and 12285 patterns - 12275 of which are translated into English (US/in).
We work hard to bring you the best knitting and crochet have to offer, inspiration and advice as well as great quality yarns at incredible prices! Would you like to use our patterns for other than personal use? You can read what you are allowed to do in the Copyright text at the bottom of all our patterns. Happy crafting!
Post a comment to pattern DROPS 140-26
We would love to hear what you have to say about this pattern!
If you want to leave a question, please make sure you select the correct category in the form below, to speed up the answering process. Required fields are marked *.